使用 Microsoft.Resources/deploymentScripts 版本 2023-08-01,您可以使用一些額外的組態,在專用網中執行部署腳本:
建立使用者指派的受控識別,並在
identity屬性中指定。 若要指派身分識別,請參閱身分識別。在專用網中建立記憶體帳戶,並指定要使用現有記憶體帳戶的部署腳本。 如需詳細資訊,請參閱 使用現有的記憶體帳戶。 記憶體帳戶需要一些額外的設定:
- 在 Azure 入口網站中開啟儲存體帳戶。
- 在左側功能表上,選取 [ 訪問控制][IAM],然後選取 [ 角色指派] 索引標籤 。
- 將 記憶體檔案數據特殊許可權參與者 角色新增至使用者指派的受控識別。
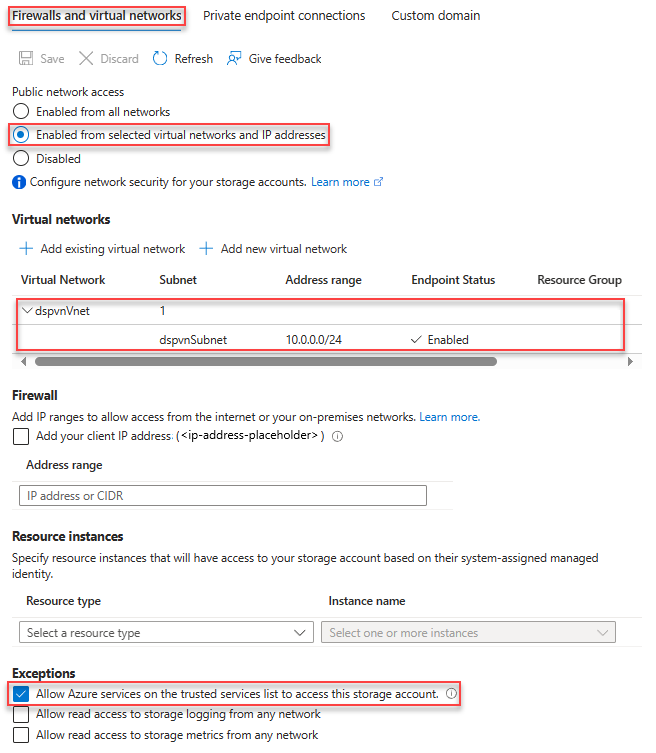
- 在左側功能表的 [ 安全性 + 網络功能] 底下,選取 [ 網络功能],然後選取 [ 防火牆和虛擬網络]。
- 選擇從選取的虛擬網路和 IP 位址啟用。
- 在 [虛擬網路] 下,新增子網路。 在下列螢幕快照中,子網稱為 dspvnVnet。
- 在 [例外狀況] 底下,選取 [允許受信任服務清單上的 Azure 服務以存取此儲存體帳戶]。
下列 Bicep 檔案示範如何設定環境以執行部署文稿:
@maxLength(10) // Required maximum length, because the storage account has a maximum of 26 characters
param prefix string
param location string = resourceGroup().location
param userAssignedIdentityName string = '${prefix}Identity'
param storageAccountName string = '${prefix}stg${uniqueString(resourceGroup().id)}'
param vnetName string = '${prefix}Vnet'
param subnetName string = '${prefix}Subnet'

resource vnet 'Microsoft.Network/virtualNetworks@2025-01-01' = {
  name: vnetName
  location: location
  properties: {
    addressSpace: {
      addressPrefixes: [
        '10.0.0.0/16'
      ]
    }
    enableDdosProtection: false
    subnets: [
      {
        name: subnetName
        properties: {
          addressPrefix: '10.0.0.0/24'
          serviceEndpoints: [
            {
              service: 'Microsoft.Storage'
            }
          ]
          delegations: [
            {
              name: 'Microsoft.ContainerInstance.containerGroups'
              properties: {
                serviceName: 'Microsoft.ContainerInstance/containerGroups'
              }
            }
          ]
        }
      }
    ]
  }
}

resource subnet 'Microsoft.Network/virtualNetworks/subnets@2024-05-01' existing = {
  parent: vnet
  name: subnetName
}
resource storageAccount 'Microsoft.Storage/storageAccounts@2025-06-01' = {
  name: storageAccountName
  location: location
  sku: {
    name: 'Standard_LRS'
  }
  kind: 'StorageV2'
  properties: {
    networkAcls: {
      bypass: 'AzureServices'
      virtualNetworkRules: [
        {
          id: subnet.id
          action: 'Allow'
          state: 'Succeeded'
        }
      ]
      defaultAction: 'Deny'
    }
  }
}

resource userAssignedIdentity 'Microsoft.ManagedIdentity/userAssignedIdentities@2025-01-31-preview' = {
  name: userAssignedIdentityName
  location: location
}

resource storageFileDataPrivilegedContributor 'Microsoft.Authorization/roleDefinitions@2022-04-01' existing = {
  name: '69566ab7-960f-475b-8e7c-b3118f30c6bd' // Storage File Data Privileged Contributor
  scope: tenant()
}

resource roleAssignment 'Microsoft.Authorization/roleAssignments@2022-04-01' = {
  scope: storageAccount

  name: guid(storageFileDataPrivilegedContributor.id, userAssignedIdentity.id, storageAccount.id)
  properties: {
    principalId: userAssignedIdentity.properties.principalId
    roleDefinitionId: storageFileDataPrivilegedContributor.id
    principalType: 'ServicePrincipal'
  }
}
您可以使用下列 Bicep 檔案來測試部署:
param prefix string

param location string  = resourceGroup().location
param utcValue string = utcNow()

param storageAccountName string
param vnetName string
param subnetName string
param userAssignedIdentityName string

resource vnet 'Microsoft.Network/virtualNetworks@2025-01-01' existing = {
  name: vnetName

  resource subnet 'subnets' existing = {
    name: subnetName
  }
}

resource userAssignedIdentity 'Microsoft.ManagedIdentity/userAssignedIdentities@2025-01-31-preview' existing = {
  name: userAssignedIdentityName
}

resource dsTest 'Microsoft.Resources/deploymentScripts@2023-08-01' = {
  name: '${prefix}DS'
  location: location
  identity: {
    type: 'userAssigned'
    userAssignedIdentities: {
      '${userAssignedIdentity.id}': {}
    }
  }
  kind: 'AzureCLI'
  properties: {
    forceUpdateTag: utcValue
    azCliVersion: '2.52.0'
    storageAccountSettings: {
      storageAccountName: storageAccountName
    }
    containerSettings: {
      subnetIds: [
        {
          id: vnet::subnet.id
        }
      ]
    }
    scriptContent: 'echo "Hello world!"'
    retentionInterval: 'P1D'
    cleanupPreference: 'OnExpiration'
  }
}
後續步驟
在本文中,您已瞭解如何存取私人虛擬網路。 若要深入了解:
在 Bicep 中使用部署腳本