具有受控識別的 Azure 受控應用程式
注意
對於 Azure 受控應用程式的受控識別支援目前為預覽狀態。 使用 2018-09-01-preview API 版本來利用受控識別。
了解如何將受控應用程式設定為包含受控識別。 受控識別可以用來允許客戶將現有資源的存取權授與受控應用程式。 由 Azure 平台管理身分識別,您無須佈建或輪替任何密碼。 如需有關 Microsoft Entra ID 中受控識別的詳細資訊,請參閱適用於 Azure 資源的受控識別。
您的應用程式可以授與兩種類型的身分識別:
- 系統指派的受控身分識別會繫結至您的應用程式,如果您的應用程式已刪除,則會被刪除。 應用程式只能有一個系統指派的受控身分識別。
- 使用者指派的受控識別是一個獨立 Azure 資源,可指派給您的應用程式。 應用程式可以有多個使用者指派的受控身分識別。
如何使用受控識別
受控識別可為受控應用程式提供許多案例。 以下為一些可解決的常見案例:
- 部署連結至現有 Azure 資源的受控應用程式。 例如,在連結至現有網路介面的受控應用程式中,部署 Azure 虛擬機器 (VM)。
- 為受控應用程式和發行者授與受控資源群組外部之 Azure 資源的存取權。
- 為 Azure 中的活動記錄和其他服務提供受控應用程式的操作身分識別。
新增受控識別
建立具有受控識別的受控應用程式,需要在 Azure 資源上設定其他屬性。 下列範例顯示範例 identity 屬性:
{
  "identity": {
    "type": "SystemAssigned, UserAssigned",
    "userAssignedIdentities": {
      "/subscriptions/aaaa0a0a-bb1b-cc2c-dd3d-eeeeee4e4e4e/resourceGroups/testRG/providers/Microsoft.ManagedIdentity/userassignedidentites/myuserassignedidentity": {}
    }
  }
}
有兩種常見方式可以用來建立受控應用程式identity:createUiDefinition.json 和 Azure Resource Manager 範本。 針對簡單的單一建立案例,應該使用 createUiDefinition 來啟用受控識別,因為其提供更豐富的體驗。 不過,在處理需要自動化或多個受控應用程式部署的進階或複雜系統時,可以使用範本。
使用 createUiDefinition
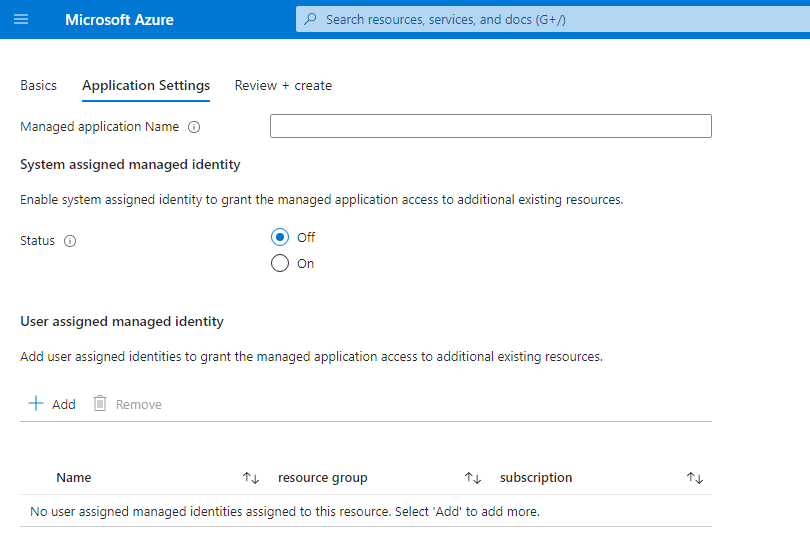
受控應用程式可以透過 createUiDefinition.json,使用受控識別來設定。 在 outputs 區段中,金鑰 managedIdentity 可用來覆寫受控應用程式範本的 identity 屬性。 下列範例會在受控應用程式上啟用系統指派的受控識別。 您可以使用 createUiDefinition 元素來要求取用者提供輸入,以形成更複雜的身分識別物件。 這些輸入可用於以使用者指派的受控身分識別來建構受控應用程式。
"outputs": {
  "managedIdentity": { "Type": "SystemAssigned" }
}
針對受控識別使用 createUiDefinition 的時機
以下是關於何時使用 createUiDefinition,在受控應用程式上啟用受控識別的一些建議。
- 受控應用程式的建立會通過 Azure 入口網站或 Azure Marketplace 來進行。
- 受控識別需要複雜的取用者輸入。
- 建立受控應用程式時需要受控識別。
受控識別 createUIDefinition 控制項
createUiDefinition.json 支援內建的受控識別控制項。
{
  "$schema": "https://schema.management.azure.com/schemas/0.1.2-preview/CreateUIDefinition.MultiVm.json#",
  "handler": "Microsoft.Azure.CreateUIDef",
  "version": "0.1.2-preview",
  "parameters": {
    "basics": [],
    "steps": [
      {
        "name": "applicationSettings",
        "label": "Application Settings",
        "subLabel": {
          "preValidation": "Configure your application settings",
          "postValidation": "Done"
        },
        "bladeTitle": "Application Settings",
        "elements": [
          {
            "name": "appName",
            "type": "Microsoft.Common.TextBox",
            "label": "Managed application Name",
            "toolTip": "Managed application instance name",
            "visible": true
          },
          {
            "name": "appIdentity",
            "type": "Microsoft.ManagedIdentity.IdentitySelector",
            "label": "Managed Identity Configuration",
            "toolTip": {
              "systemAssignedIdentity": "Enable system assigned identity to grant the managed application access to additional existing resources.",
              "userAssignedIdentity": "Add user assigned identities to grant the managed application access to additional existing resources."
            },
            "defaultValue": {
              "systemAssignedIdentity": "Off"
            },
            "options": {
              "hideSystemAssignedIdentity": false,
              "hideUserAssignedIdentity": false,
              "readOnlySystemAssignedIdentity": false
            },
            "visible": true
          }
        ]
      }
    ],
    "outputs": {
      "applicationResourceName": "[steps('applicationSettings').appName]",
      "location": "[location()]",
      "managedIdentity": "[steps('applicationSettings').appIdentity]"
    }
  }
}
使用 Azure Resource Manager 範本
注意
Marketplace 受控應用程式範本會自動產生,讓客戶能夠順利完成 Azure 入口網站建立體驗。
在這些情況下,createUiDefinition 上的 managedIdentity 輸出金鑰必須用來啟用身分識別。
您也可以透過 Azure Resource Manager 範本啟用受控識別。 下列範例會在受控應用程式上啟用系統指派的受控識別。 使用 Azure Resource Manager 範本參數來提供輸入,可以形成更複雜的身分識別物件。 這些輸入可用於以使用者指派的受控身分識別來建構受控應用程式。
針對受控識別使用 Azure Resource Manager 範本的時機
以下是關於何時使用 Azure Resource Manager 範本,在受控應用程式上啟用受控識別的一些建議。
- 您可以根據範本,以程式設計方式部署受控應用程式。
- 需要為受控識別自訂角色指派,才能佈建受控應用程式。
- 受控應用程式不需要 Azure 入口網站和 Marketplace 建立流程。
SystemAssigned 範本
使用系統指派的受控身分識別來部署受控應用程式的基本 Azure Resource Manager 範本。
"resources": [
  {
    "type": "Microsoft.Solutions/applications",
    "name": "[parameters('applicationName')]",
    "apiVersion": "2018-09-01-preview",
    "location": "[parameters('location')]",
    "identity": {
        "type": "SystemAssigned"
    },
    "properties": {
        "ManagedResourceGroupId": "[parameters('managedByResourceGroupId')]",
        "parameters": { }
    }
  }
]
UserAssigned 範本
使用使用者指派的受控身分識別來部署受控應用程式的基本 Azure Resource Manager 範本。
"resources": [
  {
    "type": "Microsoft.ManagedIdentity/userAssignedIdentities",
    "name": "[parameters('managedIdentityName')]",
    "apiVersion": "2018-11-30",
    "location": "[parameters('location')]"
  },
  {
    "type": "Microsoft.Solutions/applications",
    "name": "[parameters('applicationName')]",
    "apiVersion": "2018-09-01-preview",
    "location": "[parameters('location')]",
    "identity": {
        "type": "UserAssigned",
        "userAssignedIdentities": {
            "[resourceID('Microsoft.ManagedIdentity/userAssignedIdentities/',parameters('managedIdentityName'))]": {}
        }
    },
    "properties": {
        "ManagedResourceGroupId": "[parameters('managedByResourceGroupId')]",
        "parameters": { }
    }
  }
]
授與 Azure 資源的存取權
為受控應用程式授與身分識別之後,就可以建立角色指派,來為其授與現有 Azure 資源的存取權。
若要這樣做,請搜尋並選取受控應用程式或使用者指派的受控身分識別名稱,然後選取 [存取控制 (IAM)]。 如需詳細步驟,請參閱使用 Azure 入口網站指派 Azure 角色。
連結現有的 Azure 資源
注意
在部署受控應用程式之前,必須先設定使用者指派的受控身分識別。 此外,只有 Marketplace 種類支援受控應用程式的連結資源部署。
受控識別也可以用來部署受控應用程式,該應用程式需要在其部署期間存取現有資源。 當客戶佈建受控應用程式時,可以新增使用者指派的受控身分識別,為 mainTemplate 部署提供額外的授權。
使用連結的資源製作 createUiDefinition
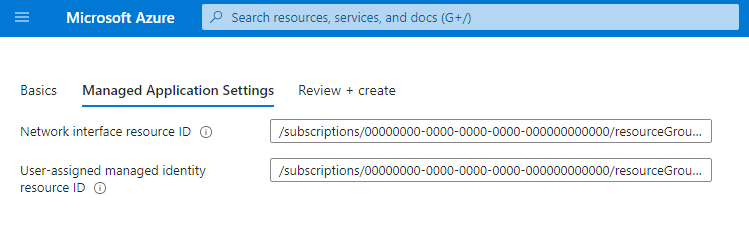
您將受控應用程式的部署連結至現有資源時,必須提供在該資源上具有適用角色指派的現有 Azure 資源和使用者指派的受控身分識別。
需要兩個輸入的範例 createUiDefinition.json:網路介面資源識別碼和使用者指派的受控身分識別資源識別碼。
{
  "$schema": "https://schema.management.azure.com/schemas/0.1.2-preview/CreateUIDefinition.MultiVm.json#",
  "handler": "Microsoft.Azure.CreateUIDef",
  "version": "0.1.2-preview",
  "parameters": {
    "basics": [
      {}
    ],
    "steps": [
      {
        "name": "managedApplicationSetting",
        "label": "Managed Application Settings",
        "subLabel": {
          "preValidation": "Managed Application Settings",
          "postValidation": "Done"
        },
        "bladeTitle": "Managed Application Settings",
        "elements": [
          {
            "name": "networkInterfaceId",
            "type": "Microsoft.Common.TextBox",
            "label": "Network interface resource ID",
            "defaultValue": "/subscriptions/aaaa0a0a-bb1b-cc2c-dd3d-eeeeee4e4e4e/resourceGroups/testRG/providers/Microsoft.Network/networkInterfaces/existingnetworkinterface",
            "toolTip": "Must represent the identity as an Azure Resource Manager resource identifier format ex. /subscriptions/sub1/resourcegroups/myGroup/providers/Microsoft.Network/networkInterfaces/networkinterface1",
            "visible": true
          },
          {
            "name": "userAssignedId",
            "type": "Microsoft.Common.TextBox",
            "label": "User-assigned managed identity resource ID",
            "defaultValue": "/subscriptions/aaaa0a0a-bb1b-cc2c-dd3d-eeeeee4e4e4e/resourceGroups/testRG/providers/Microsoft.ManagedIdentity/userassignedidentites/myuserassignedidentity",
            "toolTip": "Must represent the identity as an Azure Resource Manager resource identifier format ex. /subscriptions/sub1/resourcegroups/myGroup/providers/Microsoft.ManagedIdentity/userAssignedIdentities/identity1",
            "visible": true
          }
        ]
      }
    ],
    "outputs": {
      "existingNetworkInterfaceId": "[steps('managedApplicationSetting').networkInterfaceId]",
      "managedIdentity": "[parse(concat('{\"Type\":\"UserAssigned\",\"UserAssignedIdentities\":{',string(steps('managedApplicationSetting').userAssignedId),':{}}}'))]"
    }
  }
}
這個 createUiDefinition.json 會產生具有兩個欄位的建立使用者體驗。 第一個欄位可讓使用者輸入 Azure 資源識別碼,以將資源連結至受控應用程式部署。 第二個可讓取用者輸入使用者指派的受控身分識別 Azure 資源識別碼,該識別碼可存取連結的 Azure 資源。 產生的體驗如下所示:
使用連結的資源製作 mainTemplate
除了更新 createUiDefinition 之外,也需要更新主要範本,以接受傳入的連結資源識別碼。 您可以透過新增參數來更新主要範本,以接受新的輸出。 因為 managedIdentity 輸出會覆寫所產生之受控應用程式範本的值,所以不會傳遞到主要範本,而且不應該包括在 parameters 區段中。
將網路設定檔設定為 createUiDefinition.json 所提供之現有網路介面的主要範本範例。
{
  "$schema": "https://schema.management.azure.com/schemas/2015-01-01/deploymentTemplate.json#",
  "contentVersion": "1.0.0.0",
  "parameters": {
    "existingNetworkInterfaceId": { "type": "string" }
  },
  "variables": {
  },
  "resources": [
    {
      "apiVersion": "2016-04-30-preview",
      "type": "Microsoft.Compute/virtualMachines",
      "name": "myLinkedResourceVM",
      "location": "[resourceGroup().location]",
      "properties": {
        …,
        "networkProfile": {
          "networkInterfaces": [
            {
              "id": "[parameters('existingNetworkInterfaceId')]"
            }
          ]
        }
      }
    }
  ]
}
使用連結的資源來取用受控應用程式
建立受控應用程式套件之後,就可以透過 Azure 入口網站取用受控應用程式。 在可以加以取用之前,有數個必要條件步驟。
- 您必須建立必要之已連結的 Azure 資源執行個體。
- 使用者指派的受控身分識別必須建立並提供角色指派給連結的資源。
- 現有的連結資源識別碼和使用者指派的受控身分識別識別碼會提供給 createUiDefinition。
存取受控識別權杖
受控應用程式的權杖現在可從發行者租用戶中,透過 listTokens API 來存取。 範例要求可能如下所示:
POST https://management.azure.com/subscriptions/{subscriptionId}/resourceGroups/{resourceGroup}/providers/Microsoft.Solutions/applications/{applicationName}/listTokens?api-version=2018-09-01-preview HTTP/1.1

{
  "authorizationAudience": "https://management.azure.com/",
  "userAssignedIdentities": [
      "/subscriptions/{subscriptionId}/resourceGroups/{resourceGroup}/providers/Microsoft.ManagedIdentity/userAssignedIdentities/{userAssignedIdentityName}"
  ]
}
要求本文參數:
| 參數 | 必要 | 描述 |
|---|---|---|
authorizationAudience |
否 | 目標資源的應用程式識別碼 URI。 其也是已發行權杖的 aud (對象) 宣告。 預設值為 "https://management.azure.com/" |
userAssignedIdentities |
否 | 要擷取權杖之使用者指派的受控識別清單。 若未指定,listTokens 會傳回系統指派的受控識別權杖。 |
範例回應可能如下所示:
HTTP/1.1 200 OK
Content-Type: application/json

{
  "value": [
    {
      "access_token": "eyJ0eXAi…",
      "expires_in": "2…",
      "expires_on": "1557…",
      "not_before": "1557…",
      "authorizationAudience": "https://management.azure.com/",
      "resourceId": "/subscriptions/{subscriptionId}/resourceGroups/{resourceGroup}/providers/Microsoft.Solutions/applications/{applicationName}",
      "token_type": "Bearer"
    }
  ]
}
回應在 value 屬性底下包含標記陣列:
| 參數 | 描述 |
|---|---|
access_token |
要求的存取權杖。 |
expires_in |
存取權杖維持有效的秒數。 |
expires_on |
存取權杖到期的時間範圍。 這個值會以 epoch 的秒數來表示。 |
not_before |
存取權杖生效的時間範圍。 這個值會以 epoch 的秒數來表示。 |
authorizationAudience |
要求存取權杖的 aud (對象)。 這個值與 listTokens 要求中所提供的相同。 |
resourceId |
已發行權杖的 Azure 資源識別碼。 這個值可以是受控應用程式識別碼或使用者指派的受控身分識別識別碼。 |
token_type |
語彙基元的類型。 |