瞭解如何在 Azure Resource Manager 範本 (ARM 範本) 中使用部署指令碼。 部署腳本可用來執行 ARM 範本無法完成的自訂步驟。 例如,建立自我簽署憑證。 在本教學課程中,您會建立範本來部署 Azure 金鑰保存庫,然後使用相同範本中的資源來 Microsoft.Resources/deploymentScripts 建立憑證,然後將憑證新增至金鑰保存庫。 若要深入瞭解部署腳本,請參閱 在 ARM 範本中使用部署腳本。
這很重要
會在相同的資源群組中建立兩個部署腳本資源,即儲存體帳戶和容器執行個體,以執行腳本執行和疑難排解。 當指令碼執行進入終端狀態時,指令碼服務通常會刪除這些資源。 在資源刪除之前,您需支付資源費用。 若要深入瞭解,請參閱 清除部署指令碼資源。
本教學課程涵蓋下列工作:
- 開啟快速入門範本
- 編輯範本
- 部署範本
- 偵錯失敗的指令碼
- 清理資源
如需涵蓋部署腳本的 Learn 模組,請參閱 使用部署腳本擴充 ARM 範本。
先決條件
若要完成本文,您需要:
使用者指派的受控識別。 此身分識別可用來在指令碼中執行 Azure 特定動作。 若要建立一個,請參閱 使用者指派的受控識別。 部署範本時,您需要身分識別碼。 身分的格式為:
/subscriptions/<SubscriptionID>/resourcegroups/<ResourceGroupName>/providers/Microsoft.ManagedIdentity/userAssignedIdentities/<IdentityID>使用下列命令列介面指令碼,提供資源群組名稱和身分名稱以取得 ID。
echo "Enter the Resource Group name:" &&
read resourceGroupName &&
az identity list -g $resourceGroupName
開啟快速入門範本
您不是從頭開始建立範本,而是從 Azure 快速入門範本開啟範本。 Azure 快速入門範本是 ARM 範本的存放庫。
本快速入門中使用的範本稱為 建立 Azure 金鑰保存庫和秘密。 範本會建立金鑰保存庫,然後將秘密新增至金鑰保存庫。
從 Visual Studio Code 中,選取 [檔案>開啟檔案]。
在 [檔案名稱] 中,貼上下列 URL:
https://raw.githubusercontent.com/Azure/azure-quickstart-templates/master/quickstarts/microsoft.keyvault/key-vault-create/azuredeploy.json選取 [ 開啟] 以開啟檔案。
選取 [檔案>另存新檔 ] ,將檔案另存為 azuredeploy.json 至本機電腦。
編輯範本
對範本進行下列變更:
清理範本 (選用)
原始範本會將秘密新增至金鑰保存庫。 若要簡化教學課程,請移除下列資源:
Microsoft.KeyVault/vaults/secrets
移除下列兩個參數定義:
secretNamesecretValue
如果您選擇不移除這些定義,則需要在部署期間指定參數值。
設定金鑰保存庫存取原則
部署指令碼會將憑證新增至金鑰保存庫。 配置金鑰庫存取原則,以便授予受控身分存取權限。
新增參數以取得受控識別識別碼:
"identityId": {
  "type": "string",
  "metadata": {
    "description": "Specifies the ID of the user-assigned managed identity."
  }
},
新增參數來設定金鑰保存庫存取原則,讓受控識別可以將憑證新增至金鑰保存庫:
"certificatesPermissions": {
  "type": "array",
  "defaultValue": [
    "get",
    "list",
    "update",
    "create"
  ],
  "metadata": {
  "description": "Specifies the permissions to certificates in the vault. Valid values are: all, get, list, update, create, import, delete, recover, backup, restore, manage contacts, manage certificate authorities, get certificate authorities, list certificate authorities, set certificate authorities, delete certificate authorities."
  }
}
將
Microsoft.KeyVault/vaults資源的現有金鑰保存庫存取政策更新為:"accessPolicies": [ { "objectId": "[parameters('objectId')]", "tenantId": "[parameters('tenantId')]", "permissions": { "keys": "[parameters('keysPermissions')]", "secrets": "[parameters('secretsPermissions')]", "certificates": "[parameters('certificatesPermissions')]" } }, { "objectId": "[reference(parameters('identityId'), '2018-11-30').principalId]", "tenantId": "[parameters('tenantId')]", "permissions": { "keys": "[parameters('keysPermissions')]", "secrets": "[parameters('secretsPermissions')]", "certificates": "[parameters('certificatesPermissions')]" } } ],已定義兩個原則,一個適用於登入使用者,另一個適用於受控識別。 登入的使用者只需要 清單 權限即可驗證部署。 為了簡化教學課程,會將相同的憑證指派給受控識別和登入的使用者。
新增部署指令碼
新增部署指令碼所使用的三個參數:
"certificateName": {
  "type": "string",
  "defaultValue": "DeploymentScripts2019"
},
"subjectName": {
  "type": "string",
  "defaultValue": "CN=contoso.com"
},
"utcValue": {
  "type": "string",
  "defaultValue": "[utcNow()]"
}
新增
deploymentScripts資源:備註
因為內嵌部署指令碼會以雙引號括住,所以部署指令碼內的字串必須改為用單引號括住。 PowerShell 逸出字元 是倒引號 (
`)。{ "type": "Microsoft.Resources/deploymentScripts", "apiVersion": "2023-08-01", "name": "createAddCertificate", "location": "[resourceGroup().location]", "dependsOn": [ "[resourceId('Microsoft.KeyVault/vaults', parameters('keyVaultName'))]" ], "identity": { "type": "UserAssigned", "userAssignedIdentities": { "[parameters('identityId')]": { } } }, "kind": "AzurePowerShell", "properties": { "forceUpdateTag": "[parameters('utcValue')]", "azPowerShellVersion": "3.0", "timeout": "PT30M", "arguments": "[format(' -vaultName {0} -certificateName {1} -subjectName {2}', parameters('keyVaultName'), parameters('certificateName'), parameters('subjectName'))]", // can pass an argument string, double quotes must be escaped "scriptContent": " param( [string] [Parameter(Mandatory=$true)] $vaultName, [string] [Parameter(Mandatory=$true)] $certificateName, [string] [Parameter(Mandatory=$true)] $subjectName ) $ErrorActionPreference = 'Stop' $DeploymentScriptOutputs = @{} $existingCert = Get-AzKeyVaultCertificate -VaultName $vaultName -Name $certificateName if ($existingCert -and $existingCert.Certificate.Subject -eq $subjectName) { Write-Host 'Certificate $certificateName in vault $vaultName is already present.' $DeploymentScriptOutputs['certThumbprint'] = $existingCert.Thumbprint $existingCert | Out-String } else { $policy = New-AzKeyVaultCertificatePolicy -SubjectName $subjectName -IssuerName Self -ValidityInMonths 12 -Verbose # private key is added as a secret that can be retrieved in the Resource Manager template Add-AzKeyVaultCertificate -VaultName $vaultName -Name $certificateName -CertificatePolicy $policy -Verbose # it takes a few seconds for KeyVault to finish $tries = 0 do { Write-Host 'Waiting for certificate creation completion...' Start-Sleep -Seconds 10 $operation = Get-AzKeyVaultCertificateOperation -VaultName $vaultName -Name $certificateName $tries++ if ($operation.Status -eq 'failed') { throw 'Creating certificate $certificateName in vault $vaultName failed with error $($operation.ErrorMessage)' } if ($tries -gt 120) { throw 'Timed out waiting for creation of certificate $certificateName in vault $vaultName' } } while ($operation.Status -ne 'completed') $newCert = Get-AzKeyVaultCertificate -VaultName $vaultName -Name $certificateName $DeploymentScriptOutputs['certThumbprint'] = $newCert.Thumbprint $newCert | Out-String } ", "cleanupPreference": "OnSuccess", "retentionInterval": "P1D" } }deploymentScripts資源取決於金鑰保存庫資源和角色指派資源。 它具有以下屬性:-
identity:部署指令碼會使用使用者指派的受控識別來執行指令碼中的作業。 -
kind:指定指令碼的類型。 目前僅支援 PowerShell 腳本。 -
forceUpdateTag:判斷是否應執行部署指令碼,即使指令碼來源尚未變更。 可以是目前的時間戳記或 GUID。 若要深入瞭解,請參閱多次執行指令碼。 -
azPowerShellVersion:指定要使用的 Azure PowerShell 模組版本。 目前,部署指令碼支援 2.7.0、2.8.0 和 3.0.0 版。 -
timeout:指定以 ISO 8601 格式指定的允許指令碼執行時間上限。 預設值為 P1D。 -
arguments:指定參數值。 這些值以空格分隔。 -
scriptContent:指定指令碼內容。 若要執行外部指令碼,請改用primaryScriptURI。 如需詳細資訊,請參閱 使用外部指令碼。 只有在本機電腦上測試指令碼時,才需要宣告$DeploymentScriptOutputs。 宣告變數可讓指令碼在本機電腦和資源中deploymentScript執行,而不需要進行變更。 指派給$DeploymentScriptOutputs的值可作為部署中的輸出使用。 如需詳細資訊,請參閱 使用 PowerShell 部署腳本的輸出 或 使用 CLI 部署腳本的輸出。 -
cleanupPreference:指定何時刪除部署指令碼資源的偏好設定。 預設值為 [一律],這表示即使處於終端狀態 (成功、失敗、已取消) ,仍會刪除部署指令碼資源。 在本教學課程中,會使用 OnSuccess ,讓您有機會檢視腳本執行結果。 -
retentionInterval:指定服務在達到終止狀態後保留指令碼資源的間隔。 此持續時間到期時,資源將會被刪除。 持續時間基於 ISO 8601 模式。 本教學使用 P1D,意思是一天。 當設定為cleanupPreference時,會使用此屬性。 目前未啟用此屬性。
部署指令碼採用三個參數:
keyVaultName、certificateName和subjectName。 它會建立憑證,然後將憑證新增至金鑰保存庫。$DeploymentScriptOutputs用於儲存輸出值。 若要深入瞭解,請參閱 使用 PowerShell 部署腳本的輸出 或 使用 CLI 部署腳本的輸出。完整的模板 可以在這裡找到。
-
若要查看偵錯程序,請將以下這一行新增至部署指令碼,以程式碼中放入錯誤:
Write-Output1 $keyVaultName正確的命令是
Write-Output而不是Write-Output1。選取 [檔案>儲存] 以儲存檔案。
部署範本
選取左上角的 PowerShell 或 Bash (適用於 CLI) 來選擇您偏好的環境。 切換時需要重新啟動 shell。
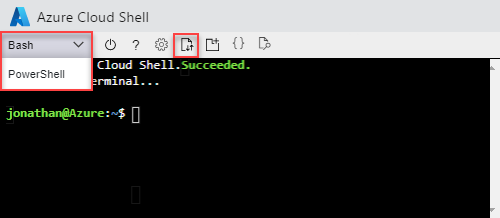
選取 [上傳/下載檔案],然後選取 [上傳]。 請參閱上一個螢幕截圖。 選取您在上一節中儲存的檔案。 上傳檔案後,您可以使用
ls命令和cat命令來驗證檔案是否已成功上傳。執行下列 Azure CLI 或 Azure PowerShell 指令碼來部署範本。
echo "Enter a project name that is used to generate resource names:" && read projectName && echo "Enter the location (i.e. centralus):" && read location && echo "Enter your email address used to sign in to Azure:" && read upn && echo "Enter the user-assigned managed identity ID:" && read identityId && adUserId=$((az ad user show --id ${upn}) | jq -r '.id') && resourceGroupName="${projectName}rg" && keyVaultName="${projectName}kv" && az group create --name $resourceGroupName --location $location && az deployment group create --resource-group $resourceGroupName --template-file "$HOME/azuredeploy.json" --parameters identityId=$identityId keyVaultName=$keyVaultName objectId=$adUserId部署指令碼服務需要建立額外的部署指令碼資源,才能執行指令碼。 除了實際的指令碼執行時間外,準備和清理程序最多可能需要一分鐘才能完成。
部署失敗,因為指令碼中使用了無效的命令
Write-Output1。 您會收到錯誤訊息:The term 'Write-Output1' is not recognized as the name of a cmdlet, function, script file, or operable program. Check the spelling of the name, or if a path was included, verify that the path is correct and try again.部署指令碼執行結果會儲存在部署指令碼資源中,以供疑難排解之用。
偵錯失敗的指令碼
登入 Azure 入口網站。
開啟資源群組。 這是附加 rg 的專案名稱。 您會在資源群組中看到兩個額外的資源。 這些資源稱為 部署指令碼資源。
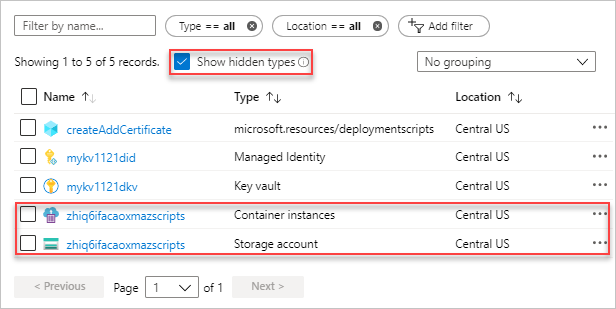
這兩個檔案都有 azscripts 尾碼。 其中一個是儲存體帳戶,另一個則是容器執行個體。
選取 [顯示隱藏類型 ] 以列出
deploymentScripts資源。選取具有 azscripts 尾碼的儲存體帳戶。
選取 [檔案共用 ] 圖磚。 您會看到包含部署腳本執行檔案的 azscripts 資料夾。
選取 azscripts。 您會看到兩個資料夾 azscriptinput 和 azscriptoutput。 輸入資料夾包含系統 PowerShell 腳本檔案和使用者部署腳本檔案。 輸出資料夾包含 executionresult.json 和指令碼輸出檔案。 您可以在 executionresult.json中看到錯誤訊息。 輸出檔案不存在,因為執行失敗。
移除該行 Write-Output1 並重新部署範本。
當第二個部署成功執行時,指令碼服務將會移除部署指令碼資源,因為屬性 cleanupPreference 會設定為 OnSuccess。
清理資源
當不再需要 Azure 資源時,請刪除資源群組來清除您部署的資源。
- 從 Azure 入口網站 中,從左側功能表中選取 [資源群組 ]。
- 在 依名稱篩選 欄位中輸入資源群組名稱。
- 選取資源群組名稱。
- 從頂端功能表選取 [刪除資源群組 ]。
後續步驟
在本教學課程中,您已瞭解如何在 ARM 範本中使用部署腳本。 若要瞭解如何根據條件部署 Azure 資源,請參閱: