Azure Front Door 是新式雲端原生應用程式傳遞網路 (ADN),可提供動態網站加速、全域負載平衡、TLS 終止和應用層安全性。 它會在 HTTP/HTTPS 層(第 7 層)運作,並作為 Web 應用程式的進入點,根據後端的 URL 路徑、延遲和健康情況狀態等屬性來路由和優化流量。
Azure Front Door 的主要優點是其原生支援 WebSocket 和 WebSocket Secure (WSS) 連線。 此支援可啟用用戶端與後端服務之間的即時雙向通訊,而不需要任何特殊設定。
在本指南中,我們會示範如何使用 Azure Front Door 搭配 Azure SignalR Service 來針對即時應用程式作為前端。 透過 Front Door 路由流量,可以:
- 啟用具有全球覆蓋和邊緣加速功能的 WebSocket 支援。
- 套用集中式安全策略,例如 WAF 規則和速率限制,
- 減少後端服務的公開曝光。
如圖表所示,您會設定 Azure Front Door 將 WebSocket 流量路由傳送至 SignalR 支援的應用程式後端。 此設定可確保您的即時功能受益於透過 Azure 全球邊緣網路進行低延遲、可調整且安全的流量處理。
設定及配置 Azure Front Door
建立 Azure SignalR Service 資源
請遵循 文章 並建立 SignalR 服務資源
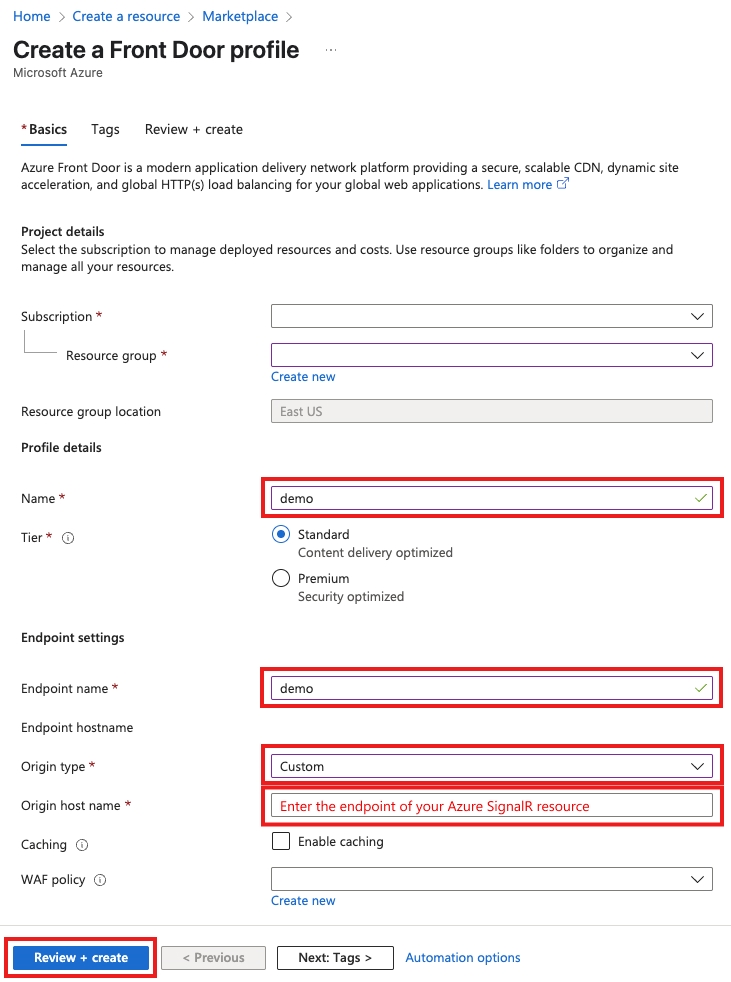
建立 Azure Front Door 資源
在 Azure 入口網站上,搜尋 Front Door 和 Create。
快速測試
進行快速測試,以確認 SignalR 端點狀況良好,且已正確設定 Azure Front Door 資源。
將要求傳送至 <your-SignalR-resource-endpoint>/client,它應該返回 400,並顯示錯誤訊息 「必須提供 'hub' 查詢參數」。 這則訊息表示要求已抵達 SignalR 服務,且該服務如預期般執行了驗證。
curl -v <your-SignalR-resource-endpoint>/client
退貨
< HTTP/1.1 400 Bad Request
< ...
<
'hub' query parameter is required.
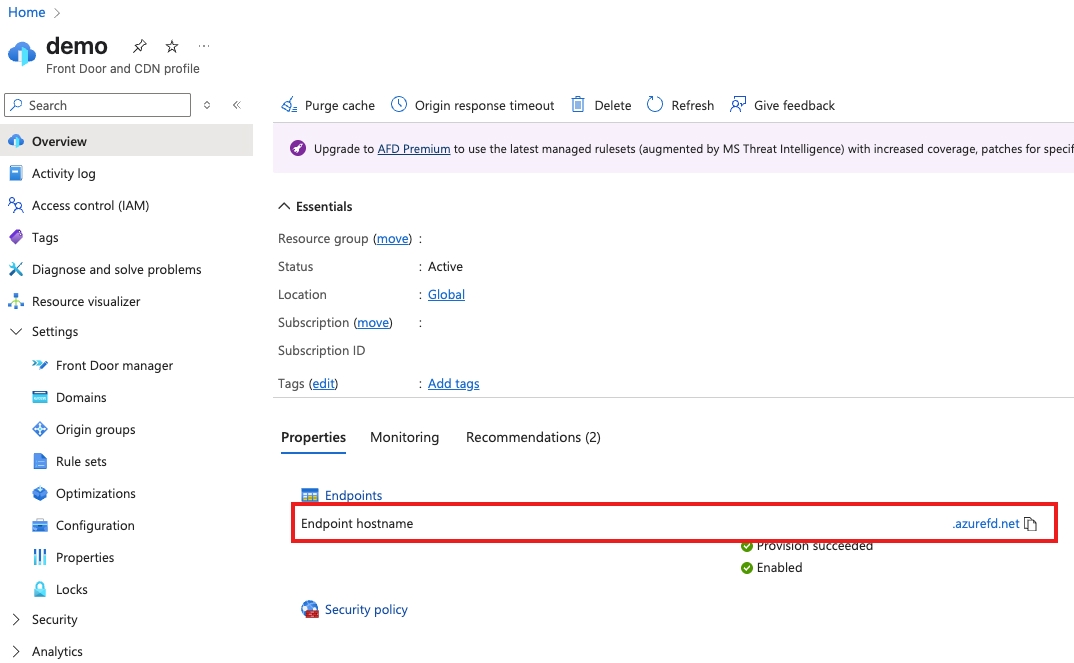
透過 Azure Front Door http://<the-hostname-of-your-Azure-Front-Door-resource>/client將要求傳送至 Azure SignalR 的相同健康情況端點。 移至所建立 Azure Front Door 資源的 [概觀] 索引標籤,並找出端點主機名。
curl -I http://<the-hostname-of-your-Azure-Front-Door-resource>/client
它也應該傳回 400 並顯示錯誤訊息 「必須提供 'hub' 查詢參數」。 此訊息確認請求已成功通過 Azure Front Door 到達 SignalR 服務。
< HTTP/1.1 400 Bad Request
< ...
<
'hub' query parameter is required.
透過 Azure Front Door 執行 SignalR 範例應用程式
現在我們可以確認流量可以透過 Azure Front Door 連線到 SignalR Service。 接下來,我們會使用基本的範例應用程式來示範 Azure Front Door 無需設定即可管理 WebSocket 流量的能力。 我們採取循序漸進的方法,讓你可以隨時跟著做,如果需要。
建立專案
mkdir afd-demo
cd afd-demo

touch afd-demo.csproj
將內容貼到 afd-demo.csproj 檔案中。 此專案只會使用 「Microsoft.Azure.SignalR」 套件。
<Project Sdk="Microsoft.NET.Sdk.Web">
  <PropertyGroup>
    <TargetFramework>net7.0</TargetFramework>
    <Nullable>enable</Nullable>
    <ImplicitUsings>enable</ImplicitUsings>
    <RootNamespace>afd_demo</RootNamespace>
  </PropertyGroup>
  <ItemGroup>
    <PackageReference Include="Microsoft.Azure.SignalR" Version="1.30.2" />
  </ItemGroup>
</Project>
設定應用程式設定
建立 appsettings.json 檔案並貼上內容。 我們將在下一個步驟中建立的 Program.cs 檔案中參考這些值。 在 ConnectionString 中新增區 ClientEndpoint 段。
touch appsettings.json
原始 連接字串 只針對示範目的出現在本文中。 在生產環境中,請一律保護您的存取金鑰。 使用 Azure 金鑰保存庫,使用 Microsoft Entra 識別碼安全地管理和輪替密鑰,以及使用 Microsoft Entra 識別符來授權存取權,並保護您的 連接字串。
{
  "Azure": {
    "SignalR": {
      "ConnectionString": "<the-connection-string-of-your-Azure-SignalR-resource>;ClientEndpoint=<the-endpoint-of-your-Azure-Front-Door-resource>"
    }
  }
}
建立 Program.cs 檔案
touch Program.cs
將程式代碼貼到 Program.cs 檔案中。 Web 應用程式會定義 SignalR 中樞,並在 Web 根目錄提供服務 index.html 。
using Microsoft.Azure.SignalR;
var builder = WebApplication.CreateBuilder(args);

// Automatically read in the configuration from `appsettings.json`
builder.Services.AddSignalR().AddAzureSignalR();

var app = builder.Build();
app.UseStaticFiles();

app.UseRouting();

app.MapHub<DemoHub>("/demohub");

app.MapGet("/", async context =>
{
    var path = Path.Combine(Directory.GetCurrentDirectory(), "wwwroot", "index.html");
    context.Response.ContentType = "text/html";
    await context.Response.SendFileAsync(path);
});

app.Run();
定義 SignalR 中樞
mkdir hubs && cd hubs
touch demohubs.cs
將程式代碼貼到 demohubs.cs 檔案中。 為了簡單起見,中樞只向 SignalR 用戶端公開 BroadcastMessage 方法,該方法會將接收的訊息廣播到所有連線的 SignalR 用戶端。
using Microsoft.AspNetCore.SignalR;

public class DemoHub : Hub
{
    public Task BroadcastMessage(string message) =>
        Clients.All.SendAsync("broadcastMessage", message);
}
定義 Web UI
請確定您位於項目資料夾的根目錄。
mkdir wwwroot && cd wwwroot
touch index.html
將程式代碼貼到 index.html。 使用者介面是由 <textarea> 接收來自使用者的文字輸入,以及 <button> 透過 SignalR 連線傳送使用者輸入的 。 由於我們已定義 SignalR 伺服器用來廣播已接收訊息的行為,因此您會看到記錄至瀏覽器控制台的相同訊息。
<!DOCTYPE html>
<html>

<head>
  <meta http-equiv="Cache-Control" content="no-cache, no-store, must-revalidate" />
  <meta name="viewport" content="width=device-width">
  <meta http-equiv="Pragma" content="no-cache" />
  <meta http-equiv="Expires" content="0" />
  <title>Azure SignalR with Azure Front Door as the reverse proxy</title>
</head>

<body>
  <div>
    <textarea id="message" style="display: block; width: 100%; padding: 5px 10px; max-width: 400px; margin-bottom: 8px;"
      placeholder="Your message..."></textarea>
    <button id="btn-send" disabled>Send</button>
  </div>

  <!--Reference the SignalR library. -->
  <script src="https://cdnjs.cloudflare.com/ajax/libs/microsoft-signalr/6.0.1/signalr.js"></script>

  <script type="module">
    document.addEventListener("DOMContentLoaded", async function () {
      const connection = new signalR.HubConnectionBuilder()
        .withUrl("/demohub")
        .build();

      connection.on("broadcastMessage", (msg) => {
        console.log(msg)
      })
      await connection.start();
      document.getElementById("btn-send").removeAttribute("disabled")

      document.getElementById("btn-send").addEventListener("click", () => {
        const message = document.getElementById("message").value
        if (message !== "") {
          connection.send("broadcastMessage", message)
          document.getElementById("message").value = ""
        } else {
          alert("Message body is empty. Please enter message.")
        }
      })
    })
  </script>
</body>

</html>
執行應用程式,並透過 Azure Front Door 驗證訊息流程
這是範例的所有程序代碼。 讓我們執行應用程式。
  dotnet restore
  dotnet run
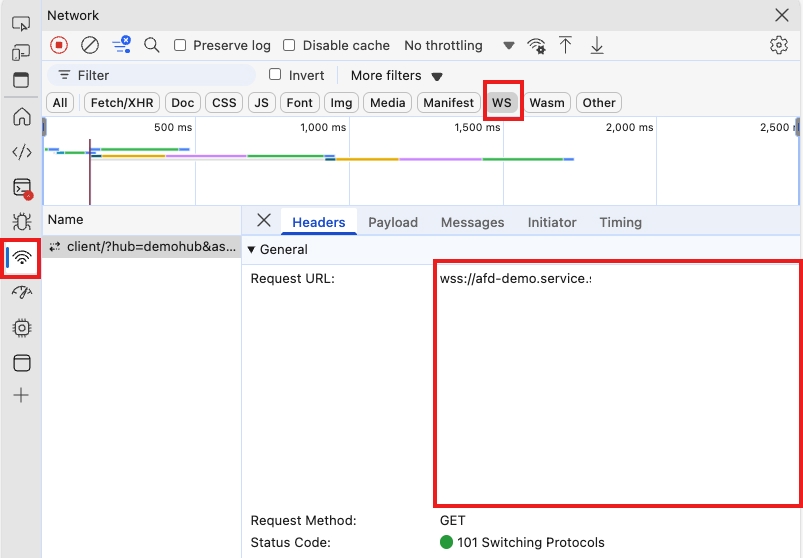
從瀏覽器開啟 http://localhost:5129 ,並使用 F12 鍵盤快捷方式開啟開發人員工具。 前往網路面板,您可以看到 WebSocket 連線確實已使用 Azure Front Door 建立。
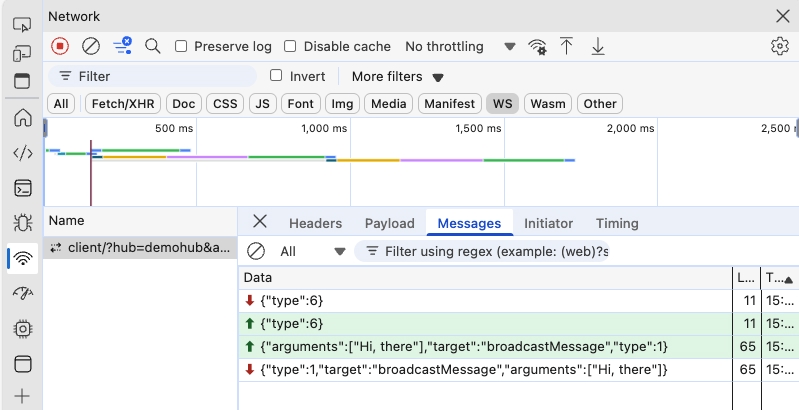
嘗試在文字框中輸入某個項目,然後按 [傳送] 按鈕。 您會看到訊息如預期般記錄到瀏覽器主控台。
您也可以檢查網路面板中的訊息流程。