啟用 Azure 雲端服務 (傳統) 中角色執行個體的通訊
重要
針對新客戶目前已取代 Azure 雲端服務 (傳統),而針對所有客戶,該服務將從 2024 年 8 月 31 日起完全淘汰。 新部署應該使用 Azure Resource Manager 型的新部署模型 Azure 雲端服務 (延伸支援)。
雲端服務角色透過內部和外部連線通訊。 外部連接稱為輸入端點,而內部連接稱為內部端點。 本文描述如何修改服務定義以建立端點。
輸入端點
輸入端點是在您要對外公開連接埠時使用。 您可以指定通訊協定類型和端點連接埠,稍後這些設定將適用於端點的外部和內部連接埠。 您也可以使用 localPort 屬性為端點指定不同的內部連接埠。
輸入端點可以使用下列通訊協定: http、https、tcp、udp。
若要建立輸入端點,請將 InputEndpoint 子元素新增至 Web 或背景工作角色的 Endpoints 元素。
<Endpoints>
  <InputEndpoint name="StandardWeb" protocol="http" port="80" localPort="80" />
</Endpoints>
執行個體輸入端點
執行個體輸入端點與輸入端點類似,但可讓您使用負載平衡器上的連接埠轉送,來針對各角色執行個體對應特定的公眾對應連接埠。 您可以指定單一公眾連接埠,或某個範圍內的連接埠。
執行個體輸入端點只能使用 tcp 或 udp 作為通訊協定。
若要建立執行個體輸入端點,請將 InstanceInputEndpoint 子元素新增至 Web 或背景工作角色的 Endpoints 元素。
<Endpoints>
  <InstanceInputEndpoint name="Endpoint2" protocol="tcp" localPort="10100">
    <AllocatePublicPortFrom>
      <FixedPortRange max="10109" min="10105" />
    </AllocatePublicPortFrom>
  </InstanceInputEndpoint>
</Endpoints>
內部端點
內部端點可供執行個體對執行個體通訊時使用。 該連接埠是選擇性的,如果省略,將指派動態連接埠至端點。 可以使用連接埠範圍。 每個角色的內部端點限制為五個。
內部端點可以使用下列通訊協定: http、tcp、udp、any。
若要建立內部輸入端點,請將 InternalEndpoint 子元素新增至 Web 或背景工作角色的 Endpoints 元素。
<Endpoints>
  <InternalEndpoint name="Endpoint3" protocol="any" port="8999" />
</Endpoints>
您也可以使用連接埠範圍。
<Endpoints>
  <InternalEndpoint name="Endpoint3" protocol="any">
    <FixedPortRange max="8999" min="8995" />
  </InternalEndpoint>
</Endpoints>
背景工作角色與Web 角色
使用背景工作角色和 Web 角色二者時,端點會有一個細微的差異。 Web 角色必須至少要有一個輸入端點使用 HTTP 通訊協定。
<Endpoints>
  <InputEndpoint name="StandardWeb" protocol="http" port="80" localPort="80" />
  <!-- more endpoints may be declared after the first InputEndPoint -->
</Endpoints>
使用 .NET SDK 存取端點
Azure 受控程式庫提供讓角色執行個體在執行階段通訊的方法。 藉由在角色執行個體內執行的程式碼,您可以擷取其他角色執行個體及其端點之存在的相關資訊。 您也可以取得目前角色執行個體的相關資訊。
注意
您只能抓取在您的雲端服務中執行,且至少定義一個內部端點之角色執行個體的相關資訊。 您無法取得在其他服務中執行之角色執行個體的相關資料。
您可以使用 Instances 屬性抓取角色的執行個體。 先使用 CurrentRoleInstance 以傳回對目前角色執行個體的參考,然後使用 Role 屬性來傳回對角色本身的參考。
當您以程式設計方式透過 .NET SDK 連接到角色執行個體時,存取端點資訊就相對較簡單。 例如,當您連接到特定的角色環境後,即可使用此程式碼取得特定端點的連接埠:
int port = RoleEnvironment.CurrentRoleInstance.InstanceEndpoints["StandardWeb"].IPEndpoint.Port;
Instances 屬性會傳回 RoleInstance 物件的集合。 這個集合一律會包含目前的執行個體。 如果該角色沒有定義內部端點,則該集合會包含目前的執行個體,而沒有其他執行個體。 在沒有為角色定義內部端點的情況下,集合中的角色執行個體數量一律為一。 如果該角色定義了內部端點,就可以在執行階段中探索其執行個體,而且集合中執行個體的數量將與服務組態檔中為該角色指定的執行個體數量相對應。
注意
Azure 設管理程式庫沒有提供判斷其他角色執行個體健康狀態的方法,但是如果您的服務需要這類功能,您可以自行實作此健康狀態評估。 您可以使用 Azure 診斷 來取得執行中角色執行個體的相關資訊。
若要判斷角色執行個體上內部端點的連接埠號碼,您可以使用 InstanceEndpoints 屬性來傳回內含端點名稱和其對應 IP 位址及連接埠的 Dictionary 物件。 IPEndpoint 屬性會傳回所指定端點的 IP 位址和連接埠。 PublicIPEndpoint 屬性會傳回負載平衡端點的連接埠。 不會使用 PublicIPEndpoint 屬性的 IP 位址部分。
以下是逐一查看角色執行個體的範例。
foreach (RoleInstance roleInst in RoleEnvironment.CurrentRoleInstance.Role.Instances)
{
    Trace.WriteLine("Instance ID: " + roleInst.Id);
    foreach (RoleInstanceEndpoint roleInstEndpoint in roleInst.InstanceEndpoints.Values)
    {
        Trace.WriteLine("Instance endpoint IP address and port: " + roleInstEndpoint.IPEndpoint);
    }
}
以下是可取得透過服務定義所公開的端點,並開始接聽連線之背景工作角色的範例。
警告
這個程式碼只適用於已部署的服務。 在 Azure 計算模擬器中執行時,會忽略建立直接連接埠 (InstanceInputEndpoint 元素) 的服務組態元素。
using System;
using System.Diagnostics;
using System.Linq;
using System.Net;
using System.Net.Sockets;
using System.Threading;
using Microsoft.WindowsAzure;
using Microsoft.WindowsAzure.Diagnostics;
using Microsoft.WindowsAzure.ServiceRuntime;
using Microsoft.WindowsAzure.StorageClient;

namespace WorkerRole1
{
  public class WorkerRole : RoleEntryPoint
  {
    public override void Run()
    {
      try
      {
        // Initialize method-wide variables
        var epName = "Endpoint1";
        var roleInstance = RoleEnvironment.CurrentRoleInstance;

        // Identify direct communication port
        var myPublicEp = roleInstance.InstanceEndpoints[epName].PublicIPEndpoint;
        Trace.TraceInformation("IP:{0}, Port:{1}", myPublicEp.Address, myPublicEp.Port);

        // Identify public endpoint
        var myInternalEp = roleInstance.InstanceEndpoints[epName].IPEndpoint;

        // Create socket listener
        var listener = new Socket(
          myInternalEp.AddressFamily, SocketType.Stream, ProtocolType.Tcp);

        // Bind socket listener to internal endpoint and listen
        listener.Bind(myInternalEp);
        listener.Listen(10);
        Trace.TraceInformation("Listening on IP:{0},Port: {1}",
          myInternalEp.Address, myInternalEp.Port);

        while (true)
        {
          // Block the thread and wait for a client request
          Socket handler = listener.Accept();
          Trace.TraceInformation("Client request received.");

          // Define body of socket handler
          var handlerThread = new Thread(
            new ParameterizedThreadStart(h =>
            {
              var socket = h as Socket;
              Trace.TraceInformation("Local:{0} Remote{1}",
                socket.LocalEndPoint, socket.RemoteEndPoint);

              // Shut down and close socket
              socket.Shutdown(SocketShutdown.Both);
              socket.Close();
            }
          ));

          // Start socket handler on new thread
          handlerThread.Start(handler);
        }
      }
      catch (Exception e)
      {
        Trace.TraceError("Caught exception in run. Details: {0}", e);
      }
    }

    public override bool OnStart()
    {
      // Set the maximum number of concurrent connections
      ServicePointManager.DefaultConnectionLimit = 12;

      // For information on handling configuration changes
      // see the MSDN topic at https://go.microsoft.com/fwlink/?LinkId=166357.
      return base.OnStart();
    }
  }
}
用網路流量規則控制角色通訊
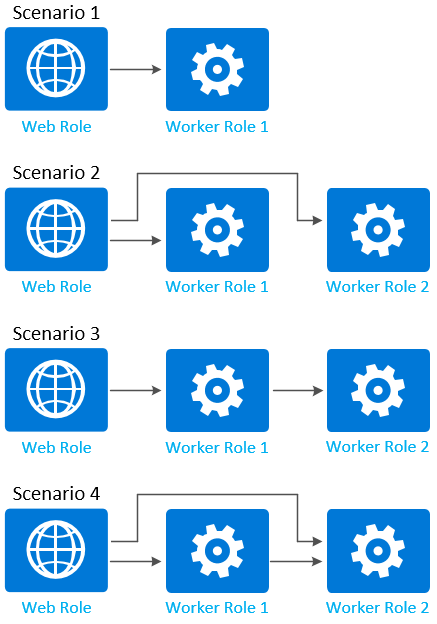
定義內部端點之後,您可以新增網路流量規則 (根據建立的端點) 來控制角色之間通訊的方式。 下圖顯示一些控制角色通訊的常見案例:

以下程式碼範例顯示上圖中角色的角色定義。 每個角色定義都包含至少一個內部端點定義:
<ServiceDefinition name="MyService" xmlns="http://schemas.microsoft.com/ServiceHosting/2008/10/ServiceDefinition">
  <WebRole name="WebRole1" vmsize="Medium">
    <Sites>
      <Site name="Web">
        <Bindings>
          <Binding name="HttpIn" endpointName="HttpIn" />
        </Bindings>
      </Site>
    </Sites>
    <Endpoints>
      <InputEndpoint name="HttpIn" protocol="http" port="80" />
      <InternalEndpoint name="InternalTCP1" protocol="tcp" />
    </Endpoints>
  </WebRole>
  <WorkerRole name="WorkerRole1">
    <Endpoints>
      <InternalEndpoint name="InternalTCP2" protocol="tcp" />
    </Endpoints>
  </WorkerRole>
  <WorkerRole name="WorkerRole2">
    <Endpoints>
      <InternalEndpoint name="InternalTCP3" protocol="tcp" />
      <InternalEndpoint name="InternalTCP4" protocol="tcp" />
    </Endpoints>
  </WorkerRole>
</ServiceDefinition>
注意
固定和自動指派之連接埠二者的內部端點都可能會在角色之間產生通訊限制。
根據預設,定義內部端點之後,來自任何角色的通訊都可以在沒有任何限制的情況下流向角色的內部端點。 若要限制通訊,您必須在服務定義檔中將 NetworkTrafficRules 元素新增至 ServiceDefinition 元素。
實例 1
只允許從 WebRole1 至 WorkerRole1 的網路流量。
<ServiceDefinition name="MyService" xmlns="http://schemas.microsoft.com/ServiceHosting/2008/10/ServiceDefinition">
  <NetworkTrafficRules>
    <OnlyAllowTrafficTo>
      <Destinations>
        <RoleEndpoint endpointName="InternalTCP2" roleName="WorkerRole1"/>
      </Destinations>
      <AllowAllTraffic/>
      <WhenSource matches="AnyRule">
        <FromRole roleName="WebRole1"/>
      </WhenSource>
    </OnlyAllowTrafficTo>
  </NetworkTrafficRules>
</ServiceDefinition>
案例 2
只允許從 WebRole1 至 WorkerRole1 和 WorkerRole2 的網路流量。
<ServiceDefinition name="MyService" xmlns="http://schemas.microsoft.com/ServiceHosting/2008/10/ServiceDefinition">
  <NetworkTrafficRules>
    <OnlyAllowTrafficTo>
      <Destinations>
        <RoleEndpoint endpointName="InternalTCP2" roleName="WorkerRole1"/>
        <RoleEndpoint endpointName="InternalTCP3" roleName="WorkerRole2"/>
      </Destinations>
      <WhenSource matches="AnyRule">
        <FromRole roleName="WebRole1"/>
      </WhenSource>
    </OnlyAllowTrafficTo>
  </NetworkTrafficRules>
</ServiceDefinition>
案例 3
只允許從 WebRole1 至 WorkerRole1,以及從 WorkerRole1 至 WorkerRole2 的網路流量。
<ServiceDefinition name="MyService" xmlns="http://schemas.microsoft.com/ServiceHosting/2008/10/ServiceDefinition">
  <NetworkTrafficRules>
    <OnlyAllowTrafficTo>
      <Destinations>
        <RoleEndpoint endpointName="InternalTCP2" roleName="WorkerRole1"/>
      </Destinations>
      <AllowAllTraffic/>
      <WhenSource matches="AnyRule">
        <FromRole roleName="WebRole1"/>
      </WhenSource>
    </OnlyAllowTrafficTo>
  </NetworkTrafficRules>
  <NetworkTrafficRules>
    <OnlyAllowTrafficTo>
      <Destinations>
        <RoleEndpoint endpointName="InternalTCP3" roleName="WorkerRole2"/>
      </Destinations>
      <WhenSource matches="AnyRule">
        <FromRole roleName="WorkerRole1"/>
      </WhenSource>
    </OnlyAllowTrafficTo>
  </NetworkTrafficRules>
</ServiceDefinition>
案例 4
只允許從 WebRole1 至 WorkerRole1、從 WebRole1 至 WorkerRole2,以及從 WorkerRole1 至 WorkerRole2 的網路流量。
<ServiceDefinition name="MyService" xmlns="http://schemas.microsoft.com/ServiceHosting/2008/10/ServiceDefinition">
  <NetworkTrafficRules>
    <OnlyAllowTrafficTo>
      <Destinations>
        <RoleEndpoint endpointName="InternalTCP2" roleName="WorkerRole1"/>
      </Destinations>
      <AllowAllTraffic/>
      <WhenSource matches="AnyRule">
        <FromRole roleName="WebRole1"/>
      </WhenSource>
    </OnlyAllowTrafficTo>
  </NetworkTrafficRules>
  <NetworkTrafficRules>
    <OnlyAllowTrafficTo >
      <Destinations>
        <RoleEndpoint endpointName="InternalTCP3" roleName="WorkerRole2"/>
      </Destinations>
      <AllowAllTraffic/>
      <WhenSource matches="AnyRule">
        <FromRole roleName="WorkerRole1"/>
      </WhenSource>
    </OnlyAllowTrafficTo>
  </NetworkTrafficRules>
  <NetworkTrafficRules>
    <OnlyAllowTrafficTo >
      <Destinations>
        <RoleEndpoint endpointName="InternalTCP4" roleName="WorkerRole2"/>
      </Destinations>
      <AllowAllTraffic/>
      <WhenSource matches="AnyRule">
        <FromRole roleName="WebRole1"/>
      </WhenSource>
    </OnlyAllowTrafficTo>
  </NetworkTrafficRules>
</ServiceDefinition>
您可以在這裡找到使用之元素的 XML 結構描述參考。
下一步
深入了解雲端服務 模型。