快速入門:使用進階訊息傳送 WhatsApp 訊息
Azure 通訊服務 可讓您傳送和接收 WhatsApp 訊息。 在本快速入門中,開始整合您的應用程式與 Azure 通訊進階訊息 SDK,並開始傳送/接收 WhatsApp 訊息。 完成本快速入門後,您的 Azure 帳戶中會產生幾美分或更少的少許費用。
必要條件
要接收訊息的作用中 WhatsApp 電話號碼
.NET 開發環境 (例如 Visual Studio、Visual Studio Code 或 .NET CLI)
設定
建立 .NET 專案
若要建立專案,請遵循使用Visual Studio建立 .NET 控制台應用程式的教學課程。
若要編譯程序代碼,請按 Ctrl+F7。
Install the package
將 Azure.Communication.Messages NuGet 套件安裝到您的 C# 專案。
- 在開啟 NuGet 封裝管理員
Project>Manage NuGet Packages...。 - 搜尋套件
Azure.Communication.Messages。 - 安裝最新版本。
設定應用程式架構
在文字編輯器中開啟 Program.cs 檔案。
使用下列程式代碼取代Program.cs的內容:
using System;
using System.Collections.Generic;
using System.Threading.Tasks;
using Azure;
using Azure.Communication.Messages;

namespace AdvancedMessagingQuickstart
{
    class Program
    {
        public static async Task Main(string[] args)
        {
            Console.WriteLine("Azure Communication Services - Send WhatsApp Messages");

            // Quickstart code goes here
        }
    }
}
若要使用進階傳訊功能,我們會新增 using 指示詞以包含 Azure.Communication.Messages 命名空間。
using Azure.Communication.Messages;
物件模型
下列類別和介面會處理適用於 .NET 的 Azure 通訊服務 進階傳訊 SDK 的一些主要功能。
| 名稱 | 描述 |
|---|---|
| NotificationMessagesClient | 此類別會連線到您的 Azure 通訊服務 資源。 它會傳送訊息。 |
| MessageTemplate | 此類別會定義您使用的範本,以及訊息範本屬性的內容。 |
| TemplateNotificationContent | 此類別會定義您要傳送之範本訊息的「who」 和 「what」。 |
| TextNotificationContent | 這個類別會定義您要傳送之簡訊的「誰」和「內容」。 |
| MediaNotificationContent | 此類別會定義您要傳送之媒體訊息的「誰」和「內容」。 |
程式碼範例
請遵循下列步驟,將必要的代碼段新增至Program.cs檔案的Main函式。
驗證用戶端
NotificationMessagesClient用來連線到您的 Azure 通訊服務 資源。
為了簡單起見,本快速入門會使用 連接字串 進行驗證。 在生產環境中,我們建議使用 服務主體。
從 Azure 入口網站中的 Azure 通訊服務 資源取得 連接字串。 在左側,流覽至索引 Keys 標籤。複製 Connection string 主鍵的欄位。 連接字串 格式endpoint=https://{your Azure Communication Services resource name}.communication.azure.com/;accesskey={secret key}為 。
![顯示 Azure 入口網站 中 Azure 通訊服務 資源的螢幕快照,檢視 [主鍵] 區段中的 [連線 ion 字串] 字段。](media/get-started/get-communication-resource-connection-string.png#lightbox)
將環境變數COMMUNICATION_SERVICES_CONNECTION_STRING設定為 連接字串的值。
開啟主控台視窗,然後輸入下列命令:
setx COMMUNICATION_SERVICES_CONNECTION_STRING "<your connection string>"
新增環境變數之後,您可能需要重新啟動任何需要讀取環境變數的執行中程式,包括主控台視窗。 例如,如果您使用 Visual Studio 作為編輯器,請在執行範例前重新啟動 Visual Studio。
如需如何為系統設定環境變數的詳細資訊,請遵循將 連接字串 儲存在環境變數中的步驟。
若要具現化 NotificationMessagesClient,請將下列程式代碼新增至 Main 方法:
// Retrieve connection string from environment variable
string connectionString =
    Environment.GetEnvironmentVariable("COMMUNICATION_SERVICES_CONNECTION_STRING");

// Instantiate the client
var notificationMessagesClient = new NotificationMessagesClient(connectionString);
![顯示 Azure 入口網站 中 Azure 通訊服務 資源的螢幕快照,檢視 [主鍵] 區段中的 [連線 字串] 字段。](media/get-started/get-communication-resource-endpoint-and-key.png#lightbox)
設定通道註冊標識碼
通道註冊標識碼 GUID 是在通道註冊期間建立的。 您可以在入口網站中查閱 Azure 通訊服務 資源的 [通道] 索引標籤。
![此螢幕快照顯示 Azure 入口網站 中 Azure 通訊服務 資源,並檢視 [頻道] 索引標籤。[頻道標識符] 字段的複製動作會放在 [注意]。](media/get-started/get-messages-channel-id.png#lightbox)
將它指派給名為 channelRegistrationId 的變數。
var channelRegistrationId = new Guid("<your channel registration ID GUID>");
設定收件者清單
您必須提供與 WhatsApp 帳戶相關聯的真實電話號碼。 此 WhatsApp 帳戶會接收本快速入門中傳送的範本、文字和媒體訊息。 在本快速入門中,此電話號碼可能是您的個人電話號碼。
收件者電話號碼不能是與 WhatsApp 頻道註冊相關聯的商務電話號碼(發件人標識符)。 寄件者標識碼會顯示為傳送給收件者之文字和媒體訊息的發件者。
電話號碼應包含國家/地區代碼。 如需電話號碼格式的詳細資訊,請參閱 whatsApp 檔中的 電話 號碼格式。
注意
收件者清單中目前僅支援一個電話號碼。
建立如下的收件者清單:
var recipientList = new List<string> { "<to WhatsApp phone number>" };
範例:
// Example only
var recipientList = new List<string> { "+14255550199" };
開始在企業與 WhatsApp 用戶之間傳送訊息
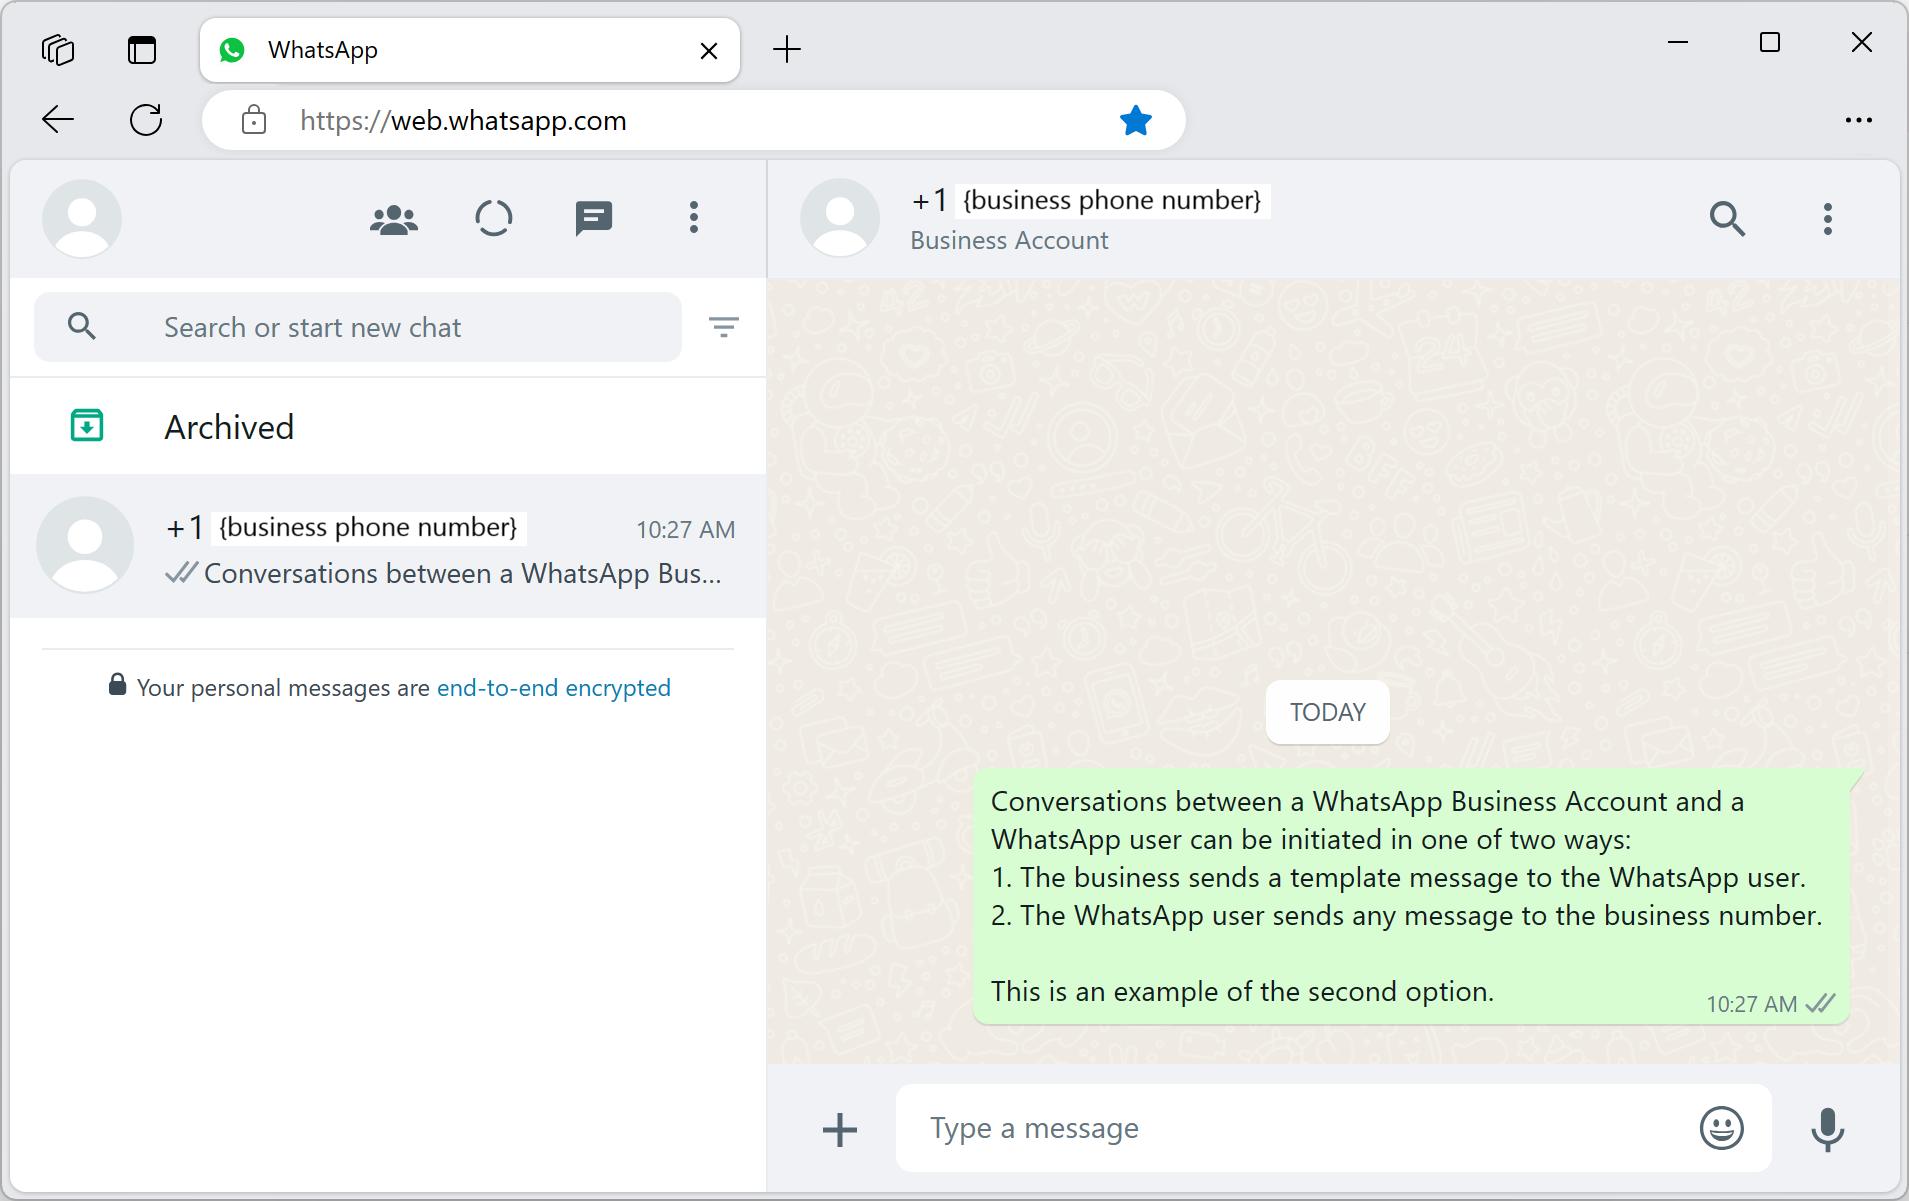
WhatsApp Business 帳戶與 WhatsApp 使用者之間的交談可以透過下列兩種方式之一起始:
- 商務會將範本訊息傳送給 WhatsApp 使用者。
- WhatsApp 使用者會將任何訊息傳送至商務號碼。
不論交談的啟動方式為何, 企業只能傳送範本訊息,直到使用者傳送訊息給企業為止。 只有在使用者傳送訊息給企業之後,企業才能在作用中交談期間將文字或媒體訊息傳送給使用者。 一旦 24 小時交談視窗到期,就必須重新初始化交談。 若要深入了解對話,請參閱 WhatsApp Business Platform 的定義。
(選項 1)從企業起始交談 - 傳送範本訊息
藉由傳送範本訊息來起始交談。
首先,使用範本的值建立 MessageTemplate。
以下是使用預設範本 sample_template建立 MessageTemplate。
如果 sample_template 無法使用,請跳至 選項 2。 如需進階使用者,請參閱範本頁面,以瞭解如何使用選項 1 傳送不同的範本。
訊息 SDK 可讓 Contoso 將樣板化 WhatsApp 訊息傳送給 WhatsApp 使用者。 若要傳送以下範本訊息,需要詳細數據:
- WhatsApp 通道標識碼
- 收件者 電話 E16 格式的數位
- 範本詳細數據
- 名稱,例如 'sample_template'
- 語言,例如 'en_us'
- 如果有任何參數,則為
// Assemble the template content
string templateName = "sample_template";
string templateLanguage = "en_us";
var messageTemplate = new MessageTemplate(templateName, templateLanguage);
如需如何組合 MessageTemplate 以及如何建立您自己的範本的更多範例,請參閱下列資源:
如需範本的進一步 WhatsApp 需求,請參閱 WhatsApp Business Platform API 參考:
然後組合傳送範本訊息:
// Assemble template message
var templateContent =
    new TemplateNotificationContent(channelRegistrationId, recipientList, messageTemplate);

// Send template message
Response<SendMessageResult> sendTemplateMessageResult =
    await notificationMessagesClient.SendAsync(templateContent);
現在,用戶必須回應範本訊息。 從 WhatsApp 使用者帳戶,回復從 WhatsApp Business 帳戶收到的範本訊息。 訊息的內容與此案例無關。
重要
收件者必須響應範本訊息,才能起始交談,才能將文字或媒體訊息傳遞至收件者。
(選項 2)從使用者起始交談
在 WhatsApp Business 帳戶與 WhatsApp 用戶之間起始交談的另一個選項是讓使用者起始交談。 若要這樣做,請從您的個人 WhatsApp 帳戶,將訊息傳送至您的商務號碼(寄件者標識符)。

將簡訊傳送至 WhatsApp 使用者
訊息 SDK 可讓 Contoso 傳送文字 WhatsApp 訊息,該訊息會起始 WhatsApp 使用者。 若要傳送以下詳細數據,需要下列文字訊息:
- WhatsApp 通道標識碼
- 收件者 電話 E16 格式的號碼
- 要傳送的郵件內文/文字
重要
若要將簡訊傳送至 WhatsApp 使用者,WhatsApp 用戶必須先將訊息傳送至 WhatsApp Business 帳戶。 如需詳細資訊,請參閱 開始在商務與 WhatsApp 使用者之間傳送訊息。
在此範例中,我們會以「感謝您的意見反應。\n 來自通知傳訊 SDK」的文字回復 WhatsApp 使用者。
然後組合傳送簡訊:
// Assemble text message
var textContent =
    new TextNotificationContent(channelRegistrationId, recipientList, "Thanks for your feedback.\n From Notification Messaging SDK");

// Send text message
Response<SendMessageResult> sendTextMessageResult =
    await notificationMessagesClient.SendAsync(textContent);
將媒體訊息傳送至 WhatsApp 使用者
訊息 SDK 可讓 Contoso 將 Image WhatsApp 訊息傳送給 WhatsApp 使用者。 若要傳送影像內嵌訊息,您需要下列詳細數據:
- WhatsApp 通道標識碼
- 收件者 電話 E16 格式的號碼
- Image 的 MediaUri
重要
若要將簡訊傳送至 WhatsApp 使用者,WhatsApp 用戶必須先將訊息傳送至 WhatsApp Business 帳戶。 如需詳細資訊,請參閱 開始在商務與 WhatsApp 使用者之間傳送訊息。
例如,建立 URI:
var uri = new Uri("https://aka.ms/acsicon1");
然後組合傳送媒體訊息:
// Assemble media message
var mediaContent =
    new MediaNotificationContent(channelRegistrationId, recipientList, uri);

// Send media message
Response<SendMessageResult> sendMediaMessageResult =
    await notificationMessagesClient.SendAsync(mediaContent);
執行程式碼
建立並執行您的程式。
若要將文字或媒體訊息傳送至 WhatsApp 使用者,WhatsApp 商務帳戶與 WhatsApp 使用者之間必須有作用中的交談。
如果您沒有使用中的交談,為了本快速入門的目的,您應該在傳送範本訊息和傳送文字訊息之間新增等候。 這個新增的延遲可讓您有足夠的時間回復使用者的 WhatsApp 帳戶。 如需參考,範例程式代碼中的完整範例會在傳送下一則訊息之前提示手動用戶輸入。
如果成功,您會在使用者的 WhatsApp 帳戶上收到三則訊息。
- 若要編譯程序代碼,請按 Ctrl+F7。
- 若要在不偵錯的情況下執行程式,請按 Ctrl+F5。
完整範例程式碼
using System;
using System.Collections.Generic;
using System.Linq;
using System.Threading.Tasks;
using Azure;
using Azure.Communication.Messages;

namespace AdvancedMessagingQuickstart
{
    class Program
    {
        public static async Task Main(string[] args)
        {
            Console.WriteLine("Azure Communication Services - Send WhatsApp Messages\n");

            string connectionString = Environment.GetEnvironmentVariable("COMMUNICATION_SERVICES_CONNECTION_STRING");
            NotificationMessagesClient notificationMessagesClient =
                new NotificationMessagesClient(connectionString);

            var channelRegistrationId = new Guid("<Your Channel ID>");
            var recipientList = new List<string> { "<Recipient's WhatsApp Phone Number>" };

            // Send sample template sample_template
            string templateName = "sample_template";
            string templateLanguage = "en_us";
            MessageTemplate sampleTemplate = new MessageTemplate(templateName, templateLanguage);
            TemplateNotificationContent templateContent =
                new TemplateNotificationContent(channelRegistrationId, recipientList, sampleTemplate);
            Response<SendMessageResult> sendTemplateMessageResult =
                await notificationMessagesClient.SendAsync(templateContent);

            PrintResult(sendTemplateMessageResult);
            Console.WriteLine("Template message sent.\nWait until the WhatsApp user responds " +
                "to the template message, then press any key to continue.\n");
            Console.ReadKey();

            // Send a text message
            string messageText = "Thanks for your feedback.";
            TextNotificationContent textContent =
                new TextNotificationContent(channelRegistrationId, recipientList, messageText);
            Response<SendMessageResult> sendTextMessageResult =
                await notificationMessagesClient.SendAsync(textContent);

            PrintResult(sendTextMessageResult);
            Console.WriteLine($"Text message sent to my phoneNumber.\nPress any key to continue.\n");
            Console.ReadKey();

            // Send a media message
            Uri uri = new Uri("https://aka.ms/acsicon1");
            MediaNotificationContent mediaContent =
                new MediaNotificationContent(channelRegistrationId, recipientList, uri);
            Response<SendMessageResult> sendMediaMessageResult =
                await notificationMessagesClient.SendAsync(mediaContent);

            PrintResult(sendMediaMessageResult);
            Console.WriteLine("Media message sent.\nPress any key to exit.\n");
            Console.ReadKey();
        }

        public static void PrintResult(Response<SendMessageResult> result)
        {
            Console.WriteLine($"Response: {result.GetRawResponse().Status} " +
                $"({result.GetRawResponse().ReasonPhrase})");
            Console.WriteLine($"Date: " +
                $"{result.GetRawResponse().Headers.First(header => header.Name == "Date").Value}");
            Console.WriteLine($"ClientRequestId: {result.GetRawResponse().ClientRequestId}");
            Console.WriteLine($"MS-CV: " +
                $"{result.GetRawResponse().Headers.First(header => header.Name == "MS-CV").Value}");
            foreach (var receipts in result.Value.Receipts)
            {
                Console.WriteLine($"MessageId: {receipts.MessageId}");
            }
            Console.WriteLine($"\n");
        }
    }
}
必要條件
要接收訊息的作用中 WhatsApp 電話號碼
Java 開發工具套件 (JDK) 第 8 版或更新版本
設定
若要設定用來傳送訊息的環境,請執行下列各節中的步驟。
建立新的 Java 應用程式
開啟終端機或命令視窗,並流覽至您要在其中建立 Java 應用程式的目錄。 執行下列命令,從 maven-archetype-quickstart 範本產生 Java 專案。
mvn archetype:generate -DgroupId="com.communication.quickstart" -DartifactId="communication-quickstart" -DarchetypeArtifactId="maven-archetype-quickstart" -DarchetypeVersion="1.4" -DinteractiveMode="false"
目標 generate 會建立與值同名的 artifactId 目錄。 在此目錄下, src/main/java 目錄包含專案原始碼、 src/test/java 目錄 包含測試來源,而 pom.xml 檔案是專案的 Project 物件模型 (POM)。
Install the package
在文字編輯器中開啟 pom.xml 檔案。 將下列相依性元素加入至相依性群組。
<dependency>
    <groupId>com.azure</groupId>
    <artifactId>azure-communication-messages</artifactId>
    <version>1.0.0</version>
</dependency>
設定應用程式架構
在文本編輯器中開啟 /src/main/java/com/communication/quickstart/App.java 、新增匯入指示詞,以及移除 System.out.println("Hello world!"); 語句:
package com.communication.quickstart;

import com.azure.communication.messages.*;
import com.azure.communication.messages.models.*;

import java.util.ArrayList;
import java.util.List;
public class App
{
    public static void main( String[] args )
    {
        // Quickstart code goes here.
    }
}
物件模型
下列類別和介面會處理適用於 Java 的 Azure 通訊服務 進階傳訊 SDK 的一些主要功能。
| 名稱 | 描述 |
|---|---|
| NotificationMessagesClientBuilder | 這個類別會建立通知訊息用戶端。 您會提供端點和認證。 |
| NotificationMessagesClient | 需要這個類別才能傳送 WhatsApp 訊息並下載媒體檔案。 |
| NotificationMessagesAsyncClient | 需要這個類別才能以異步方式傳送 WhatsApp 訊息和下載媒體檔案。 |
| SendMessageResult | 這個類別包含傳送通知訊息的進階傳訊服務結果。 |
| MessageTemplateClientBuilder | 這個類別會建立訊息範本用戶端。 您會提供端點和認證。 |
| MessageTemplateClient | 需要這個類別,才能取得 WhatsApp 範本的清單。 |
| MessageTemplateAsyncClient | 需要這個類別,才能以異步方式取得 WhatsApp 範本清單。 |
程式碼範例
請遵循下列步驟,將必要的代碼段新增至App.java檔案的主要函式。
驗證用戶端
有一些不同的選項可用來驗證訊息用戶端:
若要驗證用戶端,您可以具現化 NotificationMessagesClient 或 MessageTemplateClient 連接字串。 您也可以使用任何實作 介面的 com.azure.core.http.HttpClient 自訂 HTTP 用戶端來初始化用戶端。
為了簡單起見,本快速入門會使用 連接字串 進行驗證。 在生產環境中,我們建議使用 服務主體。
從 Azure 入口網站中的 Azure 通訊服務 資源取得 連接字串。 在左側,流覽至索引 Keys 標籤。複製 Connection string 的 Primary key欄位。 連接字串 格式endpoint=https://{your Azure Communication Services resource name}.communication.azure.com/;accesskey={secret key}為 。
將環境變數COMMUNICATION_SERVICES_CONNECTION_STRING設定為 連接字串的值。
開啟主控台視窗,然後輸入下列命令:
setx COMMUNICATION_SERVICES_CONNECTION_STRING "<your connection string>"
如需如何為系統設定環境變數的詳細資訊,請遵循將 連接字串 儲存在環境變數中的步驟。
若要具現化 NotificationMessagesClient,請將下列程式代碼新增至 main 方法:
// You can get your connection string from your resource in the Azure portal.
String connectionString = System.getenv("COMMUNICATION_SERVICES_CONNECTION_STRING");

NotificationMessagesClient notificationClient = new NotificationMessagesClientBuilder()
    .connectionString(connectionString)
    .buildClient();
設定通道註冊標識碼
通道註冊標識碼 GUID 是在通道註冊期間建立的。 您可以在入口網站中查閱 Azure 通訊服務 資源的 [通道] 索引標籤。
將它指派給名為 channelRegistrationId 的變數。
String channelRegistrationId = "<your channel registration id GUID>";
設定收件者清單
您必須提供與 WhatsApp 帳戶相關聯的真實電話號碼。 此 WhatsApp 帳戶會接收本快速入門中傳送的文字和媒體訊息。 在本快速入門中,此電話號碼可能是您的個人電話號碼。
收件者電話號碼不能是與 WhatsApp 頻道註冊相關聯的商務電話號碼(發件人標識符)。 寄件者標識碼會顯示為傳送給收件者之文字和媒體訊息的發件者。
電話號碼應包含國家/地區代碼。 如需電話號碼格式的詳細資訊,請參閱 whatsApp 檔中的 電話 號碼格式。
注意
收件者清單中目前僅支援一個電話號碼。
建立如下的收件者清單:
List<String> recipientList = new ArrayList<>();
recipientList.add("<to WhatsApp phone number>");
範例:
// Example only
List<String> recipientList = new ArrayList<>();
recipientList.add("+14255550199");
開始在企業與 WhatsApp 用戶之間傳送訊息
WhatsApp Business 帳戶與 WhatsApp 使用者之間的交談可以透過下列兩種方式之一起始:
- 商務會將範本訊息傳送給 WhatsApp 使用者。
- WhatsApp 使用者會將任何訊息傳送至商務號碼。
不論交談的啟動方式為何, 企業只能傳送範本訊息,直到使用者傳送訊息給企業為止。 只有在使用者傳送訊息給企業之後,企業才能在作用中交談期間將文字或媒體訊息傳送給使用者。 一旦 24 小時交談視窗到期,就必須重新初始化交談。 若要深入了解對話,請參閱 WhatsApp Business Platform 的定義。
(選項 1)從企業起始交談 - 傳送範本訊息
藉由傳送範本訊息來起始交談。
首先,使用範本的值建立 MessageTemplate。
以下是使用預設範本 sample_template建立 MessageTemplate。
如果 sample_template 無法使用,請跳至 選項 2。 如需進階使用者,請參閱範本頁面,以瞭解如何使用選項 1 傳送不同的範本。
訊息 SDK 可讓 Contoso 將樣板化 WhatsApp 訊息傳送給 WhatsApp 使用者。 若要傳送以下範本訊息,需要詳細數據:
- WhatsApp 通道標識碼
- 收件者 電話 E16 格式的號碼
- 範本詳細數據
- 名稱,例如 'sample_template'
- 語言,例如 'en_us'
- 如果有任何參數,則為
// Assemble the template content
String templateName = "sample_template";
String templateLanguage = "en_us";
MessageTemplate messageTemplate = new MessageTemplate(templateName, templateLanguage);

// Assemble template message
TemplateNotificationContent templateContent = new TemplateNotificationContent(channelRegistrationId, recipientList, messageTemplate);

// Send template message
SendMessageResult templateMessageResult = notificationClient.send(templateContent);

// Process result
for (MessageReceipt messageReceipt : templateMessageResult.getReceipts()) {
    System.out.println("Message sent to:" + messageReceipt.getTo() + " and message id:" + messageReceipt.getMessageId());
}
現在,用戶必須回應範本訊息。 從 WhatsApp 使用者帳戶,回復從 WhatsApp Business 帳戶收到的範本訊息。 訊息的內容與此案例無關。
重要
收件者必須響應範本訊息,才能起始交談,才能將文字或媒體訊息傳遞至收件者。
(選項 2)從使用者起始交談
在 WhatsApp Business 帳戶與 WhatsApp 用戶之間起始交談的另一個選項是讓使用者起始交談。 若要這樣做,請從您的個人 WhatsApp 帳戶,將訊息傳送至您的商務號碼(寄件者標識符)。
將簡訊傳送至 WhatsApp 使用者
訊息 SDK 可讓 Contoso 傳送文字 WhatsApp 訊息,該訊息會起始 WhatsApp 使用者。 若要傳送以下詳細數據,需要下列文字訊息:
- WhatsApp 通道標識碼
- 收件者 電話 E16 格式的號碼
- 要傳送的郵件內文/文字
重要
若要將簡訊傳送至 WhatsApp 使用者,WhatsApp 用戶必須先將訊息傳送至 WhatsApp Business 帳戶。 如需詳細資訊,請參閱 開始在商務與 WhatsApp 使用者之間傳送訊息。
在此範例中,我們會以「感謝您的意見反應。\n 來自通知傳訊 SDK」的文字回復 WhatsApp 使用者。
然後組合傳送簡訊:
// Assemble text message
TextNotificationContent textContent = new TextNotificationContent(channelRegistrationId, recipientList, "“Thanks for your feedback.\n From Notification Messaging SDK");

// Send text message
SendMessageResult textMessageResult = notificationClient.send(textContent);

// Process result
for (MessageReceipt messageReceipt : textMessageResult.getReceipts()) {
    System.out.println("Message sent to:" + messageReceipt.getTo() + " and message id:" + messageReceipt.getMessageId());
}
將媒體訊息傳送至 WhatsApp 使用者
訊息 SDK 可讓 Contoso 將 Image WhatsApp 訊息傳送給 WhatsApp 使用者。 若要傳送影像內嵌訊息,您需要下列詳細數據:
- WhatsApp 通道標識碼
- 收件者 電話 E16 格式的數位
- Image 的 MediaUri
重要
若要將簡訊傳送至 WhatsApp 使用者,WhatsApp 用戶必須先將訊息傳送至 WhatsApp Business 帳戶。 如需詳細資訊,請參閱 開始在商務與 WhatsApp 使用者之間傳送訊息。
例如,建立 URI:
String mediaUrl = "https://aka.ms/acsicon1";
然後組合傳送媒體訊息:
// Assemble media message
MediaNotificationContent mediaContent = new MediaNotificationContent(channelRegistrationId, recipientList, mediaUrl);

// Send media message
SendMessageResult mediaMessageResult = notificationClient.send(mediaContent);

// Process result
for (MessageReceipt messageReceipt : mediaMessageResult.getReceipts()) {
    System.out.println("Message sent to:" + messageReceipt.getTo() + " and message id:" + messageReceipt.getMessageId());
}
執行程式碼
流覽至包含pom.xml檔案的目錄,並使用
mvn命令編譯專案。mvn compile執行下列
mvn命令以執行應用程式。mvn exec:java -D"exec.mainClass"="com.communication.quickstart.App" -D"exec.cleanupDaemonThreads"="false"
完整範例程式碼
在 GitHub 上尋找本快速入門的完成程式代碼。
必要條件
要接收訊息的作用中 WhatsApp 電話號碼
Node.js建議使用中 LTS 和維護 LTS 版本(建議使用 8.11.1 和 10.14.1)
- 在終端機或命令視窗中,執行
node --version以檢查是否已安裝Node.js
- 在終端機或命令視窗中,執行
設定
若要設定用來傳送訊息的環境,請執行下列各節中的步驟。
建立新的 Node.js 應用程式
為您的應用程式建立新的目錄,然後開啟終端機或命令視窗來流覽至它,然後執行下列命令。
mkdir advance-messages-quickstart && cd advance-messages-quickstart執行下列命令,以使用預設設定建立 package.json 檔案。
npm init -y使用文字編輯器在專案根目錄中建立名為 send-messages.js 的檔案。
將下列代碼段新增至檔案 send-messages.js。
async function main() {
    // Quickstart code goes here.
}

main().catch((error) => {
    console.error("Encountered an error while sending message: ", error);
    process.exit(1);
});
在下列各節中,您已將本快速入門的所有原始程式碼新增至 您所建立send-messages.js 檔案。
Install the package
npm install使用 命令來安裝適用於 JavaScript 的 Azure 通訊服務 進階傳訊 SDK。
npm install @azure-rest/communication-messages --save
選項--save會將連結庫列為package.json檔案中的相依性。
物件模型
下列類別和介面會處理適用於 JavaScript 的 Azure 通訊服務 進階傳訊 SDK 的一些主要功能。
| 名稱 | 描述 |
|---|---|
| MessageClient | 此類別會連線到您的 Azure 通訊服務 資源。 它會傳送訊息。 |
| MessageTemplate | 此類別會定義您使用的範本,以及訊息範本屬性的內容。 |
程式碼範例
請遵循下列步驟,將必要的代碼段新增至send-messages.js檔案的主要 函式 。
驗證用戶端
下列程式代碼會使用 dotenv 套件,從名為 COMMUNICATION_SERVICES_CONNECTION_STRING 的環境變數擷取資源的 連接字串。
為了簡單起見,本快速入門會使用 連接字串 進行驗證。 在生產環境中,我們建議使用 服務主體。
從 Azure 入口網站中的 Azure 通訊服務 資源取得 連接字串。 在左側,流覽至索引 Keys 標籤。複製 Connection string 的 Primary key欄位。 連接字串 格式endpoint=https://{your Azure Communication Services resource name}.communication.azure.com/;accesskey={secret key}為 。
將環境變數COMMUNICATION_SERVICES_CONNECTION_STRING設定為 連接字串的值。
開啟主控台視窗,然後輸入下列命令:
setx COMMUNICATION_SERVICES_CONNECTION_STRING "<your connection string>"
如需如何為您的系統設定環境變數的詳細資訊,請遵循將 連接字串 儲存在環境變數中的步驟。
若要具現化 MessageClient,請將下列程式代碼新增至 Main 方法:
const MessageClient = require("@azure-rest/communication-messages").default;

// Set Connection string
const connectionString = process.env["COMMUNICATION_SERVICES_CONNECTION_STRING"];

// Instantiate the client
const client = MessageClient(connectionString);
設定通道註冊標識碼
通道註冊標識碼 GUID 是在通道註冊期間建立的。 您可以在入口網站中查閱 Azure 通訊服務 資源的 [通道] 索引標籤。
將它指派給名為 channelRegistrationId 的變數。
const channelRegistrationId = "<your channel registration id GUID>";
設定收件者清單
您必須提供與 WhatsApp 帳戶相關聯的真實電話號碼。 此 WhatsApp 帳戶會接收本快速入門中傳送的範本、文字和媒體訊息。 在本快速入門中,此電話號碼可能是您的個人電話號碼。
收件者電話號碼不能是與 WhatsApp 頻道註冊相關聯的商務電話號碼(發件人標識符)。 寄件者標識碼會顯示為傳送給收件者之文字和媒體訊息的發件者。
電話號碼應包含國家/地區代碼。 如需電話號碼格式的詳細資訊,請參閱 WhatsApp 檔中的 電話 數位格式。
注意
收件者清單中目前僅支援一個電話號碼。
建立如下的收件者清單:
const recipientList = ["<to WhatsApp phone number>"];
範例:
// Example only
const recipientList = ["+14255550199"];
開始在企業與 WhatsApp 用戶之間傳送訊息
WhatsApp Business 帳戶與 WhatsApp 使用者之間的交談可以透過下列兩種方式之一起始:
- 商務會將範本訊息傳送給 WhatsApp 使用者。
- WhatsApp 使用者會將任何訊息傳送至商務號碼。
不論交談的啟動方式為何, 企業只能傳送範本訊息,直到使用者傳送訊息給企業為止。 只有在使用者傳送訊息給企業之後,企業才能在作用中交談期間將文字或媒體訊息傳送給使用者。 一旦 24 小時交談視窗到期,就必須重新初始化交談。 若要深入了解對話,請參閱 WhatsApp Business Platform 的定義。
(選項 1)從企業起始交談 - 傳送範本訊息
藉由傳送範本訊息來起始交談。
首先,使用範本的值建立 MessageTemplate。
以下是使用預設範本 sample_template建立 MessageTemplate。
如果 sample_template 無法使用,請跳至 選項 2。 如需進階使用者,請參閱範本頁面,以瞭解如何使用選項 1 傳送不同的範本。
訊息 SDK 可讓 Contoso 將樣板化 WhatsApp 訊息傳送給 WhatsApp 使用者。 若要傳送以下範本訊息,需要詳細數據:
- WhatsApp 通道標識碼
- 收件者 電話 E16 格式的數位
- 範本詳細數據
- 名稱,例如 'sample_template'
- 語言,例如 'en_us'
- 如果有任何參數,則為
// Assemble the template content
const template = {
    name: "sample_template",
    language: "en_US"
};
如需如何組合 MessageTemplate 以及如何建立您自己的範本的更多範例,請參閱下列資源:
如需範本的進一步 WhatsApp 需求,請參閱 WhatsApp Business Platform API 參考:
// Send template message
const templateMessageResult = await client.path("/messages/notifications:send").post({
    contentType: "application/json",
    body: {
        channelRegistrationId: channelRegistrationId,
        to: recipientList,
        kind: "template",
        template: template
    }
});

// Process result
if (templateMessageResult.status === "202") {
    templateMessageResult.body.receipts.forEach((receipt) => {
        console.log("Message sent to:"+receipt.to+" with message id:"+receipt.messageId);
    });
} else {
    throw new Error("Failed to send message");
}
現在,用戶必須回應範本訊息。 從 WhatsApp 使用者帳戶,回復從 WhatsApp Business 帳戶收到的範本訊息。 訊息的內容與此案例無關。
重要
收件者必須響應範本訊息,才能起始交談,才能將文字或媒體訊息傳遞至收件者。
(選項 2)從使用者起始交談
在 WhatsApp Business 帳戶與 WhatsApp 用戶之間起始交談的另一個選項是讓使用者起始交談。 若要這樣做,請從您的個人 WhatsApp 帳戶,將訊息傳送至您的商務號碼(寄件者標識符)。
將簡訊傳送至 WhatsApp 使用者
訊息 SDK 可讓 Contoso 傳送文字 WhatsApp 訊息,該訊息會起始 WhatsApp 使用者。 若要傳送以下詳細數據,需要下列文字訊息:
- WhatsApp 通道標識碼
- 收件者 電話 E16 格式的數位
- 要傳送的郵件內文/文字
重要
若要將簡訊傳送至 WhatsApp 使用者,WhatsApp 用戶必須先將訊息傳送至 WhatsApp Business 帳戶。 如需詳細資訊,請參閱 開始在商務與 WhatsApp 使用者之間傳送訊息。
在此範例中,我們會以「感謝您的意見反應。\n 來自通知傳訊 SDK」的文字回復 WhatsApp 使用者。
組合並傳送媒體訊息:
// Send text message
const textMessageResult = await client.path("/messages/notifications:send").post({
    contentType: "application/json",
    body: {
        channelRegistrationId: channelRegistrationId,
        to: recipientList,
        kind: "text",
        content: "Thanks for your feedback.\n From Notification Messaging SDK"
    }
});

// Process result
if (textMessageResult.status === "202") {
    textMessageResult.body.receipts.forEach((receipt) => {
        console.log("Message sent to:"+receipt.to+" with message id:"+receipt.messageId);
    });
} else {
    throw new Error("Failed to send message");
}
將媒體訊息傳送至 WhatsApp 使用者
訊息 SDK 可讓 Contoso 將 Image WhatsApp 訊息傳送給 WhatsApp 使用者。 若要傳送影像內嵌訊息,您需要下列詳細數據:
- WhatsApp 通道標識碼
- E16 格式的收件者 電話 號碼
- Image 的 MediaUri
重要
若要將簡訊傳送至 WhatsApp 使用者,WhatsApp 用戶必須先將訊息傳送至 WhatsApp Business 帳戶。 如需詳細資訊,請參閱 開始在商務與 WhatsApp 使用者之間傳送訊息。
若要傳送媒體訊息,請提供影像的URL。 例如,
const url = "https://aka.ms/acsicon1";
組合並傳送媒體訊息:
// Send media message
const mediaMessageResult = await client.path("/messages/notifications:send").post({
    contentType: "application/json",
    body: {
        channelRegistrationId: channelRegistrationId,
        to: recipientList,
        kind: "image",
        mediaUri: url
    }
});

// Process result
if (mediaMessageResult.status === "202") {
    mediaMessageResult.body.receipts.forEach((receipt) => {
        console.log("Message sent to:"+receipt.to+" with message id:"+receipt.messageId);
    });
} else {
    throw new Error("Failed to send message");
}
執行程式碼
使用 node 命令來執行您新增至send-messages.js檔案的程式代碼。
node ./send-messages.js
完整範例程式碼
您可以從 GitHub 下載範例應用程式。
必要條件
使用中的 WhatsApp 電話號碼來接收訊息。
適用於您作業系統的 Python 3.7+ 。
設定
建立新的 Python 應用程式
在終端機或主控台視窗中,為您的應用程式建立新資料夾並流覽至該資料夾。
mkdir messages-quickstart && cd messages-quickstart
Install the package
您必須使用適用於 Python 1.0.0 版或更新版本的 Azure 通訊訊息用戶端連結庫。
從主控台提示字元中,執行下列命令:
pip install azure-communication-messages
設定應用程式架構
建立名為 messages-quickstart.py 的新檔案,並新增基本程序結構。
type nul > messages-quickstart.py
基本程序結構
import os

class MessagesQuickstart(object):
    print("Azure Communication Services - Advanced Messages SDK Quickstart")

if __name__ == '__main__':
    messages = MessagesQuickstart()
物件模型
下列類別和介面會處理適用於 Python Azure 通訊服務 Messages SDK 的一些主要功能。
| 名稱 | 描述 |
|---|---|
| NotificationMessagesClient | 此類別會連線到您的 Azure 通訊服務 資源。 它會傳送訊息。 |
| MessageTemplate | 此類別會定義您使用的範本,以及訊息範本屬性的內容。 |
| TemplateNotificationContent | 此類別會定義您要傳送之範本訊息的「who」 和 「what」。 |
| TextNotificationContent | 這個類別會定義您要傳送之簡訊的「誰」和「內容」。 |
| ImageNotificationContent | 這個類別會定義您想要傳送之影像媒體訊息的「誰」和「內容」。 |
程式碼範例
請遵循下列步驟,將必要的代碼段新增至 messages-quickstart.py python 程式。
驗證用戶端
傳送的訊息是使用 NotificationMessagesClient 完成。 NotificationMessagesClient 是使用從 Azure 入口網站 中 Azure 通訊服務 資源取得的 連接字串 進行驗證。 如需 連接字串 的詳細資訊,請參閱 access-your-connection-strings-and-service-endpoints。
如螢幕快照所示,從 Azure 入口網站 取得 Azure 通訊資源 連接字串。在左側,流覽至索引Keys標籤。複製Connection string主鍵的欄位。 連接字串 格式endpoint=https://{your Azure Communication Services resource name}.communication.azure.com/;accesskey={secret key}為 。
![顯示 Azure 入口網站 中 Azure 通訊服務 資源的螢幕快照,檢視 [金鑰] 區段中的 [主鍵] 字段。](media/get-started/get-communication-resource-connection-string.png)
將環境變數COMMUNICATION_SERVICES_CONNECTION_STRING設定為 連接字串的值。
開啟主控台視窗,然後輸入下列命令:
setx COMMUNICATION_SERVICES_CONNECTION_STRING "<your connection string>"
新增環境變數之後,您可能需要重新啟動任何需要讀取環境變數的執行中程式,包括主控台視窗。 例如,如果您使用 Visual Studio 作為編輯器,請在執行範例前重新啟動 Visual Studio。
如需如何為您的系統設定環境變數的詳細資訊,請遵循將 連接字串 儲存在環境變數中的步驟。
    # Get a connection string to our Azure Communication Services resource.
    connection_string = os.getenv("COMMUNICATION_SERVICES_CONNECTION_STRING")

    def send_template_message(self):
        from azure.communication.messages import NotificationMessagesClient

        # Create NotificationMessagesClient Client
        messaging_client = NotificationMessagesClient.from_connection_string(self.connection_string)
設定通道註冊標識碼
通道註冊標識碼 GUID 是在通道註冊期間建立的。 您可以在入口網站中查閱 Azure 通訊服務 資源的 [通道] 索引標籤。
將它指派給名為 channelRegistrationId 的變數。
channelRegistrationId = os.getenv("WHATSAPP_CHANNEL_ID_GUID")
設定收件者清單
您必須提供與 WhatsApp 帳戶相關聯的真實電話號碼。 此 WhatsApp 帳戶會接收本快速入門中傳送的範本、文字和媒體訊息。 在本快速入門中,此電話號碼可能是您的個人電話號碼。
收件者電話號碼不能是與 WhatsApp 頻道註冊相關聯的商務電話號碼(發件人標識符)。 寄件者標識碼會顯示為傳送給收件者之文字和媒體訊息的發件者。
電話號碼應包含國家/地區代碼。 如需電話號碼格式的詳細資訊,請參閱 whatsApp 檔中的 電話 數位格式。
注意
收件者清單中目前僅支援一個電話號碼。
如下所示設定收件者清單:
phone_number = os.getenv("RECIPIENT_WHATSAPP_PHONE_NUMBER")
使用範例:
    # Example only
    to=[self.phone_number],
開始在企業與 WhatsApp 用戶之間傳送訊息
WhatsApp Business 帳戶與 WhatsApp 使用者之間的交談可以透過下列兩種方式之一起始:
- 商務會將範本訊息傳送給 WhatsApp 使用者。
- WhatsApp 使用者會將任何訊息傳送至商務號碼。
不論交談的啟動方式為何, 企業只能傳送範本訊息,直到使用者傳送訊息給企業為止。 只有在使用者傳送訊息給企業之後,企業才能在作用中交談期間將文字或媒體訊息傳送給使用者。 一旦 24 小時交談視窗到期,就必須重新初始化交談。 若要深入了解對話,請參閱 WhatsApp Business Platform 的定義。
(選項 1)從企業起始交談 - 傳送範本訊息
藉由傳送範本訊息來起始交談。
首先,使用範本的值建立 MessageTemplate。
以下是使用預設範本 sample_template建立 MessageTemplate。
如果 sample_template 無法使用,請跳至 選項 2。 如需進階使用者,請參閱範本頁面,以瞭解如何使用選項 1 傳送不同的範本。
訊息 SDK 可讓 Contoso 將樣板化 WhatsApp 訊息傳送給 WhatsApp 使用者。 若要傳送以下範本訊息,需要詳細數據:
- WhatsApp 通道標識碼
- E16 格式的收件者 電話 號碼
- 範本詳細數據
- 名稱,例如 'sample_template'
- 語言,例如 'en_us'
- 如果有任何參數,則為
如需如何組合 MessageTemplate 以及如何建立您自己的範本的更多範例,請參閱下列資源:
如需範本的進一步 WhatsApp 需求,請參閱 WhatsApp Business Platform API 參考:
若要傳送 WhatsApp 範本訊息,請在 send_template_message(self) 函式中新增下列程式代碼。
        input_template: MessageTemplate = MessageTemplate(
            name="<<template_name>>",
            language="<<template_language>>")
        template_options = TemplateNotificationContent(
            channel_registration_id=self.channelRegistrationId,
            to=[self.phone_number],
            template=input_template
        )

        # calling send() with whatsapp template details
        message_responses = messaging_client.send(template_options)
        response = message_responses.receipts[0]

        if (response is not None):
            print("WhatsApp Templated Message with message id {} was successfully sent to {}."
            .format(response.message_id, response.to))
        else:
            print("Message failed to send")
將 send_template_message() 呼叫新增至 main 方法。
    # Calling send_template_message()
    messages.send_template_message()
現在,用戶必須回應範本訊息。 從 WhatsApp 使用者帳戶,回復從 WhatsApp Business 帳戶收到的範本訊息。 訊息的內容與此案例無關。
重要
收件者必須響應範本訊息,才能起始交談,才能將文字或媒體訊息傳遞至收件者。
(選項 2)從使用者起始交談
在 WhatsApp Business 帳戶與 WhatsApp 用戶之間起始交談的另一個選項是讓使用者起始交談。 若要這樣做,請從您的個人 WhatsApp 帳戶,將訊息傳送至您的商務號碼(寄件者標識符)。
將簡訊傳送至 WhatsApp 使用者
訊息 SDK 可讓 Contoso 傳送文字 WhatsApp 訊息,該訊息會起始 WhatsApp 使用者。 若要傳送以下詳細數據,需要下列文字訊息:
- WhatsApp 通道標識碼
- 收件者 電話 E16 格式的數位
- 要傳送的郵件內文/文字
重要
若要將簡訊傳送至 WhatsApp 使用者,WhatsApp 用戶必須先將訊息傳送至 WhatsApp Business 帳戶。 如需詳細資訊,請參閱 開始在商務與 WhatsApp 使用者之間傳送訊息。
在此範例中,我們會以「感謝您的意見反應。\n 來自通知傳訊 SDK」的文字回復 WhatsApp 使用者。
    def send_text_message(self):
        from azure.communication.messages import NotificationMessagesClient
        from azure.communication.messages.models import ( TextNotificationContent)

        # Create NotificationMessagesClient Client
        messaging_client = NotificationMessagesClient.from_connection_string(self.connection_string)
        text_options = TextNotificationContent (
            channel_registration_id=self.channelRegistrationId,
            to= [self.phone_number],
            content="Thanks for your feedback.\n From Notification Messaging SDK",
        )

        # calling send() with whatsapp message details
        message_responses = messaging_client.send(text_options)
        response = message_responses.receipts[0]

        if (response is not None):
            print("WhatsApp Text Message with message id {} was successfully sent to {}."
            .format(response.message_id, response.to))
        else:
            print("Message failed to send")
更新 main 方法以執行send_text_message()
    #Calling send_text_message()
    messages.send_text_message()
將媒體訊息傳送至 WhatsApp 使用者
訊息 SDK 可讓 Contoso 將 Image WhatsApp 訊息傳送給 WhatsApp 使用者。 若要傳送影像內嵌訊息,您需要下列詳細數據:
- WhatsApp 通道標識碼
- E16 格式的收件者 電話 號碼
- Image 的 MediaUri
重要
若要將簡訊傳送至 WhatsApp 使用者,WhatsApp 用戶必須先將訊息傳送至 WhatsApp Business 帳戶。 如需詳細資訊,請參閱 開始在商務與 WhatsApp 使用者之間傳送訊息。
傳送媒體 WhatsApp 訊息時所使用的media_uri範例。
input_media_uri: str = “https://aka.ms/acsicon1"
    def send_image_message(self):
        from azure.communication.messages import NotificationMessagesClient
        from azure.communication.messages.models import ( ImageNotificationContent)

        # Create NotificationMessagesClient Client
        messaging_client = NotificationMessagesClient.from_connection_string(self.connection_string)
        input_media_uri: str = "https://aka.ms/acsicon1"
        image_message_options = ImageNotificationContent(
            channel_registration_id=self.channelRegistrationId,
            to=[self.phone_number],
            media_uri=input_media_uri
        )

        # calling send() with whatsapp image message
        message_responses = messaging_client.send(image_message_options)
        response = message_responses.receipts[0]

        if (response is not None):
            print("WhatsApp Image containing Message with message id {} was successfully sent to {}"
            .format(response.message_id, response.to))
        else:
            print("Message failed to send")
更新 main 方法以執行 send_image_message()
    # Calling send_image_message()
    messages.send_image_message()
執行程式碼
若要執行程式代碼,請確定您位於檔案 messages-quickstart.py 所在的目錄。
python messages-quickstart.py
Azure Communication Services - Advanced Messages Quickstart
WhatsApp Templated Message with message id <<GUID>> was successfully sent to <<ToRecipient>>
WhatsApp Text Message with message id <<GUID>> was successfully sent to <<ToRecipient>>
WhatsApp Image containing Message with message id <<GUID>> was successfully sent to <<ToRecipient>>
完整範例程式碼
import os

class MessagesQuickstart(object):
    print("Azure Communication Services - Advanced Messages SDK Quickstart using connection string.")
    # Advanced Messages SDK implementations goes in this section.

    connection_string = os.getenv("COMMUNICATION_SERVICES_CONNECTION_STRING")
    phone_number = os.getenv("RECIPIENT_PHONE_NUMBER")
    channelRegistrationId = os.getenv("WHATSAPP_CHANNEL_ID")

    def send_template_message(self):
        from azure.communication.messages import NotificationMessagesClient
        from azure.communication.messages.models import ( TemplateNotificationContent , MessageTemplate )

        # client creation
        messaging_client = NotificationMessagesClient.from_connection_string(self.connection_string)
        input_template: MessageTemplate = MessageTemplate(
            name="<<TEMPLATE_NAME>>",
            language="<<LANGUAGE>>")
        template_options = TemplateNotificationContent(
            channel_registration_id=self.channelRegistrationId,
            to=[self.phone_number],
            template=input_template
        )

        # calling send() with WhatsApp template details.
        message_responses = messaging_client.send(template_options)
        response = message_responses.receipts[0]

        if (response is not None):
            print("WhatsApp Templated Message with message id {} was successfully sent to {}"
            .format(response.message_id, response.to))
        else:
            print("Message failed to send")

    def send_text_message(self):
        from azure.communication.messages import NotificationMessagesClient
        from azure.communication.messages.models import ( TextNotificationContent )

        # client creation
        messaging_client = NotificationMessagesClient.from_connection_string(self.connection_string)

        text_options = TextNotificationContent (
            channel_registration_id=self.channelRegistrationId,
            to= [self.phone_number],
            content="Hello World via ACS Advanced Messaging SDK.",
        )

        # calling send() with WhatsApp message details
        message_responses = messaging_client.send(text_options)
        response = message_responses.receipts[0]

        if (response is not None):
            print("WhatsApp Text Message with message id {} was successfully sent to {}"
            .format(response.message_id, response.to))
        else:
            print("Message failed to send")

    def send_image_message(self):
        from azure.communication.messages import NotificationMessagesClient
        from azure.communication.messages.models import ( ImageNotificationContent)

        # Create NotificationMessagesClient Client
        messaging_client = NotificationMessagesClient.from_connection_string(self.connection_string)
        input_media_uri: str = "https://aka.ms/acsicon1"
        image_message_options = ImageNotificationContent(
            channel_registration_id=self.channelRegistrationId,
            to=[self.phone_number],
            media_uri=input_media_uri
        )

        # calling send() with whatsapp image message
        message_responses = messaging_client.send(image_message_options)
        response = message_responses.receipts[0]

        if (response is not None):
            print("WhatsApp Image containing Message with message id {} was successfully sent to {}"
            .format(response.message_id, response.to))
        else:
            print("Message failed to send")

if __name__ == '__main__':
    messages = MessagesQuickstart()
    messages.send_template_message()
    messages.send_text_message()
    messages.send_image_message()
其他範例
您可以在 GitHub 上檢閱及下載 Python 訊息 SDK 的其他範例程式代碼。
下一步
在本快速入門中,您已試用 WhatsApp SDK 的進階傳訊。 接下來,您可能也想要看到下列文章: