在本教學課程中,您會使用 HTTP 設定並使用 Postman 對 Azure 通訊服務提出要求。 在本教學課程結束時,您會使用通訊服務和 Postman 成功傳送簡訊服務 (SMS) 訊息。 然後,您可以使用 Postman 來探索通訊服務中的其他 API。
在本教學課程中,您將瞭解如何:
- 下載 Postman。
- 設定 Postman 以簽署 HTTP 要求。
- 對通訊服務 SMS API 提出要求,以傳送訊息。
Prerequisites
- 具有有效訂用帳戶的 Azure 帳戶。 如果您沒有 Azure 訂用帳戶,您可以 免費建立帳戶。 免費帳戶提供您價值 200 USD 的 Azure 點數,讓您可以試用各種服務組合。
- 作用中的 Azure 通訊服務資源和連接字串。 如果您沒有資源,請參閱 建立通訊服務資源。
- 可傳送簡訊的通訊服務電話號碼。 若要取得電話號碼,請參閱 取得電話號碼。
下載並安裝Postman
Postman 是一種桌面應用程式,能夠針對任何 HTTP API 提出 API 要求。 Postman 通常用於測試和探索 API。 在本教學課程中,您會 從 Postman 網站下載最新的桌面版本。 Postman 有適用於 Windows、Mac 和 Linux 的版本,因此請下載適合您作系統的版本。
下載完成之後,請開啟應用程式。 開始畫面會要求您登入或建立Postman帳戶。 建立帳戶是可選項,您可以按一下 跳過並進入應用程式。 建立帳戶會將 API 要求設定儲存至 Postman。 然後,您可以在其他電腦上接收您的請求。

建立帳戶或略過步驟之後,您現在會看到 Postman 的主畫面。
建立及設定 Postman 集合
Postman 可以以多種方式組織請求。 在本教學課程中,您會建立 Postman 集合。 若要執行此工作,請在應用程式左側選取 [集合]。
![顯示 Postman 主畫面的螢幕快照,其中已醒目提示 [集合] 索引標籤。](media/postman/collections-tab.png)
選取 建立新的集合 以開始建立集合的流程。 新的索引標籤會在 Postman 的中心區域中開啟,您可以在其中命名集合。 在這裡,集合名為 Azure 通訊服務。

建立並命名集合之後,即可進行設定。
新增集合變數
若要處理驗證並讓要求更容易,您可以在新建立的通訊服務集合中指定兩個集合變數。 這些變數可供集合中的所有要求使用。 若要開始建立變數,請選取 變數 索引標籤。
![顯示 Postman 與 [通訊服務變數] 索引標籤的螢幕快照。](media/postman/variable-stab.png)
在 [集合 ] 索引標籤上,建立兩個變數:
-
key:此變數應該是 Azure 入口網站中 [通訊服務 金鑰 ] 頁面中的其中一個金鑰。 例如
oW...A==。 -
端點:此變數應該是 [ 金鑰 ] 頁面中的通訊服務端點。 請確保您移除末端斜線。 例如
https://contoso.communication.azure.com。
在 變數 索引標籤上,在 起始值 直欄中輸入這些值。 選取右上角的 [全部保存]。 正確設定時,Postman 窗格看起來應該類似下圖。

若要深入瞭解變數,請參閱 Postman 檔。
建立預先要求腳本
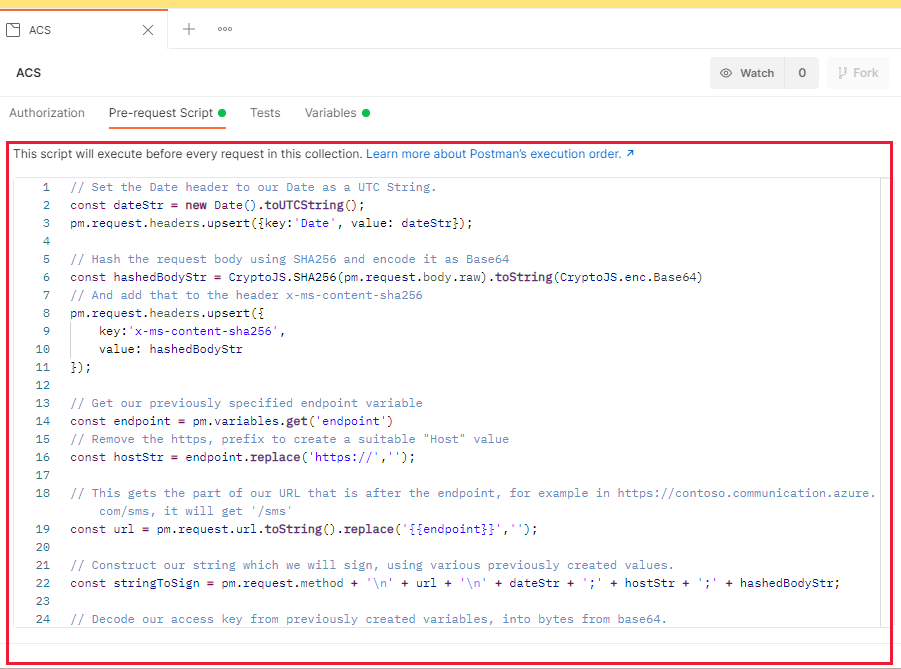
下一個步驟是在Postman中建立預先要求腳本。 預先請求腳本會在Postman中的每個請求之前執行。 它可以為您修改或變更要求參數。 您可以使用此腳本簽署 HTTP 要求,讓通訊服務可以授權這些要求。 如需簽署需求的詳細資訊,請參閱 我們的驗證指南。
您可以在集合中建立此腳本,使其在集合中的任何要求上執行。 若要執行此步驟,請在 [ 集合 ] 索引標籤上,選取 [ 預先要求指令碼]。

現在,您可以在文字區域中輸入來建立預先要求指令碼。 在將此步驟貼入之前,如果您使用像 Visual Studio Code 這樣的完整代碼編輯器撰寫,可能會更容易。 本教學課程會逐步引導您完成腳本程式的每個部分。 如果您想要將腳本複製到Postman並開始使用,請跳到結尾。 讓我們開始撰寫指令碼。
撰寫前置要求腳本
第一個步驟是建立國際標準時間 (UTC) 字串,並將其新增至 Date HTTP 標頭。 將這個字串儲存在變數中,以供稍後簽署時使用。
// Set the Date header to our Date as a UTC String.
const dateStr = new Date().toUTCString();
pm.request.headers.upsert({key:'Date', value: dateStr});
接下來,使用 SHA 256 哈希請求正文,並將它放在x-ms-content-sha256標頭中。 Postman 包含一些用於全域雜湊和簽署的 標準函式庫 ,因此您不需要安裝或要求它們。
// Hash the request body by using SHA256 and encode it as Base64
const hashedBodyStr = CryptoJS.SHA256(pm.request.body.raw).toString(CryptoJS.enc.Base64)
// And add that to the header x-ms-content-sha256
pm.request.headers.upsert({
    key:'x-ms-content-sha256',
    value: hashedBodyStr
});
使用您先前指定的端點變數來辨別 HTTP 主機標頭的值。 我們不會在處理這個腳本之前設置 Host 標頭。處理完此腳本後,才會設置 Host 標頭。
// Get our previously specified endpoint variable.
const endpoint = pm.variables.get('endpoint')
// Remove the https prefix to create a suitable "Host" value.
const hostStr = endpoint.replace('https://','');
使用這項資訊,您現在可以建立字串,以簽署 HTTP 要求。 字串是由先前建立的數個值所組成。
// This gets the part of our URL that is after the endpoint, for example, in https://contoso.communication.azure.com/sms, it will get '/sms'.
const url = pm.request.url.toString().replace('{{endpoint}}','');

// Construct our string, which we'll sign, by using various previously created values.
const stringToSign = pm.request.method + '\n' + url + '\n' + dateStr + ';' + hostStr + ';' + hashedBodyStr;
最後,您會使用通訊服務金鑰簽署此字串。 然後將該金鑰新增至您要求的標頭中的 Authorization。
// Decode our access key from previously created variables into bytes from Base64.
const key = CryptoJS.enc.Base64.parse(pm.variables.get('key'));
// Sign our previously calculated string with HMAC 256 and our key. Convert it to Base64.
const signature = CryptoJS.HmacSHA256(stringToSign, key).toString(CryptoJS.enc.Base64);

// Add our final signature in Base64 to the authorization header of the request.
pm.request.headers.upsert({
    key:'Authorization',
    value: "HMAC-SHA256 SignedHeaders=date;host;x-ms-content-sha256&Signature=" + signature
});
最終預請求腳本
最終預先要求腳本看起來應該像下列範例:
// Set the Date header to our Date as a UTC String.
const dateStr = new Date().toUTCString();
pm.request.headers.upsert({key:'Date', value: dateStr});

// Hash the request body by using SHA256 and encode it as Base64.
const hashedBodyStr = CryptoJS.SHA256(pm.request.body.raw).toString(CryptoJS.enc.Base64)
// And add that to the header x-ms-content-sha256.
pm.request.headers.upsert({
    key:'x-ms-content-sha256',
    value: hashedBodyStr
});

// Get our previously specified endpoint variable.
const endpoint = pm.variables.get('endpoint')
// Remove the https prefix to create a suitable "Host" value.
const hostStr = endpoint.replace('https://','');

// This gets the part of our URL that is after the endpoint, for example, in https://contoso.communication.azure.com/sms, it will get '/sms'.
const url = pm.request.url.toString().replace('{{endpoint}}','');

// Construct our string, which we'll sign, by using various previously created values.
const stringToSign = pm.request.method + '\n' + url + '\n' + dateStr + ';' + hostStr + ';' + hashedBodyStr;

// Decode our access key from previously created variables into bytes from Base64.
const key = CryptoJS.enc.Base64.parse(pm.variables.get('key'));
// Sign our previously calculated string with HMAC 256 and our key. Convert it to Base64.
const signature = CryptoJS.HmacSHA256(stringToSign, key).toString(CryptoJS.enc.Base64);

// Add our final signature in Base64 to the authorization header of the request.
pm.request.headers.upsert({
    key:'Authorization',
    value: "HMAC-SHA256 SignedHeaders=date;host;x-ms-content-sha256&Signature=" + signature
});
在「 預先請求指令碼」 標籤的文字區域中輸入或貼上此最終指令碼。

輸入之後,請選取 Ctrl+S 或選取 [儲存] 以將指令碼儲存至集合。
![顯示 Postman 前置要求文稿 [儲存] 按鈕的螢幕快照。](media/postman/save-pre-request-script.png)
在 Postman 中建立要求
現在一切都已設定好,您就可以在Postman中建立通訊服務要求。 若要開始使用,請選取通訊服務集合旁的加號 (+)。

您已在 Postman 中建立新的請求分頁,現在您需要進行設定。 您針對SMS傳送 API 提出要求,因此請務必參考 此 API 的檔以取得協助。 現在來配置 Postman 的請求。
若要開始,請將要求類型設定為 , POST 然後在 [要求 URL] 字段中輸入 {{endpoint}}/sms?api-version=2021-03-07 。 此 URL 會使用您先前建立的 endpoint 變數自動將它傳送至您的通訊服務資源。

在請求的 正文 索引標籤上,選取 原始。 在右側的下拉式清單中,選取 [JSON]。
顯示將請求本文設定為原始格式和 JSON 格式的螢幕快照。
您已設定要求以 JSON 格式傳送和接收資訊。
在文字區域中,以下列格式輸入請求的主體:
{
    "from":"<Your Azure Communication Services Telephone Number>",
    "message":"<The message you'd like to send>",
    "smsRecipients": [
        {
            "to":"<The number you'd like to send the message to>"
        }
    ]
}
對於 from 值,您需要在通訊服務入口網站中取得電話號碼,如先前所述。 輸入時不要包含任何空格,也不要在前面加上您的國碼 (地區碼)。 例如 +15555551234。 您可以將 message 設為您想要傳送的任何內容,Hello from Azure Communication Services 則是一個很好的範例。 此值 to 應該是您有權存取的電話,以便接收簡訊。 使用您自己的行動電話是個好主意。
將此要求儲存至您先前建立的通訊服務集合。 此步驟可確保它能識別您先前建立的變數和預請求腳本。 選取請求區域右上角的儲存。
![顯示 Postman 要求的 [儲存] 按鈕的螢幕快照。](media/postman/postman-save.png)
出現的對話框會詢問您要呼叫要求的內容,以及您想要儲存的位置。 您可以將它命名為您想要的任何專案,但請確定您在對話框的下半部選取您的通訊服務集合。
![顯示 [Postman 儲存要求] 對話方塊的螢幕擷取畫面,並已選取通訊服務集合。](media/postman/postman-save-to-acs.png)
發送請求
現在所有設定已完成,您可以傳送要求,並在手機上取得簡訊。 若要執行此步驟,請確定已選取您的要求,然後選取 [傳送]。
![顯示 Postman 要求的螢幕快照,其中已醒目提示 [傳送] 按鈕。](media/postman/postman-send.png)
如果一切順利,您會看到來自通訊服務的回應,這是 202 狀態代碼。

您在 to 中所提供號碼的行動電話也會收到簡訊。 您現在有功能 Postman 設定,可與通訊服務通訊並傳送簡訊。