適用於: Azure Stack Edge Pro - GPUAzure Stack Edge Pro 2Azure Stack Edge Pro RAzure Stack Edge Mini R
本文會說明如何在 Azure Stack Edge Pro 裝置現有的 Kubernetes 叢集上啟用 Azure Arc。
此程序假設您已閱讀並理解以下文章:
先決條件
請確定您已在 Azure Stack Edge Pro 裝置和您用來存取裝置的用戶端上,完成下列必要條件:
針對裝置
您有 1 個節點 Azure Stack Edge Pro 裝置的登入認證。
你擁有訂閱的擁有者權限。 您在服務主體的角色指派步驟期間,會需要此存取權。
針對存取裝置的用戶端
您有用來存取 Azure Stack Edge Pro 裝置的 Windows 用戶端系統。
用戶端執行 Windows PowerShell 5.0 以上版本。 若要下載最新版本的 Windows PowerShell,請前往安裝 Windows PowerShell。
您也可以有搭配支援作業系統的其他用戶端。 本文說明使用 Windows 用戶端時的程序。
您已完成在 Azure Stack Edge Pro 裝置上存取 Kubernetes 叢集中所描述的程序。 您已經:
- 已將
kubectl安裝在用戶端上。 - 請確定
kubectl用戶端版本與在 Azure Stack Edge Pro 裝置上執行的 Kubernetes 主要版本相比,沒有差超過一個版本。使用
kubectl version檢查用戶端上執行的 kubectl 版本。 記下完整版本。在 Azure Stack Edge Pro 裝置的本機 UI 中,前往 [軟體更新],並記下 Kubernetes 伺服器版本號碼。
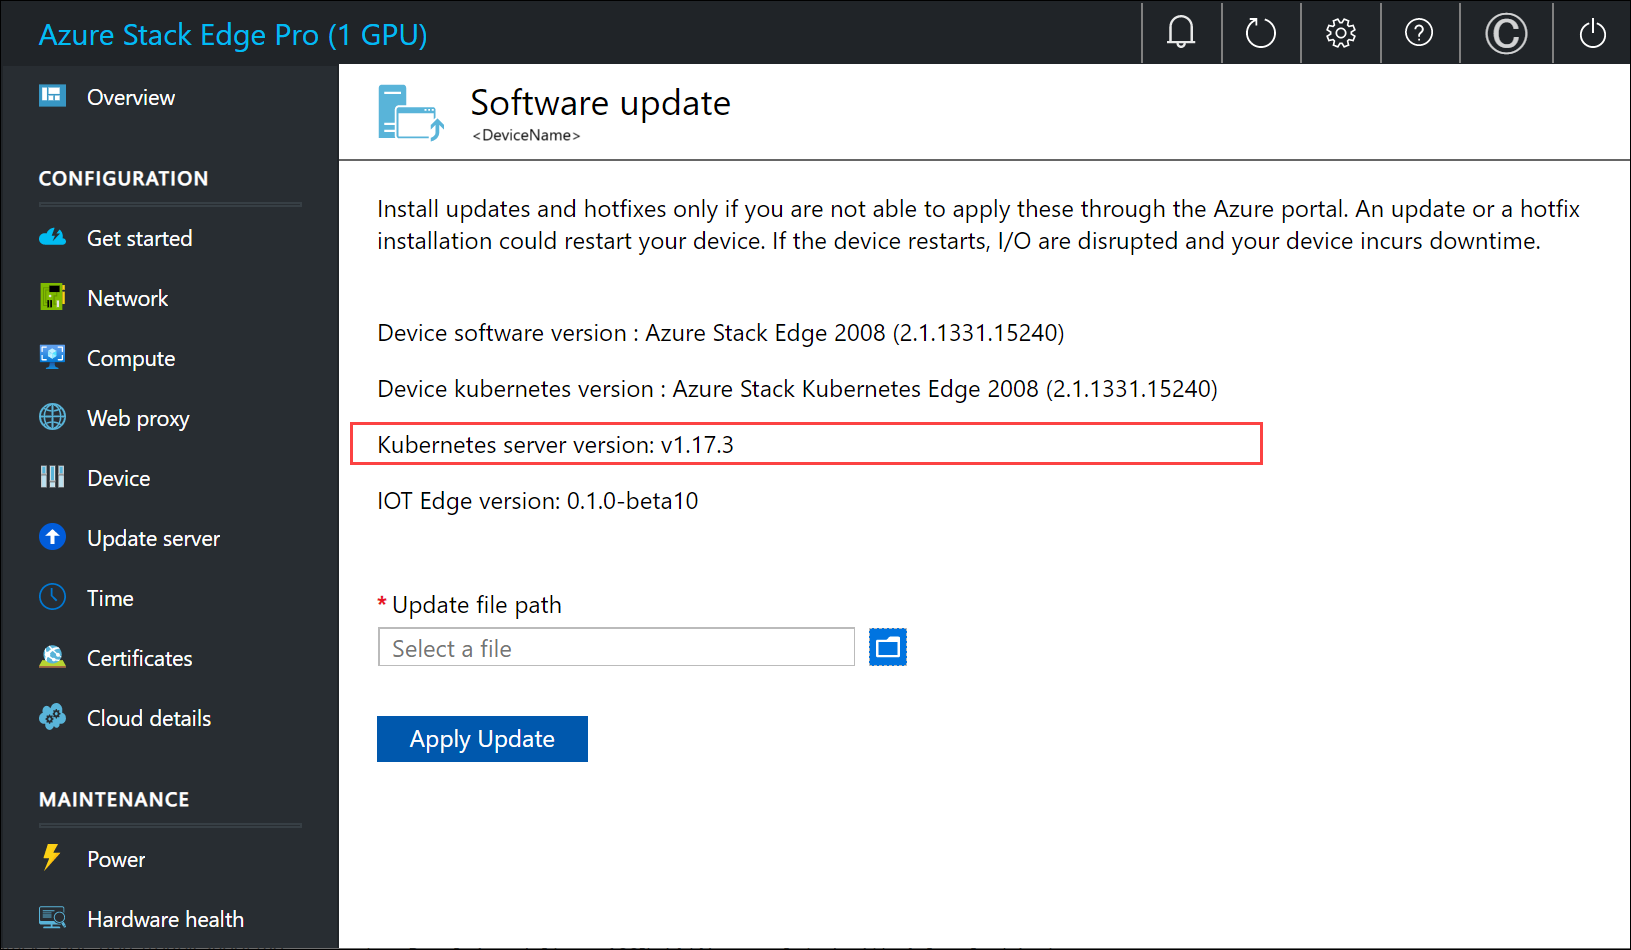
確認這兩個版本相容。
- 已將
註冊 Kubernetes 資源提供者
在 Kubernetes 叢集上啟用 Azure Arc 之前,您必須針對您的訂用帳戶,啟用和註冊 Microsoft.Kubernetes 和 Microsoft.KubernetesConfiguration。
若要啟用資源提供者,請在 Azure 入口網站中,前往您打算用於部署的訂用帳戶。 前往 [資源提供者]。
在右窗格中,搜尋您要新增的提供者。 在此範例中,是
Microsoft.Kubernetes和Microsoft.KubernetesConfiguration。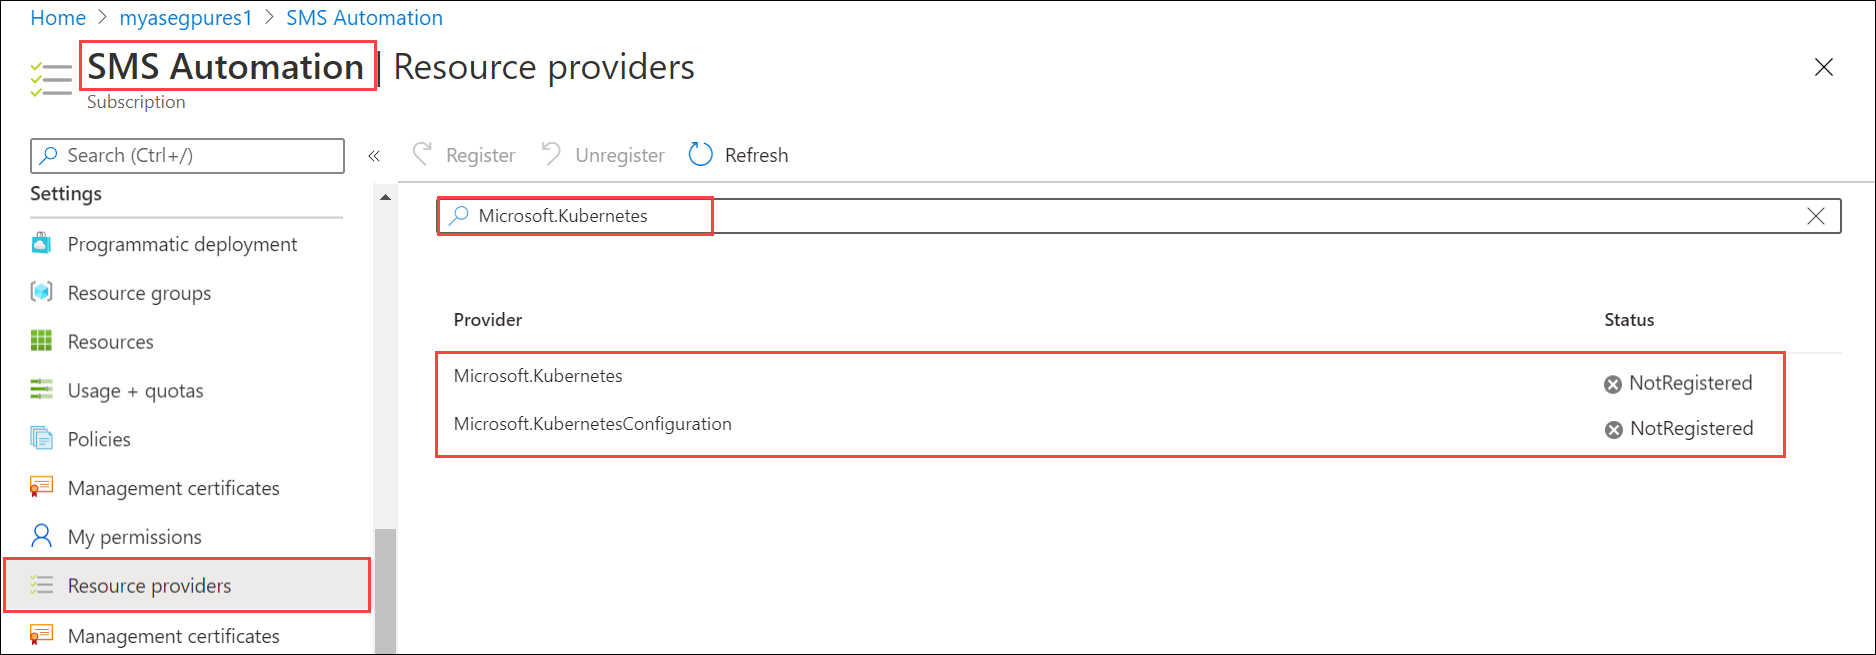
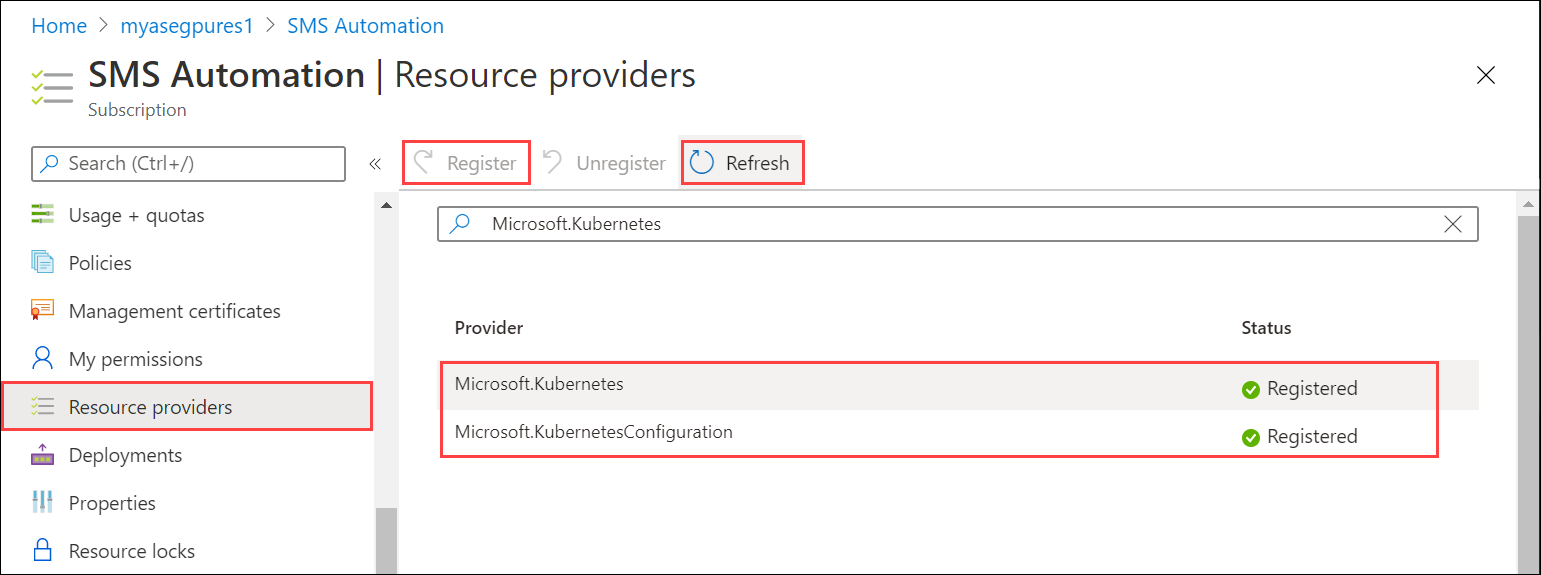
選取資源提供者,然後從命令列頂端選取 [註冊]。 註冊作業需要幾分鐘的時間。
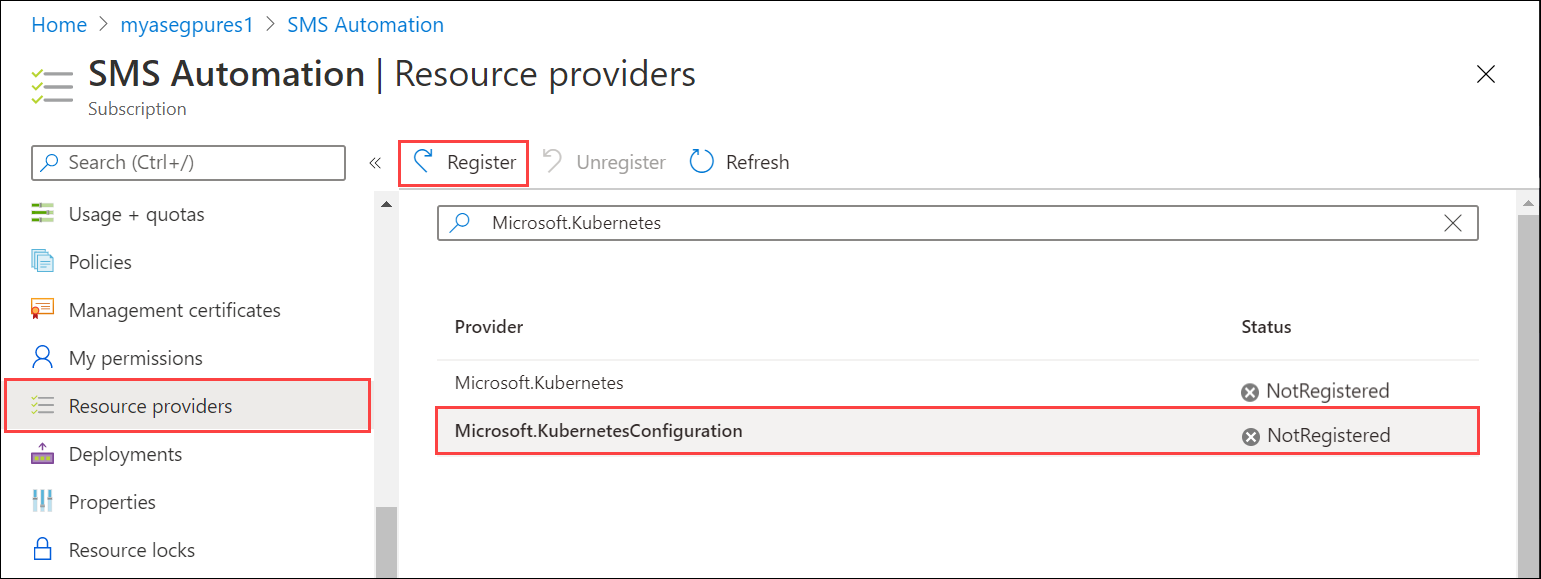
重新整理 UI,直到您看到資源提供者已註冊為止。 針對這兩個資源提供者重複此流程。
您也可以透過 az cli 註冊資源提供者。 如需詳細資訊,請參閱為已啟用 Azure Arc 的 Kubernetes 註冊兩個提供者。
建立服務主體,指派角色
請確定您有
Subscription ID,以及您用於 Azure Stack Edge 服務資源部署的資源群組名稱。 若要取得訂用帳戶識別碼,請前往 Azure 入口網站中的 Azure Stack Edge 資源。 瀏覽至 [概觀] 和 [基本資訊]。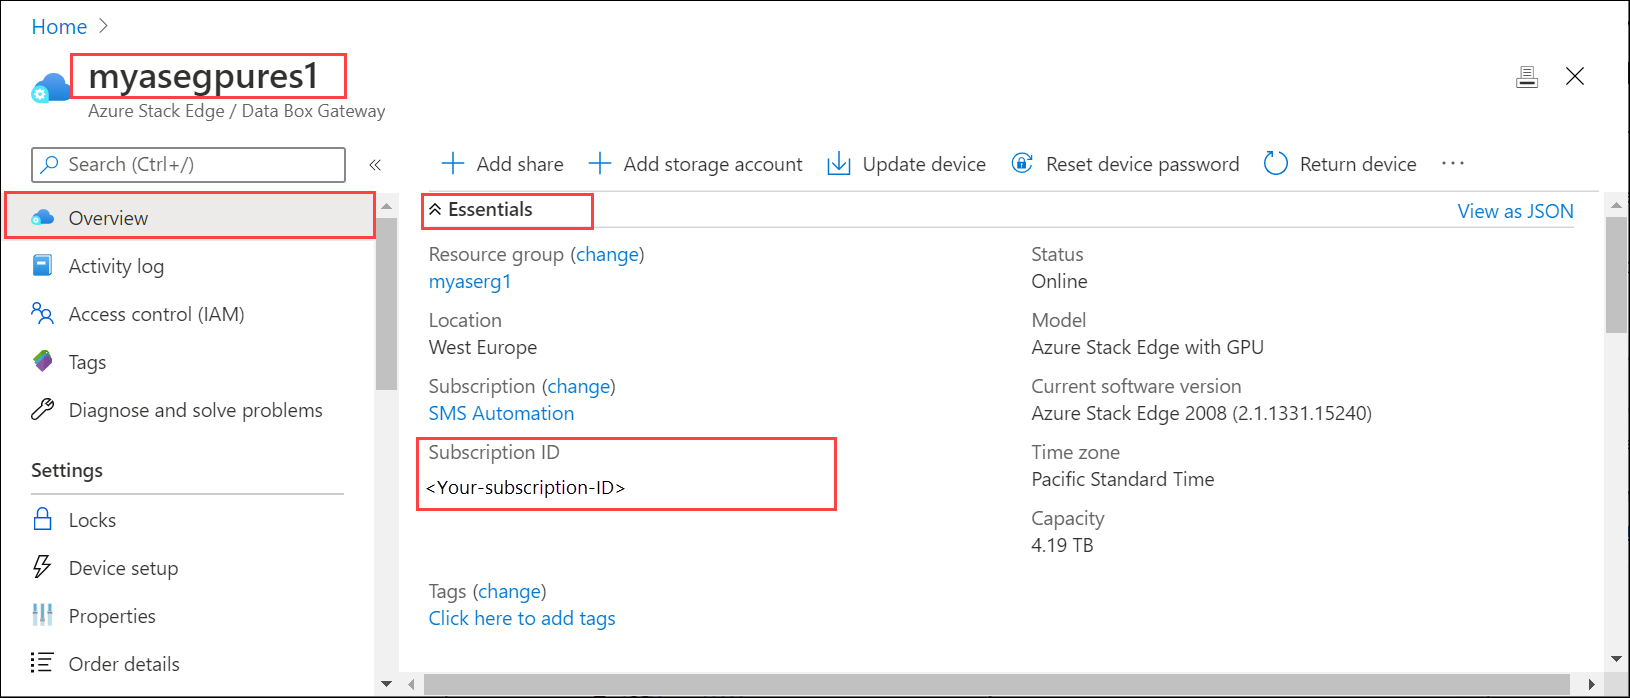
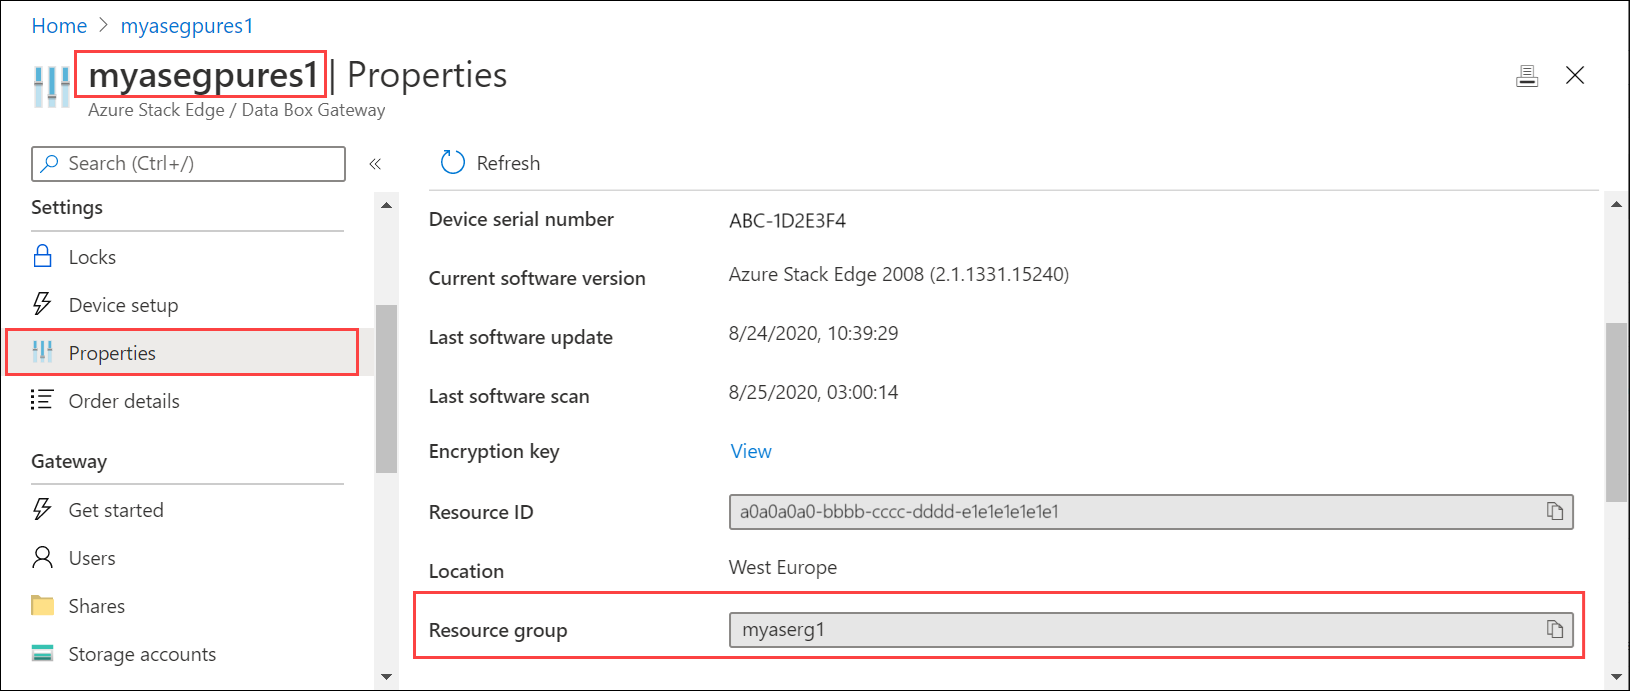
若要取得資源群組名稱,請前往 [屬性]。
若要建立服務主體,請透過
az cli使用下列命令。az ad sp create-for-rbac --name "<Informative name for service principal>"如需如何登入
az cli的資訊,請參閱在 Azure 入口網站中啟動 Cloud Shell。 如果在本機用戶端上使用az cli來建立服務主體,請確定您執行的是 2.25 版或更新版本。範例如下。
PS /home/user> az ad sp create-for-rbac --name "https://azure-arc-for-ase-k8s"
{
  "appId": "xxxxxxxx-xxxx-xxxx-xxxx-xxxxxxxxxxxx",
  "displayName": "azure-arc-for-ase-k8s",
  "name": "https://azure-arc-for-ase-k8s",
  "password": "<password>",
  "tenant": "xxxxxxxx-xxxx-xxxx-xxxx-xxxxxxxxxxxx"
}
PS /home/user>
記下
appId、name、password和tenantID,因為您將會使用這些值作為下一個命令的輸入內容。有多種方法可以取得
appId。 以下三種是首選方法。 如果你使用以下選項之一,可以跳過前一部分的步驟 1、2 和 3,直接進入下一步 4。選項一 - 使用 Minishell 執行以下 PowerShell 指令:
[Device-IP]: PS> Get-AzureDataBoxEdgeApplicationId
xxxxxxxx-xxxx-xxxx-xxxx-xxxxxxxxxxxx
[Device-IP]: PS>
選項二 - 請依照以下步驟在 Azure 入口網站查看您裝置的 JSON 細節:
前往你的 Azure Stack Edge 裝置 概覽 ,然後在右上角選擇 JSON 檢視 。
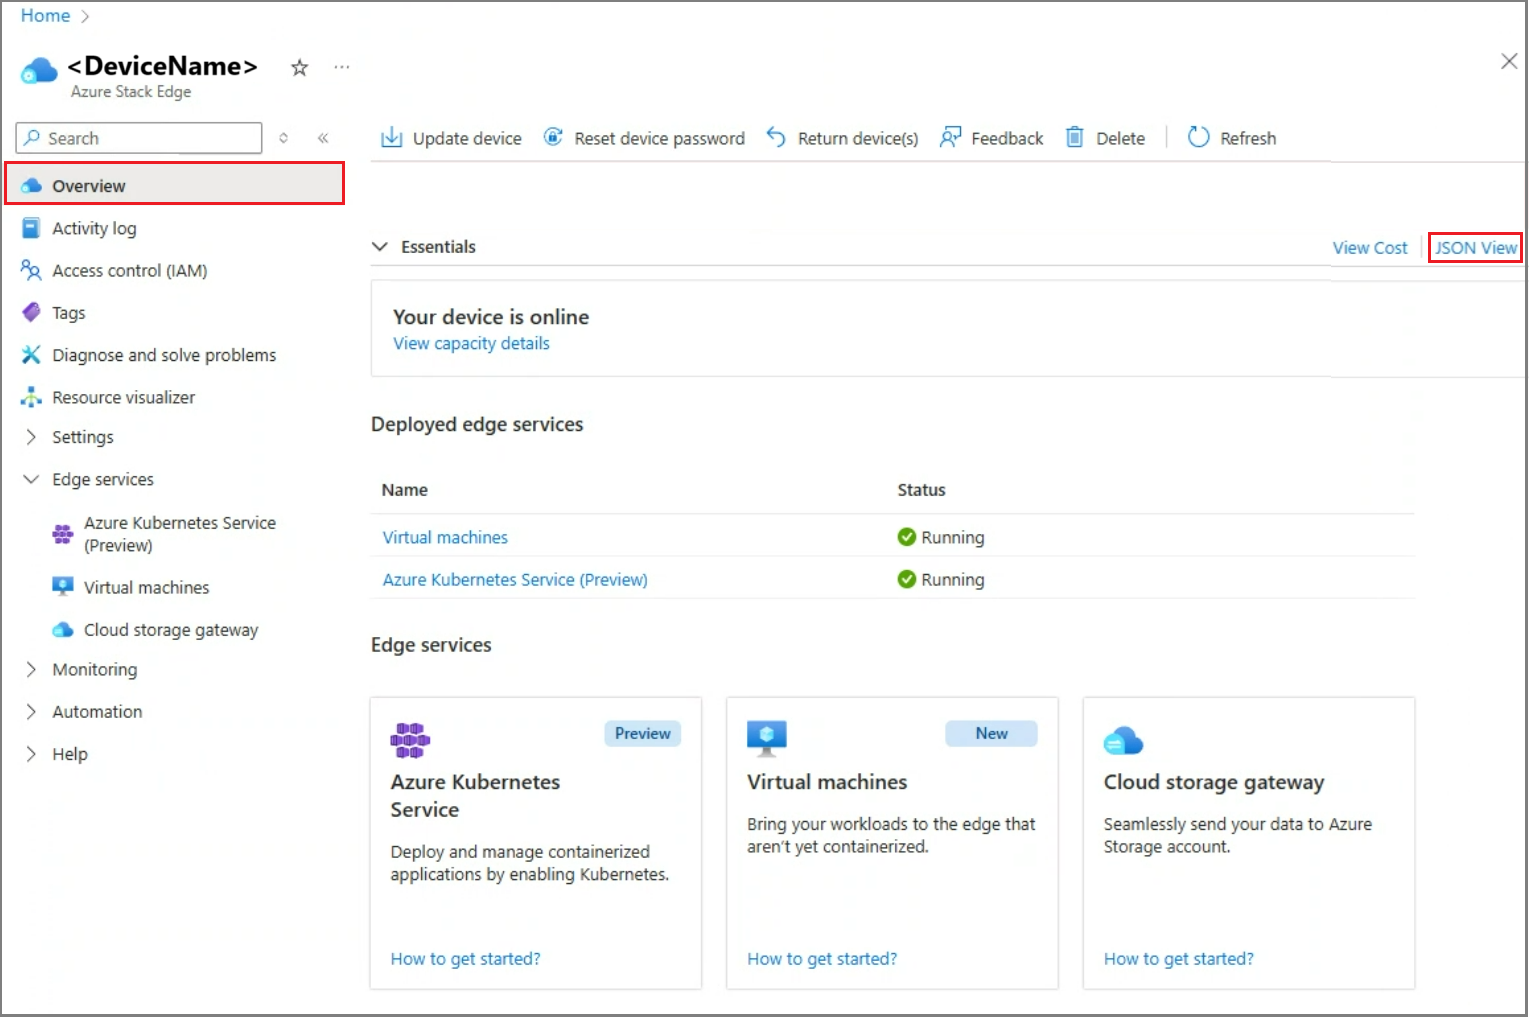
在您裝置的資源 JSON 詳細資料中,請記下
principalId。
選項三 - 在用戶端電腦上使用非 Azure Stack Edge PowerShell 執行以下指令:
// ASE resource group and resource name can be obtained from Azure portal
PS C:\> $ASEResource= GetAzResource –ResourceGroupName <resource-group-name> -ResourceName <resource-name>
PS C:\> $ASEResource.Identity.PrincipalId
xxxxxxxx-xxxx-xxxx-xxxx-xxxxxxxxxxxx
PS C:\>
在您建立新的服務主體或使用上述選項之一將其取回後,將
Kubernetes Cluster - Azure Arc Onboarding角色指派給新建立的主體。 這是內建的 Azure 角色 (在命令中使用角色識別碼),權限受到限制。 使用下列命令:az role assignment create --role 34e09817-6cbe-4d01-b1a2-e0eac5743d41 --assignee <appId-from-service-principal> --scope /subscriptions/<SubscriptionID>/resourceGroups/<Resource-group-name>範例如下。
PS /home/user> az role assignment create --role 34e09817-6cbe-4d01-b1a2-e0eac5743d41 --assignee xxxxxxxx-xxxx-xxxx-xxxx-xxxxxxxxxxxx --scope /subscriptions/xxxxxxxx-xxxx-xxxx-xxxx-xxxxxxxxxxxx/resourceGroups/myaserg1
{
  "canDelegate": null,
  "id": "/subscriptions/xxxxxxxx-xxxx-xxxx-xxxx-xxxxxxxxxxxx/resourceGroups/myaserg1/providers/Microsoft.Authorization/roleAssignments/00000000-0000-0000-0000-000000000000",
  "name": "xxxxxxxx-xxxx-xxxx-xxxx-xxxxxxxxxxxx",
  "principalId": "xxxxxxxx-xxxx-xxxx-xxxx-xxxxxxxxxxxx",
  "principalType": "ServicePrincipal",
  "resourceGroup": "myaserg1",
  "roleDefinitionId": "/subscriptions/xxxxxxxx-xxxx-xxxx-xxxx-xxxxxxxxxxxx/providers/Microsoft.Authorization/roleDefinitions/34e09817-6cbe-4d01-b1a2-e0eac5743d41",
  "scope": "/subscriptions/xxxxxxxx-xxxx-xxxx-xxxx-xxxxxxxxxxxx/resourceGroups/myaserg1",
  "type": "Microsoft.Authorization/roleAssignments"
}
PS /home/user>
在 Kubernetes 叢集上啟用 Arc
請遵循下列步驟來設定 Kubernetes 叢集,以進行 Azure Arc 管理:
執行以下命令:
Set-HcsKubernetesAzureArcAgent -SubscriptionId "<Your Azure Subscription Id>" -ResourceGroupName "<Resource Group Name>" -ResourceName "<Azure Arc resource name (shouldn't exist already)>" -Location "<Region associated with resource group>" -TenantId "<Tenant Id of service principal>" -ClientId "<App id of service principal>"執行此指令後,你會看到後續提示來指定
ClientSecret。 在提示時提供服務主體密碼。如果您使用 Azure 公用以外的雲端,請新增
CloudEnvironment參數。 您可以將此參數設定為AZUREPUBLICCLOUD、AZURECHINACLOUD、AZUREGERMANCLOUD和AZUREUSGOVERNMENTCLOUD。使用考量:
- 要在你的裝置上部署 Azure Arc,請確保你使用的是 支援的 Azure Arc 區域。
- 使用
az account list-locations指令來確定準確的位置名稱,然後在Set-HcsKubernetesAzureArcAgentcmdlet 中傳遞。 位置名稱通常會有格式設定,不含任何空格。
這很重要
若您取得
Id,而非使用舊方法建立新的服務主體,則請勿指定ClientId、TenantId或ClientSecret。以下是範例:
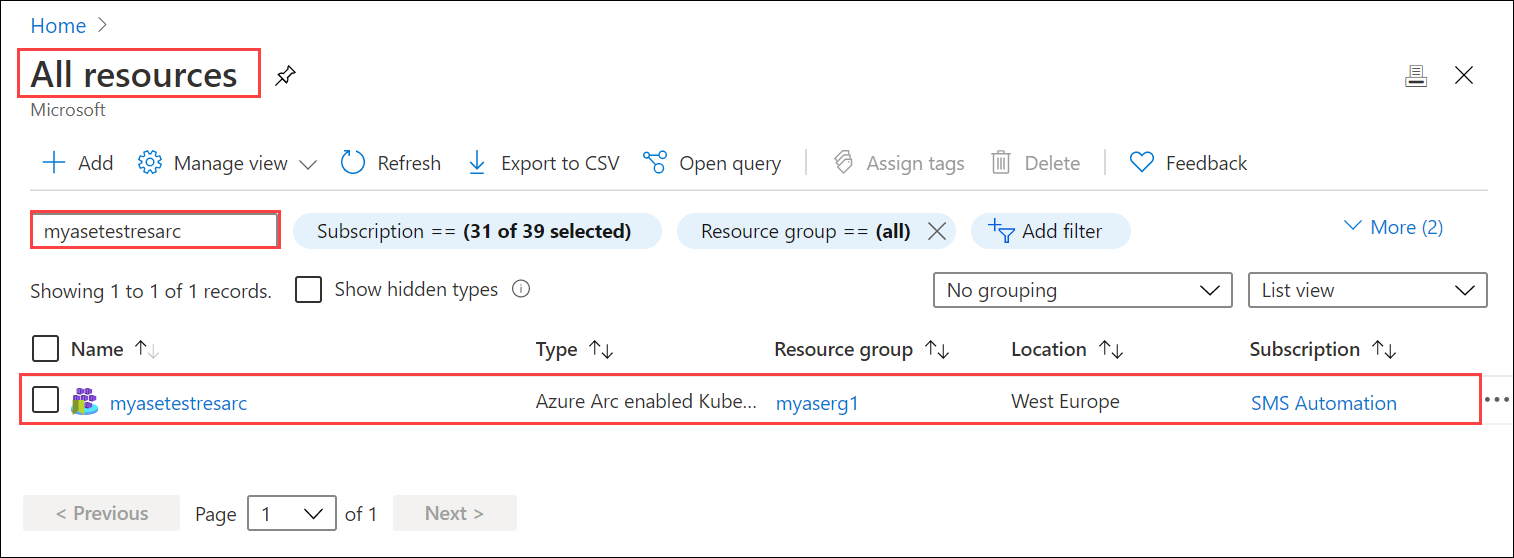
[10.100.10.10]: PS>Set-HcsKubernetesAzureArcAgent -SubscriptionId "xxxxxxxx-xxxx-xxxx-xxxx-xxxxxxxxxxxx" -ResourceGroupName "myaserg1" -ResourceName "myasetestresarc" -Location "westeurope" -TenantId "xxxxxxxx-xxxx-xxxx-xxxx-xxxxxxxxxxxx" -ClientId "xxxxxxxx-xxxx-xxxx-xxxx-xxxxxxxxxxxx"

WARNING: A script or application on the remote computer 10.126.76.0 is sending a prompt request. When you are prompted,
enter sensitive information, such as credentials or passwords, only if you trust the remote computer and the
application or script that is requesting the data.

cmdlet Set-HcsKubernetesAzureArcAgent at command pipeline position 1

Supply values for the following parameters:
ClientSecret: **********************************
[10.100.10.10]: PS>
在 Azure 入口網站中,應該使用您在上述命令中提供的名稱來建立資源。
若要確認已成功啟用 Azure Arc,請從 PowerShell 介面執行下列命令:
kubectl get deployments,pods -n azure-arc以下是範例輸出,顯示在
azure-arc命名空間中,部署於 Kubernetes 叢集上的 Azure Arc 代理程式。[10.128.44.240]: PS>kubectl get deployments,pods -n azure-arc NAME READY UP-TO-DATE AVAILABLE AGE deployment.apps/cluster-metadata-operator 1/1 1 1 13d deployment.apps/clusterconnect-agent 1/1 1 1 13d deployment.apps/clusteridentityoperator 1/1 1 1 13d deployment.apps/config-agent 1/1 1 1 13d deployment.apps/controller-manager 1/1 1 1 13d deployment.apps/extension-manager 1/1 1 1 13d deployment.apps/flux-logs-agent 1/1 1 1 13d deployment.apps/kube-aad-proxy 1/1 1 1 13d deployment.apps/metrics-agent 1/1 1 1 13d deployment.apps/resource-sync-agent 1/1 1 1 13d NAME READY STATUS RESTARTS AGE pod/cluster-metadata-operator-9568b899c-2stjn 2/2 Running 0 13d pod/clusterconnect-agent-576758886d-vggmv 3/3 Running 0 13d pod/clusteridentityoperator-6f59466c87-mm96j 2/2 Running 0 13d pod/config-agent-7cbd6cb89f-9fdnt 2/2 Running 0 13d pod/controller-manager-df6d56db5-kxmfj 2/2 Running 0 13d pod/extension-manager-58c94c5b89-c6q72 2/2 Running 0 13d pod/flux-logs-agent-6db9687fcb-rmxww 1/1 Running 0 13d pod/kube-aad-proxy-67b87b9f55-bthqv 2/2 Running 0 13d pod/metrics-agent-575c565fd9-k5j2t 2/2 Running 0 13d pod/resource-sync-agent-6bbd8bcd86-x5bk5 2/2 Running 0 13d [10.128.44.240]: PS>
此處會顯示這些代理程式的概念概觀。
從 Kubernetes 叢集移除 Arc
若要移除 Azure Arc 管理,請遵循下列步驟:
執行以下命令:
Remove-HcsKubernetesAzureArcAgent
附註
預設情況下,當資源 yamls 從 Git 倉庫刪除時,對應的資源不會從 Kubernetes 叢集中刪除。 您需要在 Arc OperatorParams 中設定 --sync-garbage-collection,才能在資源從 git 存放庫中刪除時,允許刪除資源。 如需詳細資訊,請參閱刪除設定
後續步驟
要了解如何執行 Azure Arc 部署,請參考 在 Azure Stack Edge Pro 裝置上,透過 GitOps 及 Redis 部署無狀態的 PHP 應用程式Guestbook。