在 Azure Stack Edge Pro GPU 上上傳、匯入、匯出和刪除憑證
適用于:  Azure Stack Edge Pro - GPU Azure Stack Edge Pro 2 Azure Stack Edge Pro R Azure Stack Edge Mini R
若要確保 Azure Stack Edge 裝置與連線到它的用戶端之間的安全且受信任的通訊,您可以使用自我簽署憑證或自備憑證。 本文說明如何管理這些憑證,包括如何上傳、匯入和匯出這些憑證。 您也可以檢視憑證到期日,並刪除舊的簽署憑證。
若要深入瞭解如何建立這些憑證,請參閱 使用 Azure PowerShell 建立憑證。
在裝置上上傳憑證
如果您攜帶自己的憑證,則根據預設,您為裝置建立的憑證會位於 用戶端的 [個人] 存放區 中。 這些憑證必須在用戶端上匯出為適當的格式檔案,然後上傳至您的裝置。
必要條件
將根憑證和端點憑證上傳至裝置之前,請確定憑證是以適當的格式匯出。
- 根憑證必須匯出為具有延伸模組的 DER 格式
.cer。 如需詳細步驟,請參閱 將憑證匯出為 DER 格式 。 - 端點憑證必須匯出為 具有私密金鑰的 .pfx 檔案。 如需詳細步驟,請參閱 使用私密金鑰 將憑證匯出為 .pfx 檔案。
上傳憑證
若要在裝置上上傳根憑證和端點憑證,請在本機 Web UI 的 [憑證 ] 頁面上使用 [ + 新增憑證 ] 選項 。 執行下列步驟:
先上傳根憑證。 在本機 Web UI 中,移至 [ 憑證 ]。
選取 [+ 新增憑證 ]。
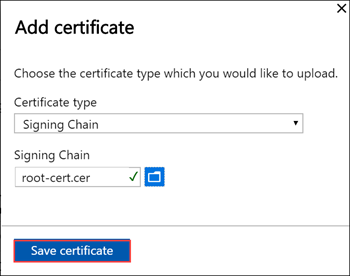
儲存憑證。
上傳端點憑證
接下來上傳端點憑證。
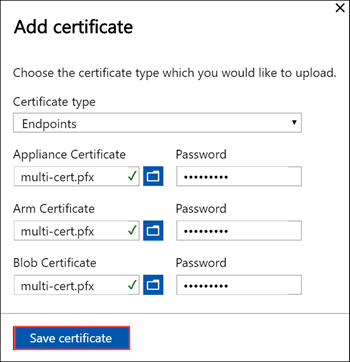
選擇 .pfx 格式的 憑證檔案,並在匯出憑證時輸入您提供的密碼。 Azure Resource Manager 憑證可能需要幾分鐘的時間才能套用。
如果簽署鏈結未先更新,而且您嘗試上傳端點憑證,則會收到錯誤。
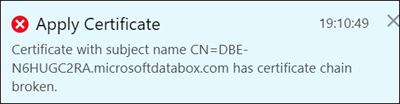
返回並上傳簽署鏈結憑證,然後上傳並套用端點憑證。
重要
如果裝置名稱或 DNS 網域已變更,則必須建立新的憑證。 然後,用戶端憑證和裝置憑證應更新為新的裝置名稱和 DNS 網域。
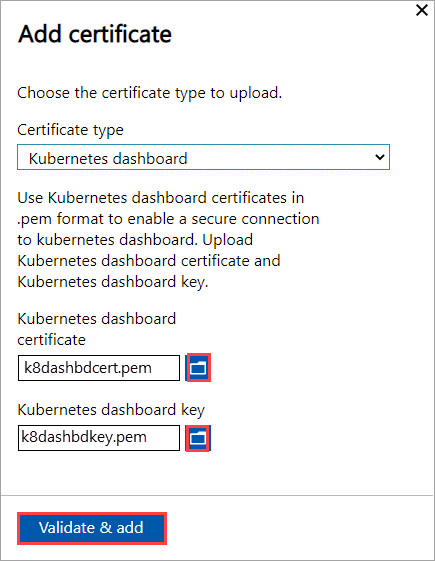
上傳 Kubernetes 憑證
Kubernetes 憑證可以是 Edge Container Registry 或 Kubernetes 儀表板。 在每個案例中,都必須上傳憑證和金鑰檔案。 請遵循下列步驟來建立及上傳 Kubernetes 憑證:
您將用來
openssl建立 Kubernetes 儀表板憑證或 Edge Container Registry。 請務必在您將用來建立憑證的系統上安裝 openssl。 在 Windows 系統上,您可以使用 Chocolatey 來安裝openssl。 安裝 Chocolatey 之後,開啟 PowerShell 並輸入:choco install openssl使用
openssl來建立這些憑證。cert.pem系統會建立憑證檔案和key.pem金鑰檔案。針對 Edge Container Registry,請使用下列命令:
openssl req -newkey rsa:4096 -nodes -sha256 -keyout key.pem -x509 -days 365 -out cert.pem -subj "/CN=<ecr.endpoint-suffix>"以下是範例輸出:
PS C:\WINDOWS\system32> openssl req -newkey rsa:4096 -nodes -sha256 -keyout key.pem -x509 -days 365 -out cert.pem -subj "/CN=ecr.dbe-1d6phq2.microsoftdatabox.com"
Generating a RSA private key
.....................++++....++++
writing new private key to 'key.pem'
-----
PS C:\WINDOWS\system32>
針對 Kubernetes 儀表板憑證,請使用下列命令:
openssl req -newkey rsa:4096 -nodes -sha256 -keyout key.pem -x509 -days 365 -out cert.pem -subj "/CN=<<kubernetes-dashboard.endpoint-suffix> OR <endpoint-suffix>>"以下是範例輸出:
PS C:\WINDOWS\system32> openssl req -newkey rsa:4096 -nodes -sha256 -keyout key.pem -x509 -days 365 -out cert.pem -subj "/CN=kubernetes-dashboard.dbe-1d8phq2.microsoftdatabox.com"
Generating a RSA private key
.....................++++....++++
writing new private key to 'key.pem'
-----
PS C:\WINDOWS\system32>
上傳您稍早產生的 Kubernetes 憑證和對應的金鑰檔案。
For Edge Container Registry

針對 Kubernetes 儀表板
在存取裝置的用戶端上匯入憑證
您可以使用裝置產生的憑證,或自備憑證。 使用裝置產生的憑證時,您必須先在用戶端下載憑證,才能將這些憑證匯入適當的憑證存放區。 請參閱 將憑證下載到存取裝置 的用戶端。
在這兩種情況下,您必須將您建立並上傳至裝置的憑證匯入 Windows 用戶端上(存取裝置)到適當的憑證存放區。
您匯出為 DER 的根憑證現在應該在用戶端系統上的受信任根憑證授權單位 中匯入 。 如需詳細步驟,請參閱 將憑證匯入信任的根憑證授權單位存放區 。
您匯出為 的
.pfx端點憑證必須匯出為具有擴充功能的.cerDER。 這會.cer接著匯入 您系統上的個人憑證存儲 中。 如需詳細步驟,請參閱 將憑證匯入個人憑證存儲 。
將憑證匯入為 DER 格式
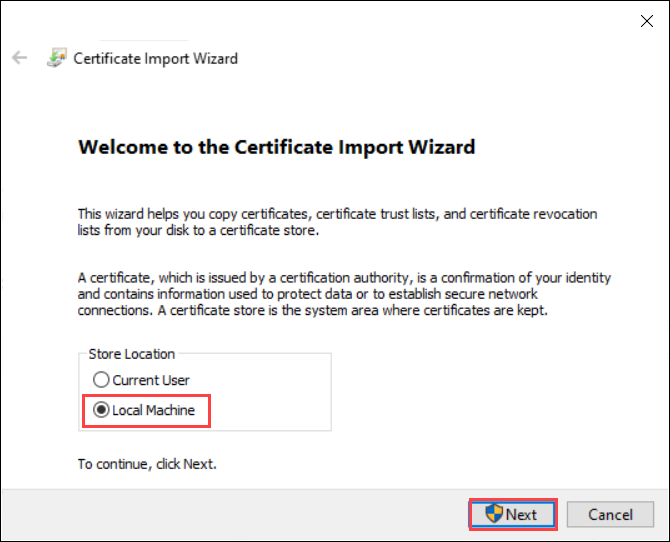
若要在 Windows 用戶端上匯入憑證,請採取下列步驟:
以滑鼠右鍵按一下檔案,然後選取 [ 安裝憑證 ]。 此動作會啟動 [憑證匯入精靈]。

針對 [ 市集位置 ],選取 [ 本機電腦 ],然後選取 [ 下一步 ]。
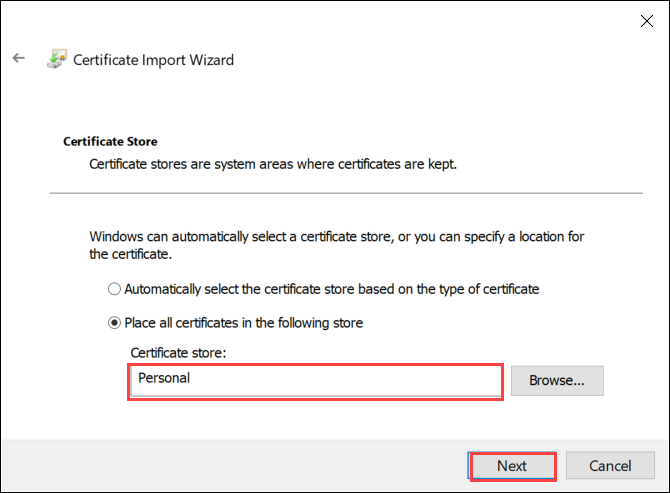
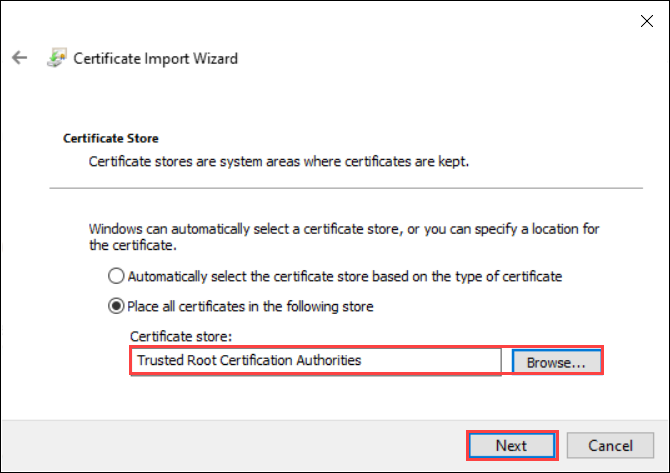
選取 [ 將所有憑證放在下列存放區 ],然後選取 [ 流覽 ]。
若要匯入個人存放區,請流覽至遠端主機的個人存放區,然後選取 [ 下一步 ]。
若要匯入至信任的存放區,請流覽至 [受信任的根憑證授權單位],然後選取 [ 下一步 ]。
選取完成。 顯示匯入成功效果的訊息。
檢視憑證到期日
如果您攜帶自己的憑證,憑證通常會在 1 年或 6 個月內到期。 若要檢視憑證上的到期日,請移至裝置本機 Web UI 中的 [ 憑證 ] 頁面。 如果您選取特定憑證,您可以在憑證上檢視到期日。
刪除簽署鏈結憑證
您可以從裝置刪除舊的已過期簽署鏈結憑證。 當您這樣做時,簽署鏈結中的任何相依憑證將不再有效。 只能刪除簽署鏈結憑證。
若要從 Azure Stack Edge 裝置刪除簽署鏈結憑證,請執行下列步驟:
在裝置的本機 Web UI 中,移至 [ 設定 > 憑證]。
選取您要刪除的簽署鏈結憑證。 接著選取刪除。
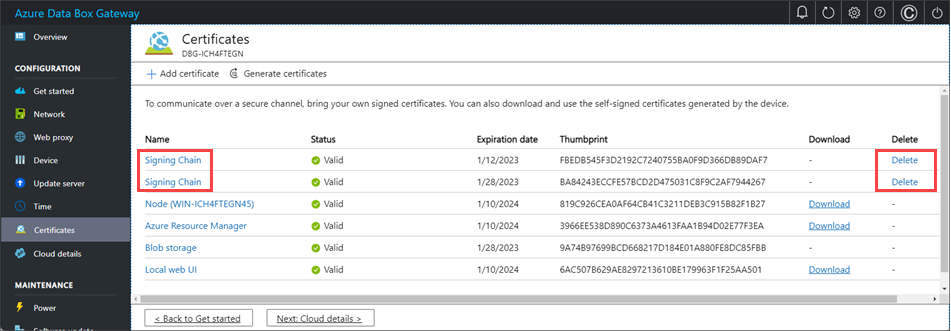
在 [ 刪除憑證 ] 窗格中,確認憑證的指紋,然後選取 [ 刪除 ]。 無法反轉憑證刪除。
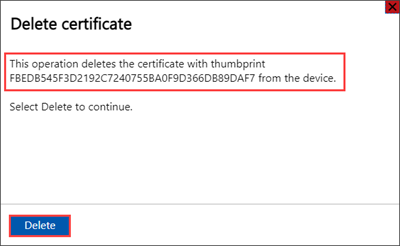
憑證刪除完成後,簽署鏈結中的所有相依憑證將不再有效。
若要查看狀態更新,請重新整理顯示。 簽署鏈結憑證將不再顯示,相依憑證將會有 無效 的狀態。

下一步
瞭解如何 針對憑證問題進行疑難排解