使用 Azure 入口網站來管理 Azure Stack Edge Pro GPU 上的 VM 磁碟
適用於:  Azure Stack Edge Pro - GPUAzure Stack Edge Pro 2Azure Stack Edge Pro RAzure Stack Edge Mini R
您可以使用 Azure 入口網站,在部署於 Azure Stack Edge Pro 裝置的虛擬機器 (VM) 上佈建磁碟。 磁碟會透過本機 Azure Resource Manager 佈建到裝置上,並取用裝置容量。 新增、中斷連結和刪除磁碟等作業可以透過 Azure 入口網站來完成,進而呼叫本機 Azure Resource Manager 來佈建儲存體。
本文說明如何新增、中斷連結或移除和刪除現有 VM 中的資料磁碟,以及透過 Azure 入口網站調整 VM 本身的大小。
關於 VM 上的磁碟
您的 VM 會有 OS 磁碟和資料磁碟。 部署於裝置上的每一個虛擬機器都有一個連結的作業系統磁碟。 作業系統磁碟有預先安裝的 OS,在您建立 VM 時即已選取。 此磁碟包含開機磁碟區。
注意
您無法變更裝置上所部署 VM 的 OS 磁碟大小。 OS 磁碟大小取決於您選取的 VM 大小。
另一方面,資料磁碟是連結至裝置上執行中 VM 的受控磁碟。 資料磁碟可用來儲存應用程式資料。 資料磁碟一般是 SCSI 磁碟機。 VM 大小會決定可以連結至 VM 的資料磁碟數目。 根據預設,系統會使用進階儲存體來裝載磁碟。
部署在裝置上的 VM 有時可能會包含暫存磁碟。 暫存磁碟為應用程式和處理序提供短期儲存空間,僅用於儲存分頁檔或交換檔之類的資料。 暫存磁碟上的資料可能會在維護事件期間或當您重新佈署虛擬機器時遺失。 VM 成功完成標準重新開機期間會保留暫存磁碟上的資料。
必要條件
在透過 Azure 入口網站開始管理裝置上執行中 VM 上的磁碟之前,請先確定:
您可以存取已啟動的 Azure Stack Edge Pro GPU 裝置。 您也已經為裝置上的計算啟用網路介面。 此動作會在 VM 的該網路介面上建立虛擬交換器。
在裝置的本機 UI 中,移至 [計算]。 選取您將用來建立虛擬交換器的網路介面。
重要
您只能設定一個連接埠進行計算。
在網路介面上啟用計算。 Azure Stack Edge Pro GPU 會建立和管理對應至該網路介面的虛擬交換器。
您已將至少一部 VM 部署到裝置上。 若要建立此 VM,請參閱透過 Azure 入口網站在 Azure Stack Edge Pro 上部署 VM 中的指示。
新增資料磁碟
請遵循下列步驟,將磁碟新增至部署在裝置上的虛擬機器。
移至您要在其中新增資料磁碟的虛擬機器,然後在虛擬機器的 [詳細資料] 中選取 [磁碟]。
![Azure Stack Edge 虛擬機 [詳細數據] 索引標籤上 [磁碟] 設定的螢幕快照。[磁碟] 標籤會反白顯示。](media/azure-stack-edge-gpu-manage-virtual-machine-disks-portal/add-data-disk-1.png)
在 [磁碟] 刀鋒視窗的 [資料磁碟] 底下,選取 [建立並連結新磁碟]。
![[概觀] 檢視中 [磁碟] 刀鋒視窗的螢幕快照,其中 虛擬機器。[數據磁碟] 底下的 [建立並連結新的磁碟] 選項會反白顯示。](media/azure-stack-edge-gpu-manage-virtual-machine-disks-portal/add-data-disk-2.png)
在 [建立新磁碟] 刀鋒視窗中,輸入下列參數:
欄位 描述 Name 資源群組內的唯一名稱。 建立資料磁碟之後,便無法變更名稱。 Edge 資源群組 輸入要在其中儲存新磁碟的 Edge 資源群組。 大小 資料磁碟的大小 (GiB)。 資料磁碟的大小上限取決於所選取的 VM 大小。 在佈建磁碟時,也請考慮裝置上的實際空間,以及會取用容量的其他執行中 VM 工作負載。 ![虛擬機 [建立新磁碟] 刀鋒視窗的螢幕快照。[確定] 按鈕會反白顯示。](media/azure-stack-edge-gpu-manage-virtual-machine-disks-portal/add-data-disk-3.png)
選取 [確定] 並繼續。
在 [磁碟] 顯示畫面中,您會看到新磁碟的對應項目。 接受預設值,或將有效的邏輯單元編號 (LUN) 指派給磁碟,然後選取 [儲存]。 LUN 是 SCSI 磁碟的唯一識別碼。 如需詳細資訊,請參閱何謂 LUN?。
![新增磁碟之後,虛擬機顯示的 [磁碟] 螢幕快照。新磁碟的磁碟編號和 [儲存] 按鈕會反白顯示。](media/azure-stack-edge-gpu-manage-virtual-machine-disks-portal/add-data-disk-4.png)
您會看到正在建立磁碟的通知。 成功建立磁碟後,虛擬機器就會更新。

瀏覽回到虛擬機器的 [詳細資料] 頁面。 磁碟清單會更新以顯示新建立的資料磁碟。
![虛擬機 [詳細數據] 索引標籤的螢幕快照。新建立的虛擬機磁碟會在 [磁碟] 區域中反白顯示。](media/azure-stack-edge-gpu-manage-virtual-machine-disks-portal/add-data-disk-6.png)
變更資料磁碟
請遵循下列步驟來變更與裝置上部署的虛擬機器相關聯的磁碟。
移至要變更的資料磁碟所在的虛擬機器,然後選取虛擬機器 [詳細資料] 中的 [磁碟]。
在資料磁碟清單中,選取您想要變更的磁碟。 在所選取磁碟的最右邊,選取編輯圖示 (鉛筆)。
![虛擬機上磁碟的螢幕快照。[數據磁碟] 區段和用來編輯數據磁碟的鉛筆圖示會反白顯示。](media/azure-stack-edge-gpu-manage-virtual-machine-disks-portal/edit-data-disk-1.png)
在 [變更磁碟] 刀鋒視窗中,您只能變更磁碟的大小。 您無法在建立磁碟後變更其名稱。 變更磁碟的 [大小],然後儲存變更。
![虛擬機 [變更磁碟] 刀鋒視窗的螢幕快照。[大小] 選項和 [確定] 按鈕會反白顯示。](media/azure-stack-edge-gpu-manage-virtual-machine-disks-portal/edit-data-disk-2.png)
注意
您只能擴充資料磁碟。 您無法縮小磁碟。
在 [磁碟] 顯示畫面中,磁碟清單會重新整理以顯示更新後的磁碟。
連結現有的磁碟
請遵循下列步驟,將現有磁碟連結至部署在裝置上的虛擬機器。
移至您要作為現有磁碟連結目標的虛擬機器,然後在虛擬機器的 [詳細資料] 中選取 [磁碟]。
在 [磁碟] 刀鋒視窗的 [資料磁碟] 底下,選取 [連結現有磁碟]。
![Azure Stack Edge 虛擬機的 [磁碟] 刀鋒視窗螢幕快照。醒目提示 [附加現有的磁碟] 選項。](media/azure-stack-edge-gpu-manage-virtual-machine-disks-portal/attach-existing-data-disk-1.png)
接受預設 LUN 或指派有效的 LUN。 從下拉式清單中選擇現有的資料磁碟。 選取 [儲存]。
![新增現有磁碟之後 Azure Stack Edge 虛擬機的 [磁碟] 刀鋒窗口螢幕快照。磁碟的 LUN 編號和名稱會反白顯示,如同 [儲存] 按鈕。](media/azure-stack-edge-gpu-manage-virtual-machine-disks-portal/attach-existing-data-disk-2.png)
選取 [儲存] 並繼續。
您會看到虛擬機器已更新的通知。 VM 更新後,請瀏覽回到虛擬機器的 [詳細資料] 頁面。 重新整理頁面,以在資料磁碟清單中檢視新連結的磁碟。
![顯示虛擬機 [詳細數據] 窗格 [數據磁碟] 區段的螢幕快照。數據磁碟專案會反白顯示。](media/azure-stack-edge-gpu-manage-virtual-machine-disks-portal/list-data-disks-2.png)
卸離資料磁碟
請遵循下列步驟來中斷連結或移除與裝置上部署的虛擬機器相關聯的資料磁碟。
注意
- 您可以在 VM 執行時移除資料磁碟。 請先確定沒有任何項目正在使用該磁碟,再與 VM 中斷連結。
- 如果您中斷連結磁碟,系統不會自動刪除該磁碟。 請遵循下面刪除磁碟中的步驟。
移至要與資料磁碟中斷連結的虛擬機器,然後在虛擬機器的 [詳細資料] 中選取 [磁碟]。
![顯示虛擬機 [詳細數據] 窗格 [數據磁碟] 區段的螢幕快照。[數據磁碟] 底下的磁碟專案會反白顯示。](media/azure-stack-edge-gpu-manage-virtual-machine-disks-portal/list-data-disks-1.png)
在磁碟清單中,選取您想要中斷連結的磁碟。 在所選取磁碟的最右邊,選取中斷連結圖示 (「X」)。 所選的磁碟便會中斷連結。 選取 [儲存]。
![虛擬機的磁碟顯示螢幕快照。可中斷連結之未連結磁碟的 X 圖示,並反白顯示 [儲存] 按鈕。](media/azure-stack-edge-gpu-manage-virtual-machine-disks-portal/detach-data-disk-1.png)
磁碟中斷連結之後,虛擬機器便會更新。 重新整理頁面,以檢視更新後的資料磁碟清單。
刪除資料磁碟
請遵循下列步驟來刪除未連結至裝置上所部署 VM 的資料磁碟。
注意
在刪除資料磁碟之前,如果磁碟正在使用中,您必須將資料磁碟與 VM 中斷連結。
移至裝置上的 [虛擬機器],然後移至 [資源] 窗格。 選取 [磁碟]。
![顯示虛擬機 [資源] 刀鋒視窗上 [磁碟] 索引卷標的螢幕快照。[資源] 標籤和 [磁碟] 索引標籤會反白顯示。](media/azure-stack-edge-gpu-manage-virtual-machine-disks-portal/delete-disk-1.png)
在磁碟清單中,選取您想要刪除的磁碟。 在所選取磁碟的最右邊,選取刪除圖示 (垃圾桶)。
![顯示虛擬機 [資源] 刀鋒視窗上 [磁碟] 索引卷標的螢幕快照。已醒目提示含有垃圾桶圖示的數據磁碟,指出可以刪除它。](media/azure-stack-edge-gpu-manage-virtual-machine-disks-portal/delete-disk-2.png)
如果您沒有看到刪除圖示,則可以在 [連結的 VM] 資料行中選取 VM 名稱,然後將磁碟與 VM 中斷連結。
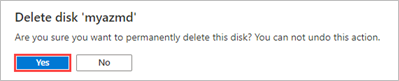
您會看到一則訊息,要求您確認要刪除磁碟。 此作業無法反轉。 選取 [是]。
刪除完成時,便會從清單中移除磁碟。
下一步
若要了解如何在 Azure Stack Edge Pro 裝置上部署虛擬機器,請參閱透過 Azure 入口網站部署虛擬機器。