Azure Databricks 叢集的區域災害復原
本文說明適用於 Azure Databricks 叢集的災害復原架構,以及完成該設計的步驟。
Azure Databricks 架構
當您從 Azure 入口網站 建立 Azure Databricks 工作區時,受控應用程式會部署為訂用帳戶中的 Azure 資源、所選 Azure 區域(例如美國西部)。 此設備會部署在 Azure 虛擬網絡 中,其中包含網路安全組和訂用帳戶中可用的 Azure 儲存體 帳戶。 虛擬網路提供 Databricks 工作區的周邊層級安全性,並透過網路安全組進行保護。 在工作區中,您會提供背景工作角色和驅動程式 VM 類型和 Databricks 運行時間版本,以建立 Databricks 叢集。 保存的數據可在您的記憶體帳戶中使用。 建立叢集之後,您可以透過筆記本、REST API 或 ODBC/JDBC 端點執行作業,方法是將它們附加至特定叢集。
Databricks 控制平面會管理及監視 Databricks 工作區環境。 任何管理作業,例如建立叢集,都會從控制平面起始。 所有元數據,例如排程工作,都會儲存在 Azure 資料庫中,而且資料庫備份會自動 異地復寫到已實作的配對區域 。
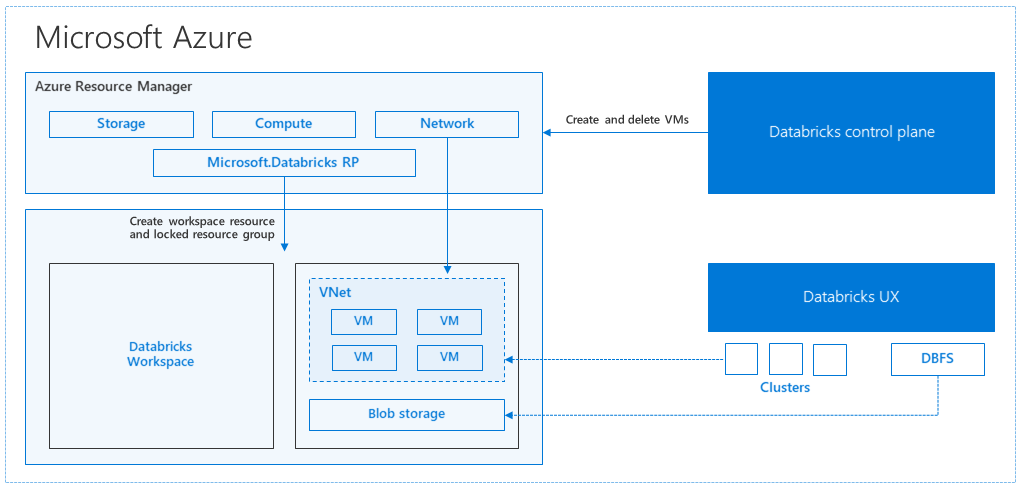
此架構的優點之一是使用者可以將 Azure Databricks 連線到其帳戶中的任何記憶體資源。 主要優點是計算 (Azure Databricks) 和記憶體都可以彼此獨立調整。
如何建立區域災害復原拓撲
在上述架構描述中,有數個元件用於具有 Azure Databricks 的巨量數據管線:Azure 儲存體、Azure 資料庫和其他數據源。 Azure Databricks 是 巨量數據管線的計算 。 這本質上是暫時的,這表示雖然您的數據仍可在 Azure 儲存體 中使用,但計算(Azure Databricks 叢集)可以終止,以避免在不需要計算時支付計算費用。 計算 (Azure Databricks) 和記憶體來源必須位於相同的區域中,讓作業不會遇到高延遲。
若要建立您自己的區域災害復原拓撲,請遵循下列需求:
在不同的 Azure 區域中布建多個 Azure Databricks 工作區。 例如,在美國東部建立主要 Azure Databricks 工作區。 在個別區域中建立次要災害復原 Azure Databricks 工作區,例如美國西部。 如需配對的 Azure 區域清單,請參閱 跨區域複寫。 如需 Azure Databricks 區域的詳細資訊,請參閱 支援的區域。
使用 異地備援記憶體。 根據預設,與 Azure Databricks 相關聯的數據會儲存在 Azure 儲存體 中,而 Databricks 作業的結果會儲存在 Azure Blob 儲存體 中,讓處理過的數據具有持久性,並在叢集終止后維持高可用性。 叢集記憶體和作業記憶體位於相同的可用性區域中。 為了防止區域無法使用,Azure Databricks 工作區預設會使用異地備援記憶體。 使用異地備援記憶體時,數據會復寫至 Azure 配對區域。 Databricks 建議您保留異地備援記憶體預設值,但如果您需要改用本地備援記憶體,您可以在工作區的 ARM 範本中設定
storageAccountSkuName為Standard_LRS。建立次要區域之後,您必須移轉使用者、使用者資料夾、筆記本、叢集設定、作業設定、連結庫、記憶體、init 腳本,以及重新設定訪問控制。 下一節將概述其他詳細數據。
區域災害
若要準備區域性災害,您必須在次要區域中明確維護另一組 Azure Databricks 工作區。 請參閱 災害復原。
我們建議的災害復原工具主要是 Terraform(適用於基礎結構複寫)和差異深度複製(適用於數據復寫)。
詳細的移轉步驟
安裝 Databricks CLI
本文中的範例使用 Databricks 命令行介面 (CLI),這是透過 Azure Databricks REST API 輕鬆使用的包裝函式。
執行任何移轉步驟之前,請先在本機計算機或虛擬機上安裝 Databricks CLI。 如需詳細資訊,請參閱 安裝 Databricks CLI。
注意
本文中提供的 Python 腳本適用於 Python 2.7 和更新版本。
設定兩個配置檔。
遵循 _中的步驟,設定兩個配置檔:一個用於主要工作區,另一個用於次要工作區。
databricks configure --profile primary
databricks configure --profile secondary
本文中的程式代碼區塊會使用對應的工作區命令,在每個後續步驟中的配置檔之間切換。 請確定您所建立的設定檔名稱會替換成每個程式代碼區塊。
EXPORT_PROFILE = "primary"
IMPORT_PROFILE = "secondary"
如有需要,您可以在命令行手動切換:
databricks workspace list --profile primary
databricks workspace list --profile secondary
移轉Microsoft Entra 標識碼 (先前稱為 Azure Active Directory) 使用者
手動將相同的Microsoft Entra ID(先前稱為 Azure Active Directory)使用者新增至主要工作區中的次要工作區。
移轉使用者資料夾和筆記本
使用下列 Python 程式代碼來移轉沙盒化用戶環境,其中包括每個使用者的巢狀資料夾結構和筆記本。
注意
連結庫不會在此步驟中複製,因為基礎 API 不支援這些連結庫。
將下列 Python 腳本複製並儲存至檔案,然後在 Databricks 命令行中執行它。 例如:
python scriptname.py。import sys import os import subprocess from subprocess import call, check_output EXPORT_PROFILE = "primary" IMPORT_PROFILE = "secondary" # Get a list of all users user_list_out = check_output(["databricks", "workspace", "list", "/Users", "--profile", EXPORT_PROFILE]) user_list = (user_list_out.decode(encoding="utf-8")).splitlines() print (user_list) # Export sandboxed environment(folders, notebooks) for each user and import into new workspace. #Libraries are not included with these APIs / commands. for user in user_list: #print("Trying to migrate workspace for user ".decode() + user) print (("Trying to migrate workspace for user ") + user) subprocess.call(str("mkdir -p ") + str(user), shell = True) export_exit_status = call("databricks workspace export_dir /Users/" + str(user) + " ./" + str(user) + " --profile " + EXPORT_PROFILE, shell = True) if export_exit_status==0: print ("Export Success") import_exit_status = call("databricks workspace import_dir ./" + str(user) + " /Users/" + str(user) + " --profile " + IMPORT_PROFILE, shell=True) if import_exit_status==0: print ("Import Success") else: print ("Import Failure") else: print ("Export Failure") print ("All done")移轉叢集組態
一旦移轉筆記本之後,您可以選擇性地將叢集組態移轉至新的工作區。 它幾乎是使用 databricks-cli 的完全自動化步驟,除非您想要執行選擇性叢集組態移轉,而不是針對所有步驟。
注意
沒有建立叢集設定端點,此腳本會立即嘗試建立每個叢集。 如果您的訂用帳戶中沒有足夠的核心可用,叢集建立可能會失敗。 只要成功傳輸組態,就可以忽略失敗。
下列腳本提供的腳本會列印從舊到新叢集標識符的對應,稍後可用於作業移轉(針對設定為使用現有叢集的作業)。
將下列 Python 腳本複製並儲存至檔案,然後在 Databricks 命令行中執行它。 例如:
python scriptname.py。import sys import os import subprocess import json from subprocess import call, check_output EXPORT_PROFILE = "primary" IMPORT_PROFILE = "secondary" # Get all clusters info from old workspace clusters_out = check_output(["databricks", "clusters", "list", "--profile", EXPORT_PROFILE]) clusters_info_list = str(clusters_out.decode(encoding="utf-8")).splitlines() print("Printing Cluster info List") print(clusters_info_list) # Create a list of all cluster ids clusters_list = [] ##for cluster_info in clusters_info_list: clusters_list.append(cluster_info.split(None, 1)[0]) for cluster_info in clusters_info_list: if cluster_info != '': clusters_list.append(cluster_info.split(None, 1)[0]) # Optionally filter cluster ids out manually, so as to create only required ones in new workspace # Create a list of mandatory / optional create request elements cluster_req_elems = ["num_workers","autoscale","cluster_name","spark_version","spark_conf","node_type_id","driver_node_type_id","custom_tags","cluster_log_conf","spark_env_vars","autotermination_minutes","enable_elastic_disk"] print("Printing Cluster element List") print (cluster_req_elems) print(str(len(clusters_list)) + " clusters found in the primary site" ) print ("---------------------------------------------------------") # Try creating all / selected clusters in new workspace with same config as in old one. cluster_old_new_mappings = {} i = 0 for cluster in clusters_list: i += 1 print("Checking cluster " + str(i) + "/" + str(len(clusters_list)) + " : " +str(cluster)) cluster_get_out_f = check_output(["databricks", "clusters", "get", "--cluster-id", str(cluster), "--profile", EXPORT_PROFILE]) cluster_get_out=str(cluster_get_out_f.decode(encoding="utf-8")) print ("Got cluster config from old workspace") print (cluster_get_out) # Remove extra content from the config, as we need to build create request with allowed elements only cluster_req_json = json.loads(cluster_get_out) cluster_json_keys = cluster_req_json.keys() #Don't migrate Job clusters if cluster_req_json['cluster_source'] == u'JOB' : print ("Skipping this cluster as it is a Job cluster : " + cluster_req_json['cluster_id'] ) print ("---------------------------------------------------------") continue #cluster_req_json.pop(key, None) for key in cluster_json_keys: if key not in cluster_req_elems: print (cluster_req_json) #cluster_del_item=cluster_json_keys .keys() cluster_req_json.popitem(key, None) # Create the cluster, and store the mapping from old to new cluster ids #Create a temp file to store the current cluster info as JSON strCurrentClusterFile = "tmp_cluster_info.json" #delete the temp file if exists if os.path.exists(strCurrentClusterFile) : os.remove(strCurrentClusterFile) fClusterJSONtmp = open(strCurrentClusterFile,"w+") fClusterJSONtmp.write(json.dumps(cluster_req_json)) fClusterJSONtmp.close() #cluster_create_out = check_output(["databricks", "clusters", "create", "--json", json.dumps(cluster_req_json), "--profile", IMPORT_PROFILE]) cluster_create_out = check_output(["databricks", "clusters", "create", "--json-file", strCurrentClusterFile , "--profile", IMPORT_PROFILE]) cluster_create_out_json = json.loads(cluster_create_out) cluster_old_new_mappings[cluster] = cluster_create_out_json['cluster_id'] print ("Cluster create request sent to secondary site workspace successfully") print ("---------------------------------------------------------") #delete the temp file if exists if os.path.exists(strCurrentClusterFile) : os.remove(strCurrentClusterFile) print ("Cluster mappings: " + json.dumps(cluster_old_new_mappings)) print ("All done") print ("P.S. : Please note that all the new clusters in your secondary site are being started now!") print (" If you won't use those new clusters at the moment, please don't forget terminating your new clusters to avoid charges")移轉作業組態
如果您在上一個步驟中移轉叢集組態,您可以選擇將作業組態移轉至新的工作區。 這是使用 databricks-cli 的完全自動化步驟,除非您想要執行選擇性作業組態移轉,而不是對所有作業執行。
注意
排程作業的組態也包含「排程」資訊,因此根據預設,在移轉時會根據設定的時間開始運作。 因此,下列程式代碼區塊會在移轉期間移除任何排程資訊(以避免跨舊工作區和新工作區重複執行)。 當您準備好進行完全移轉之後,請設定這類工作的排程。
作業組態需要新叢集或現有叢集的設定。 如果使用現有的叢集,下列腳本 /code 會嘗試以新的叢集標識符取代舊的叢集標識符。
將下列 Python 腳本複製並儲存至檔案。 將和
new_cluster_id的值old_cluster_id取代為上一個步驟中完成的叢集移轉輸出。 在 databricks-cli 命令列中執行它,例如python scriptname.py。import sys import os import subprocess import json from subprocess import call, check_output EXPORT_PROFILE = "primary" IMPORT_PROFILE = "secondary" # Please replace the old to new cluster id mappings from cluster migration output cluster_old_new_mappings = {"0227-120427-tryst214": "0229-032632-paper88"} # Get all jobs info from old workspace try: jobs_out = check_output(["databricks", "jobs", "list", "--profile", EXPORT_PROFILE]) jobs_info_list = jobs_out.splitlines() except: print("No jobs to migrate") sys.exit(0) # Create a list of all job ids jobs_list = [] for jobs_info in jobs_info_list: jobs_list.append(jobs_info.split(None, 1)[0]) # Optionally filter job ids out manually, so as to create only required ones in new workspace # Create each job in the new workspace based on corresponding settings in the old workspace for job in jobs_list: print("Trying to migrate " + str(job)) job_get_out = check_output(["databricks", "jobs", "get", "--job-id", job, "--profile", EXPORT_PROFILE]) print("Got job config from old workspace") job_req_json = json.loads(job_get_out) job_req_settings_json = job_req_json['settings'] # Remove schedule information so job doesn't start before proper cutover job_req_settings_json.pop('schedule', None) # Replace old cluster id with new cluster id, if job configured to run against an existing cluster if 'existing_cluster_id' in job_req_settings_json: if job_req_settings_json['existing_cluster_id'] in cluster_old_new_mappings: job_req_settings_json['existing_cluster_id'] = cluster_old_new_mappings[job_req_settings_json['existing_cluster_id']] else: print("Mapping not available for old cluster id " + str(job_req_settings_json['existing_cluster_id'])) continue call(["databricks", "jobs", "create", "--json", json.dumps(job_req_settings_json), "--profile", IMPORT_PROFILE]) print("Sent job create request to new workspace successfully") print("All done")移轉連結庫
目前沒有任何直接的方式可將連結庫從某個工作區移轉至另一個工作區。 相反地,請手動將這些連結庫重新安裝到新的工作區。 您可以使用 Databricks CLI 將此作業自動化,以將自定義連結庫上傳至工作區。
移轉 Azure Blob 記憶體和 Azure Data Lake Storage 掛接
使用筆記本型解決方案,手動重新掛接所有 Azure Blob 記憶體和 Azure Data Lake Storage (Gen 2) 裝入點。 記憶體資源會掛接在主要工作區中,而且必須在次要工作區中重複。 沒有外部 API 可供掛接。
移轉叢集 init 腳本
任何叢集初始化腳本都可以使用 Databricks CLI 從舊版移轉至新的工作區。 首先,將所需的腳本複製到本機桌面或虛擬機。 接下來,將這些腳本複製到相同路徑的新工作區。
注意
如果您已將初始化文本儲存在 DBFS 中,請先將它們遷移至支援的位置。 請參閱 _。
// Primary to local
databricks fs cp dbfs:/Volumes/my_catalog/my_schema/my_volume/ ./old-ws-init-scripts --profile primary

// Local to Secondary workspace
databricks fs cp old-ws-init-scripts dbfs:/Volumes/my_catalog/my_schema/my_volume/ --profile secondary
手動重新設定並重新套用訪問控制。
如果您現有的主要工作區設定為使用 進階或企業層 (SKU),您可能也會使用存取控制。
如果您使用訪問控制,請手動將訪問控制重新套用至資源(Notebooks、Clusters、Jobs、Tables)。
Azure 生態系統的災害復原
如果您使用其他 Azure 服務,請務必針對這些服務實作災害復原最佳做法。 例如,如果您選擇使用外部 Hive 中繼存放區實例,您應該考慮 Azure SQL 資料庫、Azure HDInsight 和/或 適用於 MySQL 的 Azure 資料庫 的災害復原。 如需災害復原的一般資訊,請參閱 Azure 應用程式的災害復原。
下一步
如需詳細資訊,請參閱 Azure Databricks 檔。