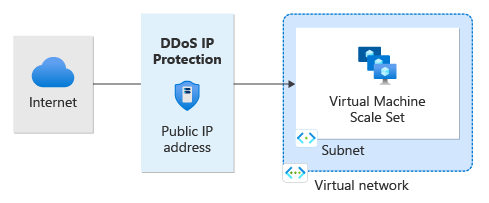
使用 Azure PowerShell 開始使用 Azure DDoS IP 保護。 在此快速入門中,您將利用 PowerShell 啟用 DDoS IP 保護,並將其連結至公用 IP 位址。
必要條件
- 具有有效訂用帳戶的 Azure 帳戶。 免費建立帳戶。
- 已在本機安裝 Azure PowerShell 或 Azure Cloud Shell
- 如果您選擇在本機安裝和使用 PowerShell,此文章會要求使用 Azure PowerShell 模組 9.0.0 版或更新版本。 執行
Get-Module -ListAvailable Az以尋找安裝的版本。 如果您需要升級,請參閱安裝 Azure PowerShell 模組。 如果正在本機執行 PowerShell,也需要執行Connect-AzAccount,以建立與 Azure 的連線。
注意
建議您使用 Azure Az PowerShell 模組來與 Azure 互動。 若要開始使用,請參閱安裝 Azure PowerShell (部分機器翻譯)。 若要了解如何移轉至 Az PowerShell 模組,請參閱將 Azure PowerShell 從 AzureRM 移轉至 Az。
Azure Cloud Shell
Azure Cloud Shell 是裝載於 Azure 中的互動式殼層環境,可在瀏覽器中使用。 您可以使用 Bash 或 PowerShell 搭配 Cloud Shell,與 Azure 服務共同使用。 您可以使用 Cloud Shell 預先安裝的命令,執行本文提到的程式碼,而不必在本機環境上安裝任何工具。
要啟動 Azure Cloud Shell:
| 選項 | 範例/連結 |
|---|---|
| 選取程式碼或命令區塊右上角的 [試試看]。 選取 [試試看] 並不會自動將程式碼或命令複製到 Cloud Shell 中。 |  |
| 請前往 https://shell.azure.com,或選取 [啟動 Cloud Shell] 按鈕,在瀏覽器中開啟 Cloud Shell。 |  |
| 選取 Azure 入口網站右上方功能表列上的 [Cloud Shell] 按鈕。 |  |
若要使用 Azure Cloud Shell:
啟動 Cloud Shell。
選取程式碼區塊 (或命令區塊) 上的 [複製] 按鈕以複製程式碼或命令。
透過在 Windows 和 Linux 上選取 Ctrl+Shift+V;或在 macOS 上選取 Cmd+Shift+V,將程式碼或命令貼到 Cloud Shell 工作階段中。
選取 Enter 鍵執行程式碼或命令。
為公用 IP 位址啟用 DDoS IP 保護
您可以在建立公用 IP 位址時啟用 DDoS IP 保護。 在此範例中,我們會將公用 IP 位址命名為 myStandardPublicIP:
#Creates the resource group
New-AzResourceGroup -Name MyResourceGroup -Location eastus

#Creates the IP address and enables DDoS IP Protection
New-AzPublicIpAddress -Name myStandardPublicIP -ResourceGroupName MyResourceGroup -Sku Standard -Location "East US" -AllocationMethod Static -DdosProtectionMode Enabled
注意
DDoS IP 保護只會在公用 IP 標準 SKU 上啟用。
為現有的公用 IP 位址啟用 DDoS IP 保護
您可以建立現有公用 IP 位址的關聯:
#Gets the public IP address
$publicIp = Get-AzPublicIpAddress -Name myStandardPublicIP -ResourceGroupName MyResourceGroup

#Enables DDoS IP Protection for the public IP address
$publicIp.DdosSettings.ProtectionMode = 'Enabled'

#Updates public IP address
Set-AzPublicIpAddress -PublicIpAddress $publicIp
驗證和測試
檢查公用 IP 位址的詳細資料,並確認已啟用 DDoS IP 保護。
#Gets the public IP address
$publicIp = Get-AzPublicIpAddress -Name myStandardPublicIP -ResourceGroupName MyResourceGroup

#Checks the status of the public IP address
$protectionMode = $publicIp.DdosSettings.ProtectionMode

#Returns the status of the public IP address
$protectionMode
停用現有公用 IP 位址的 DDoS IP 保護
$publicIp = Get-AzPublicIpAddress -Name myStandardPublicIP -ResourceGroupName MyResourceGroup

$publicIp.DdosSettings.ProtectionMode = 'Disabled'

Set-AzPublicIpAddress -PublicIpAddress $publicIp
注意
將 DDoS IP 保護從 [已啟用] 變更為 [已停用] 時,公用 IP 資源的遙測將不再作用中。
清除資源
您可以保留資源,以供下一個教學課程使用。 若不再需要,請刪除 MyResourceGroup 資源群組。 刪除該資源群組時,也將同時刪除 DDoS 保護計劃及其所有相關資源。
Remove-AzResourceGroup -Name MyResourceGroup
下一步
在本快速入門中,您已建立:
- 資源群組
- 公用 IP 位址
您已使用 Azure PowerShell 啟用 DDoS IP 保護。 若要了解如何檢視及設定 DDoS 保護計劃的遙測,請繼續進行教學課程。
