本文將示範如何使用 Azure VM Image Builder 範本,在 Azure Compute Gallery 中建立自訂的虛擬機映像,並將其全球分發。 接著你可以用映像檔在 Microsoft Dev Box 裡建立開發者盒子。
標準化的虛擬機映像檔能透過預先定義的安全、設定與軟體,協助你確保開發機部署一致。 但手動設定影像管線既耗時又複雜,且建立自訂虛擬機(VM)映像檔既困難又不可靠。
Azure VM Image Builder 是一項基於 HashiCorp Packer 的託管服務,簡化了為開發機建立與建置虛擬機映像的流程。 本文中的圖片建構器範本包含安裝 Visual Studio Code 和 Chocolatey 的自訂步驟。
VM 影像建構器可以:
- 抽象化手動步驟或複雜的工具與流程,並隱藏 Azure 專屬的需求。 例如,執行
sysprep以泛化映像,但允許進階使用者覆寫。 - 使用現有的映像建置流程。 你可以從你的管線呼叫 VM Image Builder,或在 Azure Pipelines 中使用 Azure VM Image Builder 服務任務。
- 從各種來源收集客製化資料,這樣你就不用自己收集了。
- 與 Azure Compute Gallery 整合,建立一套用於全球分發、複製、版本管理與擴展的影像管理系統。 你可以將映像檔分發為虛擬硬碟和受管理映像檔,而不必重建它。
重要
Microsoft Dev Box 僅支援使用 受信任啟動 安全類型的映像檔。
必要條件
本文範例使用 Azure PowerShell。 你也可以使用 Azure CLI。
| 類別 | 需求 |
|---|---|
| 工具與權限 | 一個你擁有 擁有者 或 貢獻 者權限的 Azure 資源群組。 |
| Tools | 安裝了 Azure PowerShell 6.0 或更新版本。 相關說明請參見 Windows 安裝 Azure PowerShell。 |
設定工具與角色
你需要設定工具和角色:
- 安裝必要的Azure PowerShell模組。
- 為你多次使用的資訊設定變數。
- 註冊必要的 Azure 提供者。
- 為你的資源群組建立使用者身份,並指派一個允許分發圖片的角色。
安裝 PowerShell 模組
請執行以下指令安裝所需的 PowerShell 模組:
'Az.ImageBuilder', 'Az.ManagedServiceIdentity' | ForEach-Object {Install-Module -Name $_ -AllowPrerelease}
回應關於不可信倉庫的提示 Y 。
設定變數
建立變數來儲存你多次使用的資訊。 執行以下程式碼,替換 <resource-group> 成你的資源群組名稱和 <location> 你想使用的 Azure 區域。
# Get existing context
$currentAzContext = Get-AzContext

# Get your current subscription ID
$subscriptionID=$currentAzContext.Subscription.Id

# Destination image resource group
$imageResourceGroup="<resource-group>"

# Location
$location="<location>"

# Image distribution metadata reference name
$runOutputName="aibCustWinManImg01"

# Image template name
$imageTemplateName="vscodeWinTemplate"
註冊 Azure 資源提供者
要使用 VM Image Builder,必須註冊以下 Azure 資源提供者:
Microsoft.VirtualMachineImagesMicrosoft.ComputeMicrosoft.NetworkMicrosoft.StorageMicrosoft.KeyVaultMicrosoft.ContainerInstance
請執行以下指令檢查服務提供者註冊:
Get-AzResourceProvider -ProviderNamespace "Microsoft.VirtualMachineImages", "Microsoft.Compute", "Microsoft.Network", "Microsoft.Storage", "Microsoft.KeyVault", "Microsoft.ContainerInstance" | Format-table -Property ProviderNamespace,RegistrationState如果任何提供者註冊沒有傳回
Registered,請執行Register-AzResourceProvider命令註冊提供者。 以下範例註冊Microsoft.VirtualMachineImages資源提供者。Register-AzResourceProvider -ProviderNamespace Microsoft.VirtualMachineImages
建立並指派使用者身份
建立一個 Azure 角色定義,允許分發映像檔。 然後為您的資源群組建立使用者指派的身分識別,並將角色指派給該使用者身分識別。 VM Image Builder 利用使用者身份將影像儲存在 Azure Compute Gallery 中。
執行以下程式碼來建立 Azure 角色定義和使用者身份。
# Set up a unique role definition name
$timeInt=$(get-date -UFormat "%s")
$imageRoleDefName="Azure Image Builder Image Def"+$timeInt
$identityName="aibIdentity"+$timeInt

# Create an identity
New-AzUserAssignedIdentity -ResourceGroupName $imageResourceGroup -Name $identityName -Location $location

$identityNameResourceId=$(Get-AzUserAssignedIdentity -ResourceGroupName $imageResourceGroup -Name $identityName).Id
$identityNamePrincipalId=$(Get-AzUserAssignedIdentity -ResourceGroupName $imageResourceGroup -Name $identityName).PrincipalId
執行以下程式碼下載一個允許分發映像檔的 Azure 角色定義範本,更新範本中的參數,並將角色指派給使用者身份。
$aibRoleImageCreationUrl="https://raw.githubusercontent.com/azure/azvmimagebuilder/master/solutions/12_Creating_AIB_Security_Roles/aibRoleImageCreation.json"
$aibRoleImageCreationPath = "aibRoleImageCreation.json"

# Download the configuration
Invoke-WebRequest -Uri $aibRoleImageCreationUrl -OutFile $aibRoleImageCreationPath -UseBasicParsing
((Get-Content -path $aibRoleImageCreationPath -Raw) -replace '<subscriptionID>',$subscriptionID) | Set-Content -Path $aibRoleImageCreationPath
((Get-Content -path $aibRoleImageCreationPath -Raw) -replace '<rgName>', $imageResourceGroup) | Set-Content -Path $aibRoleImageCreationPath
((Get-Content -path $aibRoleImageCreationPath -Raw) -replace 'Azure Image Builder Service Image Creation Role', $imageRoleDefName) | Set-Content -Path $aibRoleImageCreationPath

# Create a role definition
New-AzRoleDefinition -InputFile  ./aibRoleImageCreation.json

# Grant the role definition to the VM Image Builder service principal
New-AzRoleAssignment -ObjectId $identityNamePrincipalId -RoleDefinitionName $imageRoleDefName -Scope "/subscriptions/$subscriptionID/resourceGroups/$imageResourceGroup"
建立圖庫和虛擬機影像建置器範本
要在 Azure Compute Gallery 使用 VM Image Builder,你需要一個圖庫和一個圖片定義。 以下步驟是建立新的相簿與影像定義,並自訂虛擬機影像建構器範本。
執行以下命令以建立新的資源庫及具有 Windows 365 映像所需受信任啟動安全類型的映像定義。
# Gallery name
$galleryName= "devboxGallery"

# Image definition name
$imageDefName ="vscodeImageDef"

# Second replication region
$replRegion2="eastus"

# Create the gallery
New-AzGallery -GalleryName $galleryName -ResourceGroupName $imageResourceGroup -Location $location

$SecurityType = @{Name='SecurityType';Value='TrustedLaunch'}
$features = @($SecurityType)

# Create the image definition
New-AzGalleryImageDefinition -GalleryName $galleryName -ResourceGroupName $imageResourceGroup -Location $location -Name $imageDefName -OsState generalized -OsType Windows -Publisher 'myCompany' -Offer 'vscodebox' -Sku '1-0-0' -Feature $features -HyperVGeneration "V2"
將以下 Azure Resource Manager 的 VM Image Builder 範本複製並貼上到新檔案中。 將檔案儲存到像 c:\temp\mytemplate.json 這類位置,然後關閉檔案。
範本定義原始影像及套用的自訂,安裝 Chocolatey 與 Visual Studio Code,並指示影像發行位置。
{
   "$schema": "http://schema.management.azure.com/schemas/2015-01-01/deploymentTemplate.json#",
   "contentVersion": "1.0.0.0",
   "parameters": {
     "imageTemplateName": {
      "type": "string"
     },
     "api-version": {
      "type": "string"
     },
     "svclocation": {
      "type": "string"
     }
   },
   "variables": {},
   "resources": [
     {
      "name": "[parameters('imageTemplateName')]",
      "type": "Microsoft.VirtualMachineImages/imageTemplates",
      "apiVersion": "[parameters('api-version')]",
      "location": "[parameters('svclocation')]",
      "dependsOn": [],
      "tags": {
        "imagebuilderTemplate": "win11multi",
        "userIdentity": "enabled"
      },
      "identity": {
        "type": "UserAssigned",
        "userAssignedIdentities": {
         "<imgBuilderId>": {}
        }
      },
      "properties": {
        "buildTimeoutInMinutes": 100,
        "vmProfile": {
         "vmSize": "Standard_DS2_v2",
         "osDiskSizeGB": 127
        },
      "source": {
         "type": "PlatformImage",
         "publisher": "MicrosoftWindowsDesktop",
         "offer": "Windows-11",
         "sku": "win11-21h2-ent",
         "version": "latest"
      },
        "customize": [
         {
            "type": "PowerShell",
            "name": "Install Choco and VS Code",
            "inline": [
               "Set-ExecutionPolicy Bypass -Scope Process -Force; [System.Net.ServicePointManager]::SecurityProtocol = [System.Net.ServicePointManager]::SecurityProtocol -bor 3072; iex ((New-Object System.Net.WebClient).DownloadString('https://community.chocolatey.org/install.ps1'))",
               "choco install -y vscode"
            ]
         }
        ],
         "distribute":
         [
            {
               "type": "SharedImage",
               "galleryImageId": "/subscriptions/<subscriptionID>/resourceGroups/<rgName>/providers/Microsoft.Compute/galleries/<sharedImageGalName>/images/<imageDefName>",
               "runOutputName": "<runOutputName>",
               "artifactTags": {
                  "source": "azureVmImageBuilder",
                  "baseosimg": "win11multi"
               },
               "replicationRegions": [
                 "<region1>",
                 "<region2>"
               ]
            }
         ]
      }
     }
   ]
  }
用你的設定配置新範本,執行以下程式碼,並替換
<template-location>成你的範本檔案位置和名稱。$templateFilePath = "<template-location>" (Get-Content -path $templateFilePath -Raw ) -replace '<subscriptionID>',$subscriptionID | Set-Content -Path $templateFilePath (Get-Content -path $templateFilePath -Raw ) -replace '<rgName>',$imageResourceGroup | Set-Content -Path $templateFilePath (Get-Content -path $templateFilePath -Raw ) -replace '<runOutputName>',$runOutputName | Set-Content -Path $templateFilePath (Get-Content -path $templateFilePath -Raw ) -replace '<imageDefName>',$imageDefName | Set-Content -Path $templateFilePath (Get-Content -path $templateFilePath -Raw ) -replace '<sharedImageGalName>',$galleryName| Set-Content -Path $templateFilePath (Get-Content -path $templateFilePath -Raw ) -replace '<region1>',$location | Set-Content -Path $templateFilePath (Get-Content -path $templateFilePath -Raw ) -replace '<region2>',$replRegion2 | Set-Content -Path $templateFilePath ((Get-Content -path $templateFilePath -Raw) -replace '<imgBuilderId>',$identityNameResourceId) | Set-Content -Path $templateFilePath
建立並檢視映像檔
將自訂範本提交到 VM Image Builder 服務,然後建立映像檔。
執行以下指令將你的範本提交給服務。 該指令會下載任何相依的產物,例如腳本,並將其儲存在以
IT_為前綴的暫存資源群組中。New-AzResourceGroupDeployment -ResourceGroupName $imageResourceGroup -TemplateFile $templateFilePath -Api-Version "2020-02-14" -imageTemplateName $imageTemplateName -svclocation $location透過在範本中呼叫動作
Run來建立影像。 在確認提示中輸入 Y。YesInvoke-AzResourceAction -ResourceName $imageTemplateName -ResourceGroupName $imageResourceGroup -ResourceType Microsoft.VirtualMachineImages/imageTemplates -ApiVersion "2020-02-14" -Action Run
重要
建立影像並複製到兩個區域可能需要一些時間。 你可能會看到 PowerShell 和 Azure 入口網站的進度報告不同。 等到流程完成後,再從映像檔開始建立開發框定義。
取得圖片相關資訊
執行以下指令即可取得新建置映像檔的資訊,包括執行狀態與配置狀態。
Get-AzImageBuilderTemplate -ImageTemplateName $imageTemplateName -ResourceGroupName $imageResourceGroup | Select-Object -Property Name, LastRunStatusRunState, LastRunStatusMessage, ProvisioningState
範例輸出:
Name              LastRunStatusRunState LastRunStatusMessage ProvisioningState
----              --------------------- -------------------- -----------------
vscodeWinTemplate Running                                    Succeeded
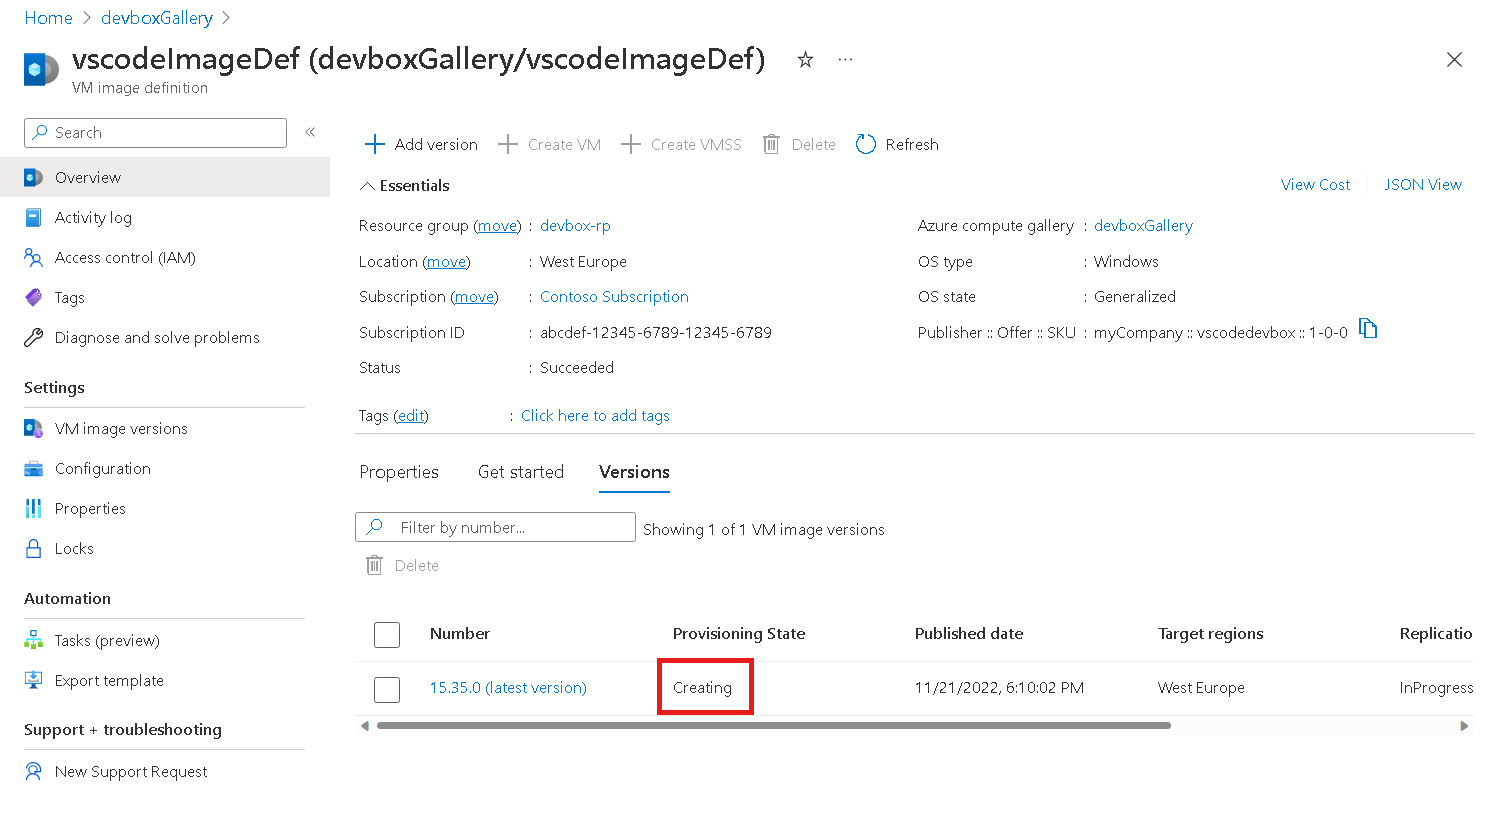
您也可以在 Azure 入口網站中檢視映像的布建狀態。 請前往您的相簿查看圖片定義。
設定畫廊並建立開發框
一旦您的自訂映像儲存在資源庫中,您即可設定資源庫以在 Microsoft 開發箱開發中心使用其映像。 更多資訊請參閱 「配置 Microsoft Dev Box 的 Azure Compute Gallery」。
當你在開發中心讓相簿圖片可用後,你可以將自訂圖片附加到開發箱專案,並用它來建立開發箱。 如需詳細資訊,請參閱快速入門:設定 Microsoft 開發箱。
