本文會引導您使用 Spring Cloud Functions 開發 Java 函式,並將其發佈至 Azure Functions。 當您完成時,您的函式程式碼會在 Azure 中的取用方案上執行,並且可使用 HTTP 要求來觸發。
必要條件
- Azure 訂用帳戶。 如果您沒有 Azure 訂用帳戶,請在開始前建立免費帳戶。
若要使用 Java 開發函式,您必須安裝下列項目:
- Java Developer Kit 第 11 版
- Apache Maven 3.0 版或更高版本
- Azure CLI
- Azure Functions Core Tools 第 4 版
重要
您必須將 JAVA_HOME 環境變數設定為 JDK 的安裝位置,才能完成本快速入門。
請確定您的核心工具版本至少為 4.0.5455。
我們要建置的專案
我們將建置傳統 「Hello, World」 函式,以在 Azure Functions 上執行,並使用 Spring Cloud 函式進行設定。
函式會 User 接收 JSON 物件,其中包含用戶名稱,並將包含歡迎訊息的物件傳回 Greeting 給該使用者。
該專案可在 GitHub 倉庫的 Spring Cloud Function 範例 azure-function-java-worker 中取得。 如果您想要查看本快速入門中所述的最終工作,可以直接使用該範例。
建立新的 Maven 專案
我們將建立空的 Maven 專案,並使用 Spring Cloud Function 和 Azure Functions 進行設定。
在空白資料夾中,建立新的 pom.xml 檔案,並從範例專案的 pom.xml 檔案複製/貼上內容。
注意
此檔案會使用 Spring Boot 和 Spring Cloud 函式中的 Maven 相依性,並設定 Spring Boot 和 Azure Functions Maven 外掛程式。
您需要為應用程式自訂幾個屬性:
-
<functionAppName>是 Azure 函式的名稱 -
<functionAppRegion>是部署函式的 Azure 區域名稱 -
<functionResourceGroup>是您使用的 Azure 資源群組名稱
直接在pom.xml檔案頂端附近變更這些屬性,如下列範例所示:
    <properties>
        <java.version>11</java.version>

        <!-- Spring Boot start class. WARNING: correct class must be set -->
        <start-class>com.example.DemoApplication</start-class>

        <!-- customize those properties. WARNING: the functionAppName should be unique across Azure -->
        <azure.functions.maven.plugin.version>1.36.0</azure.functions.maven.plugin.version>
        <functionResourceGroup>my-spring-function-resource-group</functionResourceGroup>
        <functionAppServicePlanName>my-spring-function-service-plan</functionAppServicePlanName>
        <functionAppName>my-spring-function</functionAppName>
        <functionPricingTier>Y1</functionPricingTier>
        <functionAppRegion>eastus</functionAppRegion>
    </properties>
建立 Azure 組態檔
建立 src/main/resources 資料夾,並將下列 Azure Functions 組態檔新增至其中。
host.json:
{
  "version": "2.0",
  "extensionBundle": {
    "id": "Microsoft.Azure.Functions.ExtensionBundle",
    "version": "[4.*, 5.2.0)"
  },
  "functionTimeout": "00:10:00"
}
local.settings.json:
{
  "IsEncrypted": false,
  "Values": {
    "AzureWebJobsStorage": "",
    "FUNCTIONS_WORKER_RUNTIME": "java",
    "FUNCTIONS_EXTENSION_VERSION": "~4",
    "AzureWebJobsDashboard": ""
  }
}
建立網域物件
Azure Functions 可以接收及傳送 JSON 格式的物件。
我們現在要建立 User 和 Greeting 物件,以代表我們的領域模型。
如果您想要自定義本快速入門,並讓其更有趣,您可以建立更複雜的物件,並提供更多屬性。
建立 src/main/java/com/example/model 資料夾,並新增下列兩個檔案:
User.java:
package com.example.model;

public class User {

    private String name;

    public User() {
    }

    public User(String name) {
        this.name = name;
    }

    public String getName() {
        return name;
    }

    public void setName(String name) {
        this.name = name;
    }
}
Greeting.java:
package com.example.model;

public class Greeting {

    private String message;

    public Greeting() {
    }

    public Greeting(String message) {
        this.message = message;
    }

    public String getMessage() {
        return message;
    }

    public void setMessage(String message) {
        this.message = message;
    }
}
建立 Spring Boot 應用程式
此應用程式會管理所有商業規則,並可存取完整的 Spring Boot 生態系統。 這項功能相較於標準 Azure 函式,為您提供兩大主要優點:
- 它不依賴 Azure Functions API,因此您可以輕鬆地將它移植到其他系統。 例如,您可以在一般的 Spring Boot 應用程式中重複使用它。
- 您可以使用 Spring Boot 中的所有
@Enable批注來新增功能。
在 src/main/java/com/example 資料夾中,建立下列檔案,這是一般的 Spring Boot 應用程式:
DemoApplication.java:
package com.example;

import org.springframework.boot.SpringApplication;
import org.springframework.boot.autoconfigure.SpringBootApplication;

@SpringBootApplication
public class DemoApplication {
    public static void main(String[] args) throws Exception {
        SpringApplication.run(DemoApplication.class, args);
    }
}
現在, 在 src/main/java/com/example/你好 資料夾中建立下列檔案。 此程式代碼包含 Spring Boot 元件,代表我們想要執行的函式:
Hello.java:
package com.example.hello;

import com.example.model.*;
import org.springframework.stereotype.Component;
import java.util.function.Function;

@Component
public class Hello implements Function<User, Greeting> {

    @Override
    public Greeting apply(User user) {
        return new Greeting("Hello, " + user.getName() + "!\n");
    }
}
注意
函數 Hello 是相當具針對性的:
- 它是
java.util.function.Function。 其中包含商業規則,並使用標準 Java API 將一個物件轉換成另一個物件。 - 因為它有
@Component批注,所以它是 Spring Bean,依預設其名稱與 類別相同,但開頭為小寫字元:hello。 如果您想要在應用程式中建立其他函式,請遵循此命名慣例非常重要。 名稱必須符合我們將在下一節中建立的 Azure Functions 名稱。
建立 Azure 函式
為了受益於完整的 Azure Functions API,我們現在會撰寫 Azure 函式,將執行委派給在上一個步驟中建立的 Spring Cloud 函式。
在 src/main/java/com/example/你好 資料夾中,建立下列 Azure Function 類別檔案:
HelloHandler.java:
package com.example.hello;

import com.microsoft.azure.functions.*;
import com.microsoft.azure.functions.annotation.AuthorizationLevel;
import com.microsoft.azure.functions.annotation.FunctionName;
import com.microsoft.azure.functions.annotation.HttpTrigger;
import com.example.model.*;
import org.springframework.beans.factory.annotation.Autowired;
import org.springframework.stereotype.Component;

import java.util.Optional;

@Component
public class HelloHandler {

    @Autowired
    private Hello hello;

    @FunctionName("hello")
    public HttpResponseMessage execute(
        @HttpTrigger(name = "request", methods = {HttpMethod.GET, HttpMethod.POST}, authLevel = AuthorizationLevel.ANONYMOUS) HttpRequestMessage<Optional<User>> request, ExecutionContext context) {
        User user = request.getBody()
                           .filter(u -> u.getName() != null)
                           .orElseGet(() -> new User(request.getQueryParameters().getOrDefault("name", "world")));
        context.getLogger().info("Greeting user name: " + user.getName());
        return request.createResponseBuilder(HttpStatus.OK)
                      .body(hello.apply(user))
                      .header("Content-Type", "application/json")
                      .build();
    }
}
此 Java 類別是 Azure 函式,具有下列有趣的功能:
- 類別具有
@Component註釋,因此它是 Spring Bean。 - 註解所
@FunctionName("hello")定義的函式名稱為hello。 - 類別會實作實際的 Azure 函式,因此您可以在這裡使用完整的 Azure Functions API。
新增單元測試
此步驟是選擇性的,但建議驗證應用程式是否正常運作。
建立 src/test/java/com/example 資料夾,並新增下列 JUnit 測試:
HelloTest.java:
package com.example;

import com.example.hello.Hello;
import com.example.model.Greeting;
import com.example.model.User;
import org.junit.jupiter.api.Test;

import static org.assertj.core.api.Assertions.assertThat;

public class HelloTest {

    @Test
    public void test() {
        Greeting result = new Hello().apply(new User("foo"));
        assertThat(result.getMessage()).isEqualTo("Hello, foo!\n");
    }
}
您現在可以使用 Maven 來測試 Azure 函式:
mvn clean test
在本機執行函式
將應用程式部署至 Azure Function 之前,讓我們先在本機進行測試。
首先,您需要將應用程式封裝成 Jar 檔案:
mvn package
現在已封裝應用程式,您可以使用 Maven 外掛程式來執行它 azure-functions :
mvn azure-functions:run
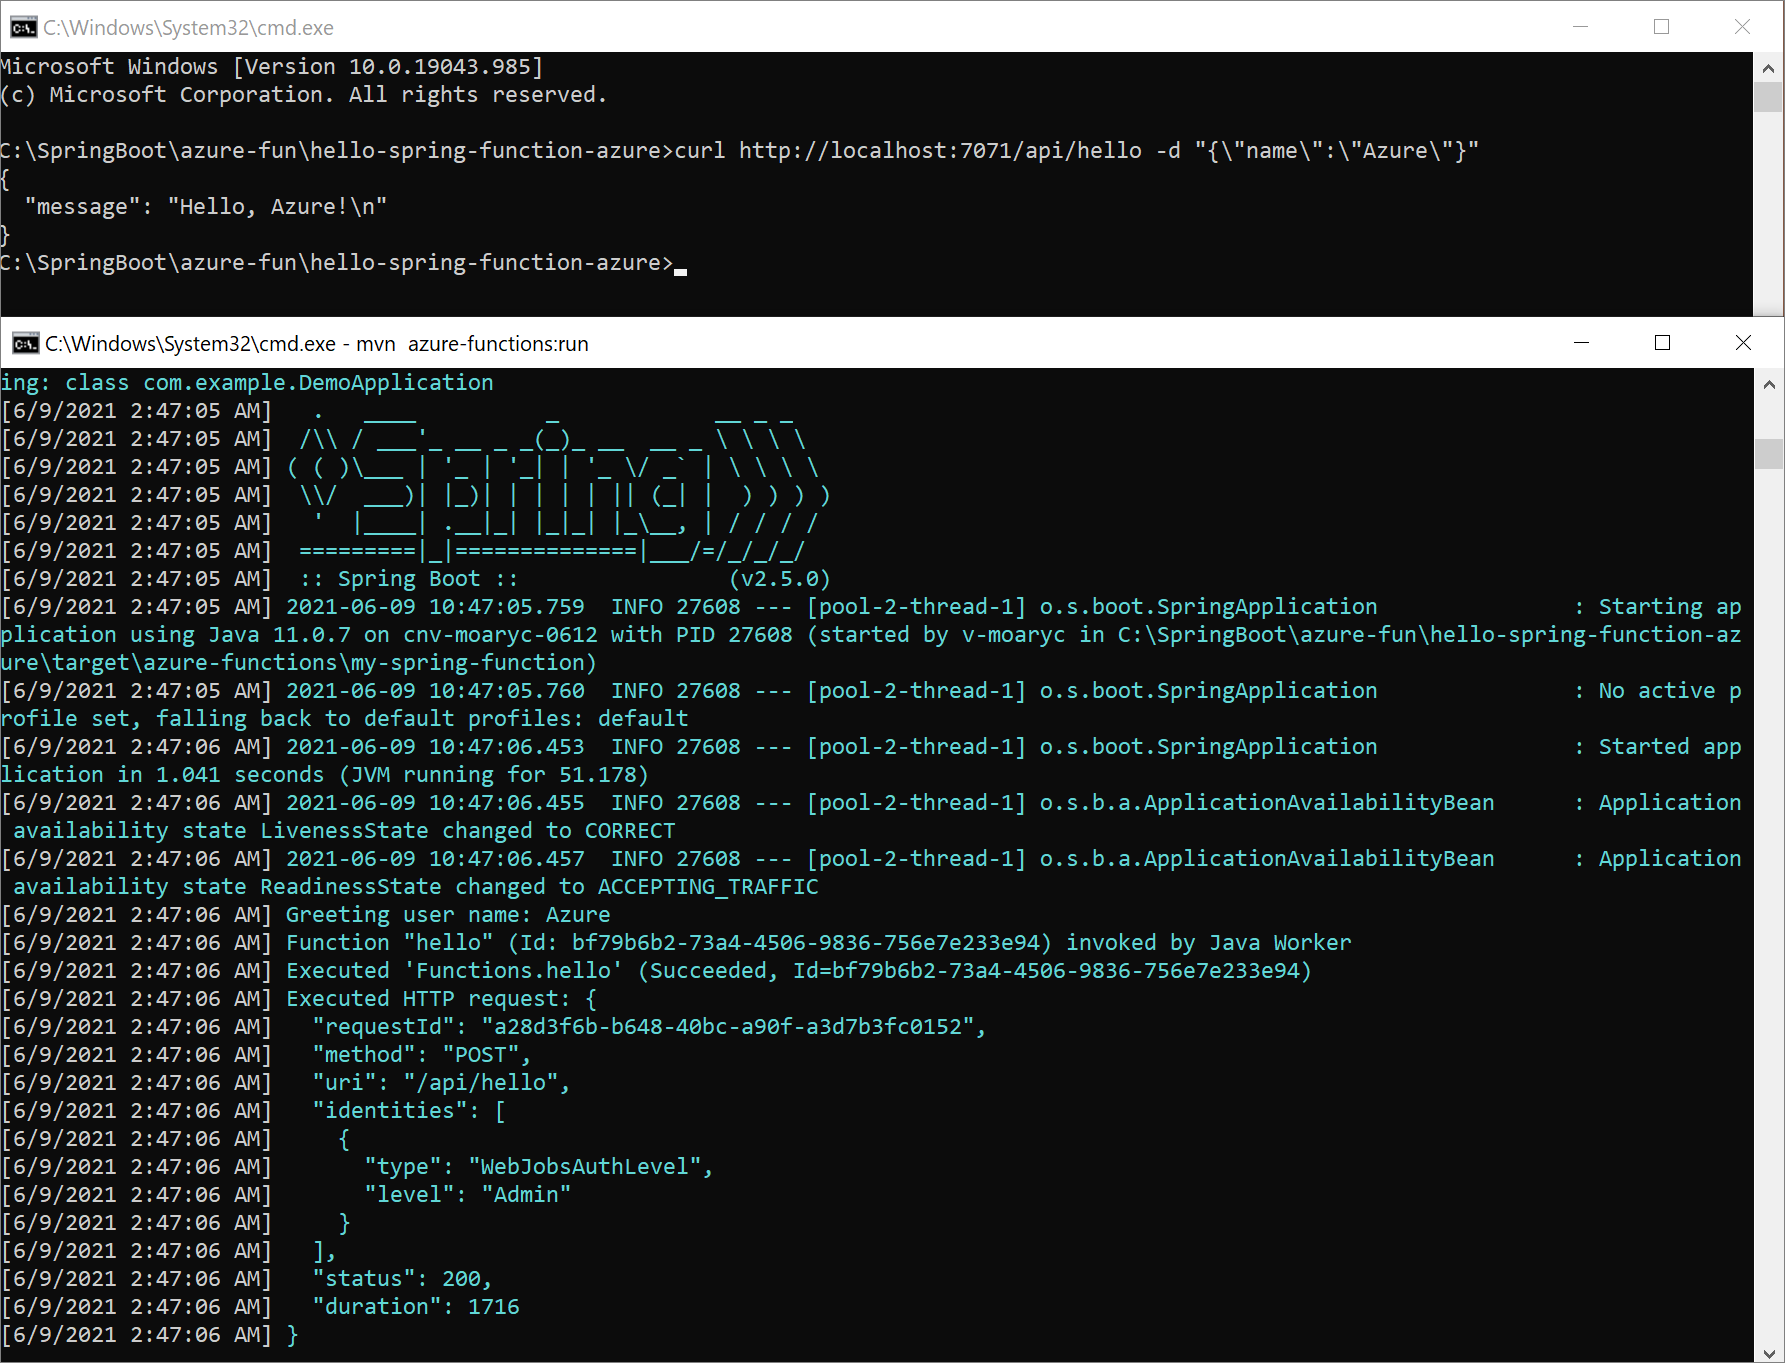
Azure 函式現在應該可以在您的本地主機上執行,使用 7071 埠。 您可以藉由傳送 JSON 格式的 User 物件的 POST 請求來測試該函式。 例如,使用 cURL:
curl -X POST http://localhost:7071/api/hello -d "{\"name\":\"Azure\"}"
函式應該會以 Greeting 物件回答您,但仍採用 JSON 格式:
{
  "message": "Hello, Azure!\n"
}
以下是畫面頂端 cURL 要求的螢幕快照,以及底部的本機 Azure 函式:
在本機執行除錯功能
下列各節說明如何偵錯函式。
使用 Intellij IDEA 進行除錯
在 Intellij IDEA 中開啟專案,然後建立要 附加的遠端 JVM 偵錯 執行組態。 如需詳細資訊,請參閱 教學課程:遠端偵錯。
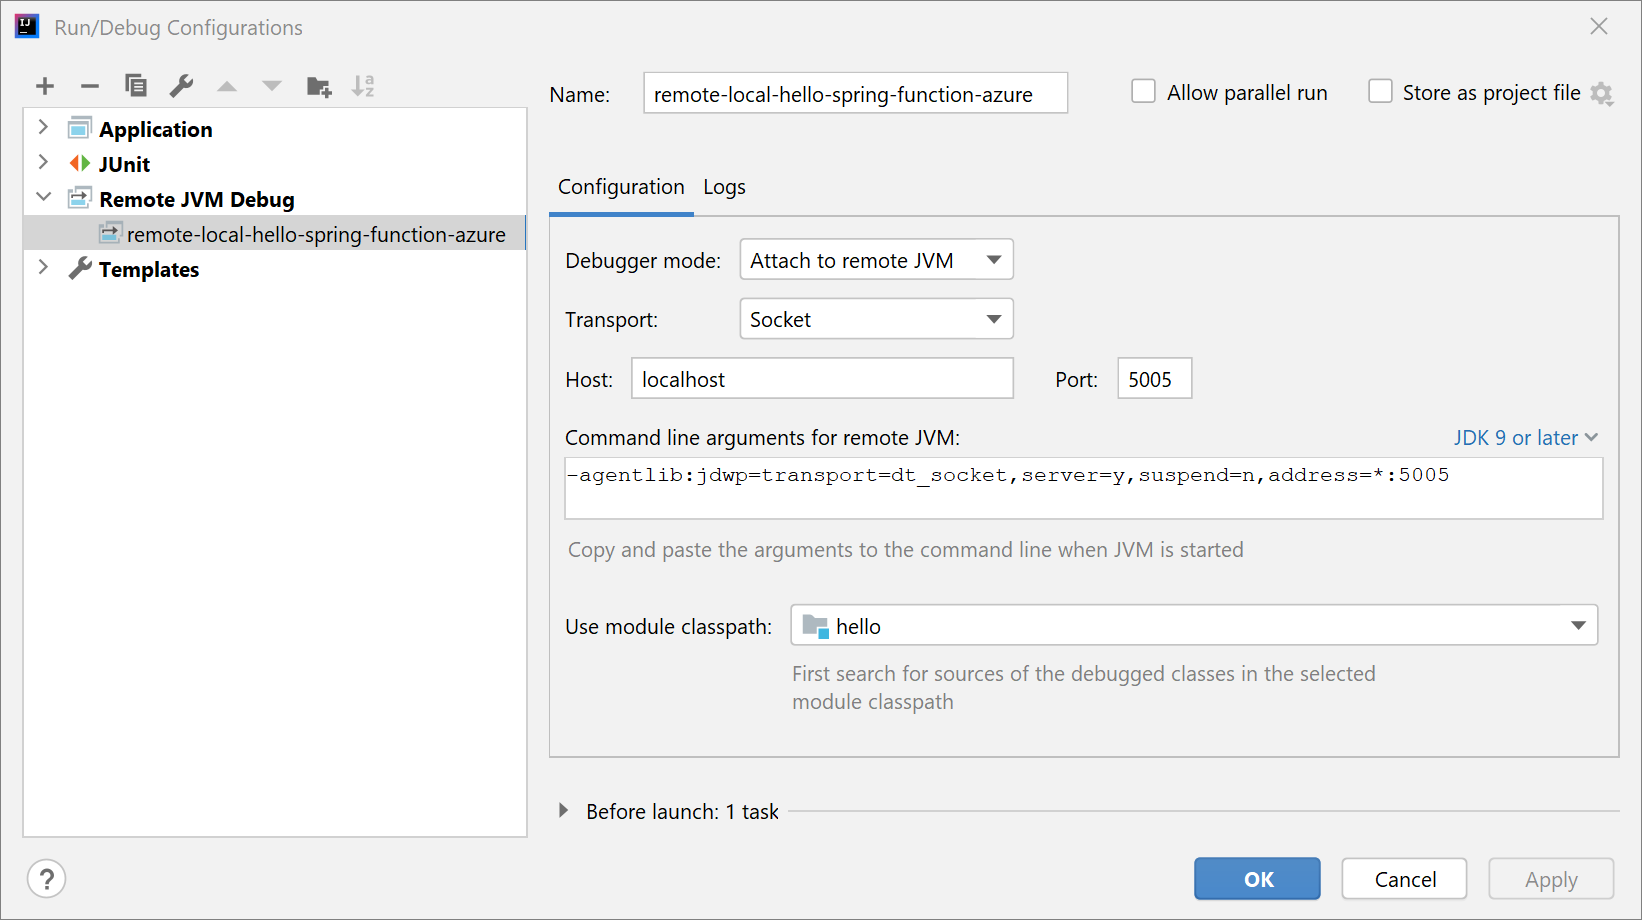
使用下列命令執行應用程式:
mvn azure-functions:run -DenableDebug
應用程式啟動時,您會看到下列輸出:
Worker process started and initialized.
Listening for transport dt_socket at address: 5005
在 IntelliJ IDEA 中啟動專案偵錯。 您會看到下列輸出:
Connected to the target VM, address: 'localhost:5005', transport: 'socket'
標記您要偵錯的斷點。 Intellij IDEA 會在傳送要求之後進入偵錯模式。
使用 Visual Studio Code 進行偵錯
在 Visual Studio Code 中開啟項目,然後設定下列 launch.json 檔案內容:
{
    "version": "0.2.0",
    "configurations": [
        {
            "type": "java",
            "name": "Attach to Remote Program",
            "request": "attach",
            "hostName": "127.0.0.1",
            "port": 5005
        }
    ]
}
使用下列命令執行應用程式:
mvn azure-functions:run -DenableDebug
應用程式啟動時,您會看到下列輸出:
Worker process started and initialized.
Listening for transport dt_socket at address: 5005
在 Visual Studio Code 中啟動專案偵錯,然後標記您要偵錯的斷點。 Visual Studio Code 會在傳送要求之後進入偵錯模式。 如需詳細資訊,請參閱 執行和偵錯 Java。
將功能部署至 Azure Functions
現在,您要將 Azure 函式發佈至生產環境。 請記住,您在 pom.xml 檔案中定義的 <functionAppName>、<functionAppRegion> 和 <functionResourceGroup> 屬性是用來設定您的函式。
注意
Maven 外掛程式需要向 Azure 進行驗證。 如果您已安裝 Azure CLI,請先使用 az login ,再繼續進行。
如需更多認證選項,請參閱資料庫中的azure-maven-plugins。
執行 Maven 以自動部署您的函式:
mvn azure-functions:deploy
現在移至 Azure 入口網站,以尋找已建立的Function App。
選擇功能:
- 在函式概觀中,記下函式的 URL。
- 若要檢查執行中的函式,請選取 導覽功能表上的 [記錄串流 ]。
現在,如同您在上一節中所做的,請使用 cURL 來存取執行中的函式,如下列範例所示。 請務必以您的實際函式名稱取代 your-function-name 。
curl https://your-function-name.azurewebsites.net/api/hello -d "{\"name\":\"Azure\"}"
如同上一 Greeting 節,函式應該會以物件回答您,但仍採用 JSON 格式:
{
  "message": "Hello, Azure!\n"
}
恭喜,您有在 Azure Functions 上執行的 Spring Cloud 函式! 如需 Spring Cloud 函式的詳細資訊和範例,請參閱下列資源:
下一步
若要深入了解 Spring 和 Azure,請繼續閱讀「Azure 上的 Spring」文件中心中的資訊。