備註
Azure Spring Apps 是 Azure Spring Cloud 服務的新名稱。 雖然服務有新名稱,但您會在某些地方看到舊名稱一段時間,因為我們正在努力更新螢幕擷取畫面、影片和圖表等資產。
Azure Spring Apps 是完全受控的微服務開發,具有內建的服務探索和設定管理。 此服務可讓您輕鬆地將 Spring Boot 型微服務應用程式部署至 Azure。 本教學課程示範如何在 Jenkins 中使用 Azure CLI 來自動化 Azure Spring Apps 的持續整合和傳遞 (CI/CD)。
在本教學課程中,您將完成下列工作:
- 佈建服務實例並啟動 Java Spring 應用程式
- 準備您的 Jenkins 伺服器
- 在 Jenkins 管線中使用 Azure CLI 來建置和部署微服務應用程式
先決條件
- Azure 訂用帳戶:如果您沒有 Azure 訂用帳戶,請在開始前建立免費帳戶。
- Jenkins: 在 Linux VM 上安裝 Jenkins
- GitHub 帳戶:如果您沒有 GitHub 帳戶,請先建立 免費帳戶 ,再開始。
佈建服務實例並啟動 Java Spring 應用程式
我們使用 Piggy 計量 作為範例 Microsoft 服務應用程式,並遵循 快速入門中的相同步驟:使用 Azure CLI 啟動 Java Spring 應用程式 來佈建服務實例並設定應用程式。 如果您已經完成了相同的過程,則可以跳到下一部分。 否則,以下是包含的 Azure CLI 命令。 請參閱 快速入門:使用 Azure CLI 啟動 Java Spring 應用程式 ,以取得詳細資訊。
您的本機電腦必須符合與 Jenkins 建置伺服器相同的先決條件。 請確定已安裝下列專案,以建置和部署微服務應用程式:
- Git
- JDK 8
- Maven 3.0 或更新版本
- 已安裝 Azure CLI,版本 2.0.67 或更新版本
安裝 Azure Spring Apps 延伸模組:
az extension add --name spring建立資源群組以包含您的 Azure Spring Apps 服務:
az group create --location eastus --name <resource group name>佈建 Azure Spring Apps 的執行個體:
az spring create -n <service name> -g <resource group name>將 Piggy Metrics 存放庫分支到您自己的 GitHub 帳戶。 在本機電腦中,將代碼倉庫複製到名為
source-code的目錄中。mkdir source-code git clone https://github.com/<your GitHub id>/piggymetrics設定您的組態伺服器。 請務必將<你的 GitHub ID>替換為正確的值。
az spring config-server git set -n <your-service-name> --uri https://github.com/<your GitHub id>/piggymetrics --label config建置專案:
cd piggymetrics
mvn clean package -D skipTests
建立三個微服務: 閘道、 auth-service 和 account-service:
az spring app create --n gateway -s <service name> -g <resource group name>
az spring app create --n auth-service -s <service name> -g <resource group name>
az spring app create --n account-service -s <service name> -g <resource group name>
部署應用程式:
az spring app deploy -n gateway -s <service name> -g <resource group name> --jar-path ./gateway/target/gateway.jar
az spring app deploy -n account-service -s <service name> -g <resource group name> --jar-path ./account-service/target/account-service.jar
az spring app deploy -n auth-service -s <service name> -g <resource group name> --jar-path ./auth-service/target/auth-service.jar
將公用端點指派給閘道:
az spring app update -n gateway -s <service name> -g <resource group name> --is-public true查詢閘道應用程式以取得 URL,以便您可以確認應用程式正在執行。
az spring app show --name gateway | grep url導覽至上一個命令提供的 URL 以執行 PiggyMetrics 應用程式。
準備 Jenkins 伺服器
在本節中,您將準備 Jenkins 伺服器以執行組建,這對於測試來說是合適的。 不過,由於安全性影響,您應該使用 Azure VM 代理程式 或 Azure 容器代理程式 在 Azure 中啟動代理程式來執行組建。
安裝外掛程式
登入您的 Jenkins 伺服器。
選取 [管理 Jenkins]。
選取 管理外掛程式。
在 [可用 ] 索引標籤上,選取下列外掛程式:
如果這些外掛程式未出現在清單中,請檢查「 已安裝」 標籤以查看它們是否已安裝。
若要安裝外掛程式,請選取 [ 立即下載並在重新啟動後安裝]。
重新啟動 Jenkins 伺服器以完成安裝。
在 Jenkins 認證存放區中新增 Azure 服務主體認證
您需要 Azure 服務主體才能部署至 Azure。 如需詳細資訊,請參閱部署至 Azure App Service 教學課程中的 建立服務主體 一節。
az ad sp create-for-rbac的輸出看起來像這樣:{ "appId": "xxxxxx-xxx-xxxx-xxx-xxxxxxxxxxxx", "displayName": "xxxxxxxjenkinssp", "name": "http://xxxxxxxjenkinssp", "password": "xxxxxx-xxx-xxxx-xxx-xxxxxxxxxxxx", "tenant": "xxxxxx--xxx-xxxx-xxx-xxxxxxxxxxxx" }在 Jenkins 儀表板上,選取 [認證>系統]。 然後,選取 [全域認證 (無限制)]。
選取 [新增認證]。
選取 Microsoft Azure 服務主體 作為類型。
提供下列欄位的值:
- 訂用帳戶識別碼:Azure 訂用帳戶識別碼
- 用戶端識別碼:服務主體 appid
- 用戶端密碼:服務主體密碼
- 租用戶識別碼:Microsoft 帳戶租用戶識別碼
- Azure 環境:為您的環境選取適當的值。 例如,針對 Azure 全域使用 Azure
-
ID:設定為
azure_service_principal。 我們將在本文稍後的步驟中使用此標識碼 - 說明:此值是選用的,但從文件/維護的角度建議使用。
安裝 Maven 和 Azure CLI spring 延伸模組
範例管線會使用 Maven 來建置,並使用 Azure CLI 來部署至服務執行個體。 安裝 Jenkins 時,它會建立名為 jenkins 的管理員帳戶。 請確定使用者 jenkins 具有執行 spring 延伸的許可權。
透過 SSH 連線至 Jenkins 控制器。
安裝 Maven。
sudo apt-get install maven輸入
az version來確認已安裝 Azure CLI。 如果未安裝 Azure CLI,請參閱 安裝 Azure CLI。切換至
jenkins使用者:sudo su jenkins安裝 Spring 擴充功能:
az extension add --name spring
建立 Jenkinsfile
在您自己的存儲庫中 -
https://github.com/your_github_id/piggymetrics- 在根目錄中創建一個 Jenkinsfile 。更新檔案,如下所示。 請務必取代資源群組名稱<和服務名稱的>值。<> 如果您在 Jenkins 中新增認證時使用不同的值,請將 azure_service_principal 取代為正確的 ID。
    node {
      stage('init') {
        checkout scm
      }
      stage('build') {
        sh 'mvn clean package'
      }
      stage('deploy') {
        withCredentials([azureServicePrincipal('azure_service_principal')]) {
          // Log in to Azure
          sh '''
            az login --service-principal -u $AZURE_CLIENT_ID -p $AZURE_CLIENT_SECRET -t $AZURE_TENANT_ID
            az account set -s $AZURE_SUBSCRIPTION_ID
          '''
          // Set default resource group name and service name. Replace <resource group name> and <service name> with the right values
          sh 'az config set defaults.group=<resource group name>'
          sh 'az config set defaults.spring=<service name>'

          // Deploy applications
          sh 'az spring app deploy -n gateway --jar-path ./gateway/target/gateway.jar'
          sh 'az spring app deploy -n account-service --jar-path ./account-service/target/account-service.jar'
          sh 'az spring app deploy -n auth-service --jar-path ./auth-service/target/auth-service.jar'
          sh 'az logout'
        }
      }
    }
儲存並認可變更。
建立工作
在 Jenkins 儀表板上,選取 [新增專案]。
提供作業的名稱 Deploy-PiggyMetrics,然後選取 管線。 按一下「確定」。
選擇 [管線] 索引標籤。
針對 定義,選取 來自 SCM 的管線指令碼。
針對 SCM,選取 Git。
輸入分支存放庫的 GitHub URL:
https://github.com/<your GitHub id>/piggymetrics.git。針對 分支規範(使用黑色代表「任意」),選取 /Azure。
針對 Script path 指令碼路徑,選取 Jenkinsfile。
選擇儲存
驗證並執行作業
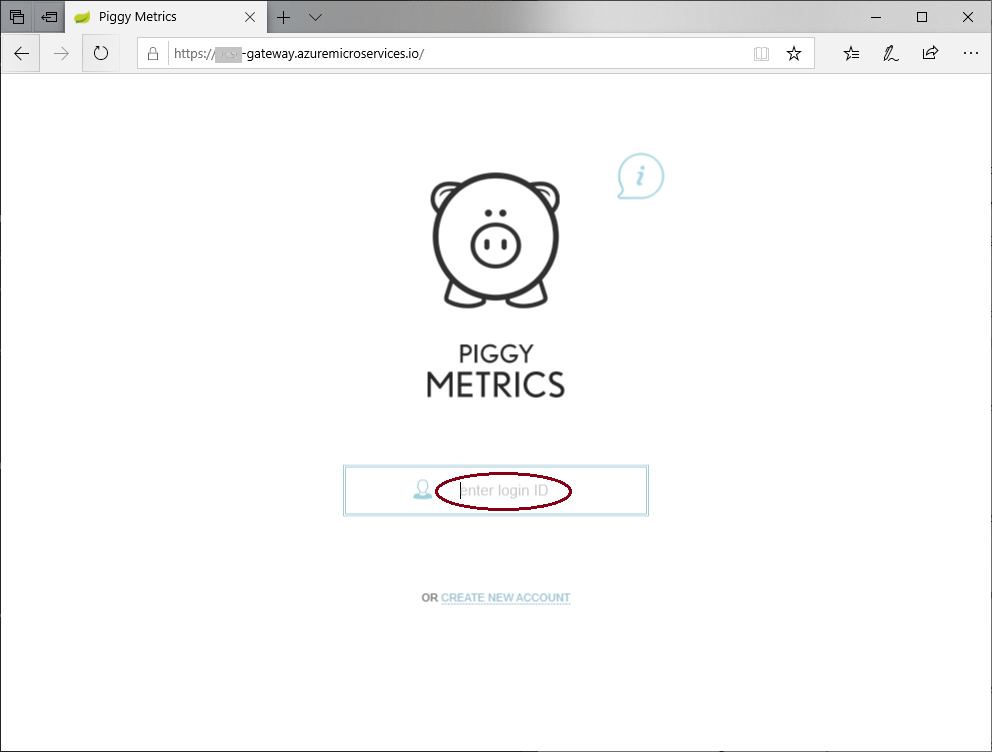
在執行工作之前,請編輯登入輸入框中的文字以 輸入登入 ID。
在您的存放庫中,開啟
index.html中的/gateway/src/main/resources/static/。搜尋
enter your login並將該文字更新為enter login ID。<input class="frontforms" id="frontloginform" name="username" placeholder="enter login ID" type="text" autocomplete="off"/>儲存並認可變更。
在 Jenkins 中手動執行作業。 在 Jenkins 儀錶板上,選取作業
Deploy-PiggyMetrics,然後選取 [立即建置]。
工作完成後,請導覽至應用程式的 gateway 公用 IP,並確認您的應用程式已更新。
清理資源
不再需要時,請刪除本文中建立的資源:
az group delete -y --no-wait -n <resource group name>