Azure DevOps 服務
開始使用 GitHub Actions 和 Azure Artifacts。 GitHub Actions 可協助您從 GitHub 內自動化軟體開發工作流程。 您可以使用 GitHub Actions 來部署至 Azure Artifacts 餵流。
你可以使用管理身份或 個人存取令牌(PAT)來進行驗證。 PAT 是一種使用者產生的憑證,用來存取 Azure DevOps 資源。 受控識別是 Azure 自動管理的服務主體類型,以允許在 Azure 服務與 Azure DevOps 之間進行無密碼驗證。 受控識別是更安全的驗證選項。
必要條件
- 具有存放庫的 GitHub 帳戶。 加入 GitHub 並 建立存放庫。
- 您從 GitHub 工作流程中將 NuGet 套件推送至的 Azure Artifacts feed。 開始使用 NuGet 套件。
- 使用相關聯的同盟認證設定使用者指派的管理身分。
- 建立使用者指派的受控識別。
- 複製 Client ID、Subscription ID 和 Directory (tenant) ID 的值,以便稍後在 GitHub Actions 工作流程中使用。
- 為您使用者指派的受管理識別指派一個適切的角色。
- 在使用者指派的受控識別 上設定同盟身分識別認證,以信任 GitHub Actions 簽發給 GitHub 存放庫的令牌。
- 允許將受管理身份指派給 Azure DevOps 中的 貢獻 者群組。 專案管理員 和 集合管理員 都有此許可權。
注意
另一種方法是使用 Microsoft Entra 應用程式,搭配服務主體和聯邦認證憑證,來連接 Azure DevOps 與 GitHub Actions。 若要深入瞭解此方法,請參閱 設定應用程式以信任外部識別提供者。
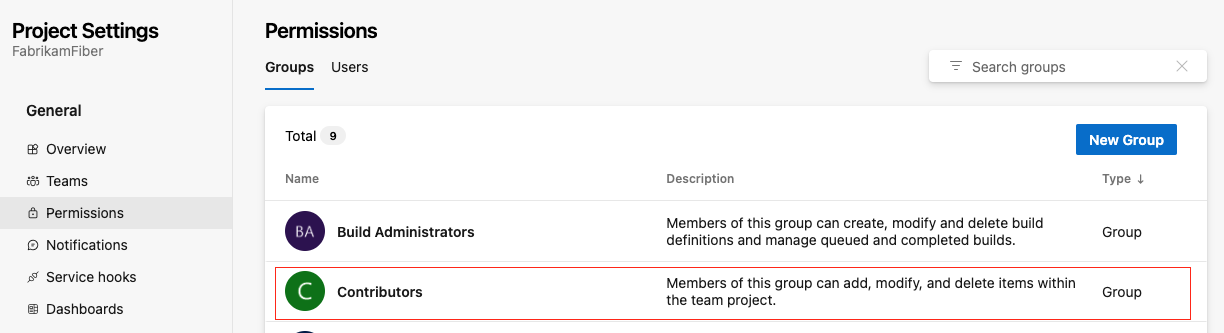
在 Azure DevOps 中將許可權指派給受管理的身份
若要將受控識別指派給 參與者 小組,請遵循下列步驟:
登入您的專案 (
https://dev.azure.com/{Your_Organization/Your_Project})。移至專案設定。
選擇 一般>許可權。
選擇 [ 參與者] 群組。
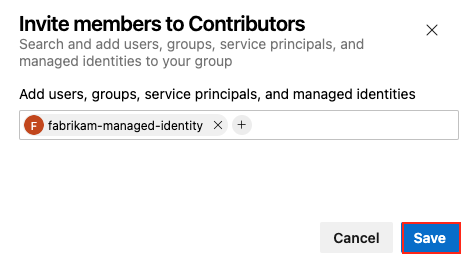
選擇 成員 索引標籤,然後選擇 新增。
搜尋並找到受管理的身份。
選取 [ 儲存 ] 將身分識別新增至 參與者 群組。

建立 GitHub 機密
您必須將受控身份的 用戶端 ID、 租戶 ID和 訂閱 ID 提供給登入動作。 這些值會儲存在 GitHub 秘密中,並在您的工作流程中參考。
在 GitHub (英文) 中,前往您的存放庫。
移至導覽功能表中的 [設定]。
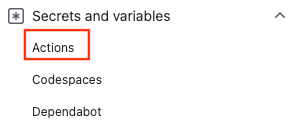
選取 [安全性] > [祕密和變數] > [動作]。
選擇 [新增存放庫祕密]。
建立
AZURE_CLIENT_ID、AZURE_TENANT_ID和AZURE_SUBSCRIPTION_ID的機密資訊。 針對您的 GitHub 秘密,從受控識別使用這些值:GitHub 祕密 Microsoft Entra 應用程式 AZURE_CLIENT_ID 應用程式 (用戶端) 識別碼 AZURE_TENANT_ID 目錄 (租用戶) 識別碼 AZURE_SUBSCRIPTION_ID 訂用帳戶識別碼 選取 [新增秘密] 以儲存每個秘密。
建立建置成品的 GitHub 工作流程
GitHub 的工作流程 是一系列動作,類似 Azure Pipelines 中的任務。 此工作流程透過管理身份與聯邦認證,自動化建置、測試、打包及發佈 .NET 專案至 Azure Artifacts 的流程。 工作流程:
- 使用 azure/login 動作 透過管理身份登入 Azure。
- 安裝 Azure Artifacts 的認證提供者。
- 使用 Azure CLI 擷取存取權杖,並設定認證提供者使用 Azure DevOps 令牌。
- 透過 setup-dotnet 動作建立 .NET Core CLI 環境。
- 還原相依性、將專案及其相依性建置成一組二進位檔,並執行與專案相關聯的所有單元測試。
- 使用版本號碼中包含的 GitHub Run ID 環境變數,將程式代碼封裝到 NuGet 套件中。
- 將 NuGet 套件發佈至 Azure Artifacts。
建立新的 YAML 檔案
在你的 GitHub 倉庫裡,建立一個新的 YAML 檔案。
.github/workflows將下列內容複製到您的 YAML 檔案。 自訂
AZURE_ARTIFACTS_FEED_URL、BUILD_CONFIGURATION及DOTNET_VERSION的值。- 將
AZURE_ARTIFACTS_FEED_URL設定為 Azure Artifacts 套件來源的註冊表 URL。 - 設定
BUILD_CONFIGURATION。 - 設定
DOTNET_VERSION為專案的版本。
name: Push a NuGet package to Azure Artifacts with managed identity and federated authentication on: push: branches: - main permissions: id-token: write # Require write permission to Fetch an federated identity token. contents: read # Require read permission to access the repository contents. env: AZURE_ARTIFACTS_FEED_URL: https://pkgs.dev.azure.com/myorg/nuget-artifact/_packaging/Fabrikam_Feed/nuget/v3/index.json BUILD_CONFIGURATION: 'Release' # set this to the appropriate build configuration DOTNET_VERSION: '6.0' NuGetDirectory: ${{ github.workspace}}/nuget VSS_NUGET_URI_PREFIXES: https://pkgs.dev.azure.com/myorg/ jobs: build: runs-on: ubuntu-latest steps: # Checkout the repo - uses: actions/checkout@v4 with: token: ${{ secrets.GITHUB_TOKEN }} - name: Azure CLI Login uses: azure/login@v2 with: client-id: ${{ secrets.AZURE_CLIENT_ID }} tenant-id: ${{ secrets.AZURE_TENANT_ID }} subscription-id: ${{ secrets.AZURE_SUBSCRIPTION_ID }} # Setup .NET Core SDK - name: Setup .NET Core uses: actions/setup-dotnet@v3 with: dotnet-version: ${{ env.DOTNET_VERSION }} # Run dotnet build and package - name: dotnet build and test run: | dotnet restore dotnet build --configuration '${{ env.BUILD_CONFIGURATION }}' dotnet test --configuration '${{ env.BUILD_CONFIGURATION }}' # Create the NuGet package in the folder from the environment variable NuGetDirectory - run: dotnet pack --configuration Release --output ${{ env.NuGetDirectory }} # Publish the NuGet package as an artifact, so they can be used in the following jobs - uses: actions/upload-artifact@v3 with: name: nuget if-no-files-found: error retention-days: 7 path: ${{ env.NuGetDirectory }}/*.nupkg az-artifacts-build-and-deploy: needs: build runs-on: ubuntu-latest steps: - uses: actions/checkout@v4 with: token: ${{ secrets.GITHUB_TOKEN }} - name: Azure CLI Login uses: azure/login@v2 with: client-id: ${{ secrets.AZURE_CLIENT_ID }} tenant-id: ${{ secrets.AZURE_TENANT_ID }} subscription-id: ${{ secrets.AZURE_SUBSCRIPTION_ID }} - uses: actions/download-artifact@v3 with: name: nuget path: ${{ env.NuGetDirectory }} - name: Setup .NET Core uses: actions/setup-dotnet@v3 with: dotnet-version: ${{ env.DOTNET_VERSION }} source-url: ${{ env.AZURE_ARTIFACTS_FEED_URL }} env: NUGET_AUTH_TOKEN: ${{secrets.GITHUB_TOKEN}} - name: Install credential provider for Azure Artifacts run: sh -c "$(curl -fsSL https://aka.ms/install-artifacts-credprovider.sh)" - name: Extract access token run: | accessToken=$(az account get-access-token --query accessToken --resource 499b84ac-1321-427f-aa17-267ca6975798 -o tsv) echo "::add-mask::$accessToken" echo "ACCESS_TOKEN=$accessToken" >> $GITHUB_ENV - name: Configure authentication provider to use Azure DevOps token run: | echo "VSS_NUGET_ACCESSTOKEN=$ACCESS_TOKEN" >> $GITHUB_ENV - name: dotnet build and publish run: | dotnet restore dotnet build --configuration '${{ env.BUILD_CONFIGURATION }}' dotnet pack --configuration '${{ env.BUILD_CONFIGURATION }}' --output ./nupkg --version-suffix ${{ github.run_id }} - name: 'Publish the package to Azure Artifacts' run: dotnet nuget push ${{ env.NuGetDirectory }}/*.nupkg --api-key AzureDevOps --source ${{ env.AZURE_ARTIFACTS_FEED_URL }}- 將
必要條件
- 具有存放庫的 GitHub 帳戶。 加入 GitHub 並 建立存放庫。
- 您從 GitHub 工作流程中將 NuGet 套件推送至的 Azure Artifacts feed。 開始使用 NuGet 套件。
- 要搭配 GitHub Action 功能使用的 Azure DevOps 個人存取令牌 (PAT)。
建立 PAT。
- 您的 PAT 必須具有讀取、寫入及管理 封裝 許可權。
使用 Azure Pipelines 進行驗證
使用個人存取令牌 (PAT) 將 GitHub 帳戶連線至 Azure DevOps。 您可以從 Azure DevOps 中產生 PAT,然後將它儲存為 GitHub 秘密。 在 GitHub 工作流程中,引用密碼以便 GitHub Action 能夠驗證 Azure DevOps 專案。
開啟您的 GitHub 存放庫並移至 [設定]。
選取 [安全性] > [祕密和變數] > [動作]。
貼上您的 PAT,並命名為
AZURE_DEVOPS_TOKEN。選擇 [新增祕密]。
建立建置成品的 GitHub 工作流程
GitHub 工作流程 是一系列動作(例如 Azure Pipelines 中的工作)。 此工作流程:
- 透過 setup-dotnet 動作建立 .NET Core CLI 環境。
- 還原相依性、將專案及其相依性建置成一組二進位檔,並執行與專案相關聯的所有單元測試。
- 使用版本號碼中包含的 GitHub Run ID 環境變數,將程式代碼封裝到 NuGet 套件中。
- 將 NuGet 套件發佈至 Azure Artifacts。
建立新的 YAML 檔案
在你的 GitHub 倉庫裡,建立一個新的 YAML 檔案。
.github/workflows將下列內容複製到您的 YAML 檔案。 自訂義
AZURE_ARTIFACTS_FEED_URL、BUILD_CONFIGURATION和DOTNET_VERSION值。- 將
AZURE_ARTIFACTS_FEED_URL設定為 Azure Artifacts 套件來源的註冊表 URL。 - 設定
BUILD_CONFIGURATION。 - 設定
DOTNET_VERSION為專案的版本。
name: Push a NuGet package to Azure Artifacts on: push: branches: - main env: AZURE_ARTIFACTS_FEED_URL: https://pkgs.dev.azure.com/myorg/nuget-artifact/_packaging/Fabrikam_Feed/nuget/v3/index.json BUILD_CONFIGURATION: 'Release' # set this to the appropriate build configuration DOTNET_VERSION: '6.x' jobs: build: runs-on: ubuntu-latest steps: # Checkout the repo - uses: actions/checkout@v2 # Setup .NET Core SDK - name: Setup .NET Core uses: actions/setup-dotnet@v1 with: dotnet-version: ${{ env.DOTNET_VERSION }} # Run dotnet build and package - name: dotnet build and test run: | dotnet restore dotnet build --configuration '${{ env.BUILD_CONFIGURATION }}' dotnet test --configuration '${{ env.BUILD_CONFIGURATION }}' az-artifacts-build-and-deploy: needs: build runs-on: ubuntu-latest steps: # Checkout the repo - uses: actions/checkout@v2 # Setup .NET Core SDK - name: Setup .NET Core uses: actions/setup-dotnet@v1 with: dotnet-version: ${{ env.DOTNET_VERSION }} source-url: ${{ env.AZURE_ARTIFACTS_FEED_URL }} env: NUGET_AUTH_TOKEN: ${{ secrets.AZURE_DEVOPS_TOKEN }} # Run dotnet build and package - name: dotnet build and publish run: | dotnet restore dotnet build --configuration '${{ env.BUILD_CONFIGURATION }}' dotnet pack -c '${{ env.BUILD_CONFIGURATION }}' --version-suffix $GITHUB_RUN_ID # Publish the package to Azure Artifacts - name: 'dotnet publish' run: dotnet nuget push bin/Release/*.nupkg --api-key AzureDevOps --source ${{ env.AZURE_ARTIFACTS_FEED_URL }}- 將
移至您的 Azure Artifacts 摘要,確認您看到您推送的套件。


清除資源
如果你不打算繼續使用 GitHub 的工作流程,請 停用該工作流程。