在您的管線中指定作業
Azure DevOps Services | Azure DevOps Server 2022 - Azure DevOps Server 2019
您可以將管線組織成作業。 每個管線至少有一個作業。 作業是一系列以單位順序執行的步驟。 換句話說,作業是可以排程執行的工作單位最小。
若要了解組成管線的重要概念和元件,請參閱 新 Azure Pipelines 使用者的重要概念。
Azure Pipelines 不支援 YAML 管線的工作優先順序。 若要控制作業執行時機,您可以指定 條件 和 相依性。
定義單一作業
在最簡單的情況下,管線具有單一作業。 在此情況下,除非您使用範本,否則不需要明確使用 job 關鍵詞。 您可以直接指定 YAML 檔案中的步驟。
此 YAML 檔案具有在 Microsoft 裝載的代理程式上執行的作業,並輸出 Hello world。
pool:
  vmImage: 'ubuntu-latest'
steps:
- bash: echo "Hello world"
您可能想要在該作業上指定更多屬性。 在此情況下,您可以使用 job 關鍵詞。
jobs:
- job: myJob
  timeoutInMinutes: 10
  pool:
    vmImage: 'ubuntu-latest'
  steps:
  - bash: echo "Hello world"
您的管線可能會有多個作業。 在此情況下,請使用 jobs 關鍵詞。
jobs:
- job: A
  steps:
  - bash: echo "A"

- job: B
  steps:
  - bash: echo "B"
您的管線可能有多個階段,每個階段都有多個作業。 在此情況下,請使用 stages 關鍵詞。
stages:
- stage: A
  jobs:
  - job: A1
  - job: A2

- stage: B
  jobs:
  - job: B1
  - job: B2
指定作業的完整語法為:
- job: string  # name of the job, A-Z, a-z, 0-9, and underscore
  displayName: string  # friendly name to display in the UI
  dependsOn: string | [ string ]
  condition: string
  strategy:
    parallel: # parallel strategy
    matrix: # matrix strategy
    maxParallel: number # maximum number simultaneous matrix legs to run
    # note: `parallel` and `matrix` are mutually exclusive
    # you may specify one or the other; including both is an error
    # `maxParallel` is only valid with `matrix`
  continueOnError: boolean  # 'true' if future jobs should run even if this job fails; defaults to 'false'
  pool: pool # agent pool
  workspace:
    clean: outputs | resources | all # what to clean up before the job runs
  container: containerReference # container to run this job inside
  timeoutInMinutes: number # how long to run the job before automatically cancelling
  cancelTimeoutInMinutes: number # how much time to give 'run always even if cancelled tasks' before killing them
  variables: { string: string } | [ variable | variableReference ]
  steps: [ script | bash | pwsh | powershell | checkout | task | templateReference ]
  services: { string: string | container } # container resources to run as a service container
  uses: # Any resources (repos or pools) required by this job that are not already referenced
    repositories: [ string ] # Repository references to Azure Git repositories
    pools: [ string ] # Pool names, typically when using a matrix strategy for the job
如果作業的主要意圖是部署您的應用程式(而不是建置或測試您的應用程式),則可以使用稱為 部署作業的特殊作業類型。
部署作業的語法如下:
- deployment: string        # instead of job keyword, use deployment keyword
  pool:
    name: string
    demands: string | [ string ]
  environment: string
  strategy:
    runOnce:
      deploy:
        steps:
        - script: echo Hi!
雖然您可以在 中 job新增部署工作的步驟,但建議您改用 部署作業。 部署作業有幾個優點。 例如,您可以部署至環境,其中包括優點,例如能夠查看您所部署專案的歷程記錄。

作業類型
作業可以是不同類型的作業,視作業的執行位置而定。
代理程式集區作業
這些作業是最常見的作業類型,而且會在代理程式集區中的代理程式上執行。
- 使用Microsoft裝載的代理程式時,管線中的每個作業都會取得全新的代理程式。
- 搭配 自我裝載代理程式使用需求 ,以指定代理程式必須執行作業的功能。 您可以針對連續作業取得相同的代理程式,視代理集區中是否有一個以上的代理程式符合管線的需求而定。 如果您的集區中只有一個符合管線需求的代理程式,管線會等到此代理程式可供使用。
注意
需求和功能是專為搭配自我裝載的代理程式使用而設計,因此作業可與符合作業需求的代理程式進行比對。 使用Microsoft裝載的代理程式時,您可以選取符合作業需求的代理程式映像,因此雖然可以將功能新增至Microsoft裝載的代理程式,但您不需要搭配Microsoft裝載的代理程式使用功能。
pool:
  name: myPrivateAgents    # your job runs on an agent in this pool
  demands: agent.os -equals Windows_NT    # the agent must have this capability to run the job
steps:
- script: echo hello world
或多個需求:
pool:
  name: myPrivateAgents
  demands:
  - agent.os -equals Darwin
  - anotherCapability -equals somethingElse
steps:
- script: echo hello world
深入瞭解 代理程式功能。
伺服器作業
伺服器作業中的工作會由 伺服器協調,並在伺服器上執行 (Azure Pipelines 或 TFS)。 伺服器作業不需要代理程式或任何目標計算機。 伺服器作業現在只支援幾個工作。 伺服器作業的最長時間為 30 天。
無代理程式作業支援的工作
目前,針對無代理程序作業,目前僅支援下列工作:
由於工作是可延伸的,因此您可以使用擴充功能來新增更多無代理程式工作。 無代理程式作業的預設逾時為 60 分鐘。
指定伺服器作業的完整語法為:
jobs:
- job: string
  timeoutInMinutes: number
  cancelTimeoutInMinutes: number
  strategy:
    maxParallel: number
    matrix: { string: { string: string } }

  pool: server # note: the value 'server' is a reserved keyword which indicates this is an agentless job
您也可以使用簡化的語法:
jobs:
- job: string
  pool: server # note: the value 'server' is a reserved keyword which indicates this is an agentless job
相依性
當您在單一階段中定義多個作業時,可以指定它們之間的相依性。 管線至少必須包含一個沒有相依性的作業。 根據預設,除非 dependsOn 已設定值,否則 Azure DevOps YAML 管線作業會以平行方式執行。
注意
每個代理程式一次只能執行一個作業。 若要平行執行多個作業,您必須設定多個代理程式。 您也需要足夠的 平行作業。
定義多個作業及其相依性的語法如下:
jobs:
- job: string
  dependsOn: string
  condition: string
循序建置的範例作業:
jobs:
- job: Debug
  steps:
  - script: echo hello from the Debug build
- job: Release
  dependsOn: Debug
  steps:
  - script: echo hello from the Release build
平行建置的範例作業(無相依性):
jobs:
- job: Windows
  pool:
    vmImage: 'windows-latest'
  steps:
  - script: echo hello from Windows
- job: macOS
  pool:
    vmImage: 'macOS-latest'
  steps:
  - script: echo hello from macOS
- job: Linux
  pool:
    vmImage: 'ubuntu-latest'
  steps:
  - script: echo hello from Linux
展開的範例:
jobs:
- job: InitialJob
  steps:
  - script: echo hello from initial job
- job: SubsequentA
  dependsOn: InitialJob
  steps:
  - script: echo hello from subsequent A
- job: SubsequentB
  dependsOn: InitialJob
  steps:
  - script: echo hello from subsequent B
風扇的範例:
jobs:
- job: InitialA
  steps:
  - script: echo hello from initial A
- job: InitialB
  steps:
  - script: echo hello from initial B
- job: Subsequent
  dependsOn:
  - InitialA
  - InitialB
  steps:
  - script: echo hello from subsequent
條件
您可以指定每個作業據以執行的條件。 根據預設,如果作業不相依於任何其他作業,或它相依的所有作業都已完成且成功,則會執行作業。 您可以強制作業執行此行為,即使先前的作業失敗或指定自定義條件也一樣。
根據執行上一個作業的狀態執行作業的範例:
jobs:
- job: A
  steps:
  - script: exit 1

- job: B
  dependsOn: A
  condition: failed()
  steps:
  - script: echo this will run when A fails

- job: C
  dependsOn:
  - A
  - B
  condition: succeeded('B')
  steps:
  - script: echo this will run when B runs and succeeds
使用 自訂條件的範例:
jobs:
- job: A
  steps:
  - script: echo hello

- job: B
  dependsOn: A
  condition: and(succeeded(), eq(variables['build.sourceBranch'], 'refs/heads/main'))
  steps:
  - script: echo this only runs for master
您可以根據上一個作業中設定的輸出變數值來指定作業執行。 在此情況下,您只能使用直接相依作業中設定的變數:
jobs:
- job: A
  steps:
  - script: "echo '##vso[task.setvariable variable=skipsubsequent;isOutput=true]false'"
    name: printvar

- job: B
  condition: and(succeeded(), ne(dependencies.A.outputs['printvar.skipsubsequent'], 'true'))
  dependsOn: A
  steps:
  - script: echo hello from B
逾時
您不妨設定允許工作執行的時間限制,以免在工作沒有回應或等候太久時佔用資源。 使用工作逾時設定,以分鐘為單位指定工作執行限制。 將值設定為 零 表示作業可以執行:
- 永遠在自我裝載代理程式上
- 在具有公用專案和公用存放庫的Microsoft裝載代理程式上 360 分鐘 (6 小時)
- 使用私人專案或私人存放庫Microsoft裝載的代理程式需要 60 分鐘(除非 支付額外的容量 )
當作業開始執行時,就會開始逾時期間。 它不包含作業排入佇列或正在等候代理程序的時間。
timeoutInMinutes允許為作業運行時間設定限制。 未指定時,預設值為 60 分鐘。 指定 時 0 ,會使用上限 (如上所述)。
cancelTimeoutInMinutes允許針對作業取消時間設定限制,當部署工作設定為在先前的工作失敗時繼續執行。 未指定時,預設值為5分鐘。 此值的範圍應介於 1 到 35790 分鐘之間。
jobs:
- job: Test
  timeoutInMinutes: 10 # how long to run the job before automatically cancelling
  cancelTimeoutInMinutes: 2 # how much time to give 'run always even if cancelled tasks' before stopping them
逾時具有下列層級的優先順序。
- 在Microsoft裝載的代理程式上,作業 會受限於根據專案類型執行的時間長度,以及它們是否使用付費平行作業來執行。 當Microsoft裝載的作業逾時間隔經過時,作業就會終止。 在Microsoft裝載的代理程式上,不論作業中指定的任何作業層級逾時,作業都不能超過此間隔。
- 在作業層級設定的逾時會指定要執行之作業的最大持續時間。 當作業層級逾時間隔經過時,作業就會終止。 如果作業是在裝載Microsoft代理程式上執行,請將作業層級逾時設定為大於 內建Microsoft裝載作業層級 逾時的間隔,並不會影響Microsoft裝載的作業逾時。
- 您也可以個別設定每個工作的逾時 - 請參閱 工作控制選項。 如果工作層級逾時間隔在工作完成之前經過,即使工作設定了較長的逾時間隔,執行中的作業也會終止。
多作業組態
從您撰寫的單一作業中,您可以平行地在多個代理程式上執行多個作業。 這些範例包含:
多重組態組建: 您可以平行建置多個組態。 例如,您可以針對和平臺上的和
release組態x64x86建置Visual C++ 應用程式debug。 如需詳細資訊,請參閱 Visual Studio 組建 - 多個平臺的多個組態。多組態部署: 您可以平行執行多個部署,例如,到不同的地理區域。
多重組態測試: 您可以平行執行多個設定。
即使多重組態變數是空的,多重設定仍一律會產生至少一個作業。
此 matrix 策略可讓工作分派多次,並使用不同的變數集。 標記 maxParallel 會限制平行處理原則的數量。 下列作業會分派三次,並指定 [位置] 和 [瀏覽器] 的值。 不過,只有兩個作業同時執行。
jobs:
- job: Test
  strategy:
    maxParallel: 2
    matrix:
      US_IE:
        Location: US
        Browser: IE
      US_Chrome:
        Location: US
        Browser: Chrome
      Europe_Chrome:
        Location: Europe
        Browser: Chrome
注意
矩陣組態名稱(如上所示 US_IE )只能包含基本的拉丁字母字母(A-Z、a-z)、數位和底線(_)。
這些名稱必須以字母開頭。
此外,它們必須是 100 個字元或更少。
您也可以使用 輸出變數 來產生矩陣。 如果您需要使用腳本來產生矩陣,這很有用。
matrix 接受包含字串化 JSON 物件的運行時間表示式。
展開時,該 JSON 對象必須符合矩陣語法。
在下列範例中,我們已硬式編碼 JSON 字串,但可由腳本語言或命令行程序產生。
jobs:
- job: generator
  steps:
  - bash: echo "##vso[task.setVariable variable=legs;isOutput=true]{'a':{'myvar':'A'}, 'b':{'myvar':'B'}}"
    name: mtrx
  # This expands to the matrix
  #   a:
  #     myvar: A
  #   b:
  #     myvar: B
- job: runner
  dependsOn: generator
  strategy:
    matrix: $[ dependencies.generator.outputs['mtrx.legs'] ]
  steps:
  - script: echo $(myvar) # echos A or B depending on which leg is running
配量
代理程式作業可用來平行執行一組測試。 例如,您可以在單一代理程式上執行 1000 個測試的大型套件。 或者,您可以使用兩個代理程式,並平行執行每一個代理程式 500 個測試。
若要套用切割,作業中的工作應該足夠聰明,才能瞭解其所屬的配量。
Visual Studio 測試工作是支持測試切割的這類工作之一。 如果您安裝了多個代理程式,您可以指定 Visual Studio 測試工作在這些代理程式上平行執行的方式。
此 parallel 策略可讓作業重複多次。
System.JobPositionInPhase變數和 System.TotalJobsInPhase 會新增至每個作業。 然後,您可以在腳本內使用變數,將工作分割在作業之間。
請參閱 使用代理程式作業平行執行和多個執行。
下列作業會分派五次,並適當地設定 和 System.TotalJobsInPhase 的值System.JobPositionInPhase。
jobs:
- job: Test
  strategy:
    parallel: 5
作業變數
如果您使用 YAML,可以在作業上指定變數。 變數可以使用宏語法 $(variableName) 傳遞至工作輸入,或使用階段變數在腳本中存取。
以下是在作業中定義變數並在工作中使用這些變數的範例。
variables:
  mySimpleVar: simple var value
  "my.dotted.var": dotted var value
  "my var with spaces": var with spaces value

steps:
- script: echo Input macro = $(mySimpleVar). Env var = %MYSIMPLEVAR%
  condition: eq(variables['agent.os'], 'Windows_NT')
- script: echo Input macro = $(mySimpleVar). Env var = $MYSIMPLEVAR
  condition: in(variables['agent.os'], 'Darwin', 'Linux')
- bash: echo Input macro = $(my.dotted.var). Env var = $MY_DOTTED_VAR
- powershell: Write-Host "Input macro = $(my var with spaces). Env var = $env:MY_VAR_WITH_SPACES"
如需使用 條件的相關信息,請參閱 指定條件。
工作區
當您執行代理程式集區作業時,它會在代理程式上建立工作區。 工作區是一個目錄,它會在其中下載來源、執行步驟,併產生輸出。 您可以使用 變數在作業 Pipeline.Workspace 中參考工作區目錄。 在此下,會建立各種子目錄:
Build.SourcesDirectory是工作下載應用程式原始碼的位置。Build.ArtifactStagingDirectory是工作在發佈之前下載管線或上傳成品所需的成品的位置。Build.BinariesDirectory是工作寫入其輸出的位置。Common.TestResultsDirectory是工作上傳其測試結果的位置。
和 $(Build.ArtifactStagingDirectory) $(Common.TestResultsDirectory) 一律會在每次建置之前刪除並重新建立。
當您在自我裝載的代理程式上執行管線時,預設不會在兩個連續執行之間清除 和 $(Common.TestResultsDirectory) 以外的$(Build.ArtifactStagingDirectory)任何子目錄。 因此,您可以執行累加建置和部署,前提是已實作工作以使用該作業。 您可以使用作業上的 設定來覆寫此行為 workspace 。
重要
工作區清除選項僅適用於自我裝載的代理程式。 作業一律會在具有Microsoft裝載代理程式的新代理程式上執行。
- job: myJob
  workspace:
    clean: outputs | resources | all # what to clean up before the job runs
當您指定其中 clean 一個選項時,這些選項會解譯如下:
outputs:在執行新作業之前先刪除Build.BinariesDirectory。resources:在執行新作業之前先刪除Build.SourcesDirectory。all:在執行新作業之前,請先刪除整個Pipeline.Workspace目錄。
  jobs:
  - deployment: MyDeploy
    pool:
      vmImage: 'ubuntu-latest'
    workspace:
      clean: all
    environment: staging
注意
視您的代理程式功能和管線需求而定,每個作業可能會路由傳送至自我裝載集區中的不同代理程式。 因此,您可能會取得後續管線執行的新代理程式(或相同管線中的階段或作業),因此 不 保證後續執行、作業或階段能夠存取先前執行、作業或階段的輸出。 您可以設定代理程式功能和管線需求來指定用來執行管線作業的代理程式,但除非集區中只有一個符合需求的單一代理程式,否則不保證後續作業會使用與先前作業相同的代理程式。 如需詳細資訊,請參閱 指定需求。
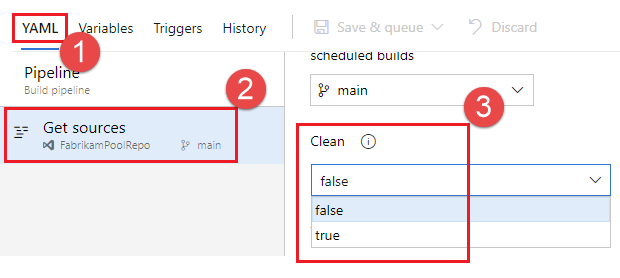
除了工作區清理之外,您也可以在管線設定UI中設定 Clean 設定來設定清除。 當 [ 清除 ] 設定為 true 時,也就是其預設值,相當於 clean: true 指定管線中每個 結帳 步驟。 當您指定 clean: true時,將會先執行 ,再git reset --hard HEAD執行 git clean -ffdx git 擷取。 若要設定 [ 清除] 設定:
編輯您的管線,選擇 ...,然後選取 [ 觸發程式]。

選取 [YAML]、 [取得來源],然後設定您想要的 [清除 ] 設定。 預設值為 True。
成品下載
此範例 YAML 檔案會發佈成品 WebSite ,然後將成品下載至 $(Pipeline.Workspace)。 只有在建置作業成功時,部署作業才會執行。
# test and upload my code as an artifact named WebSite
jobs:
- job: Build
  pool:
    vmImage: 'ubuntu-latest'
  steps:
  - script: npm test
  - task: PublishBuildArtifacts@1
    inputs:
      pathtoPublish: '$(System.DefaultWorkingDirectory)'
      artifactName: WebSite

# download the artifact and deploy it only if the build job succeeded
- job: Deploy
  pool:
    vmImage: 'ubuntu-latest'
  steps:
  - checkout: none #skip checking out the default repository resource
  - task: DownloadBuildArtifacts@0
    displayName: 'Download Build Artifacts'
    inputs:
      artifactName: WebSite
      downloadPath: $(Pipeline.Workspace)

  dependsOn: Build
  condition: succeeded()
如需使用 dependsOn 和條件的相關信息,請參閱指定條件。
存取 OAuth 令牌
您可以允許在作業中執行的腳本存取目前的 Azure Pipelines 或 TFS OAuth 安全性令牌。 令牌可用來向 Azure Pipelines REST API 進行驗證。
OAuth 令牌一律可供 YAML 管線使用。
它必須使用 明確對應至工作或步驟 env。
以下是範例:
steps:
- powershell: |
    $url = "$($env:SYSTEM_TEAMFOUNDATIONCOLLECTIONURI)$env:SYSTEM_TEAMPROJECTID/_apis/build/definitions/$($env:SYSTEM_DEFINITIONID)?api-version=4.1-preview"
    Write-Host "URL: $url"
    $pipeline = Invoke-RestMethod -Uri $url -Headers @{
      Authorization = "Bearer $env:SYSTEM_ACCESSTOKEN"
    }
    Write-Host "Pipeline = $($pipeline | ConvertTo-Json -Depth 100)"
  env:
    SYSTEM_ACCESSTOKEN: $(system.accesstoken)
下一步是什麼
意見反應
即將登場:在 2024 年,我們將逐步淘汰 GitHub 問題作為內容的意見反應機制,並將它取代為新的意見反應系統。 如需詳細資訊,請參閱:https://aka.ms/ContentUserFeedback。
提交並檢視相關的意見反應