將IoT 中樞遙測內嵌至 Azure Digital Twins
本指南會逐步解說撰寫函式的程式,此函式可以從IoT 中樞內嵌裝置遙測,並將其傳送至 Azure Digital Twins 的實例。
Azure Digital Twins 是由來自 IoT 裝置和其他來源的資料所驅動。 Azure Digital Twins 中要使用的裝置資料常見來源是 IoT 中樞 。
將資料內嵌至 Azure Digital Twins 的程式是設定外部計算資源,例如使用 Azure Functions 所建立的函式。 函式會接收資料,並使用 DigitalTwins API 來據以設定屬性或引發數位對應項 上的 遙測事件。
本操作說明文件會逐步引導您撰寫可從IoT 中樞內嵌裝置遙測的函式。
必要條件
繼續進行此範例之前,您必須將下列資源設定為必要條件:
- IoT 中樞。 如需指示,請參閱 本IoT 中樞快速入門 的<建立IoT 中樞>一節。
- 將接收裝置遙測的 Azure Digital Twins 實例。 如需指示,請參閱 設定 Azure Digital Twins 實例和驗證 。
範例遙測案例
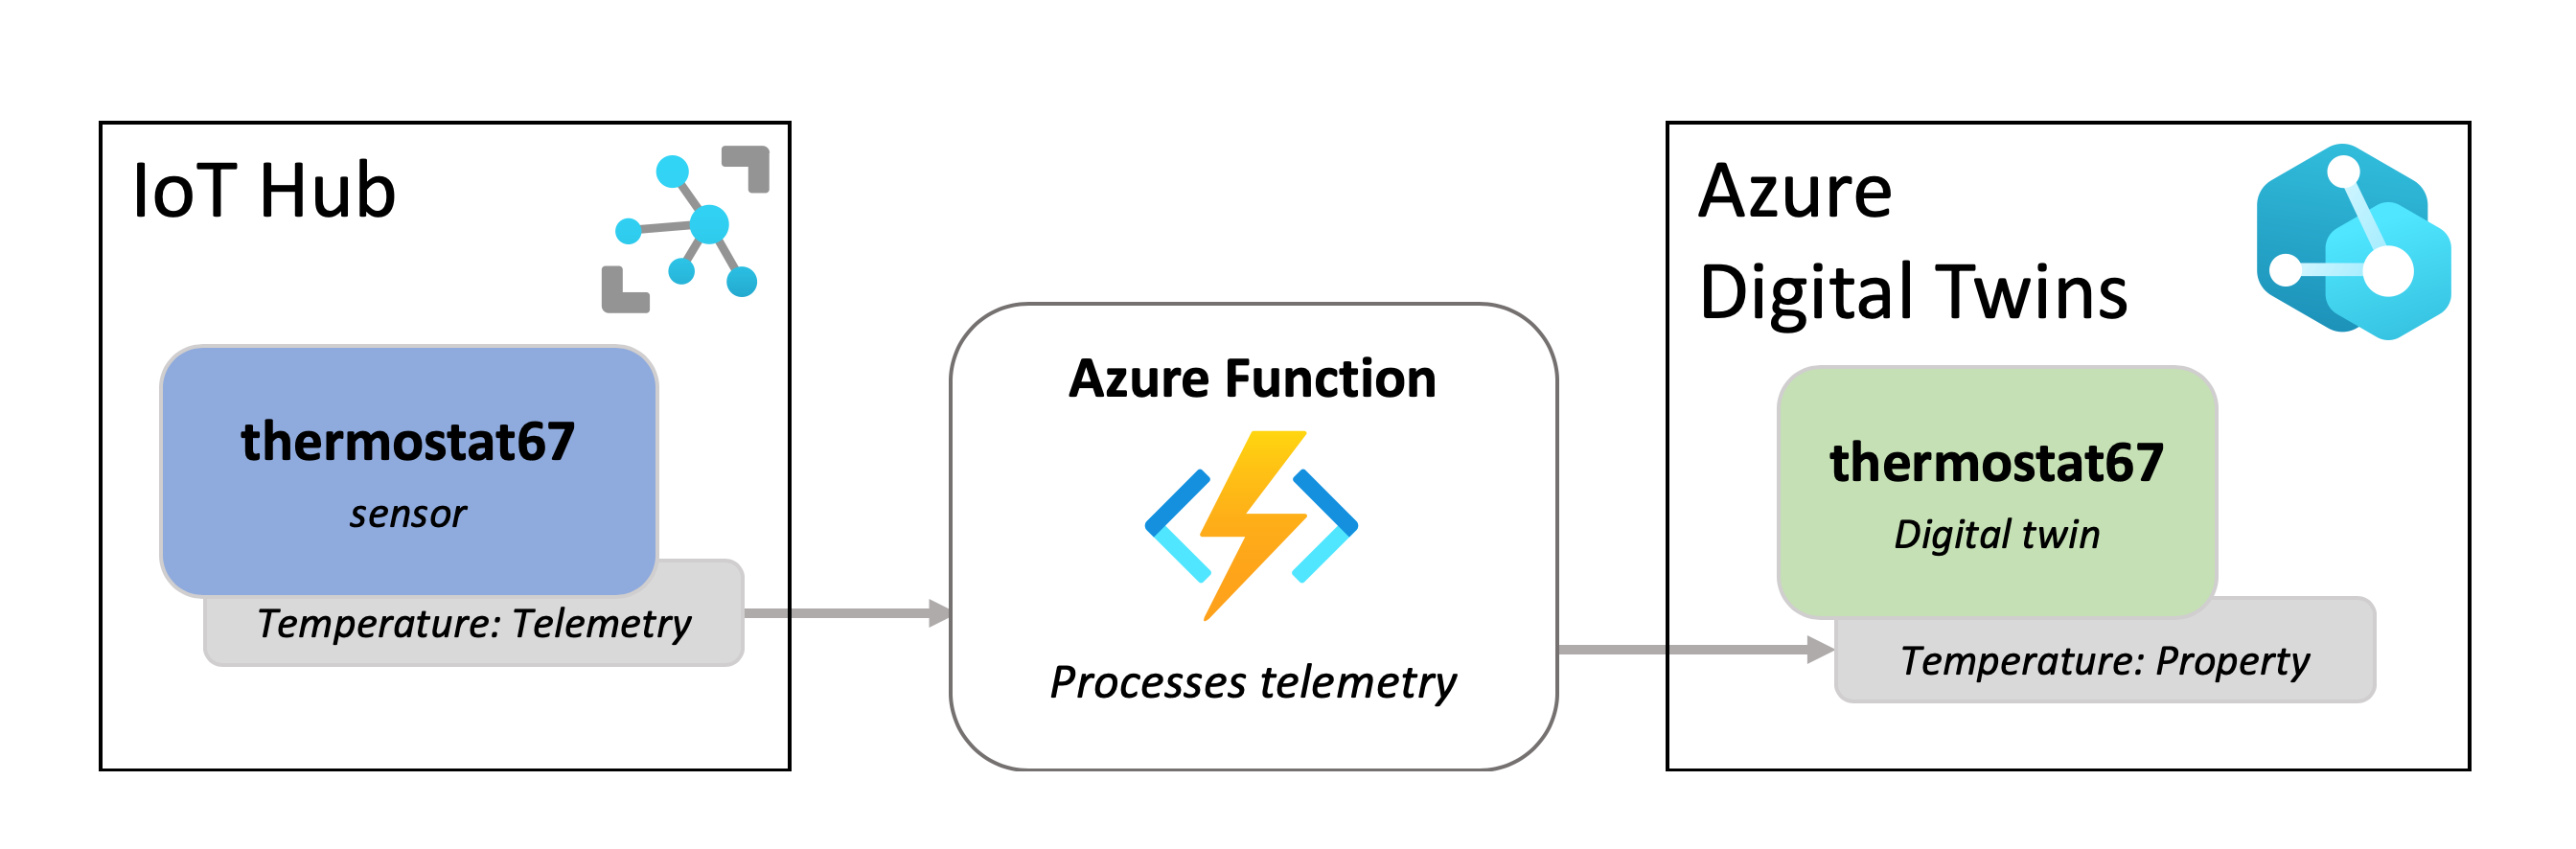
本操作說明說明如何使用 Azure 中的函式,將訊息從IoT 中樞傳送至 Azure Digital Twins。 您可以使用許多可能的設定和比對策略來傳送訊息,但本文的範例包含下列部分:
- IoT 中樞中的控溫器裝置,具有已知的裝置識別碼
- 代表裝置的數位對應項,具有相符的識別碼
注意
此範例會使用裝置識別碼與所對應數位對應項識別碼之間的直接識別碼比對,但也可提供更為複雜的裝置與對應項對應 (如使用對應表)。
每當控溫器裝置傳送溫度遙測事件時,函式就會處理遙測和 Temperature 數位對應項的 屬性應該更新。 下圖概述此案例:
新增模型與對應項
在本節中,您會在 Azure Digital Twins 中設定 數位對應項 ,以代表控溫器裝置,並使用來自IoT 中樞的資訊進行更新。
若要建立控溫器類型對應項,您必須先將控溫器模型 上傳至實例,其描述控溫器 的屬性,稍後將用來建立對應項。
此模型看似如下:
{
    "@id": "dtmi:contosocom:DigitalTwins:Thermostat;1",
    "@type": "Interface",
    "@context": "dtmi:dtdl:context;3",
    "contents": [
      {
        "@type": "Property",
        "name": "Temperature",
        "schema": "double"
      }
    ]
  }
若要將此模型上傳至對應項實例,請執行下列 Azure CLI 命令,將上述模型上傳為內嵌 JSON。 您可以在瀏覽器中的 Azure Cloud Shell 中 執行命令(使用 Bash 環境),或在本機安裝 CLI 時 在電腦上執行命令。 實例的主機名稱有一個預留位置(您也可以使用實例的易記名稱,效能略有降低)。
az dt model create --dt-name <instance-hostname-or-name> --models '{ "@id": "dtmi:contosocom:DigitalTwins:Thermostat;1", "@type": "Interface", "@context": "dtmi:dtdl:context;2", "contents": [ { "@type": "Property", "name": "Temperature", "schema": "double" } ]}'
注意
如果您在 Bash 環境中使用 Cloud Shell 以外的任何專案,您可能需要逸出內嵌 JSON 中的特定字元,使其正確剖析。 如需詳細資訊,請參閱 在不同的殼層 中使用特殊字元。
接著,您必須使用此模型建立一個對應項。 使用下列命令來建立名為 thermostat67 的控溫器對應項,並將 0.0 設定為初始溫度值。 實例的主機名稱有一個預留位置(您也可以使用實例的易記名稱,效能略有降低)。
az dt twin create --dt-name <instance-hostname-or-name> --dtmi "dtmi:contosocom:DigitalTwins:Thermostat;1" --twin-id thermostat67 --properties '{"Temperature": 0.0}'
成功建立對應項時,來自 命令的 CLI 輸出看起來應該像這樣:
{
  "$dtId": "thermostat67",
  "$etag": "W/\"0000000-9735-4f41-98d5-90d68e673e15\"",
  "$metadata": {
    "$model": "dtmi:contosocom:DigitalTwins:Thermostat;1",
    "Temperature": {
      "lastUpdateTime": "2021-09-09T20:32:46.6692326Z"
    }
  },
  "Temperature": 0.0
}
建立 Azure 函式
在本節中,您將建立 Azure 函式來存取 Azure Digital Twins,並根據它收到的 IoT 裝置遙測事件來更新對應項。 請遵循下列步驟來建立及發佈函式。
首先,建立事件方格觸發程式類型的新 Azure Functions 專案。
您可以使用 Visual Studio 來執行此動作(如需指示,請參閱使用 Visual Studio 開發 Azure Functions)、 Visual Studio Code (如需指示,請參閱使用 Visual Studio Code 在 Azure 中建立 C# 函式),或 Azure CLI (如需指示,請參閱 從命令列 在 Azure 中建立 C# 函 式)。
將下列套件新增至您的專案(您可以使用 Visual Studio NuGet 套件管理員,或 命令列工具中的 dotnet add 套件 命令)。
在名為 IoTHubtoTwins.cs 的專案內建立函式 。 將下列程式碼貼到函式檔案中:
using System;
using Azure;
using System.Net.Http;
using Azure.Core.Pipeline;
using Azure.DigitalTwins.Core;
using Azure.Identity;
using Microsoft.Azure.WebJobs;
using Microsoft.Azure.WebJobs.Extensions.EventGrid;
using Microsoft.Extensions.Logging;
using Newtonsoft.Json;
using Newtonsoft.Json.Linq;
using Azure.Messaging.EventGrid;

namespace IotHubtoTwins
{
    public class IoTHubtoTwins
    {
        private static readonly string adtInstanceUrl = Environment.GetEnvironmentVariable("ADT_SERVICE_URL");
        private static readonly HttpClient httpClient = new HttpClient();

        [FunctionName("IoTHubtoTwins")]
        // While async void should generally be used with caution, it's not uncommon for Azure function apps, since the function app isn't awaiting the task.
#pragma warning disable AZF0001 // Suppress async void error
        public async void Run([EventGridTrigger] EventGridEvent eventGridEvent, ILogger log)
#pragma warning restore AZF0001 // Suppress async void error
        {
            if (adtInstanceUrl == null) log.LogError("Application setting \"ADT_SERVICE_URL\" not set");

            try
            {
                // Authenticate with Digital Twins
                var cred = new DefaultAzureCredential();
                var client = new DigitalTwinsClient(new Uri(adtInstanceUrl), cred);
                log.LogInformation($"ADT service client connection created.");

                if (eventGridEvent != null && eventGridEvent.Data != null)
                {
                    log.LogInformation(eventGridEvent.Data.ToString());

                    // <Find_device_ID_and_temperature>
                    JObject deviceMessage = (JObject)JsonConvert.DeserializeObject(eventGridEvent.Data.ToString());
                    string deviceId = (string)deviceMessage["systemProperties"]["iothub-connection-device-id"];
                    var temperature = deviceMessage["body"]["Temperature"];
                    // </Find_device_ID_and_temperature>

                    log.LogInformation($"Device:{deviceId} Temperature is:{temperature}");

                    // <Update_twin_with_device_temperature>
                    var updateTwinData = new JsonPatchDocument();
                    updateTwinData.AppendReplace("/Temperature", temperature.Value<double>());
                    await client.UpdateDigitalTwinAsync(deviceId, updateTwinData);
                    // </Update_twin_with_device_temperature>
                }
            }
            catch (Exception ex)
            {
                log.LogError($"Error in ingest function: {ex.Message}");
            }
        }
    }
}
儲存函式程式碼。
使用 IoTHubtoTwins.cs 函式將專案發佈至 Azure 中的函式應用程式。
如需如何使用 Visual Studio 發佈函 式的指示,請參閱 使用 Visual Studio 開發 Azure Functions。 如需如何使用 Visual Studio Code 發佈函 式的指示,請參閱 使用 Visual Studio Code 在 Azure 中建立 C# 函式。 如需如何使用 Azure CLI 發佈 函式的指示,請參閱 從命令列 在 Azure 中建立 C# 函式。
發佈函式的程式完成後,您可以使用此 Azure CLI 命令來確認發佈是否成功。 資源群組有預留位置,以及函式應用程式的名稱。 此命令會列印 IoTHubToTwins 函式的相關資訊 。
az functionapp function show --resource-group <your-resource-group> --name <your-function-app> --function-name IoTHubToTwins
設定函式應用程式
若要存取 Azure Digital Twins,您的函式應用程式需要系統 指派的受控識別 ,並具有存取 Azure Digital Twins 實例的許可權。 您會在本節中設定該設定,方法是指派函式的存取角色並設定應用程式設定,以便存取您的 Azure Digital Twins 實例。
在 Azure Cloud Shell 或 本機 Azure CLI 中 執行下列命令。
注意
本節必須由有權管理 Azure 資源之使用者存取權的 Azure 使用者完成,包括授與和委派許可權。 符合此需求的常見角色包括 擁有者 、 帳戶管理員 或使用者存取管理員istrator 和 參與者 的組合 。 如需 Azure Digital Twins 角色許可權需求的詳細資訊,請參閱 設定實例和驗證 。
指派存取角色
Azure 函式需要將持有人權杖傳遞給它。 若要確定已傳遞持有人權杖,請將 Azure Digital Twins 實例的 Azure Digital Twins 資料擁有者 角色授與函式應用程式 ,以授與函式應用程式在實例上執行資料平面活動的許可權。
使用下列命令來建立 函式的系統受控識別 (如果函式已經有一個,此命令將會列印其詳細資料)。 記下
principalId輸出中的 欄位。 您將使用此識別碼來參考函式,以便在下一個步驟中授與它許可權。az functionapp identity assign --resource-group <your-resource-group> --name <your-function-app-name>principalId使用下列命令中的 值,為 Azure Digital Twins 實例提供 Azure Digital Twins 資料擁有者 角色的函 式。az dt role-assignment create --dt-name <your-Azure-Digital-Twins-instance> --assignee "<principal-ID>" --role "Azure Digital Twins Data Owner"
設定應用程式設定
接下來,為函式設定 環境變數 ,讓 Azure Digital Twins 實例的 URL 可供函式存取。
提示
Azure Digital Twins 實例的 URL 是藉由將 HTTPs:// 新增 至實例主機名稱的開頭來建立。 若要查看主機名稱,以及實例的所有屬性,請執行 az dt show --dt-name <your-Azure-Digital-Twins-instance> 。
下列命令會設定實例 URL 的環境變數,每當函式需要存取實例時,就會使用該環境變數。
az functionapp config appsettings set --resource-group <your-resource-group> --name <your-function-app-name> --settings "ADT_SERVICE_URL=https://<your-Azure-Digital-Twins-instance-host-name>"
連線函式以IoT 中樞
在本節中,您會將函式設定為 IoT 中樞裝置資料的事件目的地。 以這種方式設定您的函式可確保將來自IoT 中樞控溫器裝置的資料傳送至 Azure 函式進行處理。
使用下列 CLI 命令來建立事件訂用帳戶,IoT 中樞將用來將事件資料傳送至 IoTHubtoTwins 函 式。 有一個預留位置可供您輸入事件訂用帳戶的名稱,也有預留位置可供您輸入訂用帳戶識別碼、資源群組、IoT 中樞名稱,以及函式應用程式的名稱。
az eventgrid event-subscription create --name <name-for-hub-event-subscription> --event-delivery-schema eventgridschema --source-resource-id /subscriptions/<your-subscription-ID>/resourceGroups/<your-resource-group>/providers/Microsoft.Devices/IotHubs/<your-IoT-hub> --included-event-types Microsoft.Devices.DeviceTelemetry --endpoint-type azurefunction --endpoint /subscriptions/<your-subscription-ID>/resourceGroups/<your-resource-group>/providers/Microsoft.Web/sites/<your-function-app>/functions/IoTHubtoTwins
輸出會顯示已建立之事件訂閱的相關資訊。 您可以確認 provisioningState 結果中的值,以確認作業已順利完成:
"provisioningState": "Succeeded",
使用模擬 IoT 資料進行測試
您可以使用來自 連線端對端解決方案 的裝置模擬器來測試新的輸入函式。 DeviceSimulator 專案包含模擬控溫器 裝置,可傳送樣本溫度資料。 若要設定裝置模擬器,請遵循下列步驟:
流覽至 Azure Digital Twins 端對端範例專案存放庫 。 選取 標題下方的 [流覽程式碼 ] 按鈕,以取得您電腦上的範例專案。 這會帶您前往範例的 GitHub 存放庫,您可以選取 [程式碼 ] 按鈕, 然後選取 [下載 ZIP] 作為 .zip 下載。
這會將 .ZIP 檔案夾下載到您的電腦,做為 digital-twins-samples-main.zip 。 解壓縮資料夾並解壓縮檔案。 您將使用 DeviceSimulator 專案資料夾。
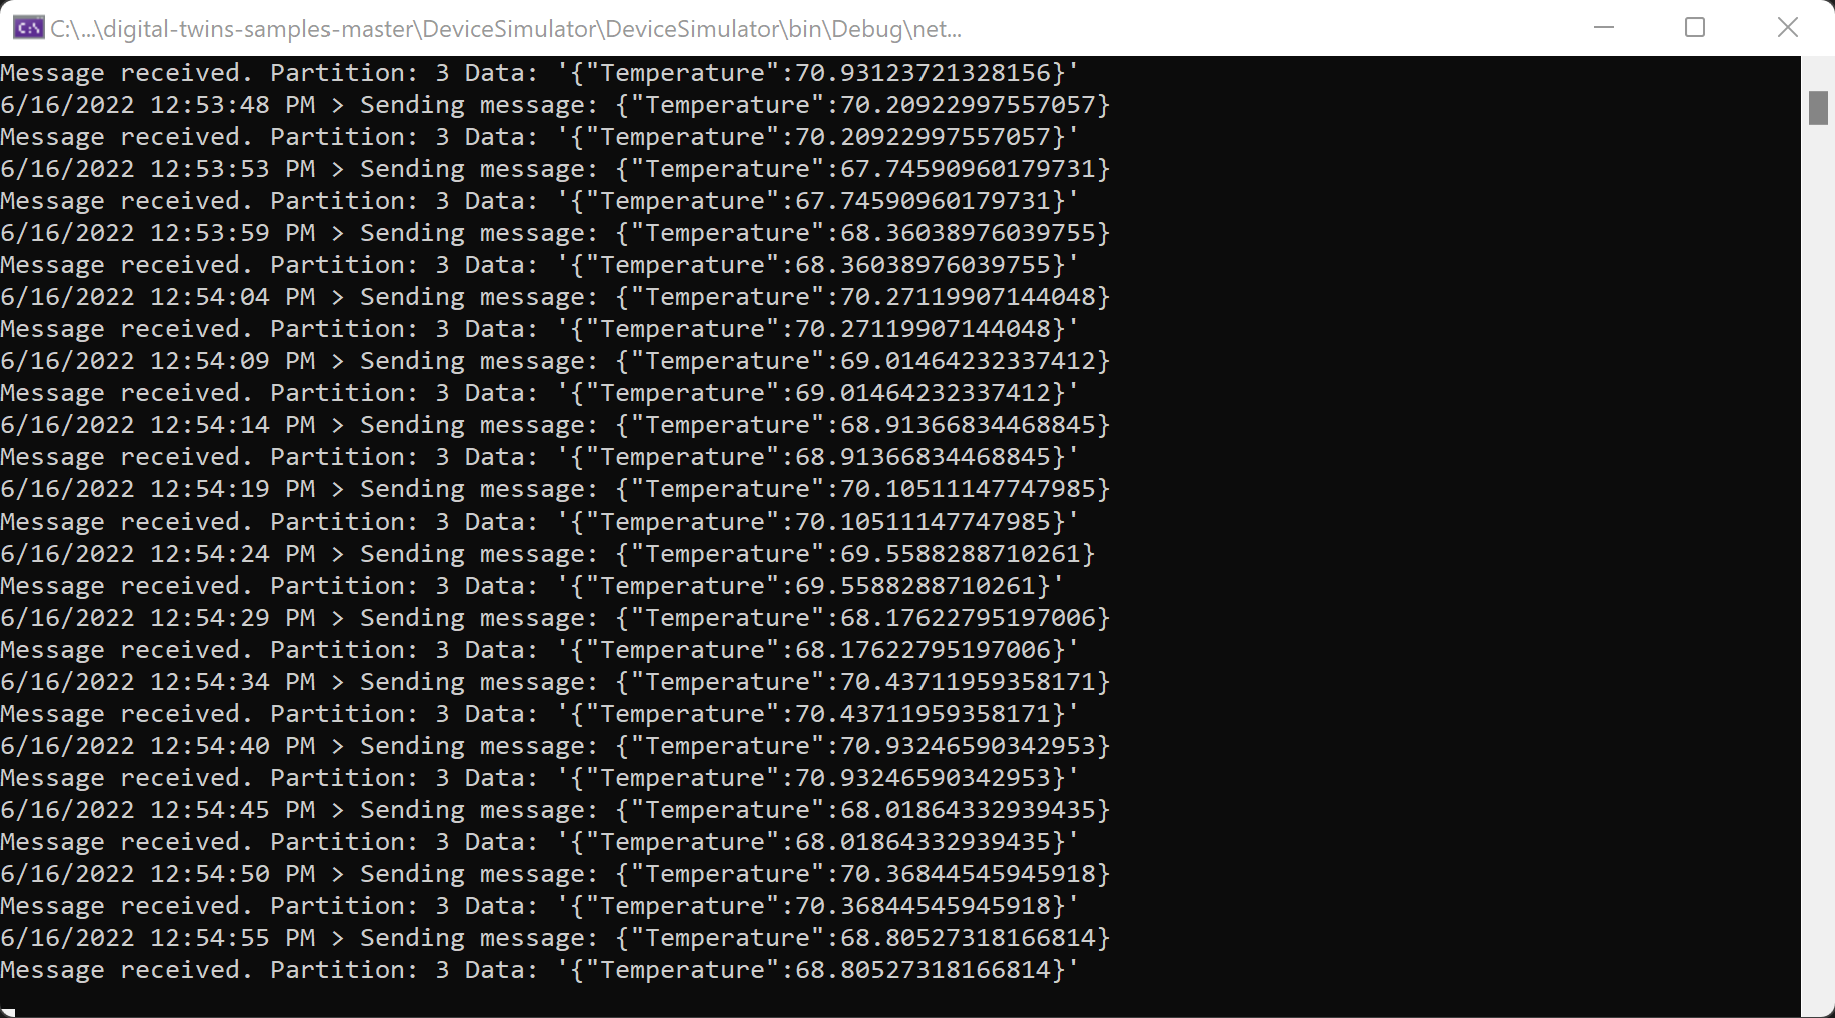
完成這些步驟之後,您應該會執行專案主控台視窗,並將模擬裝置遙測資料傳送至 IoT 中樞。
驗證結果
執行上述裝置模擬器時,控溫器數位對應項的溫度值將會變更。 在 Azure CLI 中,執行下列命令以查看溫度值。 實例的主機名稱有一個預留位置(您也可以使用實例的易記名稱,效能略有降低)。
az dt twin query --query-command "SELECT * FROM digitaltwins WHERE \$dtId = 'thermostat67'" --dt-name <instance-hostname-or-name>
注意
如果您在 Bash 環境中使用 Cloud Shell 以外的任何專案,您可能需要以不同的方式逸 $ 出查詢中的字元,使其正確剖析。 如需詳細資訊,請參閱 在不同的殼層 中使用特殊字元。
您的輸出應該會顯示控溫器67 對應項的詳細資料,包括溫度值,如下所示:
{
  "result": [
    {
      "$dtId": "thermostat67",
      "$etag": "W/\"dbf2fea8-d3f7-42d0-8037-83730dc2afc5\"",
      "$metadata": {
        "$model": "dtmi:contosocom:DigitalTwins:Thermostat;1",
        "Temperature": {
          "lastUpdateTime": "2021-06-03T17:05:52.0062638Z"
        }
      },
      "Temperature": 70.20518558807913
    }
  ]
}
Temperature若要查看值變更,請重複執行上述查詢命令。
下一步
閱讀使用 Azure Digital Twins 的資料輸入和輸出: