教學課程:使用註冊群組布建多個 X.509 裝置
在本教學課程中,您將瞭解如何布建使用 X.509 憑證進行驗證的 IoT 裝置群組。 Azure IoT SDK 中的範例裝置程式代碼將會在您的開發電腦上執行,以模擬 X.509 裝置的佈建。 在實際裝置上,裝置程式代碼會從IoT裝置部署和執行。
Azure IoT 中樞 裝置佈建服務支援兩種類型的註冊來布建裝置:
- 註冊群組:用來註冊多個相關裝置。 本教學課程示範如何使用註冊群組進行布建。
- 個別註冊:用來註冊單一裝置。
Azure IoT 中樞 裝置佈建服務支援三種形式的驗證來布建裝置:
- X.509 憑證 - 本教學課程示範 X.509 憑證證明
- 信任的平台模組 (TPM)
- 對稱金鑰
在生產案例中, 硬體安全性模組 (HSM) 用於裝置秘密的安全硬體型記憶體。 HSM 可以搭配對稱金鑰、X.509 憑證或 TPM 證明使用,以提供密碼的安全記憶體。 建議以硬體為基礎的裝置密碼記憶體,以協助保護敏感性資訊,例如裝置憑證的私鑰。
在本教學課程中,您會完成下列目標:
- 建立信任憑證鏈結,以使用 X.509 憑證組織一組裝置。
- 建立使用憑證鏈結的新群組註冊。
- 設定開發環境。
- 使用 Azure IoT 裝置 SDK 中的範例程式代碼,使用憑證鏈結布建裝置。
必要條件
如果您沒有 Azure 訂用帳戶,請在開始前建立免費帳戶。
使用 Azure 入口網站 完成設定 IoT 中樞 裝置布建服務中的步驟。
下列必要條件適用於用來模擬裝置的 Windows 開發環境。 針對 Linux 或 macOS,請參閱 SDK 檔中準備開發環境的適當章節。
安裝 Visual Studio 2022,並 啟用「使用 C++進行桌面開發」 工作負載。 也支援 Visual Studio 2015、Visual Studio 2017 和 Visual Studio 19。
安裝最新的 CMake 組建系統。 請務必檢查將 CMake 可執行檔新增至路徑的選項。
重要
在開始
CMake安裝之前,請先確認已安裝Visual Studio必要條件 (Visual Studio 和「使用 C++進行桌面開發」工作負載。 一旦必要條件就緒,並確認下載后,請安裝 CMake 建置系統。 此外,請注意,舊版 CMake 建置系統無法產生本教學課程中使用的解決方案檔案。 請務必使用最新版本的 CMake。
下列必要條件適用於 Windows 開發環境。 針對 Linux 或 macOS,請參閱 SDK 檔中準備開發環境的適當章節。
在 Windows 電腦上安裝 .NET SDK 6.0 或更新版本。 您可以使用下列命令來檢查您的版本。
dotnet --info
下列必要條件適用於 Windows 開發環境。 針對 Linux 或 macOS,請參閱 SDK 檔中準備開發環境的適當章節。
- 在您的 電腦上安裝 Node.js v4.0 或更新版本 。
下列必要條件適用於 Windows 開發環境。
下列必要條件適用於 Windows 開發環境。 針對 Linux 或 macOS,請參閱 SDK 檔中準備開發環境的適當章節。
在您的 電腦上安裝 Java SE 開發工具套件 8 或更新版本。
下載並安裝 Maven。
安裝最新版本的 Git。 請確定 Git 已新增至命令視窗可存取的環境變數。
請確定 您的電腦已安裝 OpenSSL 。 在 Windows 上,您的 Git 安裝包含 OpenSSL 的安裝。 您可以從 Git Bash 提示字元存取 OpenSSL。 若要確認已安裝 OpenSSL,請開啟 Git Bash 提示字元,然後輸入
openssl version。注意
除非您熟悉 OpenSSL,且已在 Windows 電腦上安裝它,否則建議您從 Git Bash 提示字元使用 OpenSSL。 或者,您可以選擇下載原始程式碼並建置 OpenSSL。 如果您選擇建置或下載 OpenSSL,請確定您的路徑可存取 OpenSSL 二進位檔,且
OPENSSL_CNF環境變數設定為 openssl.cnf 檔案的路徑。
準備您的開發環境
在本節中,您會準備用來建置 Azure IoT C SDK 的開發環境。 SDK 包含使用 DPS 布建的裝置所使用的範例程式代碼和工具。
在網頁瀏覽器中,移至 Azure IoT C SDK 的 [發行] 頁面。
複製最新版 Azure IoT C SDK 的標籤名稱,例如:
lts_03_2024。開啟 Windows 命令提示字元並執行下列命令,以複製最新版的 Azure IoT 裝置 SDK for C GitHub 存放庫。 將取代
<release-tag>為您在上一個步驟中複製的標記。git clone -b <release-tag> https://github.com/Azure/azure-iot-sdk-c.git cd azure-iot-sdk-c git submodule update --init此作業可能需要幾分鐘的時間才能完成。
工作完成時,請從
azure-iot-sdk-c目錄執行下列命令:mkdir cmake cd cmake程式代碼範例會使用 X.509 憑證,透過 X.509 驗證提供證明。 執行下列命令,以建置開發平台專屬的 SDK 版本,其中包含裝置布建用戶端。 模擬裝置的 Visual Studio 解決方案會在 目錄中產生
cmake。將取代
<path為您複製之 C SDK 的絕對路徑。cmake -Duse_prov_client:BOOL=ON -Dhsm_custom_lib=c:/<path>/azure-iot-sdk-c/cmake/provisioning_client/samples/custom_hsm_example/Debug/custom_hsm_example.lib ..提示
如果
cmake找不到您的 C++ 編譯程式,您可以在執行上述命令時收到建置錯誤。 如果發生這種情況,請嘗試在 Visual Studio 命令提示字元中執行命令。建置成功時,最後幾個輸出行看起來會類似下列輸出:
cmake -Duse_prov_client:BOOL=ON -Dhsm_custom_lib=c:/azure-iot-sdk-c/cmake/provisioning_client/samples/custom_hsm_example/Debug/custom_hsm_example.lib ..
-- Building for: Visual Studio 17 2022
-- Selecting Windows SDK version 10.0.19041.0 to target Windows 10.0.22000.
-- The C compiler identification is MSVC 19.32.31329.0
-- The CXX compiler identification is MSVC 19.32.31329.0

...

-- Configuring done
-- Generating done
-- Build files have been written to: C:/azure-iot-sdk-c/cmake
開啟 Windows 命令提示字元,並使用下列命令複製 適用於 C# 的 Azure IoT SDK GitHub 存放庫:
git clone https://github.com/Azure/azure-iot-sdk-csharp.git
開啟 Windows 命令提示字元,並使用下列命令複製 適用於 Node.js GitHub 存放庫的 Azure IoT SDK:
git clone https://github.com/Azure/azure-iot-sdk-node.git
開啟 Windows 命令提示字元,並使用下列命令複製 適用於 Python GitHub 的 Azure IoT 裝置 SDK 存放庫:
git clone -b v2 https://github.com/Azure/azure-iot-sdk-python.git --recursive
注意
本教學課程中使用的範例位於 azure-iot-sdk-python 存放庫的 v2 分支中。 Python SDK 的 V3 可在 Beta 中使用。
開啟 Windows 命令提示字元,並使用下列命令複製適用於 Java GitHub 的 Azure IoT 範例存放庫:
git clone https://github.com/Azure/azure-iot-sdk-java.git --recursive移至根
azure-iot-sdk-java目錄並建置項目以下載所有必要的套件。cd azure-iot-sdk-java mvn install -DskipTests=true
建立 X.509 憑證鏈結
在本節中,您會使用本教學課程產生三個憑證的 X.509 憑證鏈結,以測試每個裝置。 憑證具有下列階層。
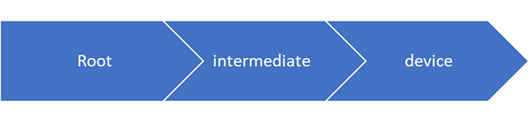
跟證書 您上傳並使用 DPS 驗證跟證書。 此驗證可讓 DPS 信任該憑證,並驗證其簽署的憑證。
中繼憑證:通常會使用中繼憑證,依產品線、公司部門或其他準則,以邏輯方式將裝置分組。 本教學課程使用具有一個中繼憑證的憑證鏈結,但在生產案例中,您可能有數個。 此鏈結中的中繼憑證是由跟證書簽署。 此憑證會提供給 DPS 中建立的註冊群組。 此組態允許管理一組裝置,這些裝置具有由相同中繼憑證簽署的裝置憑證。
裝置憑證:裝置憑證(有時稱為分葉憑證)是由中繼憑證簽署,並連同其私鑰一起儲存在裝置上。 在理想情況下,這些敏感性專案會以 HSM 安全地儲存。 同一個中繼憑證可以簽署多個裝置憑證。 每次嘗試布建時,每個裝置都會提供其憑證和私鑰,以及憑證鏈結。
如需憑證鏈結的詳細資訊,請參閱 X.509 憑證證明。
設定 X.509 OpenSSL 環境
在本節中,您會建立 Openssl 組態檔、目錄結構,以及 Openssl 命令所使用的其他檔案。
開啟 Git Bash 命令提示字元,並流覽至您要產生本教學課程 X.509 憑證和密鑰的資料夾。
為您的根 CA 憑證建立名為 openssl_root_ca.cnf 的 OpenSSL 組態檔。 OpenSSL 組態檔包含 OpenSSL 命令所取用的原則和定義。 將下列文字複製並貼到 openssl_root_ca.cnf 檔案中:
# OpenSSL root CA configuration file.

[ ca ]
default_ca = CA_default

[ CA_default ]
# Directory and file locations.
dir               = .
certs             = $dir/certs
crl_dir           = $dir/crl
new_certs_dir     = $dir/newcerts
database          = $dir/index.txt
serial            = $dir/serial
RANDFILE          = $dir/private/.rand

# The root key and root certificate.
private_key       = $dir/private/azure-iot-test-only.root.ca.key.pem
certificate       = $dir/certs/azure-iot-test-only.root.ca.cert.pem

# For certificate revocation lists.
crlnumber         = $dir/crlnumber
crl               = $dir/crl/azure-iot-test-only.intermediate.crl.pem
crl_extensions    = crl_ext
default_crl_days  = 30

# SHA-1 is deprecated, so use SHA-2 instead.
default_md        = sha256

name_opt          = ca_default
cert_opt          = ca_default
default_days      = 375
preserve          = no
policy            = policy_loose

[ policy_strict ]
# The root CA should only sign intermediate certificates that match.
countryName             = optional
stateOrProvinceName     = optional
organizationName        = optional
organizationalUnitName  = optional
commonName              = supplied
emailAddress            = optional

[ policy_loose ]
# Allow the intermediate CA to sign a more diverse range of certificates.
countryName             = optional
stateOrProvinceName     = optional
localityName            = optional
organizationName        = optional
organizationalUnitName  = optional
commonName              = supplied
emailAddress            = optional

[ req ]
default_bits        = 2048
distinguished_name  = req_distinguished_name
string_mask         = utf8only

# SHA-1 is deprecated, so use SHA-2 instead.
default_md          = sha256

# Extension to add when the -x509 option is used.
x509_extensions     = v3_ca

[ req_distinguished_name ]
# See <https://en.wikipedia.org/wiki/Certificate_signing_request>.
countryName                     = Country Name (2 letter code)
stateOrProvinceName             = State or Province Name
localityName                    = Locality Name
0.organizationName              = Organization Name
organizationalUnitName          = Organizational Unit Name
commonName                      = Common Name
emailAddress                    = Email Address

# Optionally, specify some defaults.
countryName_default             = US
stateOrProvinceName_default     = WA
localityName_default            =
0.organizationName_default      = My Organization
organizationalUnitName_default  =
emailAddress_default            =

[ v3_ca ]
# Extensions for a typical CA.
subjectKeyIdentifier = hash
authorityKeyIdentifier = keyid:always,issuer
basicConstraints = critical, CA:true
keyUsage = critical, digitalSignature, cRLSign, keyCertSign

[ v3_intermediate_ca ]
# Extensions for a typical intermediate CA.
subjectKeyIdentifier = hash
authorityKeyIdentifier = keyid:always,issuer
basicConstraints = critical, CA:true
keyUsage = critical, digitalSignature, cRLSign, keyCertSign

[ usr_cert ]
# Extensions for client certificates.
basicConstraints = CA:FALSE
nsComment = "OpenSSL Generated Client Certificate"
subjectKeyIdentifier = hash
authorityKeyIdentifier = keyid,issuer
keyUsage = critical, nonRepudiation, digitalSignature, keyEncipherment
extendedKeyUsage = clientAuth

[ server_cert ]
# Extensions for server certificates.
basicConstraints = CA:FALSE
nsComment = "OpenSSL Generated Server Certificate"
subjectKeyIdentifier = hash
authorityKeyIdentifier = keyid,issuer:always
keyUsage = critical, digitalSignature, keyEncipherment
extendedKeyUsage = serverAuth

[ crl_ext ]
# Extension for CRLs.
authorityKeyIdentifier=keyid:always

[ ocsp ]
# Extension for OCSP signing certificates.
basicConstraints = CA:FALSE
subjectKeyIdentifier = hash
authorityKeyIdentifier = keyid,issuer
keyUsage = critical, digitalSignature
extendedKeyUsage = critical, OCSPSigning
建立名為 openssl_device_intermediate_ca.cnf 的 OpenSSL 組態檔,以用於中繼和裝置憑證。 將下列文字複製並貼到 openssl_device_intermediate_ca.cnf 檔案中:
# OpenSSL root CA configuration file.

[ ca ]
default_ca = CA_default

[ CA_default ]
# Directory and file locations.
dir               = .
certs             = $dir/certs
crl_dir           = $dir/crl
new_certs_dir     = $dir/newcerts
database          = $dir/index.txt
serial            = $dir/serial
RANDFILE          = $dir/private/.rand

# The root key and root certificate.
private_key       = $dir/private/azure-iot-test-only.intermediate.key.pem
certificate       = $dir/certs/azure-iot-test-only.intermediate.cert.pem

# For certificate revocation lists.
crlnumber         = $dir/crlnumber
crl               = $dir/crl/azure-iot-test-only.intermediate.crl.pem
crl_extensions    = crl_ext
default_crl_days  = 30

# SHA-1 is deprecated, so use SHA-2 instead.
default_md        = sha256

name_opt          = ca_default
cert_opt          = ca_default
default_days      = 375
preserve          = no
policy            = policy_loose

[ policy_strict ]
# The root CA should only sign intermediate certificates that match.
countryName             = optional
stateOrProvinceName     = optional
organizationName        = optional
organizationalUnitName  = optional
commonName              = supplied
emailAddress            = optional

[ policy_loose ]
# Allow the intermediate CA to sign a more diverse range of certificates.
countryName             = optional
stateOrProvinceName     = optional
localityName            = optional
organizationName        = optional
organizationalUnitName  = optional
commonName              = supplied
emailAddress            = optional

[ req ]
default_bits        = 2048
distinguished_name  = req_distinguished_name
string_mask         = utf8only

# SHA-1 is deprecated, so use SHA-2 instead.
default_md          = sha256

# Extension to add when the -x509 option is used.
x509_extensions     = v3_ca

[ req_distinguished_name ]
# See <https://en.wikipedia.org/wiki/Certificate_signing_request>.
countryName                     = Country Name (2 letter code)
stateOrProvinceName             = State or Province Name
localityName                    = Locality Name
0.organizationName              = Organization Name
organizationalUnitName          = Organizational Unit Name
commonName                      = Common Name
emailAddress                    = Email Address

# Optionally, specify some defaults.
countryName_default             = US
stateOrProvinceName_default     = WA
localityName_default            =
0.organizationName_default      = My Organization
organizationalUnitName_default  =
emailAddress_default            =

[ v3_ca ]
# Extensions for a typical CA.
subjectKeyIdentifier = hash
authorityKeyIdentifier = keyid:always,issuer
basicConstraints = critical, CA:true
keyUsage = critical, digitalSignature, cRLSign, keyCertSign

[ v3_intermediate_ca ]
# Extensions for a typical intermediate CA.
subjectKeyIdentifier = hash
authorityKeyIdentifier = keyid:always,issuer
basicConstraints = critical, CA:true
keyUsage = critical, digitalSignature, cRLSign, keyCertSign

[ usr_cert ]
# Extensions for client certificates.
basicConstraints = CA:FALSE
nsComment = "OpenSSL Generated Client Certificate"
subjectKeyIdentifier = hash
authorityKeyIdentifier = keyid,issuer
keyUsage = critical, nonRepudiation, digitalSignature, keyEncipherment
extendedKeyUsage = clientAuth

[ server_cert ]
# Extensions for server certificates.
basicConstraints = CA:FALSE
nsComment = "OpenSSL Generated Server Certificate"
subjectKeyIdentifier = hash
authorityKeyIdentifier = keyid,issuer:always
keyUsage = critical, digitalSignature, keyEncipherment
extendedKeyUsage = serverAuth

[ crl_ext ]
# Extension for CRLs.
authorityKeyIdentifier=keyid:always

[ ocsp ]
# Extension for OCSP signing certificates.
basicConstraints = CA:FALSE
subjectKeyIdentifier = hash
authorityKeyIdentifier = keyid,issuer
keyUsage = critical, digitalSignature
extendedKeyUsage = critical, OCSPSigning
建立目錄結構、資料庫檔案 index.txt,以及 OpenSSL 命令在本教學課程中使用的序號檔案 序列 :
mkdir certs csr newcerts private
touch index.txt
openssl rand -hex 16 > serial
建立根 CA 憑證
執行下列命令來建立根 CA 私鑰和根 CA 憑證。 您可以使用此憑證和金鑰來簽署中繼憑證。
在您的 Git Bash 終端機中,建立根 CA 私鑰:
openssl genrsa -aes256 -passout pass:1234 -out ./private/azure-iot-test-only.root.ca.key.pem 4096建立根 CA 憑證:
openssl req -new -x509 -config ./openssl_root_ca.cnf -passin pass:1234 -key ./private/azure-iot-test-only.root.ca.key.pem -subj '//CN=Azure IoT Hub CA Cert Test Only' -days 30 -sha256 -extensions v3_ca -out ./certs/azure-iot-test-only.root.ca.cert.pem重要
僅需要為主體名稱 (
//CN=Azure IoT Hub CA Cert Test Only) 提供的額外正斜線,才能在 Windows 平臺上使用 Git 逸出字串。 在 Linux 平臺上,僅提供一個正斜線 (/CN=Azure IoT Hub CA Cert Test Only) 的主體名稱。檢查根 CA 憑證:
openssl x509 -noout -text -in ./certs/azure-iot-test-only.root.ca.cert.pem觀察簽發者和主體都是根 CA。
Certificate:
    Data:
        Version: 3 (0x2)
        Serial Number:
            1d:93:13:0e:54:07:95:1d:8c:57:4f:12:14:b9:5e:5f:15:c3:a9:d4
        Signature Algorithm: sha256WithRSAEncryption
        Issuer: CN = Azure IoT Hub CA Cert Test Only
        Validity
            Not Before: Jun 20 22:52:23 2022 GMT
            Not After : Jul 20 22:52:23 2022 GMT
        Subject: CN = Azure IoT Hub CA Cert Test Only
        Subject Public Key Info:
            Public Key Algorithm: rsaEncryption
                RSA Public-Key: (4096 bit)
建立中繼 CA 憑證
執行下列命令來建立中繼 CA 私鑰和中繼 CA 憑證。 您可以使用此憑證和金鑰來簽署您的裝置憑證。
在您的 Git Bash 終端機中,建立中繼 CA 私鑰:
openssl genrsa -aes256 -passout pass:1234 -out ./private/azure-iot-test-only.intermediate.key.pem 4096建立中繼 CA 憑證簽署要求 (CSR):
openssl req -new -sha256 -passin pass:1234 -config ./openssl_device_intermediate_ca.cnf -subj '//CN=Azure IoT Hub Intermediate Cert Test Only' -key ./private/azure-iot-test-only.intermediate.key.pem -out ./csr/azure-iot-test-only.intermediate.csr.pem重要
僅需要為主體名稱 (
//CN=Azure IoT Hub Intermediate Cert Test Only) 提供的額外正斜線,才能在 Windows 平臺上使用 Git 逸出字串。 在 Linux 平臺上,以單一正斜線 (/CN=Azure IoT Hub Intermediate Cert Test Only) 提供主體名稱。使用根 CA 憑證簽署中繼憑證
openssl ca -batch -config ./openssl_root_ca.cnf -passin pass:1234 -extensions v3_intermediate_ca -days 30 -notext -md sha256 -in ./csr/azure-iot-test-only.intermediate.csr.pem -out ./certs/azure-iot-test-only.intermediate.cert.pem檢查中繼 CA 憑證:
openssl x509 -noout -text -in ./certs/azure-iot-test-only.intermediate.cert.pem觀察簽發 者 是根 CA,而 主體 是中繼 CA。
Certificate:
    Data:
        Version: 3 (0x2)
        Serial Number:
            d9:55:87:57:41:c8:4c:47:6c:ee:ba:83:5d:ae:db:39
        Signature Algorithm: sha256WithRSAEncryption
        Issuer: CN = Azure IoT Hub CA Cert Test Only
        Validity
            Not Before: Jun 20 22:54:01 2022 GMT
            Not After : Jul 20 22:54:01 2022 GMT
        Subject: CN = Azure IoT Hub Intermediate Cert Test Only
        Subject Public Key Info:
            Public Key Algorithm: rsaEncryption
                RSA Public-Key: (4096 bit)
建立裝置憑證
在本節中,您會建立兩個裝置憑證及其完整鏈結憑證。 完整鏈結憑證包含裝置憑證、中繼 CA 憑證和根 CA 憑證。 裝置向 DPS 註冊時,必須出示其完整鏈結憑證。
建立第一個裝置私鑰。
openssl genrsa -out ./private/device-01.key.pem 4096建立裝置憑證 CSR。
裝置憑證的主體通用名稱 (CN) 必須設定為 裝置用來向 DPS 註冊的註冊標識碼 。 註冊標識碼是英數位元不區分大小寫的字串,加上特殊字元:
'-'、、、'.'。'_'':'最後一個字元必須是英數位元或虛線 ('-')。 一般名稱必須遵循此格式。 DPS 支援最多 128 個字元的註冊標識符;不過,X.509 憑證中主體一般名稱的最大長度為 64 個字元。 因此,使用 X.509 憑證時,註冊標識碼限制為 64 個字元。 針對群組註冊,註冊標識碼也會作為 IoT 中樞 中的裝置標識符。主體通用名稱是使用
-subj參數來設定。 在下列命令中,一般名稱會設定為 device-01。openssl req -config ./openssl_device_intermediate_ca.cnf -key ./private/device-01.key.pem -subj '//CN=device-01' -new -sha256 -out ./csr/device-01.csr.pem重要
僅需要為主體名稱 (
//CN=device-01) 提供的額外正斜線,才能在 Windows 平臺上使用 Git 逸出字串。 在 Linux 平臺上,以單一正斜線 (/CN=device-01) 提供主體名稱。簽署裝置憑證。
openssl ca -batch -config ./openssl_device_intermediate_ca.cnf -passin pass:1234 -extensions usr_cert -days 30 -notext -md sha256 -in ./csr/device-01.csr.pem -out ./certs/device-01.cert.pem檢查裝置憑證:
openssl x509 -noout -text -in ./certs/device-01.cert.pem請注意簽發者是中繼 CA,而主體是裝置註冊識別碼 。
device-01Certificate: Data: Version: 3 (0x2) Serial Number: d9:55:87:57:41:c8:4c:47:6c:ee:ba:83:5d:ae:db:3a Signature Algorithm: sha256WithRSAEncryption Issuer: CN = Azure IoT Hub Intermediate Cert Test Only Validity Not Before: Jun 20 22:55:39 2022 GMT Not After : Jul 20 22:55:39 2022 GMT Subject: CN = device-01 Subject Public Key Info: Public Key Algorithm: rsaEncryption RSA Public-Key: (4096 bit)裝置在向 DPS 進行驗證時,必須呈現完整的憑證鏈結。 使用下列命令來建立憑證鏈結:
cat ./certs/device-01.cert.pem ./certs/azure-iot-test-only.intermediate.cert.pem ./certs/azure-iot-test-only.root.ca.cert.pem > ./certs/device-01-full-chain.cert.pem在文本編輯器中開啟 憑證鏈結檔案 ./certs/device-01-full-chain.cert.pem 以檢查它。 憑證鏈結文字包含這三個憑證的完整鏈結。 您稍後在本教學課程中使用此憑證鏈結來布
device-01建 。完整鏈結文字的格式如下:
-----BEGIN CERTIFICATE-----
    <Text for the device certificate includes public key>
-----END CERTIFICATE-----
-----BEGIN CERTIFICATE-----
    <Text for the intermediate certificate includes public key>
-----END CERTIFICATE-----
-----BEGIN CERTIFICATE-----
    <Text for the root certificate includes public key>
-----END CERTIFICATE-----
若要建立私鑰、X.509 憑證和第二部裝置的完整鏈結憑證,請將此腳本複製並貼到您的 Git Bash 命令提示字元中。 若要為更多裝置建立憑證,您可以修改
registration_id腳本開頭所宣告的變數。registration_id=device-02 echo $registration_id openssl genrsa -out ./private/${registration_id}.key.pem 4096 openssl req -config ./openssl_device_intermediate_ca.cnf -key ./private/${registration_id}.key.pem -subj "//CN=$registration_id" -new -sha256 -out ./csr/${registration_id}.csr.pem openssl ca -batch -config ./openssl_device_intermediate_ca.cnf -passin pass:1234 -extensions usr_cert -days 30 -notext -md sha256 -in ./csr/${registration_id}.csr.pem -out ./certs/${registration_id}.cert.pem cat ./certs/${registration_id}.cert.pem ./certs/azure-iot-test-only.intermediate.cert.pem ./certs/azure-iot-test-only.root.ca.cert.pem > ./certs/${registration_id}-full-chain.cert.pem重要
僅需要為主體名稱 (
//CN=$registration_id) 提供的額外正斜線,才能在 Windows 平臺上使用 Git 逸出字串。 在 Linux 平臺上,以單一正斜線 (/CN=$registration_id) 提供主體名稱。注意
此腳本會使用註冊標識子作為私鑰和憑證檔案的基底檔名。 如果您的註冊識別碼包含無效檔名字符的字元,您必須據以修改腳本。
警告
憑證的文字只包含公鑰資訊。
不過,裝置也必須能夠存取裝置憑證的私鑰。 這是必要的,因為當裝置嘗試布建時,裝置必須在運行時間使用該密鑰執行驗證。 此密鑰的敏感度是建議在實際 HSM 中使用硬體型記憶體以協助保護私鑰的主要原因之一。
您會在本教學課程的其餘部分使用下列檔案:
| 憑證 | 檔案 | 說明 |
|---|---|---|
| 根 CA 憑證。 | certs/azure-iot-test-only.root.ca.cert.pem | 上傳至 DPS 並已驗證。 |
| 中繼 CA 憑證 | certs/azure-iot-test-only.intermediate.cert.pem | 用來在 DPS 中建立註冊群組。 |
| device-01 私鑰 | private/device-01.key.pem | 裝置用來在使用 DPS 進行驗證期間驗證裝置憑證的擁有權。 |
| device-01 完整鏈結憑證 | certs/device-01-full-chain.cert.pem | 由裝置呈現以向 DPS 進行驗證和註冊。 |
| device-02 私鑰 | private/device-02.key.pem | 裝置用來在使用 DPS 進行驗證期間驗證裝置憑證的擁有權。 |
| device-02 完整鏈結憑證 | certs/device-02-full-chain.cert.pem | 由裝置呈現以向 DPS 進行驗證和註冊。 |
確認跟證書的擁有權
若要讓 DPS 能夠在驗證期間驗證裝置的憑證鏈結,您必須上傳並驗證根 CA 憑證的擁有權。 若要將根 CA 憑證新增至 DPS 實例,請遵循下列步驟:
在 Azure 入口網站 中,流覽至您的裝置布建服務實例。
從左側功能表開啟 [憑證 ],然後選取 [新增 ] 以新增憑證。
為您的憑證輸入易記顯示名稱。 流覽至根 CA 憑證檔案
certs/azure-iot-test-only.root.ca.cert.pem的位置。 選取上傳。選取方塊,將 憑證狀態設定為在上傳時驗證。
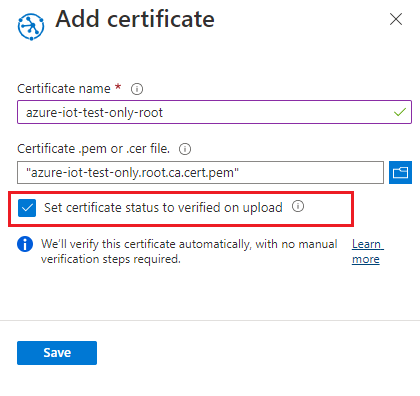
選取 [儲存]。
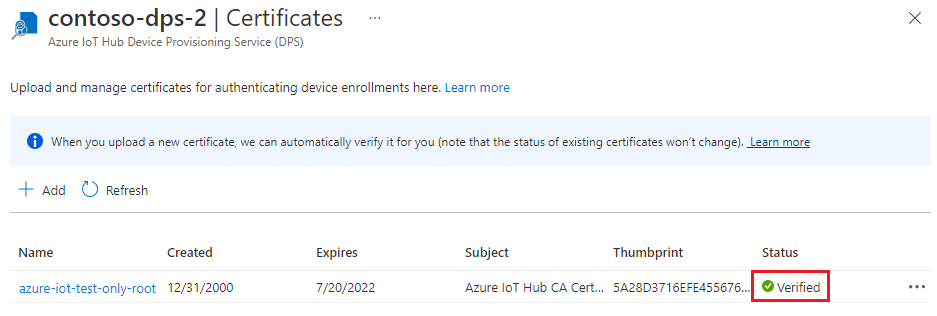
請確定您的憑證顯示在 [憑證] 索引標籤中,狀態 為 [已驗證]。
更新 Windows 裝置上的證書存儲
在非 Windows 裝置上,您可以從程式代碼傳遞憑證鏈結作為證書存儲。
在 Windows 裝置上,您必須將簽署憑證(根和中繼)新增至 Windows 證書存儲。 否則,使用傳輸層安全性的安全通道不會將簽署憑證傳輸至 DPS。
提示
您也可以使用 OpenSSL,而不是搭配 C SDK 使用安全通道 (Schannel)。 如需使用 OpenSSL 的詳細資訊,請參閱 在 SDK 中使用 OpenSSL。
若要將簽署憑證新增至 Windows 裝置中的證書存儲:
在您的 Git Bash 終端機中,將您的簽署憑證
.pfx轉換為 ,如下所示。根 CA 憑證:
openssl pkcs12 -inkey ./private/azure-iot-test-only.root.ca.key.pem -in ./certs/azure-iot-test-only.root.ca.cert.pem -export -passin pass:1234 -passout pass:1234 -out ./certs/root.pfx中繼 CA 憑證:
openssl pkcs12 -inkey ./private/azure-iot-test-only.intermediate.key.pem -in ./certs/azure-iot-test-only.intermediate.cert.pem -export -passin pass:1234 -passout pass:1234 -out ./certs/intermediate.pfx以滑鼠右鍵按兩下 [Windows 開始] 按鈕,然後選取 [ 執行]。 輸入 certmgr.msc ,然後選取 [ 確定 ] 以啟動憑證管理員。
在憑證管理員的 [憑證 - 目前使用者] 底下,選取 [受信任的跟證書授權單位]。 然後在功能表上,選取 [動作>所有工作>匯入]。
請遵循憑證匯入精靈步驟匯入
root.pfx。- 請務必依 個人資訊交換搜尋 (.pfx)
- 使用
1234作為密碼。 - 將憑證放在 受信任的跟證書授權單位 證書存儲中。
重複這些憑證管理員步驟以匯入
intermediate.pfx。- 將憑證放在 中繼證書頒發機構單位 證書存儲中。
您的簽署憑證現在在 Windows 裝置上受到信任,而且完整鏈結可以傳輸至 DPS。
建立註冊群組
登入 Azure 入口網站,並流覽至您的裝置布建服務實例。
從導覽功能表的 [設定] 區段中選取 [管理註冊]。
在頁面頂端,選取 [ 新增註冊群組]。
在 [新增註冊群組] 頁面的 [註冊 + 布建] 索引卷標上,提供下列資訊來設定註冊群組詳細數據:
欄位 描述 認證 如果您想要上傳中繼憑證只用於此註冊群組,請 選取 [X.509 中繼憑證 ] 作為 證明機制 ,或者如果您已經上傳中繼憑證,請選取 [X.509 憑證上傳至此裝置布建服務 ]。 X.509 憑證設定 根據您選擇的證明方法,上傳或選取此註冊群組的主要和次要中繼憑證。 群組名稱 提供裝置群組的名稱。 註冊組名是英數位元的不區分大小寫字串(最多 128 個字元長),加上特殊字元: '-'、、'.''_'、':'。 最後一個字元必須是英數位元或虛線 ('-')。布建狀態 如果您想要讓此註冊群組可供布建裝置,請核取 [ 啟用此註冊 ] 方塊。 如果您想要停用群組,請取消核取此方塊。 您可以稍後變更此設定。 重新布建原則 選擇重新布建原則,以反映您希望 DPS 如何處理要求重新布建的裝置。 如需詳細資訊,請參閱 重新布建原則 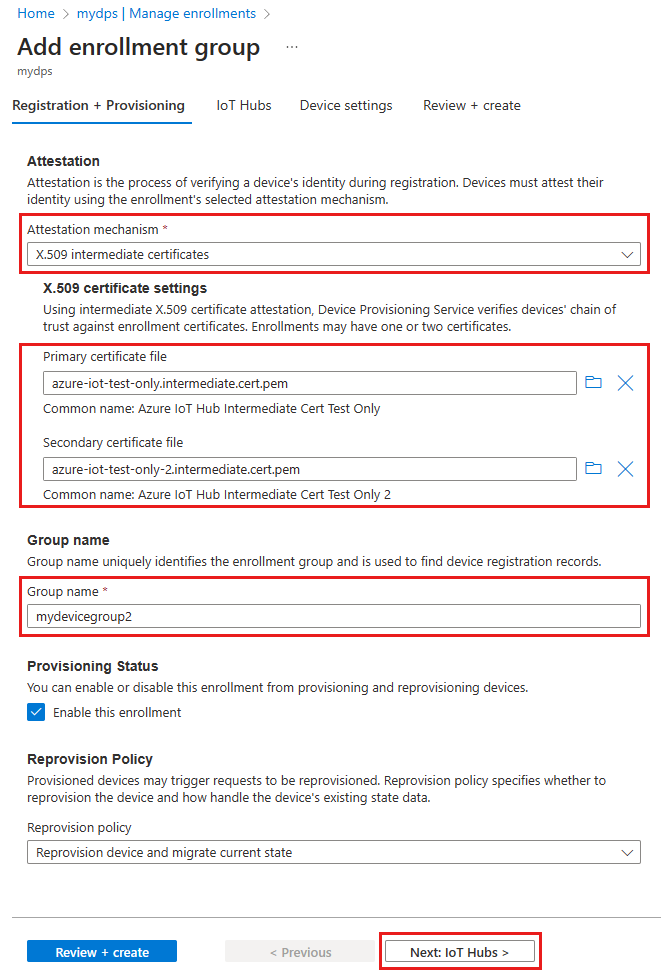
選取 [ 下一步:IoT 中樞]。
在 [新增註冊群組] 頁面的 [IoT 中樞] 索引標籤上,提供下列資訊來判斷註冊群組可以布建裝置的 IoT 中樞:
欄位 描述 目標IoT中樞 選取一或多個連結的IoT中樞,或將新連結新增至IoT中樞。 若要深入瞭解如何將IoT中樞連結至 DPS 實例,請參閱 如何連結和管理IoT中樞。 配置原則 如果您選取了多個連結的IoT中樞,請選取要將裝置指派給不同中樞的方式。 若要深入瞭解配置原則,請參閱 如何使用配置原則。
如果您只選取一個連結的IoT中樞,建議您使用 平均加權散發 原則。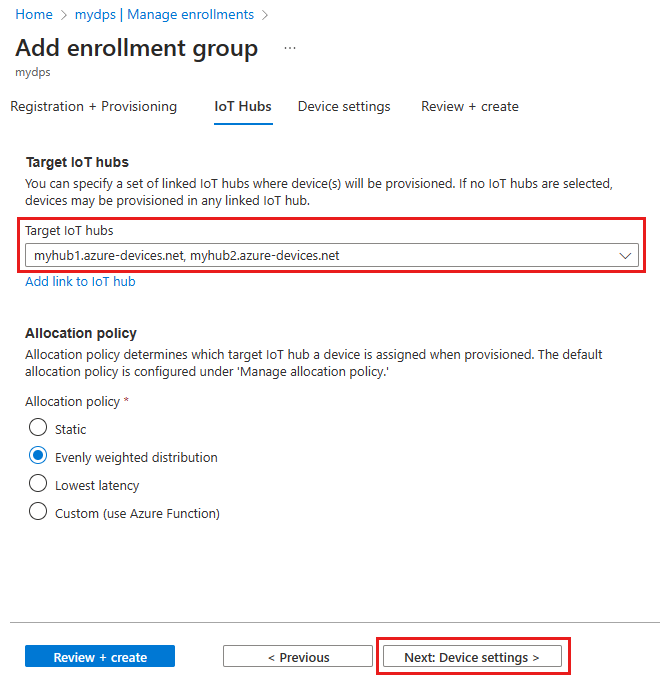
選取 [下一步:裝置設定]
在 [新增註冊群組] 頁面的 [裝置設定] 索引標籤上,提供下列資訊來定義新布建裝置的設定方式:
欄位 描述 IoT Edge 如果透過此群組布建的所有裝置都會執行 Azure IoT Edge,請檢查在布建裝置上啟用 IoT Edge。 如果此群組僅適用於未啟用 IoT Edge 的裝置,請取消核取此方塊。 群組中的所有裝置都會啟用IoT Edge,或無法啟用。 裝置標籤 使用此文字框提供您想要套用至已布建裝置裝置對應項的任何標籤。 所需的屬性 使用此文字框提供您想要套用至已布建裝置裝置對應項的任何所需屬性。 如需詳細資訊,請參閱瞭解和使用 IoT 中樞 中的裝置對應項。
完成時,選取 [下一步:檢閱 + 建立]。
在 [ 檢閱 + 建立] 索引標籤上,確認您的所有值,然後選取 [ 建立]。
準備並執行裝置佈建程序代碼
在本節中,您會使用裝置布建服務實例資訊來更新範例程序代碼。 如果裝置已驗證,則會指派給連結至本節中所設定裝置布建服務實例的 IoT 中樞。
在本節中,您會使用 Git Bash 提示字元和 Visual Studio IDE。
設定布建裝置程序代碼
在本節中,您會使用裝置布建服務實例資訊來更新範例程序代碼。
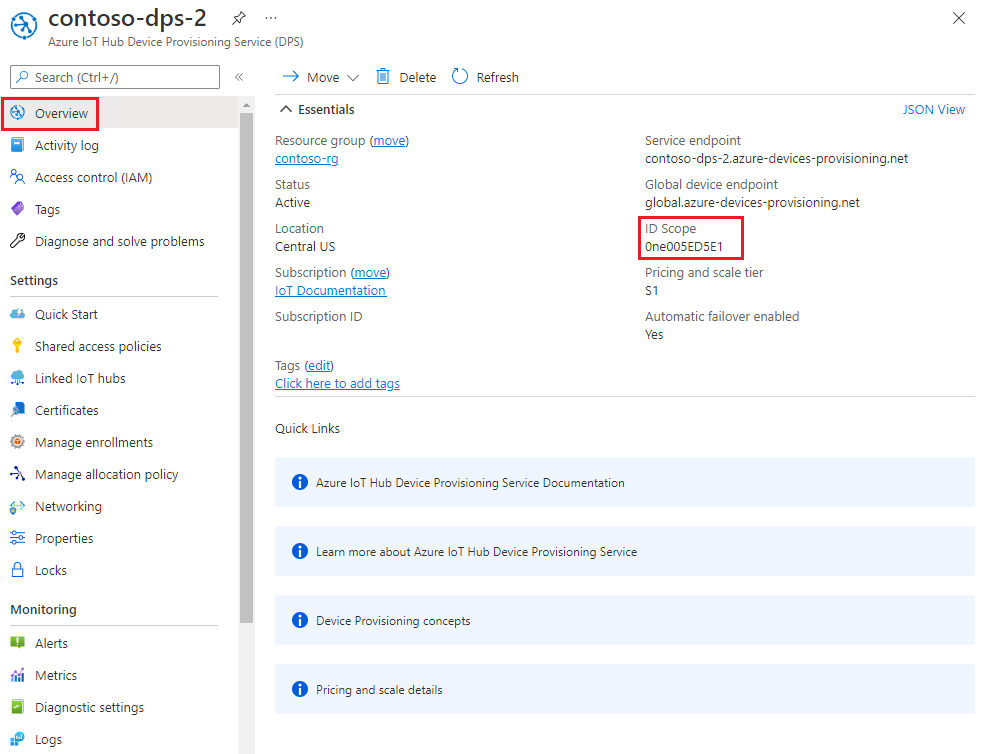
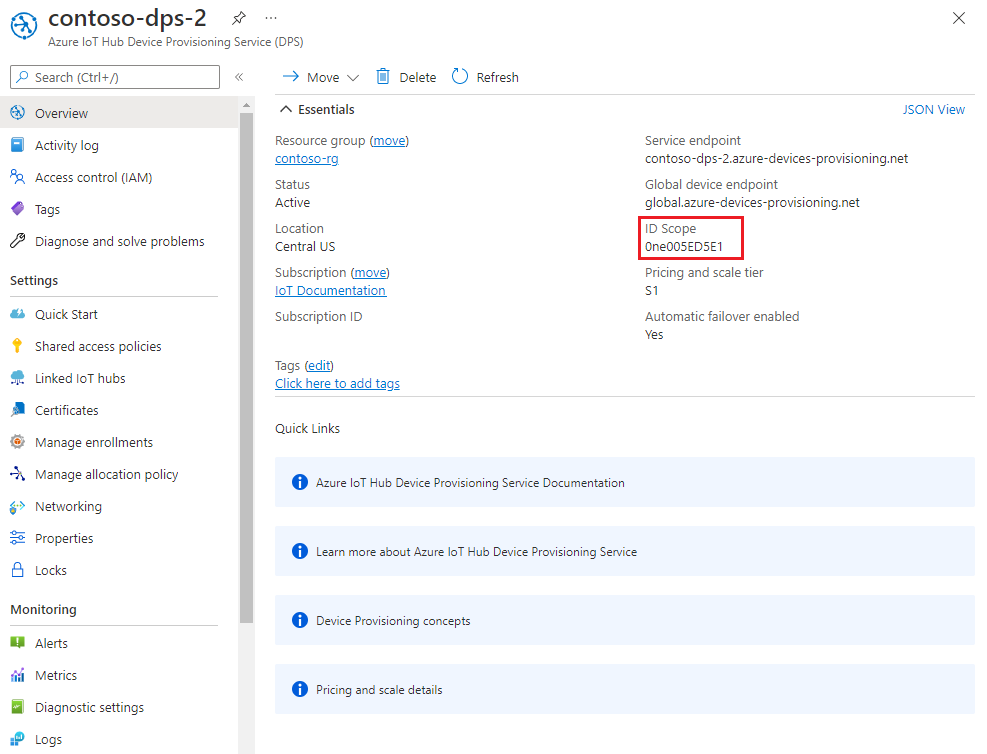
在 Azure 入口網站 中,選取裝置布建服務實例的 [概觀] 索引標籤,並記下 [標識符範圍] 值。
啟動 Visual Studio,然後開啟您在 azure-iot-sdk-c git 存放庫根目錄中建立
cmake的新方案檔案。 專案檔名為azure_iot_sdks.sln。在 Visual Studio 方案總管 中,流覽至 [Provision_Samples > prov_dev_client_sample > 原始程序檔],然後開啟 prov_dev_client_sample.c。
id_scope尋找常數,並將值取代為您稍早複製的標識符範圍值。 例如:static const char* id_scope = "0ne00000A0A";在相同的檔案中尋找函式的定義
main()。 請確定hsm_type變數已設定為SECURE_DEVICE_TYPE_X509,而且所有其他hsm_type行都會加上批注。例如:SECURE_DEVICE_TYPE hsm_type; //hsm_type = SECURE_DEVICE_TYPE_TPM; hsm_type = SECURE_DEVICE_TYPE_X509; //hsm_type = SECURE_DEVICE_TYPE_SYMMETRIC_KEY;儲存您的變更。
以 滑鼠右鍵按兩下prov_dev_client_sample 專案,然後選取 [ 設定為啟始專案]。
設定自訂 HSM 存根程式代碼
與實際安全硬體型存放設備互動的詳細數據會因裝置硬體而異。 本教學課程中模擬裝置所使用的憑證鏈結將會在自定義 HSM 存根程式代碼中硬式編碼。 在真實案例中,憑證鏈結會儲存在實際的 HSM 硬體中,為敏感性資訊提供更好的安全性。 接著會實作類似此範例中所用存根方法的方法,以從該硬體型記憶體讀取秘密。
雖然不需要 HSM 硬體,但建議保護敏感性資訊,例如憑證的私鑰。 如果範例正在呼叫實際的 HSM,則私鑰不會出現在原始程式碼中。 在原始碼中擁有金鑰會將金鑰公開給任何可檢視程式代碼的人。 這隻會在本教學課程中完成,以協助學習。
若要更新自定義 HSM 存根程式代碼,以模擬識別碼為 device-01的裝置身分識別:
在visual Studio 方案總管 中,流覽至 [Provision_Samples custom_hsm_example > > Source Files],然後開啟 custom_hsm_example.c。
使用產生裝置憑證時所使用的一般名稱,更新字串常數的
COMMON_NAME字串值。static const char* const COMMON_NAME = "device-01";在 Git Bash 終端機中,執行下列命令來產生裝置憑證的字串常數:
sed -e 's/^/"/;$ !s/$/""\\n"/;$ s/$/"/' ./certs/device-01-full-chain.cert.pem複製此命令的輸出。
使用您在產生憑證之後儲存在 ./certs/device-01-full-chain.cert.cert.pem 中的憑證鏈結來更新常數位符串的字串值
CERTIFICATE。 針對常數值,使用上一個步驟中的輸出憑證文字。憑證文字的語法必須符合下列模式,且Visual Studio不會有額外的空格或剖析。
// <Device/leaf cert>
// <intermediates>
// <root>
static const char* const CERTIFICATE = "-----BEGIN CERTIFICATE-----\n"
"MIIFOjCCAyKgAwIBAgIJAPzMa6s7mj7+MA0GCSqGSIb3DQEBCwUAMCoxKDAmBgNV\n"
    ...
"MDMwWhcNMjAxMTIyMjEzMDMwWjAqMSgwJgYDVQQDDB9BenVyZSBJb1QgSHViIENB\n"
"-----END CERTIFICATE-----\n"
"-----BEGIN CERTIFICATE-----\n"
"MIIFPDCCAySgAwIBAgIBATANBgkqhkiG9w0BAQsFADAqMSgwJgYDVQQDDB9BenVy\n"
    ...
"MTEyMjIxMzAzM1owNDEyMDAGA1UEAwwpQXp1cmUgSW9UIEh1YiBJbnRlcm1lZGlh\n"
"-----END CERTIFICATE-----\n"
"-----BEGIN CERTIFICATE-----\n"
"MIIFOjCCAyKgAwIBAgIJAPzMa6s7mj7+MA0GCSqGSIb3DQEBCwUAMCoxKDAmBgNV\n"
    ...
"MDMwWhcNMjAxMTIyMjEzMDMwWjAqMSgwJgYDVQQDDB9BenVyZSBJb1QgSHViIENB\n"
"-----END CERTIFICATE-----";
在 Git Bash 中,執行下列命令來產生裝置私鑰的字串常數:
sed -e 's/^/"/;$ !s/$/""\\n"/;$ s/$/"/' ./private/device-01.key.pem複製此命令的輸出。
使用裝置憑證的私鑰更新常數的
PRIVATE_KEY字串值。 針對常數值,使用上一個步驟中的輸出私鑰文字。私鑰文字的語法必須符合下列模式,且 Visual Studio 不會有額外的空格或剖析。
static const char* const PRIVATE_KEY = "-----BEGIN RSA PRIVATE KEY-----\n"
"MIIJJwIBAAKCAgEAtjvKQjIhp0EE1PoADL1rfF/W6v4vlAzOSifKSQsaPeebqg8U\n"
    ...
"X7fi9OZ26QpnkS5QjjPTYI/wwn0J9YAwNfKSlNeXTJDfJ+KpjXBcvaLxeBQbQhij\n"
"-----END RSA PRIVATE KEY-----";
儲存您的變更。
以滑鼠右鍵按兩下custom_hsm_example專案,然後選取 [建置]。
重要
在下一節中建置其餘方案之前,您必須先建 置custom_hsm_example 專案。
執行範例
在 Visual Studio 選單上,選取 [偵錯>開始但不偵錯] 以執行解決方案。 當系統提示您重建專案時,請選取 [ 是 ] 以在執行之前重建專案。
下列輸出是模擬裝置
device-01成功開機並連線到布建服務的範例。 裝置已指派給IoT中樞並註冊:Provisioning API Version: 1.8.0 Registering Device Provisioning Status: PROV_DEVICE_REG_STATUS_CONNECTED Provisioning Status: PROV_DEVICE_REG_STATUS_ASSIGNING Registration Information received from service: contoso-hub-2.azure-devices.net, deviceId: device-01 Press enter key to exit:重複設定第二個裝置的自定義 HSM 存根程式代碼中的步驟,
device-02然後再次執行範例。 針對該裝置使用下列值:描述 值 一般名稱 "device-02"完整憑證鏈結 使用 ./certs/device-02-full-chain.cert.pem 產生文字 私密金鑰 使用 ./private/device-02.key.pem 產生文字 下列輸出是模擬裝置
device-02成功開機並連線到布建服務的範例。 裝置已指派給IoT中樞並註冊:Provisioning API Version: 1.8.0 Registering Device Provisioning Status: PROV_DEVICE_REG_STATUS_CONNECTED Provisioning Status: PROV_DEVICE_REG_STATUS_ASSIGNING Registration Information received from service: contoso-hub-2.azure-devices.net, deviceId: device-02 Press enter key to exit:
C# 範例程式代碼已設定為使用 X.509 憑證,這些憑證會儲存在受密碼保護的 PKCS#12 格式檔案 (.pfx) 中。 您先前建立的完整鏈結憑證格式為 PEM 格式。 若要將完整鏈結憑證轉換成 PKCS#12 格式,請從您先前執行 OpenSSL 命令的目錄中,在 Git Bash 提示字元中輸入下列命令。
device-01
openssl pkcs12 -inkey ./private/device-01.key.pem -in ./certs/device-01-full-chain.cert.pem -export -passin pass:1234 -passout pass:1234 -out ./certs/device-01-full-chain.cert.pfxdevice-02
openssl pkcs12 -inkey ./private/device-02.key.pem -in ./certs/device-02-full-chain.cert.pem -export -passin pass:1234 -passout pass:1234 -out ./certs/device-02-full-chain.cert.pfx
在本節的其餘部分,使用您的 Windows 命令提示字元。
在 Azure 入口網站 中,選取裝置布建服務的 [概觀] 索引標籤。
複製 [ 標識符範圍] 值。
在 Windows 命令提示字元中 ,變更為 X509Sample 目錄。 此目錄位於您在先前步驟中複製的 SDK 存放庫: .\azure-iot-sdk-csharp\provisioning\device\samples\getting started\X509Sample。
輸入下列命令來建置並執行 X.509 裝置布建範例。 將取代
<id-scope>為您從 Azure 入口網站 複製的標識元範圍。 將取代<your-certificate-folder>為您執行 OpenSSL 命令的資料夾路徑。dotnet run -- -s <id-scope> -c <your-certificate-folder>\certs\device-01-full-chain.cert.pfx -p 1234裝置會連線到 DPS,並指派給 IoT 中樞。 然後,裝置會將遙測訊息傳送至 IoT 中樞。 您應該會看到類似下列範例的結果:
Loading the certificate...
Found certificate: 3E5AA3C234B2032251F0135E810D75D38D2AA477 CN=Azure IoT Hub CA Cert Test Only; PrivateKey: False
Found certificate: 81FE182C08D18941CDEEB33F53F8553BA2081E60 CN=Azure IoT Hub Intermediate Cert Test Only; PrivateKey: False
Found certificate: 5BA1DB226D50EBB7A6A6071CED4143892855AE43 CN=device-01; PrivateKey: True
Using certificate 5BA1DB226D50EBB7A6A6071CED4143892855AE43 CN=device-01
Initializing the device provisioning client...
Initialized for registration Id device-01.
Registering with the device provisioning service...
Registration status: Assigned.
Device device-01 registered to contoso-hub-2.azure-devices.net.
Creating X509 authentication for IoT Hub...
Testing the provisioned device with IoT Hub...
Sending a telemetry message...
Finished.
注意
如果您未在命令行上指定憑證和密碼,憑證檔案會預設為 ./certificate.pfx ,系統會提示您輸入密碼。
您可以傳遞其他參數來變更 TransportType (-t) 和 GlobalDeviceEndpoint (-g)。 如需參數類型
dotnet run -- --help的完整清單。若要註冊您的第二個裝置,請使用其完整鏈結憑證重新執行範例。
dotnet run -- -s <id-scope> -c <your-certificate-folder>\certs\device-02-full-chain.cert.pfx -p 1234
在下列步驟中,使用您的 Windows 命令提示字元。
在 Azure 入口網站 中,選取裝置布建服務的 [概觀] 索引標籤。
複製 [ 標識符範圍] 值。
在 Windows 命令提示字元中,移至範例目錄,並安裝範例所需的套件。 所顯示的路徑相對於您複製 SDK 的位置。
cd .\azure-iot-sdk-node\provisioning\device\samples
npm install
在 provisioning\device\samples 資料夾中,開啟 register_x509.js 並檢閱程序代碼。
此範例預設為 MQTT 作為傳輸通訊協定。 如果您想要使用不同的通訊協定,請將下列這一行批注化,併為適當的通訊協定取消批注。
var ProvisioningTransport = require('azure-iot-provisioning-device-mqtt').Mqtt;此範例會使用五個環境變數來驗證及布建使用 DPS 的 IoT 裝置。 這些環境變數包括:
變數名稱 描述 PROVISIONING_HOST用來連線到 DPS 實例的端點。 在本教學課程中,請使用全域端點 global.azure-devices-provisioning.net。PROVISIONING_IDSCOPEDPS 實例的標識碼範圍。 PROVISIONING_REGISTRATION_ID裝置的註冊標識碼。 它必須符合裝置憑證中的主體通用名稱。 CERTIFICATE_FILE裝置完整鏈結憑證檔案的路徑。 KEY_FILE裝置憑證私鑰檔案的路徑。 方法
ProvisioningDeviceClient.register()會嘗試註冊您的裝置。新增全域裝置端點和標識符範圍的環境變數。 將取代
<id-scope>為您從 Azure 入口網站 複製的值。set PROVISIONING_HOST=global.azure-devices-provisioning.net set PROVISIONING_IDSCOPE=<id-scope>設定裝置註冊標識碼的環境變數。 IoT 裝置的註冊標識碼必須符合其裝置憑證上的主體通用名稱。 在本教學課程中, device-01 既是裝置的主體名稱和註冊標識符。
set PROVISIONING_REGISTRATION_ID=device-01設定您先前產生的裝置完整鏈結憑證和裝置私鑰檔案的環境變數。 將取代
<your-certificate-folder>為您執行 OpenSSL 命令的資料夾路徑。set CERTIFICATE_FILE=<your-certificate-folder>\certs\device-01-full-chain.cert.pem set KEY_FILE=<your-certificate-folder>\private\device-01.key.pem執行範例並確認已成功布建裝置。
node register_x509.js您應該會看到類似下列範例的結果:
registration succeeded
assigned hub=contoso-hub-2.azure-devices.net
deviceId=device-01
Client connected
send status: MessageEnqueued
根據下表更新第二個裝置的環境變數,
device-02然後再次執行範例。環境變數 值 PROVISIONING_REGISTRATION_ID device-02CERTIFICATE_FILE <your-certificate-folder>\certs\device-02-full-chain.cert.pem KEY_FILE <your-certificate-folder>\private\device-02.key.pem
在下列步驟中,使用您的 Windows 命令提示字元。
在 Azure 入口網站 中,選取裝置布建服務的 [概觀] 索引標籤。
複製標識碼 範圍。
在 Windows 命令提示字元中,移至provision_x509.py範例的目錄。 所顯示的路徑相對於您複製 SDK 的位置。
cd .\azure-iot-sdk-python\samples\async-hub-scenarios此範例會使用六個環境變數來驗證及布建使用 DPS 的 IoT 裝置。 這些環境變數包括:
變數名稱 描述 PROVISIONING_HOST用來連線到 DPS 實例的端點。 在本教學課程中,請使用全域端點 global.azure-devices-provisioning.net。PROVISIONING_IDSCOPEDPS 實例的標識碼範圍。 DPS_X509_REGISTRATION_ID裝置的註冊標識碼。 它必須符合裝置憑證中的主體通用名稱。 X509_CERT_FILE裝置完整鏈結憑證檔案的路徑。 X509_KEY_FILE裝置憑證私鑰檔案的路徑。 PASS_PHRASE用來加密私鑰檔案的傳遞片語(如果使用的話)。 本教學課程不需要。 新增全域裝置端點和標識符範圍的環境變數。 針對標識元範圍變數,請使用您從 Azure 入口網站 複製的值。
set PROVISIONING_HOST=global.azure-devices-provisioning.net
set PROVISIONING_IDSCOPE=<ID scope for your DPS resource>
設定裝置註冊標識碼的環境變數。 IoT 裝置的註冊標識碼必須符合其裝置憑證上的主體通用名稱。 在本教學課程中, device-01 既是裝置的主體名稱和註冊標識符。
set DPS_X509_REGISTRATION_ID=device-01設定您先前產生的裝置完整鏈結憑證和裝置私鑰檔案的環境變數。 將取代
<your-certificate-folder>為您執行 OpenSSL 命令的資料夾路徑。set X509_CERT_FILE=<your-certificate-folder>\certs\device-01-full-chain.cert.pem set X509_KEY_FILE=<your-certificate-folder>\private\device-01.key.pem檢閱provision_x509.py的程序代碼。 如果您未使用 Python 3.7 版或更新版本,請變更這裡所述的程式代碼以取代
asyncio.run(main())。執行範例。 此範例會連線到 DPS,這會將裝置布建至 IoT 中樞。 布建裝置之後,此範例會將一些測試訊息傳送至IoT中樞。
python provision_x509.py您應該會看到類似下列範例的結果:
The complete registration result is
device-01
contoso-hub-2.azure-devices.net
initialAssignment
null
Will send telemetry from the provisioned device
sending message #1
sending message #2
sending message #3
sending message #4
sending message #5
sending message #6
sending message #7
sending message #8
sending message #9
sending message #10
done sending message #1
done sending message #2
done sending message #3
done sending message #4
done sending message #5
done sending message #6
done sending message #7
done sending message #8
done sending message #9
done sending message #10
根據下表更新第二個裝置的環境變數,
device-02然後再次執行範例。環境變數 值 DPS_X509_REGISTRATION_ID device-02X509_CERT_FILE <your-certificate-folder>\certs\device-02-full-chain.cert.pem X509_KEY_FILE <your-certificate-folder>\private\device-02.key.pem
在下列步驟中,您會使用 Windows 命令提示字元和 Git Bash 提示字元。
在 Azure 入口網站 中,選取裝置布建服務的 [概觀] 索引標籤。
複製標識碼 範圍。
在您的 Windows 命令提示字元中,流覽至範例項目資料夾。 顯示的路徑相對於您複製 SDK 的位置
cd .\azure-iot-sdk-java\provisioning\provisioning-device-client-samples\provisioning-X509-sample在範例程式代碼中輸入布建服務和 X.509 身分識別資訊。 這是在布建期間用於在裝置註冊之前證明模擬裝置。
在慣用的編輯器中開啟檔案
.\src\main\java\samples\com\microsoft\azure\sdk\iot\ProvisioningX509Sample.java。更新下列值。 針對
idScope,請使用您先前複製的 標識符範圍 。 針對全域端點,請使用 全域裝置端點。 每個 DPS 實例global.azure-devices-provisioning.net的這個端點都相同。private static final String idScope = "[Your ID scope here]"; private static final String globalEndpoint = "[Your Provisioning Service Global Endpoint here]";此範例預設為使用 HTTPS 做為傳輸通訊協定。 如果您想要變更通訊協定,請將下列這一行批注化,並取消批注您想要使用的通訊協定行。
private static final ProvisioningDeviceClientTransportProtocol PROVISIONING_DEVICE_CLIENT_TRANSPORT_PROTOCOL = ProvisioningDeviceClientTransportProtocol.HTTPS;使用裝置憑證 device-01.cert.pem 的值更新常數位符串的值
leafPublicPem。憑證文字的語法必須符合下列模式,且沒有額外的空格或字元。
private static final String leafPublicPem = "-----BEGIN CERTIFICATE-----\n"
"MIIFOjCCAyKgAwIBAgIJAPzMa6s7mj7+MA0GCSqGSIb3DQEBCwUAMCoxKDAmBgNV\n"
    ...
"MDMwWhcNMjAxMTIyMjEzMDMwWjAqMSgwJgYDVQQDDB9BenVyZSBJb1QgSHViIENB\n"
"-----END CERTIFICATE-----";
手動更新此字串值可能會容易發生錯誤。 若要產生適當的語法,您可以將下列命令複製並貼到 Git Bash 提示字元中,然後按 ENTER 鍵。 此命令會產生字串常數值的
leafPublicPem語法,並將它寫入輸出。sed 's/^/"/;$ !s/$/\\n" +/;$ s/$/"/' ./certs/device-01.cert.pem複製並貼上常數值的輸出憑證文字。
使用裝置憑證的未加密私鑰更新常數的
leafPrivateKey字串值, unencrypted-device-key.pem。私鑰文字的語法必須符合下列模式,且沒有額外的空格或字元。
private static final String leafPrivateKey = "-----BEGIN PRIVATE KEY-----\n" +
"MIIJJwIBAAKCAgEAtjvKQjIhp0EE1PoADL1rfF/W6v4vlAzOSifKSQsaPeebqg8U\n" +
    ...
"X7fi9OZ26QpnkS5QjjPTYI/wwn0J9YAwNfKSlNeXTJDfJ+KpjXBcvaLxeBQbQhij\n" +
"-----END PRIVATE KEY-----";
若要產生適當的語法,您可以將下列命令複製並貼到 Git Bash 提示字元中,然後按 ENTER 鍵。 此命令會產生字串常數值的
leafPrivateKey語法,並將它寫入輸出。sed 's/^/"/;$ !s/$/\\n" +/;$ s/$/"/' ./private/device-01.key.pem複製並貼上常數值的輸出私鑰文字。
rootPublicPem新增具有根 CA 憑證值的常數位符串,azure-iot-test-only.root.ca.cert.pem。 您可以在常數後面leafPrivateKey加入它。憑證文字的語法必須符合下列模式,且沒有額外的空格或字元。
private static final String rootPublicPem = "-----BEGIN CERTIFICATE-----\n"
"MIIFOjCCAyKgAwIBAgIJAPzMa6s7mj7+MA0GCSqGSIb3DQEBCwUAMCoxKDAmBgNV\n"
    ...
"MDMwWhcNMjAxMTIyMjEzMDMwWjAqMSgwJgYDVQQDDB9BenVyZSBJb1QgSHViIENB\n"
"-----END CERTIFICATE-----";
若要產生適當的語法,您可以將下列命令複製並貼到 Git Bash 提示字元中,然後按 ENTER 鍵。 此命令會產生字串常數值的
rootPublicPem語法,並將它寫入輸出。sed 's/^/"/;$ !s/$/\\n" +/;$ s/$/"/' ./certs/azure-iot-test-only.root.ca.cert.pem複製並貼上常數值的輸出憑證文字。
intermediatePublicPem新增具有中繼 CA 憑證值的常數位符串,azure-iot-test-only.intermediate.cert.pem。 您可以在上一個常數之後新增它。憑證文字的語法必須符合下列模式,且沒有額外的空格或字元。
private static final String intermediatePublicPem = "-----BEGIN CERTIFICATE-----\n"
"MIIFOjCCAyKgAwIBAgIJAPzMa6s7mj7+MA0GCSqGSIb3DQEBCwUAMCoxKDAmBgNV\n"
    ...
"MDMwWhcNMjAxMTIyMjEzMDMwWjAqMSgwJgYDVQQDDB9BenVyZSBJb1QgSHViIENB\n"
"-----END CERTIFICATE-----";
若要產生適當的語法,您可以將下列命令複製並貼到 Git Bash 提示字元中,然後按 ENTER 鍵。 此命令會產生字串常數值的
intermediatePublicPem語法,並將它寫入輸出。sed 's/^/"/;$ !s/$/\\n" +/;$ s/$/"/' ./certs/azure-iot-test-only.intermediate.cert.pem複製並貼上常數值的輸出憑證文字。
在方法中
main尋找下列幾行。// For group enrollment uncomment this line //signerCertificatePemList.add("<Your Signer/intermediate Certificate Here>");將這兩行直接新增至它們下方,以將中繼和根 CA 憑證新增至簽署鏈結。 您的簽署鏈結應該包含整個憑證鏈結,包括您已向 DPS 驗證的憑證。
signerCertificatePemList.add(intermediatePublicPem);
signerCertificatePemList.add(rootPublicPem);
注意
新增簽署憑證的順序很重要。 如果範例已變更,範例將會失敗。
儲存您的變更。
建置範例,然後移至
target資料夾。mvn clean install cd target組建會輸出資料夾中具有下列檔格式的.jar檔案
target:provisioning-x509-sample-{version}-with-deps.jar;例如:provisioning-x509-sample-1.8.1-with-deps.jar。 執行.jar檔案。 您可能需要取代下列命令中的版本。java -jar ./provisioning-x509-sample-1.8.1-with-deps.jar此範例會連線到 DPS,其會將裝置布建至 IoT 中樞。 布建裝置之後,此範例會將一些測試訊息傳送至IoT中樞。
Starting...
Beginning setup.
WARNING: sun.reflect.Reflection.getCallerClass is not supported. This will impact performance.
2022-10-21 10:41:20,476 DEBUG (main) [com.microsoft.azure.sdk.iot.provisioning.device.ProvisioningDeviceClient] - Initialized a ProvisioningDeviceClient instance using SDK version 2.0.2
2022-10-21 10:41:20,479 DEBUG (main) [com.microsoft.azure.sdk.iot.provisioning.device.ProvisioningDeviceClient] - Starting provisioning thread...
Waiting for Provisioning Service to register
2022-10-21 10:41:20,482 INFO (global.azure-devices-provisioning.net-4f8279ac-CxnPendingConnectionId-azure-iot-sdk-ProvisioningTask) [com.microsoft.azure.sdk.iot.provisioning.device.internal.task.ProvisioningTask] - Opening the connection to device provisioning service...
2022-10-21 10:41:20,652 INFO (global.azure-devices-provisioning.net-4f8279ac-Cxn4f8279ac-azure-iot-sdk-ProvisioningTask) [com.microsoft.azure.sdk.iot.provisioning.device.internal.task.ProvisioningTask] - Connection to device provisioning service opened successfully, sending initial device registration message
2022-10-21 10:41:20,680 INFO (global.azure-devices-provisioning.net-4f8279ac-Cxn4f8279ac-azure-iot-sdk-RegisterTask) [com.microsoft.azure.sdk.iot.provisioning.device.internal.task.RegisterTask] - Authenticating with device provisioning service using x509 certificates
2022-10-21 10:41:21,603 INFO (global.azure-devices-provisioning.net-4f8279ac-Cxn4f8279ac-azure-iot-sdk-ProvisioningTask) [com.microsoft.azure.sdk.iot.provisioning.device.internal.task.ProvisioningTask] - Waiting for device provisioning service to provision this device...
2022-10-21 10:41:21,605 INFO (global.azure-devices-provisioning.net-4f8279ac-Cxn4f8279ac-azure-iot-sdk-ProvisioningTask) [com.microsoft.azure.sdk.iot.provisioning.device.internal.task.ProvisioningTask] - Current provisioning status: ASSIGNING
2022-10-21 10:41:24,868 INFO (global.azure-devices-provisioning.net-4f8279ac-Cxn4f8279ac-azure-iot-sdk-ProvisioningTask) [com.microsoft.azure.sdk.iot.provisioning.device.internal.task.ProvisioningTask] - Device provisioning service assigned the device successfully
IotHUb Uri : contoso-hub-2.azure-devices.net
Device ID : device-01
2022-10-21 10:41:30,514 INFO (main) [com.microsoft.azure.sdk.iot.device.transport.ExponentialBackoffWithJitter] - NOTE: A new instance of ExponentialBackoffWithJitter has been created with the following properties. Retry Count: 2147483647, Min Backoff Interval: 100, Max Backoff Interval: 10000, Max Time Between Retries: 100, Fast Retry Enabled: true
2022-10-21 10:41:30,526 INFO (main) [com.microsoft.azure.sdk.iot.device.transport.ExponentialBackoffWithJitter] - NOTE: A new instance of ExponentialBackoffWithJitter has been created with the following properties. Retry Count: 2147483647, Min Backoff Interval: 100, Max Backoff Interval: 10000, Max Time Between Retries: 100, Fast Retry Enabled: true
2022-10-21 10:41:30,533 DEBUG (main) [com.microsoft.azure.sdk.iot.device.DeviceClient] - Initialized a DeviceClient instance using SDK version 2.1.2
2022-10-21 10:41:30,590 DEBUG (main) [com.microsoft.azure.sdk.iot.device.transport.mqtt.MqttIotHubConnection] - Opening MQTT connection...
2022-10-21 10:41:30,625 DEBUG (main) [com.microsoft.azure.sdk.iot.device.transport.mqtt.Mqtt] - Sending MQTT CONNECT packet...
2022-10-21 10:41:31,452 DEBUG (main) [com.microsoft.azure.sdk.iot.device.transport.mqtt.Mqtt] - Sent MQTT CONNECT packet was acknowledged
2022-10-21 10:41:31,453 DEBUG (main) [com.microsoft.azure.sdk.iot.device.transport.mqtt.Mqtt] - Sending MQTT SUBSCRIBE packet for topic devices/device-01/messages/devicebound/#
2022-10-21 10:41:31,523 DEBUG (main) [com.microsoft.azure.sdk.iot.device.transport.mqtt.Mqtt] - Sent MQTT SUBSCRIBE packet for topic devices/device-01/messages/devicebound/# was acknowledged
2022-10-21 10:41:31,525 DEBUG (main) [com.microsoft.azure.sdk.iot.device.transport.mqtt.MqttIotHubConnection] - MQTT connection opened successfully
2022-10-21 10:41:31,528 DEBUG (main) [com.microsoft.azure.sdk.iot.device.transport.IotHubTransport] - The connection to the IoT Hub has been established
2022-10-21 10:41:31,531 DEBUG (main) [com.microsoft.azure.sdk.iot.device.transport.IotHubTransport] - Updating transport status to new status CONNECTED with reason CONNECTION_OK
2022-10-21 10:41:31,532 DEBUG (main) [com.microsoft.azure.sdk.iot.device.DeviceIO] - Starting worker threads
2022-10-21 10:41:31,535 DEBUG (main) [com.microsoft.azure.sdk.iot.device.transport.IotHubTransport] - Invoking connection status callbacks with new status details
2022-10-21 10:41:31,536 DEBUG (main) [com.microsoft.azure.sdk.iot.device.transport.IotHubTransport] - Client connection opened successfully
2022-10-21 10:41:31,537 INFO (main) [com.microsoft.azure.sdk.iot.device.DeviceClient] - Device client opened successfully
Sending message from device to IoT Hub...
2022-10-21 10:41:31,539 DEBUG (main) [com.microsoft.azure.sdk.iot.device.transport.IotHubTransport] - Message was queued to be sent later ( Message details: Correlation Id [0d143280-dbc7-405f-a61e-fcc7a1d80b87] Message Id [4d8d39c8-5a38-4299-8f07-3ae02cdc3218] )
Press any key to exit...
2022-10-21 10:41:31,540 DEBUG (contoso-hub-2.azure-devices.net-device-01-d7c67552-Cxn0bd73809-420e-46fe-91ee-942520b775db-azure-iot-sdk-IotHubSendTask) [com.microsoft.azure.sdk.iot.device.transport.IotHubTransport] - Sending message ( Message details: Correlation Id [0d143280-dbc7-405f-a61e-fcc7a1d80b87] Message Id [4d8d39c8-5a38-4299-8f07-3ae02cdc3218] )
2022-10-21 10:41:31,844 DEBUG (MQTT Call: device-01) [com.microsoft.azure.sdk.iot.device.transport.IotHubTransport] - IotHub message was acknowledged. Checking if there is record of sending this message ( Message details: Correlation Id [0d143280-dbc7-405f-a61e-fcc7a1d80b87] Message Id [4d8d39c8-5a38-4299-8f07-3ae02cdc3218] )
2022-10-21 10:41:31,846 DEBUG (contoso-hub-2.azure-devices.net-device-01-d7c67552-Cxn0bd73809-420e-46fe-91ee-942520b775db-azure-iot-sdk-IotHubSendTask) [com.microsoft.azure.sdk.iot.device.transport.IotHubTransport] - Invoking the callback function for sent message, IoT Hub responded to message ( Message details: Correlation Id [0d143280-dbc7-405f-a61e-fcc7a1d80b87] Message Id [4d8d39c8-5a38-4299-8f07-3ae02cdc3218] ) with status OK
Message sent!
根據下表更新第二個裝置的
device-02常數、重建,然後再次執行範例。持續性 要使用的檔案 leafPublicPem./certs/device-02.cert.pem leafPrivateKey./private/device-02.key.pem
確認您的裝置布建註冊
檢查註冊群組的註冊記錄,以查看裝置的註冊詳細數據:
在 Azure 入口網站 中,移至您的裝置布建服務實例。
在 [設定] 功能表中,選取 [管理註冊]。
選取 [ 註冊群組]。 您先前建立的 X.509 註冊群組項目應該會出現在清單中。
選取註冊專案。 然後選取 [註冊狀態] 旁的 [詳細數據],以查看已透過註冊群組註冊的裝置。 已指派每個裝置的IoT中樞、其裝置識別碼,以及註冊的日期和時間會出現在清單中。
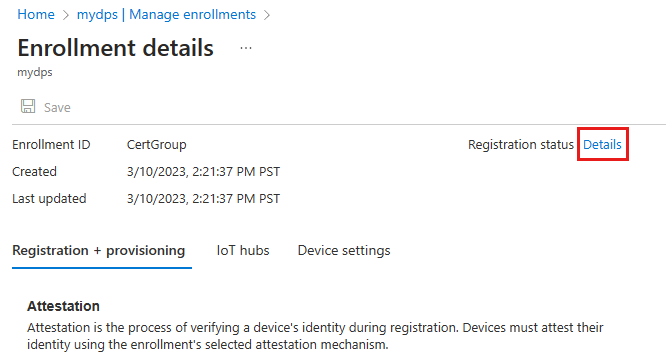
您可以選取其中一個裝置,以查看該裝置的進一步詳細數據。
若要確認 IoT 中樞上的裝置:
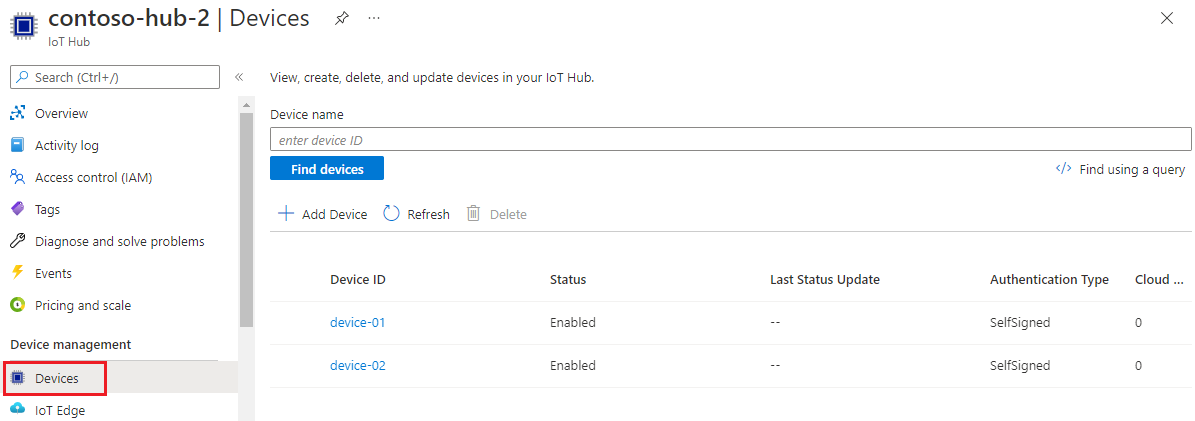
在 Azure 入口網站 中,移至您裝置已指派的IoT中樞。
在 [ 裝置管理] 功能表中,選取 [ 裝置]。
如果您的裝置已順利布建,其裝置識別碼 device-01 和 device-02 應該會出現在清單中,且狀態設定為已啟用。 如果您沒有看到您的裝置,請選取 [ 重新整理]。
清除資源
當您完成測試並探索此裝置用戶端範例時,請使用下列步驟來刪除本教學課程所建立的所有資源。
- 關閉您電腦上的裝置用戶端範例輸出視窗。
刪除您的註冊群組
從 Azure 入口網站 左側功能表中,選取 [所有資源]。
選取您的 DPS 實例。
在 [設定] 功能表中,選取 [管理註冊]。
選取 [ 註冊群組] 索引標籤 。
選取您在本教學課程中使用的註冊群組。
在 [註冊詳細數據] 頁面上,選取 [註冊狀態] 旁的 [詳細數據]。 然後選取 [裝置標識符] 數據行標頭旁的複選框,以選取註冊群組的所有註冊記錄。 選取 頁面頂端的 [刪除 ],以刪除註冊記錄。
重要
刪除註冊群組並不會刪除與其相關聯的註冊記錄。 這些孤立的記錄會計入 DPS 實例的註冊配額 。 基於這個理由,最好先刪除與註冊群組相關聯的所有註冊記錄,再刪除註冊群組本身。
返回 [ 管理註冊] 頁面,並確定 已選取 [註冊群組] 索引標籤 。
選取您在本教學課程中使用的註冊群組組名旁的複選框。
在頁面頂端,選取 [刪除]。
從 DPS 刪除已註冊的 CA 憑證
- 從 DPS 實例的左側功能表中選取 [憑證 ]。 針對您在本教學課程中上傳和驗證的每個憑證,選取憑證並選取 [ 刪除 ],然後確認您選擇的移除憑證。
從IoT 中樞 刪除裝置註冊
從 Azure 入口網站 左側功能表中,選取 [所有資源]。
選取您的IoT中樞。
在 [ 總管] 功能表中,選取 [IoT 裝置]。
選取您在本教學課程中註冊之裝置的裝置標識符旁的複選框。 例如, device-01 和 device-02。
在頁面頂端,選取 [刪除]。
下一步
在本教學課程中,您已使用註冊群組將多個 X.509 裝置布建到 IoT 中樞。 接下來,瞭解如何跨多個中樞布建 IoT 裝置。
意見反應
即將登場:在 2024 年,我們將逐步淘汰 GitHub 問題作為內容的意見反應機制,並將它取代為新的意見反應系統。 如需詳細資訊,請參閱:https://aka.ms/ContentUserFeedback。
提交並檢視相關的意見反應