本文說明如何使用 Standard Load Balancer 和公用 IP,將 IPv6 連線能力新增至 Azure 虛擬網路中的現有 IPv4 應用程式。 就地升級包含:
- 虛擬網路和子網路的 IPv6 位址空間
- 具 IPv4 和 IPv6 前端設定的 Standard Load Balancer
- 具 IPv4 + IPv6 設定的 NIC VM
- IPv6 公用 IP,讓負載平衡器具備網路對向 IPv6 連線
Azure Cloud Shell
Azure Cloud Shell 是裝載於 Azure 中的互動式殼層環境,可在瀏覽器中使用。 您可以使用 Bash 或 PowerShell 搭配 Cloud Shell,與 Azure 服務共同使用。 您可以使用 Cloud Shell 預先安裝的命令,執行本文提到的程式碼,而不必在本機環境上安裝任何工具。
要啟動 Azure Cloud Shell:
| 選項 | 範例/連結 |
|---|---|
| 選取程式碼或命令區塊右上角的 [試試看]。 選取 [試試看] 並不會自動將程式碼或命令複製到 Cloud Shell 中。 |  |
| 請前往 https://shell.azure.com,或選取 [啟動 Cloud Shell] 按鈕,在瀏覽器中開啟 Cloud Shell。 |  |
| 選取 Azure 入口網站右上方功能表列上的 [Cloud Shell] 按鈕。 |  |
若要使用 Azure Cloud Shell:
啟動 Cloud Shell。
選取程式碼區塊 (或命令區塊) 上的 [複製] 按鈕以複製程式碼或命令。
透過在 Windows 和 Linux 上選取 Ctrl+Shift+V;或在 macOS 上選取 Cmd+Shift+V,將程式碼或命令貼到 Cloud Shell 工作階段中。
選取 Enter 鍵執行程式碼或命令。
如果您選擇在本機安裝和使用 PowerShell,本文會要求使用 Azure PowerShell 模組 6.9.0 版或更新版本。 執行 Get-Module -ListAvailable Az 以尋找安裝的版本。 如果您需要升級,請參閱安裝 Azure PowerShell 模組。 如果正在本機執行 PowerShell,也需要執行 Connect-AzAccount,以建立與 Azure 的連線。
必要條件
本文假設您已部署 Standard Load Balancer,如快速入門:建立 Standard Load Balancer - Azure PowerShell 中所述。
擷取資源群組
您必須使用 Get-AzResourceGroup 擷取資源群組,才可建立雙重堆疊虛擬網路。
$rg = Get-AzResourceGroup -ResourceGroupName "myResourceGroupSLB"
建立 IPv6 IP 位址
為 Standard Load Balancer,以 New-AzPublicIpAddress 建立公用 IPv6 位址。 下列範例會在 myResourceGroupSLB 資源群組中建立名為 PublicIP_v6 的 IPv6 公用 IP 位址:
$PublicIP_v6 = New-AzPublicIpAddress `
  -Name "PublicIP_v6" `
  -ResourceGroupName $rg.ResourceGroupName `
  -Location $rg.Location  `
  -Sku Standard  `
  -AllocationMethod Static `
  -IpAddressVersion IPv6
設定負載平衡器前端
擷取現有的負載平衡器設定,然後使用 Add-AzLoadBalancerFrontendIpConfig 新增 IPv6 IP 位址,如下所示:
# Retrieve the load balancer configuration
$lb = Get-AzLoadBalancer -ResourceGroupName $rg.ResourceGroupName -Name "MyLoadBalancer"

# Add IPv6 components to the local copy of the load balancer configuration
$lb | Add-AzLoadBalancerFrontendIpConfig `
  -Name "dsLbFrontEnd_v6" `
  -PublicIpAddress $PublicIP_v6

#Update the running load balancer with the new frontend
$lb | Set-AzLoadBalancer
設定負載平衡器後端集區
在本地複本的負載平衡器設定上建立後端集區,並使用新的後端集區設定來更新執行中的負載平衡器,如下所示:
$lb | Add-AzLoadBalancerBackendAddressPoolConfig -Name "LbBackEndPool_v6"

# Update the running load balancer with the new backend pool
$lb | Set-AzLoadBalancer
設定負載平衡器規則
擷取現有的負載平衡器前端和後端集區設定,然後使用 Add-AzLoadBalancerRuleConfig 新增負載平衡規則。
# Retrieve the updated (live) versions of the frontend and backend pool
$frontendIPv6 = Get-AzLoadBalancerFrontendIpConfig -Name "dsLbFrontEnd_v6" -LoadBalancer $lb
$backendPoolv6 = Get-AzLoadBalancerBackendAddressPoolConfig -Name "LbBackEndPool_v6" -LoadBalancer $lb

# Create new LB rule with the frontend and backend
$lb | Add-AzLoadBalancerRuleConfig `
  -Name "dsLBrule_v6" `
  -FrontendIpConfiguration $frontendIPv6 `
  -BackendAddressPool $backendPoolv6 `
  -Protocol Tcp `
  -FrontendPort 80 `
  -BackendPort 80

#Finalize all the load balancer updates on the running load balancer
$lb | Set-AzLoadBalancer
新增 IPv6 位址範圍
將 IPv6 位址範圍新增至主控 VM 的虛擬網路和子網路,如下所示:
#Add IPv6 ranges to the VNET and subnet
#Retrieve the VNET object
$vnet = Get-AzVirtualNetwork  -ResourceGroupName $rg.ResourceGroupName -Name "myVnet"

#Add IPv6 prefix to the VNET
$vnet.addressspace.addressprefixes.add("fd00:db8:deca::/48")

#Update the running VNET
$vnet |  Set-AzVirtualNetwork

#Retrieve the subnet object from the local copy of the VNET
$subnet= $vnet.subnets[0]

#Add IPv6 prefix to the Subnet (subnet of the VNET prefix, of course)
$subnet.addressprefix.add("fd00:db8:deca::/64")

#Update the running VNET with the new subnet configuration
$vnet |  Set-AzVirtualNetwork
將 IPv6 設定新增至 NIC
使用 Add-AzNetworkInterfaceIpConfig 設定具 IPv6 位址的所有 VM NIC,如下所示:
#Retrieve the NIC objects
$NIC_1 = Get-AzNetworkInterface -Name "myNic1" -ResourceGroupName $rg.ResourceGroupName
$NIC_2 = Get-AzNetworkInterface -Name "myNic2" -ResourceGroupName $rg.ResourceGroupName
$NIC_3 = Get-AzNetworkInterface -Name "myNic3" -ResourceGroupName $rg.ResourceGroupName

#Add an IPv6 IPconfig to NIC_1 and update the NIC on the running VM
$NIC_1 | Add-AzNetworkInterfaceIpConfig -Name MyIPv6Config -Subnet $vnet.Subnets[0]  -PrivateIpAddressVersion IPv6 -LoadBalancerBackendAddressPool $backendPoolv6
$NIC_1 | Set-AzNetworkInterface

#Add an IPv6 IPconfig to NIC_2 and update the NIC on the running VM
$NIC_2 | Add-AzNetworkInterfaceIpConfig -Name MyIPv6Config -Subnet $vnet.Subnets[0]  -PrivateIpAddressVersion IPv6 -LoadBalancerBackendAddressPool $backendPoolv6
$NIC_2 | Set-AzNetworkInterface

#Add an IPv6 IPconfig to NIC_3 and update the NIC on the running VM
$NIC_3 | Add-AzNetworkInterfaceIpConfig -Name MyIPv6Config -Subnet $vnet.Subnets[0]  -PrivateIpAddressVersion IPv6 -LoadBalancerBackendAddressPool $backendPoolv6
$NIC_3 | Set-AzNetworkInterface
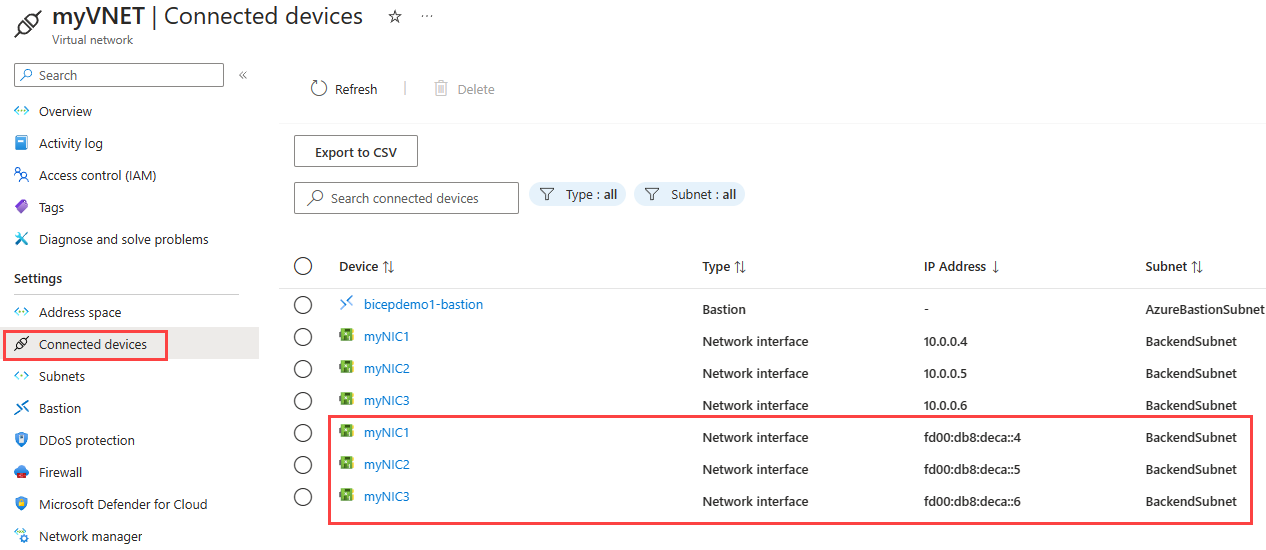
在 Azure 入口網站 中檢視 IPv6 雙堆疊虛擬網路
您可以在 Azure 入口網站 中檢視 IPv6 雙堆疊虛擬網路,如下所示:
在入口網站的搜尋列中,輸入 [虛擬網路] 並
在 [虛擬網路] 視窗中,選取 [myVNet]。
選取 [設定] 底下的 [連線裝置],以檢視連結的網路介面。 雙重堆疊虛擬網路會顯示同時具有 IPv4 和 IPv6 設定的三個 NIC。

清除資源
當不再需要時,您可以使用 Remove-AzResourceGroup 命令來移除資源群組、VM 及所有相關資源。
Remove-AzResourceGroup -Name MyAzureResourceGroupSLB
下一步
在本文中,您已將具有 IPv4 前端 IP 設定的現有 Standard Load Balancer 更新為雙重堆疊 (IPv4 和 IPv6) 設定。 您也已將 IPv6 設定新增至後端集區中 VM 的 NIC,以及新增至主控其的虛擬網路。 若要深入瞭解 Azure 虛擬網路中的 IPv6 支援,請參閱什麼是 Azure 虛擬網路的 IPv6?