適用於:Azure Logic Apps (標準)
針對您必須從標準邏輯應用程式工作流程撰寫和執行 .NET 程式碼的整合解決方案,您可以使用 Visual Studio Code 搭配 Azure Logic Apps (標準) 延伸模組。 此延伸模組提供下列功能和優點:
- 藉由建立具有彈性和控制的函式來解決最具挑戰性的整合問題,以撰寫您自己的程式碼。
- 在 Visual Studio Code 本機偵錯程式碼。 在相同的偵錯工作階段中逐步執行您的程式碼和工作流程。
- 隨著工作流程部署程式碼。 不需要其他服務方案。
- 支援 BizTalk Server 移轉案例,以便您可以將自訂 .NET 投資從內部部署隨即轉移至雲端。
透過撰寫您自己的程式碼的功能,您可以實現如下的案例:
- 自訂商業規則實作
- 自訂剖析以從輸入訊息擷取資訊
- 資料驗證和簡單轉換
- 輸出訊息至另一個系統 (例如 API) 的訊息塑形
- 計算
此功能不適用如下的案例:
- 執行需要超過 10 分鐘的程序
- 大型訊息和資料轉換
- 複雜的批次處理和解除批次案例
- 實作串流的 BizTalk Server 管線元件
如需 Azure Logic Apps 中限制的詳細資訊,請參閱限制和設定 - Azure Logic Apps。
先決條件
Azure 帳戶和訂用帳戶。 如果您沒有訂用帳戶,請註冊一個免費的 Azure 帳戶。
具有 Azure Logic Apps (標準) 延伸模組的最新 Visual Studio Code。 若要符合這些需求,請參閱使用 Visual Studio Code 在單一租用戶 Azure Logic Apps 中建立標準工作流程。
自訂函式功能目前僅適用在 Windows 作業系統上執行的 Visual Studio Code。
自訂函式功能目前支援為 Azure 裝載的邏輯應用程式工作流程呼叫 .NET Framework 和 .NET 8。
用來建立程式碼專案的本機資料夾
限制
- Azure 入口網站中目前無法使用自訂函式撰寫。 不過,將函式從 Visual Studio Code 部署至 Azure 之後,請遵循 Azure 入口網站的從工作流程呼叫程式碼中的步驟。 您可以使用名為 [在此邏輯應用程式中呼叫本機函式] 的內建動作,選取您部署的自訂函式並執行您的程式碼。 工作流程中的後續動作可以參考這些函式的輸出,就如同任何其他工作流程。 您可以檢視內建動作的執行歷程記錄、輸入和輸出。
建立程式碼專案
Visual Studio Code 的最新 Azure Logic Apps (標準) 延伸模組包含程式碼專案範本,其提供使用您的工作流程簡化的撰寫、偵錯和部署您自己的程式碼的體驗。 此專案範本會建立工作區檔案和兩個範例專案:一個專案來撰寫程式碼,另一個專案用來建立工作流程。
附註
您無法對程式碼和工作流程使用相同的專案資料夾。
開啟 Visual Studio Code。 在活動列上,選取 Azure 圖示。 (鍵盤:Shift+Alt+A)
在開啟的 Azure 視窗中,在 [工作區] 區段工具列上,從 Azure Logic Apps 功能表選取 [建立新的邏輯應用程式工作區]。
![此螢幕擷取畫面顯示 Visual Studio Code、Azure 視窗、工作區區段工具列,以及 [建立新邏輯應用程式工作區] 的選定選項。](media/create-run-custom-code-functions/create-workspace.png)
在 [選取資料夾] 方塊中,瀏覽至並選取您為專案建立的本機資料夾。
當 [建立新的邏輯應用程式工作區] 提示方塊出現時,提供工作區的名稱:

此範例會繼續進行 MyLogicAppWorkspace。
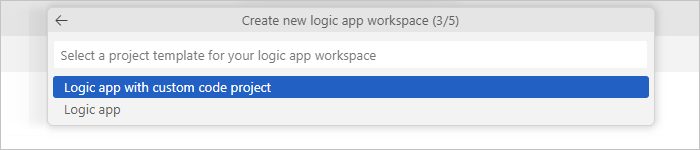
當 [選取邏輯應用程式工作區的專案範本] 提示方塊出現時,選取 [具有自訂程式碼專案的邏輯應用程式]。
對於 Azure 裝載的標準邏輯應用程式工作流程,請依照提示選取 .NET Framework 或 .NET 8。
遵循後續的提示,提供下列範例值:
Item 範例值 .NET 函式專案的函式名稱 WeatherForecast .NET 函式專案的命名空間名稱 Contoso.Enterprise 工作流程範本:
- 具狀態工作流程
- 無狀態工作流程具狀態工作流程 工作流程名稱 MyWorkflow 選取 [在目前視窗中開啟]。
完成此步驟之後,Visual Studio Code 會建立您的工作區,其中預設會包含一個 .NET 函式專案和一個邏輯應用程式專案,例如:
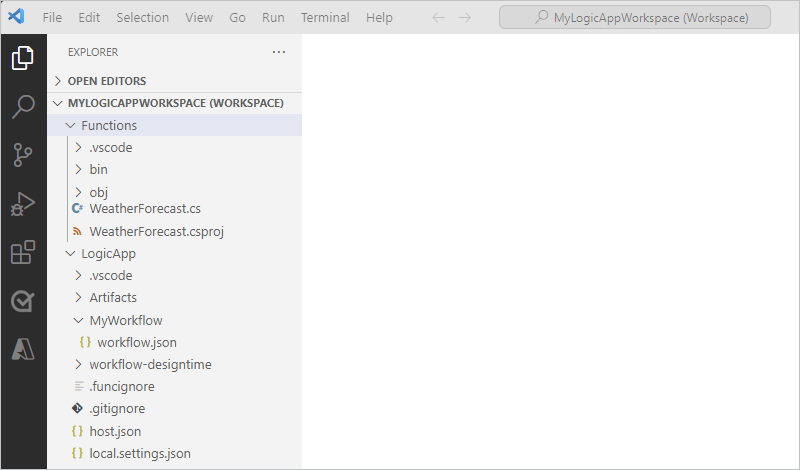
Node 描述 < 工作區名稱> 包含您的 .NET 函式專案和邏輯應用程式工作流程專案。 < 函數名稱> 包含您的 .NET 函式專案的成品。 例如,<function-name>.cs 檔案是程式碼檔案,您可以在其中撰寫程式碼。 < 邏輯應用程式名稱> 包含邏輯應用程式專案的成品,包括空白工作流程。
撰寫您的程式碼
在您的工作區中,展開 [函式] 節點 (如果尚未展開)。
開啟 <function-name>.cs 檔案,此範例中其名為 WeatherForecast.cs。
依預設,此檔案包含範例程式碼,其中包含下列程式碼元素,以及先前提供的範例值 (如適用):
- 命名空間名稱
- 類別名稱
- 函式名稱
- 函數參數
- 傳回類型
- 複雜類型
下列範例顯示完整的範例程式碼:
//------------------------------------------------------------
// Copyright (c) Microsoft Corporation. All rights reserved.
//------------------------------------------------------------

namespace Contoso.Enterprise
{
    using System;
    using System.Collections.Generic;
    using System.Threading.Tasks;
    using Microsoft.Azure.Functions.Extensions.Workflows;
    using Microsoft.Azure.WebJobs;
    using Microsoft.Extensions.Logging;

    /// <summary>
    /// Represents the WeatherForecast flow invoked function.
    /// </summary>
    public class WeatherForecast
    {

        private readonly ILogger<WeatherForecast> logger;

        public WeatherForecast(ILoggerFactory loggerFactory)
        {
            logger = loggerFactory.CreateLogger<WeatherForecast>();
        }

        /// <summary>
        /// Executes the logic app workflow.
        /// </summary>
        /// <param name="zipCode">The zip code.</param>
        /// <param name="temperatureScale">The temperature scale (e.g., Celsius or Fahrenheit).</param>
        [FunctionName("WeatherForecast")]
        public Task<Weather> Run([WorkflowActionTrigger] int zipCode, string temperatureScale)
        {

            this.logger.LogInformation("Starting WeatherForecast with Zip Code: " + zipCode + " and Scale: " + temperatureScale);

            // Generate random temperature within a range based on the temperature scale
            Random rnd = new Random();
            var currentTemp = temperatureScale == "Celsius" ? rnd.Next(1, 30) : rnd.Next(40, 90);
            var lowTemp = currentTemp - 10;
            var highTemp = currentTemp + 10;

            // Create a Weather object with the temperature information
            var weather = new Weather()
            {
                ZipCode = zipCode,
                CurrentWeather = $"The current weather is {currentTemp} {temperatureScale}",
                DayLow = $"The low for the day is {lowTemp} {temperatureScale}",
                DayHigh = $"The high for the day is {highTemp} {temperatureScale}"
            };

            return Task.FromResult(weather);
        }

        /// <summary>
        /// Represents the weather information for WeatherForecast.
        /// </summary>
        public class Weather
        {
            /// <summary>
            /// Gets or sets the zip code.
            /// </summary>
            public int ZipCode { get; set; }

            /// <summary>
            /// Gets or sets the current weather.
            /// </summary>
            public string CurrentWeather { get; set; }

            /// <summary>
            /// Gets or sets the low temperature for the day.
            /// </summary>
            public string DayLow { get; set; }

            /// <summary>
            /// Gets or sets the high temperature for the day.
            /// </summary>
            public string DayHigh { get; set; }
        }
    }
}
函式定義包含可用來開始使用的預設
Run方法。 此範例Run方法示範自訂函式功能可用一些的功能,例如傳遞不同的輸入和輸出,包括複雜的 .NET 類型。< function-name>.cs 檔案也包含
ILogger介面,其支援將事件記錄至 Application Insights 資源。 您可以將追蹤資訊傳送至 Application Insights,並將該資訊隨著工作流程中的追蹤資訊儲存,例如:private readonly ILogger<WeatherForecast> logger; public WeatherForecast(ILoggerFactory loggerFactory) { logger = loggerFactory.CreateLogger<WeatherForecast>(); } [FunctionName("WeatherForecast")] public Task<Weather> Run([WorkflowActionTrigger] int zipCode, string temperatureScale) { this.logger.LogInformation("Starting WeatherForecast with Zip Code: " + zipCode + " and Scale: " + temperatureScale); <...> }將範例函式程式碼取代為您自己的函式程式碼,並針對您自己的案例編輯預設的
Run方法。 或者,您可以複製函式,包括[FunctionName("<function-name>")]宣告,然後使用唯一名稱重新命名函式。 然後,您可以編輯重新命名的函式,以符合您的需求。
此範例會繼續進行範例程式碼,而不需要進行任何變更。
編譯和建置程式碼
完成撰寫程式碼之後,請編譯以確定不存在任何建置錯誤。 您的 .NET 函式專案會自動包含建置工作,其會編譯程式碼,然後將程式碼新增至邏輯應用程式專案中的 lib\custom 資料夾,其中工作流程會尋找要執行的自訂函式。 這些工作會根據您的 .NET 版本將組件放在 lib\custom\net472 或 lib\custom\net8 資料夾中。
在 Visual Studio Code 中,於 [活動] 列上,選取 [Explorer]。
在 [ 資源管理器] 視窗中,開啟函式專案資料夾的快捷功能表,然後選取 [ 建置函式專案]。
![顯示 Visual Studio Code、Explorer 視窗和函式專案快捷方式功能表的螢幕快照,其中包含 [建置函式專案] 的選取選項。](media/create-run-custom-code-functions/build-functions-project.png)
建置工作會針對函式專案執行。 如果您的組建成功,[ 終端機 ] 視窗會顯示 建置成功訊息。
確認邏輯應用程式專案中有下列項目:
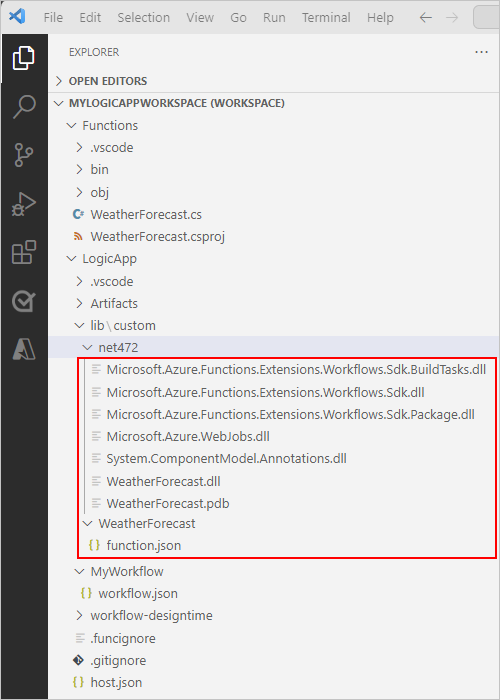
在您的工作區中,展開下列資料夾:LogicApp>lib\custom>net472 或 net8 (視您的 .NET 版本而定)。 確認名為 net472 或 net8 的子資料夾分別包含執行您的程式碼所需的組件 (DLL) 檔案,其中包含一個名為 <function-name>.dll 的檔案。
在您的工作區中,展開下列資料夾:LogicApp>lib\custom><function-name>。 確認名為 <function-name> 的子資料夾包含 function.json 檔案,其包含您撰寫的函式程式碼的相關中繼資料。 工作流程設計工具會使用此檔案來判斷呼叫程式碼時所需的輸入和輸出。
下列範例顯示邏輯應用程式專案中產生的範例組件和其他檔案:
![顯示 Visual Studio Code、Explorer 視窗和函式專案快捷方式功能表的螢幕快照,其中包含 [建置函式專案] 的選取選項。](media/create-run-custom-code-functions/build-functions-project.png#lightbox)
從工作流程呼叫您的程式碼
確認程式碼會編譯,且邏輯應用程式專案包含執行程式碼所需的檔案之後,開啟邏輯應用程式專案隨附的預設工作流程。
在工作區中的 LogicApp 下,展開 <workflow-name> 節點,開啟 workflow.json 的捷徑功能表,然後選取 [開啟設計工具]。
在開啟的工作流程設計工具上,邏輯應用程式專案隨附的預設工作流程會顯示,並具有下列觸發程序和動作:
- 內建的要求觸發程序,名為 [收到 HTTP 要求時]
- 內建的動作,名為 [在此邏輯應用程式中呼叫本機函式]
- 內建的回應動作,名為 [回應],只有在您使用要求觸發程序時,才會用來回覆呼叫端
選取名為 [在此邏輯應用程式中呼叫本機函式] 的動作。
動作的資訊窗格會在右側開啟。
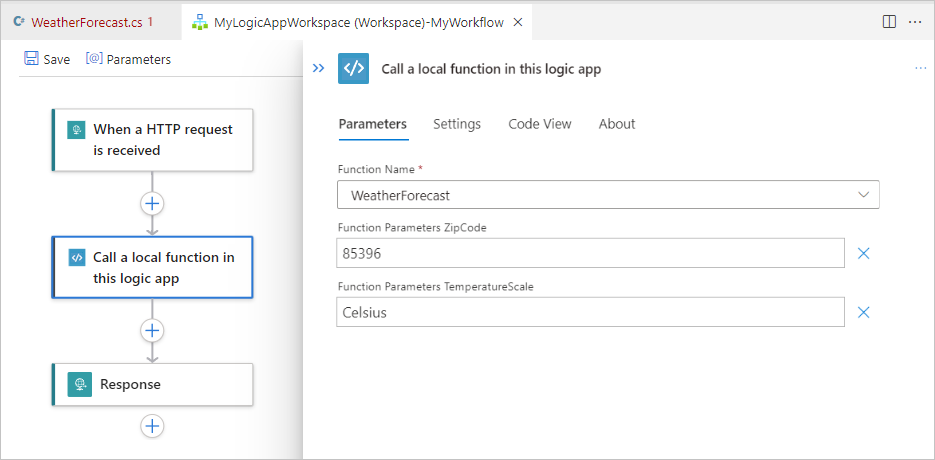
檢閱並確認 [函式名稱] 參數值已設定為您想要執行的函式。 檢閱或變更函式使用的任何其他參數值。
對程式碼和工作流程偵錯
針對下列每個 Azure 記憶體服務,啟動 Azurite 記憶體模擬器:
- Azure Blob 服務
- Azure 佇列服務
- Azure 表格服務
從 Visual Studio Code [檢視] 功能表,選取 [命令選擇區]。
在出現的提示中,尋找並選取 [Azurite:啟動 Blob 服務]。
從出現的工作目錄清單中,選取 [LogicApp]。
針對 [Azurite:啟動佇列服務] 和 [Azurite:啟動表格服務] 重複這些步驟。
當畫面底部的 Visual Studio Code 工作列顯示三個儲存體服務執行中時,您便已成功,例如:

遵循下列步驟,將調試程式附加至邏輯應用程式專案和 .NET 函式專案:
在 Visual Studio Code 活動列上,選取 [執行並偵錯]。 (鍵盤:Ctrl+Shift+D)
![此螢幕擷取畫面顯示選取了 [執行並偵錯] 的 Visual Studio Code 活動列。](media/create-run-custom-code-functions/run-debug.png)
從 [執行和除錯] 清單中,選取 [執行/除錯本機函式的邏輯應用程式(LogicApp)],如果尚未選定,然後選取 [播放](綠色箭號)。
![顯示 [執行] 和 [偵錯] 列表的螢幕快照,其中包含使用本機函式執行/偵錯邏輯應用程式的選取選項。](media/create-run-custom-code-functions/attach-debugger-logic-app-with-local-function.png)
[終端機] 視窗隨即開啟,並顯示已啟動的偵錯程序。 [偵錯主控台] 視窗隨即出現,並顯示偵錯狀態。 在 Visual Studio Code 底部,工作列變成橙色,表示 .NET 偵錯工具已載入。
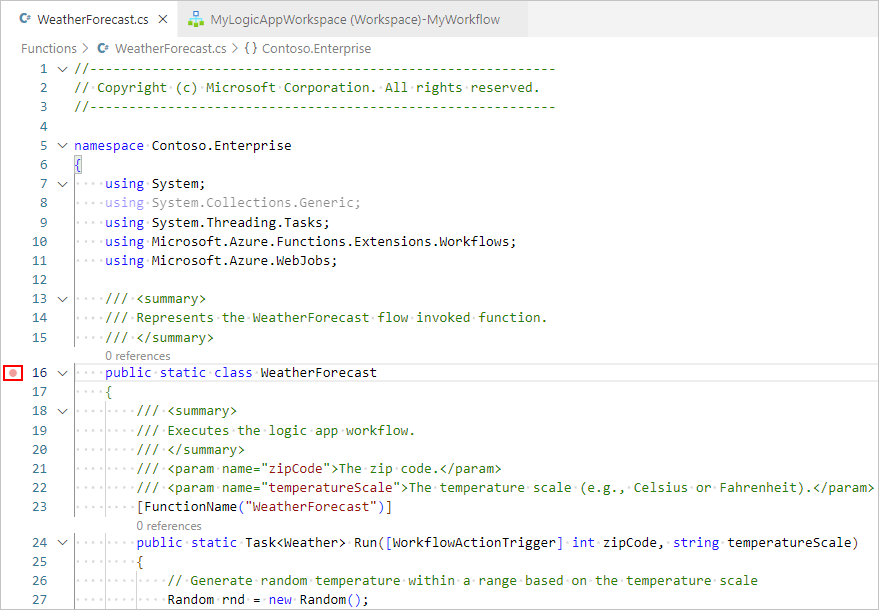
若要設定任何中斷點,請在函式定義 (<function-name>.cs) 或工作流程定義 (workflow.json) 中,尋找您要放置中斷點的行號,並選取左側的資料行,例如:
若要在工作流程中手動執行要求觸發程序,請開啟工作流程的 [概觀] 頁面。
從邏輯應用程式專案,開啟 workflow.json 檔案的捷徑功能表,然後選取 [概觀]。
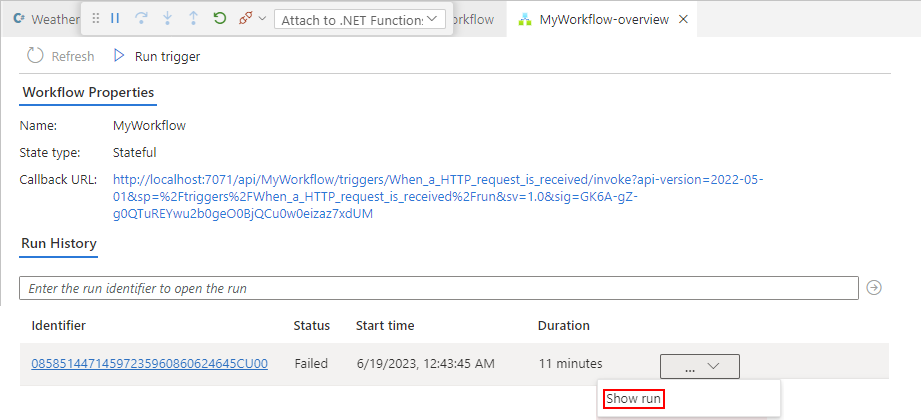
在工作流程的 [概觀] 頁面上,當您想要手動啟動工作流程時,可以使用 [執行觸發程序] 按鈕。 在 [工作流程屬性] 下,[回撥 URL] 值是工作流程中要求觸發程序建立的可呼叫端點的 URL。 您可以將要求傳送至此 URL,以從其他應用程式觸發工作流程,包括其他邏輯應用程式工作流程。
![此螢幕擷取畫面顯示 Visual Studio Code 和開啟了工作流程的 [概觀] 頁面。](media/create-run-custom-code-functions/workflow-overview.png)
在 [概觀] 頁面工具列上,選取 [執行觸發程序]。
工作流程開始執行之後,偵錯工具會啟動您的第一個中斷點。
在 [執行] 功能表或偵錯工具工具列上,選取 [偵錯動作]。
工作流程執行完成之後,[概觀] 頁面會顯示已完成的執行,以及該執行的基本詳細資料。
若要檢閱工作流程執行的詳細資訊,請選取已完成的執行。 或者,從 [持續時間] 資料行旁邊的清單,選取 [顯示執行]。
部署程式碼
您可以使用與部署邏輯應用程式專案相同的方式來部署自訂函式。 無論您是從 Visual Studio Code 部署或使用 CI/CD DevOps 流程,請確保在部署之前建置程式碼,而且所有相依組件都存在於下列邏輯應用程式專案資料夾中:
.NET 4.7.2:lib/custom/net472 資料夾
.NET 8:lib/custom/net8 資料夾
如需詳細資訊,請參閱將標準工作流程從 Visual Studio Code 部署至 Azure。
問題疑難排解
動作資訊窗格錯誤
在工作流程設計工具上,當您選取名為 [在此邏輯應用程式中呼叫本機函式] 的內建動作時,動作的資訊窗格會顯示下列訊息:
Failed to retrieve dynamic inputs. Error details:
在此案例中,檢查邏輯應用程式專案,以確定 LogicApp\lib\custom 資料夾為空白。 如果空白,請從 [終端機] 功能表中,選取 [執行工作]> [建置 Functions]。
目前沒有任何具有指定名稱的處理序正在執行
如果您在執行工作流程時收到此錯誤訊息,則可能是將偵錯工具程序連結至 .NET Functions,而不是連結至邏輯應用程式。
若要修正此問題,請從 [執行並偵錯] 清單,選取 [連結至邏輯應用程式 (LogicApp)],然後選取 [播放] (綠色三角形)。
套件未正確匯入
如果 [輸出] 視窗顯示類似以下訊息的錯誤,請確保您至少安裝了 .NET 6.0。 如果您已安裝此版本,請嘗試解除安裝再重新安裝。
C:\Users\yourUserName\.nuget\packages\microsoft.net.sdk.functions\4.2.0\build\Microsoft.NET.Sdk.Functions.targets(83,5): warning : The ExtensionsMetadataGenerator package was not imported correctly. Are you missing 'C:\Users\yourUserName\.nuget\packages\microsoft.azure.webjobs.script.extensionsmetadatagenerator\4.0.1\build\Microsoft.Azure.WebJobs.Script.ExtensionsMetadataGenerator.targets' or 'C:\Users\yourUserName\.nuget\packages\microsoft.azure.webjobs.script.extensionsmetadatagenerator\4.0.1\build\Microsoft.Azure.WebJobs.Script.ExtensionsMetadataGenerator.props'? [C:\Desktop\...\custom-code-project\MyLogicAppWorkspace\Function\WeatherForecast.csproj] WeatherForecast -> C:\Desktop\...\custom-code-project\MyLogicAppWorkspace\Function\\bin\Debug\net472\WeatherForecast.dll C:\Users\yourUserName\.nuget\packages\microsoft.net.sdk.functions\4.2.0\build\Microsoft.NET.Sdk.Functions.Build.targets(32,5): error : It was not possible to find any compatible framework version [C:\Desktop\...\custom-code-project\MyLogicAppWorkspace\Function\WeatherForecast.csproj] C:\Users\yourUserName\.nuget\packages\microsoft.net.sdk.functions\4.2.0\build\Microsoft.NET.Sdk.Functions.Build.targets(32,5): error : The specified framework 'Microsoft.NETCore.App', version '6.0.0' was not found. [C:\Desktop\...\custom-code-project\MyLogicAppWorkspace\Function\WeatherForecast.csproj] C:\Users\yourUserName\.nuget\packages\microsoft.net.sdk.functions\4.2.0\build\Microsoft.NET.Sdk.Functions.Build.targets(32,5): error : - Check application dependencies and target a framework version installed at: [C:\Desktop\...\custom-code-project\MyLogicAppWorkspace\Function\WeatherForecast.csproj]
建置失敗
如果您的函式不包含變數,且您建置程式碼,[輸出] 視窗可能會顯示下列錯誤訊息:
C:\Users\yourUserName\...\custom-code-project\Function\func.cs (24,64): error CS1031: Type expected [C:\Users\yourUserName\...\custom-code-project\Function\func.csproj]
C:\Users\yourUserName\...\custom-code-project\Function\func.cs (24,64): error CS1001: Identifier expected [C:\Users\yourUserName\...\custom-code-project\Function\func.csproj]
Build FAILED.
C:\Users\yourUserName\...\custom-code-project\Function\func.cs (24,64): error CS1031: Type expected [C:\Users\yourUserName\...\custom-code-project\Function\func.csproj]
C:\Users\yourUserName\...\custom-code-project\Function\func.cs (24,64): error CS1001: Identifier expected [C:\Users\yourUserName\...\custom-code-project\Function\func.csproj]
0 Warning(s)
2 Error(s)
若要修正此問題,請在程式碼的 Run 方法中附加下列參數:
string parameter1 = null
下列範例顯示 Run 方法簽章的顯示方式:
public static Task<Weather> Run([WorkflowActionTrigger] int zipCode, string temperatureScale, string parameter1 = null)