適用於: Azure CLI ml 延伸模組 v2 (目前)Python SDK azure-ai-ml v2 (目前)
在本文中,了解如何連線至位於 Azure 外部的資料來源,以便資料供 Azure Machine Learning 服務使用。 Azure 連線可作為金鑰保存庫 Proxy,而與連線的互動是與 Azure 金鑰保存庫的直接互動。 Azure Machine Learning 連線安全地將使用者名稱和密碼資料資源作為秘密儲存在金鑰保存庫中。 金鑰保存庫 RBAC 可控制對這些資料資源的存取。 針對此資料可用性,Azure 支援下列外部來源的連線:
- Snowflake 資料庫
- Amazon S3
- Azure SQL 資料庫
先決條件
重要事項
Azure Machine Learning 連線將連線建立期間傳遞的認證安全地儲存在工作區 Azure Key Vault 中。 連線會參考來自金鑰保存庫儲存位置的認證,以供進一步使用。 將認證儲存在金鑰保管庫之後,您無須直接處理認證。 您可以選擇將認證儲存在 YAML 檔案中。 CLI 命令或 SDK 可以覆寫它們。 建議您避免將認證儲存在 YAML 檔案中,因為安全性缺口可能會導致認證洩漏。
附註
若要成功匯入資料,請確認您已安裝適用於 SDK 的最新 azure-ai-ml 套件 (1.5.0 版或更新版本) 以及 ml 延伸模組 (2.15.1 版或更新版本)。
如果您有舊版的 SDK 套件或 CLI 延伸模組,請移除舊版,然後使用索引標籤區段中所示的程式碼來安裝新版本。 遵循 SDK 和 CLI 的指示,如下所示:
程式碼版本
az extension remove -n ml
az extension add -n ml --yes
az extension show -n ml #(the version value needs to be 2.15.1 or later)
pip uninstall azure-ai-ml
pip install azure-ai-ml
pip show azure-ai-ml #(the version value needs to be 1.5.0 or later)
建立 Snowflake DB 連線
此 YAML 檔案會建立 Snowflake DB 連線。 請務必更新適當的值:
# my_snowflakedb_connection.yaml
$schema: http://azureml/sdk-2-0/Connection.json
type: snowflake
name: my-sf-db-connection # add your datastore name here

target: jdbc:snowflake://<myaccount>.snowflakecomputing.com/?db=<mydb>&warehouse=<mywarehouse>&role=<myrole>
# add the Snowflake account, database, warehouse name and role name here. If no role name provided it will default to PUBLIC
credentials:
    type: username_password
    username: <username> # add the Snowflake database user name here or leave this blank and type in CLI command line
    password: <password> # add the Snowflake database password here or leave this blank and type in CLI command line
在 CLI 中建立 Azure Machine Learning 連線:
選項 1:使用 YAML 檔案中的使用者名稱和密碼
az ml connection create --file my_snowflakedb_connection.yaml
選項 2:覆寫命令列的使用者名稱和密碼
az ml connection create --file my_snowflakedb_connection.yaml --set credentials.
username="<username>" credentials.
password="<password>"
選項 1:從 YAML 檔案載入連線
from azure.ai.ml import MLClient, load_workspace_connection

ml_client = MLClient.from_config()

wps_connection = load_workspace_connection(source="./my_snowflakedb_connection.yaml")
wps_connection.credentials.username="<username>"
wps_connection.credentials.password="<password>"
ml_client.connections.create_or_update(workspace_connection=wps_connection)
選項 2:在 Python 指令碼中使用 WorkspaceConnection()
from azure.ai.ml import MLClient
from azure.ai.ml.entities import WorkspaceConnection
from azure.ai.ml.entities import UsernamePasswordConfiguration

# If using username/password, the name/password values should be url-encoded
import urllib.parse
username = urllib.parse.quote(os.environ["SNOWFLAKEDB_USERNAME"], safe="")
password = urllib.parse.quote(os.environ["SNOWFLAKEDB_PASSWORD"], safe="")

target= "jdbc:snowflake://<myaccount>.snowflakecomputing.com/?db=<mydb>&warehouse=<mywarehouse>&role=<myrole>"
# add the Snowflake account, database, warehouse name and role name here. If no role name provided it will default to PUBLIC
name= <my_snowflake_connection> # name of the connection
wps_connection = WorkspaceConnection(name= name,
type="snowflake",
target= target,
credentials= UsernamePasswordConfiguration(username=username, password=password)
)

ml_client.connections.create_or_update(workspace_connection=wps_connection)
瀏覽至 Azure Machine Learning 工作室。
在左側導覽的 [資產] 下,選取 [資料]。 接下來,選取 [資料連線] 索引標籤。然後選取 [建立],如下列螢幕擷取畫面所示:

在 [建立連線] 窗格中,填寫螢幕擷取畫面中所示的值。 針對類別選擇 [Snowflake],並針對驗證類型選擇 [使用者名稱密碼]。 請務必依此格式指定 [目標] 文字方塊值,並在 <> 字元之間填入您的特定值:
jdbc:snowflake://<myaccount>.snowflakecomputing.com/?db=<mydb>&warehouse=<mywarehouse>&role=<myrole>

選取 [儲存] 將認證安全地儲存在與相關工作區相關聯的金鑰保存庫中。 執行資料匯入作業時,會使用此連線。
建立使用 OAuth 的 Snowflake DB 連線
本節中的資訊說明如何建立使用 OAuth 進行驗證的 Snowflake DB 連線。
重要事項
在遵循本節的步驟之前,您必須先設定 Azure 以代表用戶端發出 OAuth 權杖。 此組態會建立 OAuth 連線所需的服務主體。 您需要下列資訊才能建立連線:
- 用戶端識別碼:服務主體的識別碼
- 用戶端密碼:服務主體的密碼
- 租用戶識別碼:Microsoft Entra ID 租用戶的識別碼
此 YAML 檔案會建立使用 OAuth 的 Snowflake DB 連線。 請務必更新適當的值:
# my_snowflakedb_connection.yaml
name: snowflake_service_principal_connection
type: snowflake
# Add the Snowflake account, database, warehouse name, and role name here. If no role name is provided, it will default to PUBLIC.
target: jdbc:snowflake://<myaccount>.snowflakecomputing.com/?db=<mydb>&warehouse=<mywarehouse>&scope=<scopeForServicePrincipal>
credentials:
  type: service_principal
  client_id: <client-id>          # The service principal's client id
  client_secret: <client-secret>  # The service principal's client secret
  tenant_id: <tenant-id>          # The Microsoft Entra ID tenant id
在 CLI 中建立 Azure Machine Learning 連線:
az ml connection create --file my_snowflakedb_connection.yaml
您也可以在命令列覆寫 YAML 檔案中的資訊:
az ml connection create --file my_snowflakedb_connection.yaml --set credentials.client_id="my-client-id" credentials.client_secret="my-client-secret" credentials.tenant_id="my-tenant-id"
透過 Python SDK,您可以載入 YAML 檔案中儲存的連線資訊來建立連線。 您可以選擇性地覆寫值:
from azure.ai.ml import MLClient, load_workspace_connection

ml_client = MLClient.from_config()

wps_connection = load_workspace_connection(source="./my_snowflakedb_connection.yaml")
wps_connection.credentials_client_id="my-client-id"
wps_connection.credentials.client_secret="my-client-secret"
wps_connection.credentials.tenant_id="my-tenant-id"
ml_client.connections.create_or_update(workspace_connection=wps_connection)
您也可以直接在 Python 指令碼中指定連線資訊,而不需依賴 YAML 檔案:
from azure.ai.ml import MLClient
from azure.ai.ml.entities import WorkspaceConnection
from azure.ai.ml.entities import ServicePrincipalConfiguration

target= "jdbc:snowflake://<myaccount>.snowflakecomputing.com/?db=<mydb>&warehouse=<mywarehouse>&role=<myrole>"
# add the Snowflake account, database, warehouse name and role name here. If no role name provided it will default to PUBLIC
name= <my_snowflake_connection> # name of the connection
auth = ServicePrincipalConfiguration(client_id="<my-client-id>", client_secret="<my-client-secret>", tenant_id="<my-tenant-id>")
wps_connection = WorkspaceConnection(name= name,
                                     type="snowflake",
                                     target=target,
                                     credentials=auth
)

ml_client.connections.create_or_update(workspace_connection=wps_connection)
附註
使用服務主體建立 Snowflake DB 連線 (針對 OAuth) 時,只能透過 Azure CLI 或 Python SDK 取得。
建立 Azure SQL DB 連線
此 YAML 指令碼會建立 Azure SQL DB 連線。 請務必更新適當的值:
# my_sqldb_connection.yaml
$schema: http://azureml/sdk-2-0/Connection.json

type: azure_sql_db
name: my-sqldb-connection

target: Server=tcp:<myservername>,<port>;Database=<mydatabase>;Trusted_Connection=False;Encrypt=True;Connection Timeout=30
# add the sql servername, port addresss and database
credentials:
    type: sql_auth
    username: <username> # add the sql database user name here or leave this blank and type in CLI command line
    password: <password> # add the sql database password here or leave this blank and type in CLI command line
在 CLI 中建立 Azure Machine Learning 連線:
選項 1:使用 YAML 檔案中的使用者名稱/密碼
az ml connection create --file my_sqldb_connection.yaml
選項 2:覆寫 YAML 檔案中的使用者名稱和密碼
az ml connection create --file my_sqldb_connection.yaml --set credentials.
username="<username>" credentials.
password="<password>"
選項 1:從 YAML 檔案載入連線
from azure.ai.ml import MLClient, load_workspace_connection

ml_client = MLClient.from_config()

wps_connection = load_workspace_connection(source="./my_sqldb_connection.yaml")
wps_connection.credentials.username="<username>"
wps_connection.credentials.password="<password>"
ml_client.connections.create_or_update(workspace_connection=wps_connection)
選項 2:使用 WorkspaceConnection()
from azure.ai.ml import MLClient
from azure.ai.ml.entities import WorkspaceConnection
from azure.ai.ml.entities import UsernamePasswordConfiguration

# If using username/password, the name/password values should be url-encoded
import urllib.parse
username = urllib.parse.quote(os.environ["MYSQL_USERNAME"], safe="")
password = urllib.parse.quote(os.environ["MYSQL_PASSWORD"], safe="")

target= "Server=tcp:<myservername>,<port>;Database=<mydatabase>;Trusted_Connection=False;Encrypt=True;Connection Timeout=30"
# add the sql servername, port address and database

name= <my_sql_connection> # name of the connection
wps_connection = WorkspaceConnection(name= name,
type="azure_sql_db",
target= target,
credentials= UsernamePasswordConfiguration(username=username, password=password)
)

ml_client.connections.create_or_update(workspace_connection=wps_connection)
瀏覽至 Azure Machine Learning 工作室。
在左側導覽的 [資產] 下,選取 [資料]。 接下來,選取 [資料連線] 索引標籤。然後選取 [建立],如下列螢幕擷取畫面所示:
在 [建立連線] 窗格中,填寫螢幕擷取畫面中所示的值。 針對類別選擇 [AzureSqlDb],並針對驗證類型選擇 [使用者名稱密碼]。 請務必依此格式指定 [目標] 文字方塊值,並在 <> 字元之間填入您的特定值:
Server=tcp:<myservername>,<port>;Database=<mydatabase>;Trusted_Connection=False;Encrypt=True;Connection Timeout=30

建立 Amazon S3 連線
使用下列 YAML 檔案建立 Amazon S3 連線。 請務必更新適當的值:
# my_s3_connection.yaml
$schema: http://azureml/sdk-2-0/Connection.json

type: s3
name: my_s3_connection

target: <mybucket> # add the s3 bucket details
credentials:
    type: access_key
    access_key_id: bbbbbbbb-1c1c-2d2d-3e3e-444444444444 # add access key id
    secret_access_key: H4iJ5kL6mN7oP8qR9sT0uV1wX2yZ3a # add access key secret
在 CLI 中建立 Azure Machine Learning 連線:
az ml connection create --file my_s3_connection.yaml
選項 1:從 YAML 檔案載入連線
from azure.ai.ml import MLClient, load_workspace_connection

ml_client = MLClient.from_config()

wps_connection = load_workspace_connection(source="./my_s3_connection.yaml")
ml_client.connections.create_or_update(workspace_connection=wps_connection)
選項 2:在 Python 指令碼中使用 WorkspaceConnection()
from azure.ai.ml import MLClient
from azure.ai.ml.entities import WorkspaceConnection
from azure.ai.ml.entities import AccessKeyConfiguration

target=<mybucket> # add the s3 bucket details
name=<my_s3_connection> # name of the connection
wps_connection=WorkspaceConnection(name=name,
type="s3",
target= target,
credentials= AccessKeyConfiguration(access_key_id="XXXJ5kL6mN7oP8qR9sT0uV1wX2yZ3aB4cXXX",acsecret_access_key="C2dE3fH4iJ5kL6mN7oP8qR9sT0uV1w")
)

ml_client.connections.create_or_update(workspace_connection=wps_connection)
瀏覽至 Azure Machine Learning 工作室。
在左側導覽的 [資產] 下,選取 [資料]。 接下來,選取 [資料連線] 索引標籤。然後選取 [建立],如下列螢幕擷取畫面所示:
在 [建立連線] 窗格中,填寫螢幕擷取畫面中所示的值。 針對類別選擇 [S3],並針對驗證類型選擇 [使用者名稱密碼]。 請務必依此格式指定 [目標] 文字方塊值,並在 <> 字元之間填入您的特定值:
<目標>

非資料連接
您可以使用這些連線類型來連線至 Git:
- Python 摘要
- Azure Container Registry
- 使用 API 金鑰的連線
這些連線不是資料連線,而是用來連線到外部服務以用於程式碼。
Git
使用下列其中一個 YAML 檔案建立 Git 連線。 請務必更新適當的值:
使用個人存取權杖 (PAT) 連接:
#Connection.yml
name: test_ws_conn_git_pat
type: git
target: https://github.com/contoso/contosorepo
credentials:
    type: pat
    pat: dummy_pat
連線到公用存放庫 (無認證):
#Connection.yml

name: git_no_cred_conn
type: git
target: https://https://github.com/contoso/contosorepo
在 CLI 中建立 Azure Machine Learning 連線:
az ml connection create --file connection.yaml
下列範例會建立 GitHub 存放庫的 Git 連線。 個人存取權杖 (PAT) 會驗證連線:
from azure.ai.ml.entities import WorkspaceConnection
from azure.ai.ml.entities import UsernamePasswordConfiguration, PatTokenConfiguration


name = "my_git_conn"

target = "https://github.com/myaccount/myrepo"

wps_connection = WorkspaceConnection(
    name=name,
    type="git",
    target=target,
    credentials=PatTokenConfiguration(pat="E3fH4iJ5kL6mN7oP8qR9sT0uV1wX2y"),
)
ml_client.connections.create_or_update(workspace_connection=wps_connection)
Python 摘要
使用下列其中一個 YAML 檔案建立 Python 摘要的連線。 請務必更新適當的值:
使用個人存取權杖 (PAT) 連接:
#Connection.yml
name: test_ws_conn_python_pat
type: python_feed
target: https://test-feed.com
credentials:
    type: pat
    pat: dummy_pat
透過使用者名稱和密碼連線:
name: test_ws_conn_python_user_pass
type: python_feed
target: https://test-feed.com
credentials:
    type: username_password
    username: <username>
    password: <password>
連線到公用摘要 (無認證):
name: test_ws_conn_python_no_cred
type: python_feed
target: https://test-feed.com3
在 CLI 中建立 Azure Machine Learning 連線:
az ml connection create --file connection.yaml
下列範例會建立 Python 摘要連線: 此個人存取權杖 (PAT) 或使用者名稱和密碼,驗證連線:
from azure.ai.ml.entities import WorkspaceConnection
from azure.ai.ml.entities import UsernamePasswordConfiguration, PatTokenConfiguration

# If using username/password, the name/password values should be url-encoded
# import urllib.parse
# username = urllib.parse.quote(os.environ["FEED_USERNAME"], safe="")
# password = urllib.parse.quote(os.environ["FEED_PASSWORD"], safe="")


name = "my_pfeed_conn"

target = "https://iJ5kL6mN7.core.windows.net/mycontainer"

wps_connection = WorkspaceConnection(
    name=name,
    type="python_feed",
    target=target,
    #credentials=UsernamePasswordConfiguration(username=username, password=password),
    credentials=PatTokenConfiguration(pat="<PatTokenConfiguration>"),

    #credentials=None
)
ml_client.connections.create_or_update(workspace_connection=wps_connection)
您無法在 Studio 中建立 Python 摘要連線。
容器登錄檔
使用下列其中一個 YAML 檔案建立 Azure Container Registry 的連線。 請務必更新適當的值:
在 CLI 中建立 Azure Machine Learning 連線:
az ml connection create --file connection.yaml
下列範例會建立 Azure Container Registry 連線:
from azure.ai.ml.entities import WorkspaceConnection
from azure.ai.ml.entities import UsernamePasswordConfiguration

# If using username/password, the name/password values should be url-encoded
import urllib.parse
username = os.environ["REGISTRY_USERNAME"]
password = os.environ["REGISTRY_PASSWORD"]

name = "my_acr_conn"

target = "https://iJ5kL6mN7.core.windows.net/mycontainer"

wps_connection = WorkspaceConnection(
    name=name,
    type="container_registry",
    target=target,
    credentials=UsernamePasswordConfiguration(username=username, password=password),
)
ml_client.connections.create_or_update(workspace_connection=wps_connection)
您無法在 Studio 中建立 Azure Container Registry 連線。
API 金鑰
下列範例會建立 API 金鑰連線:
from azure.ai.ml.entities import WorkspaceConnection
from azure.ai.ml.entities import UsernamePasswordConfiguration, ApiKeyConfiguration


name = "my_api_key"

target = "https://L6mN7oP8q.core.windows.net/mycontainer"

wps_connection = WorkspaceConnection(
    name=name,
    type="apikey",
    target=target,
    credentials=ApiKeyConfiguration(key="9sT0uV1wX"),
)
ml_client.connections.create_or_update(workspace_connection=wps_connection)
一般 Azure Container Registry
使用 GenericContainerRegistry 工作區連線,您可以指定映像組建的外部登錄,例如 Nexus 或 Artifactory。 環境映像會從指定的登錄推送,而先前的快取會被忽略。
使用下列 YAML 檔案建立連線。 請務必更新適當的值:
#myenv.yml
$schema: https://azuremlschemas.azureedge.net/latest/environment.schema.json
name: docker-image-plus-conda-example
image: mcr.microsoft.com/azureml/openmpi4.1.0-ubuntu20.04
type: python_feed
conda_file: conda_dep.yml
description: Environment created from a Docker image plus Conda environment
#conda_dep.yml
name: project_environment
dependencies:
  - python=3.10
  - pip:
    - azureml-defaults
channels:
  - anaconda
  - conda-forge
#connection.yml
name: ws_conn_generic_container_registry
type: container_registry
target: https://test-registry.com
credentials:
  type: username_password
  username: <username>
  password: <password>
#hello_world_job.yml
$schema: https://azuremlschemas.azureedge.net/latest/commandJob.schema.json
command: echo "hello world"
environment: azureml:<env name>@latest
使用您的認證從 YAML 檔案建立連線:
az ml connection create --file connection.yaml --credentials username=<username> password=<password> --resource-group my-resource-group --workspace-name my-workspace
建立環境
az ml environment create --name my-env --version 1 --file my_env.yml --conda-file conda_dep.yml --image mcr.microsoft.com/azureml/openmpi4.1.0-ubuntu20.04 --resource-group my-resource-group --workspace-name my-workspace
您可以確認已成功建立環境
az ml environment show --name my-env --version 1 --resource-group my-resource-group --workspace-name my-workspace
下列範例會建立泛型 Azure Container Registry 連線:
import os
from azure.ai.ml import MLClient
from azure.identity import DefaultAzureCredential
from azure.ai.ml.entities import Environment
from azure.ai.ml.entities import WorkspaceConnection
from azure.ai.ml.entities import UsernamePasswordConfiguration
from azureml.core.conda_dependencies import CondaDependencies
from azure.ai.ml import command

username = os.environ["REGISTRY_USERNAME"]
password = os.environ["REGISTRY_PASSWORD"]

# Enter details of Azure Machine Learning workspace
subscription_id = "<SUBSCRIPTION_ID>"
resource_group = "<RESOURCE_GROUP>"
workspace = "<AML_WORKSPACE_NAME>"

ml_client = MLClient( DefaultAzureCredential(), subscription_id, resource_group, workspace)
credentials = UsernamePasswordConfiguration(username=username, password=password)

# Create GenericContainerRegistry workspace connection for a generic registry
ws_connection = WorkspaceConnection(name="<name>", target="<target>", type="GenericContainerRegistry", credentials=credentials)
ml_client.connections.create_or_update(ws_connection)

# Create an environment
env_docker_conda = Environment(image="<base image>", conda_file="<yml file>", name="docker-image-plus-conda-example", description="Environment created from a Docker image plus Conda environment.")
ml_client.environments.create_or_updat(env_docker_conda)

job = command(command="echo 'hello world'", environment=env_docker_conda,display_name="v2-job-example")
returned_job = ml_client.create_or_update(job)
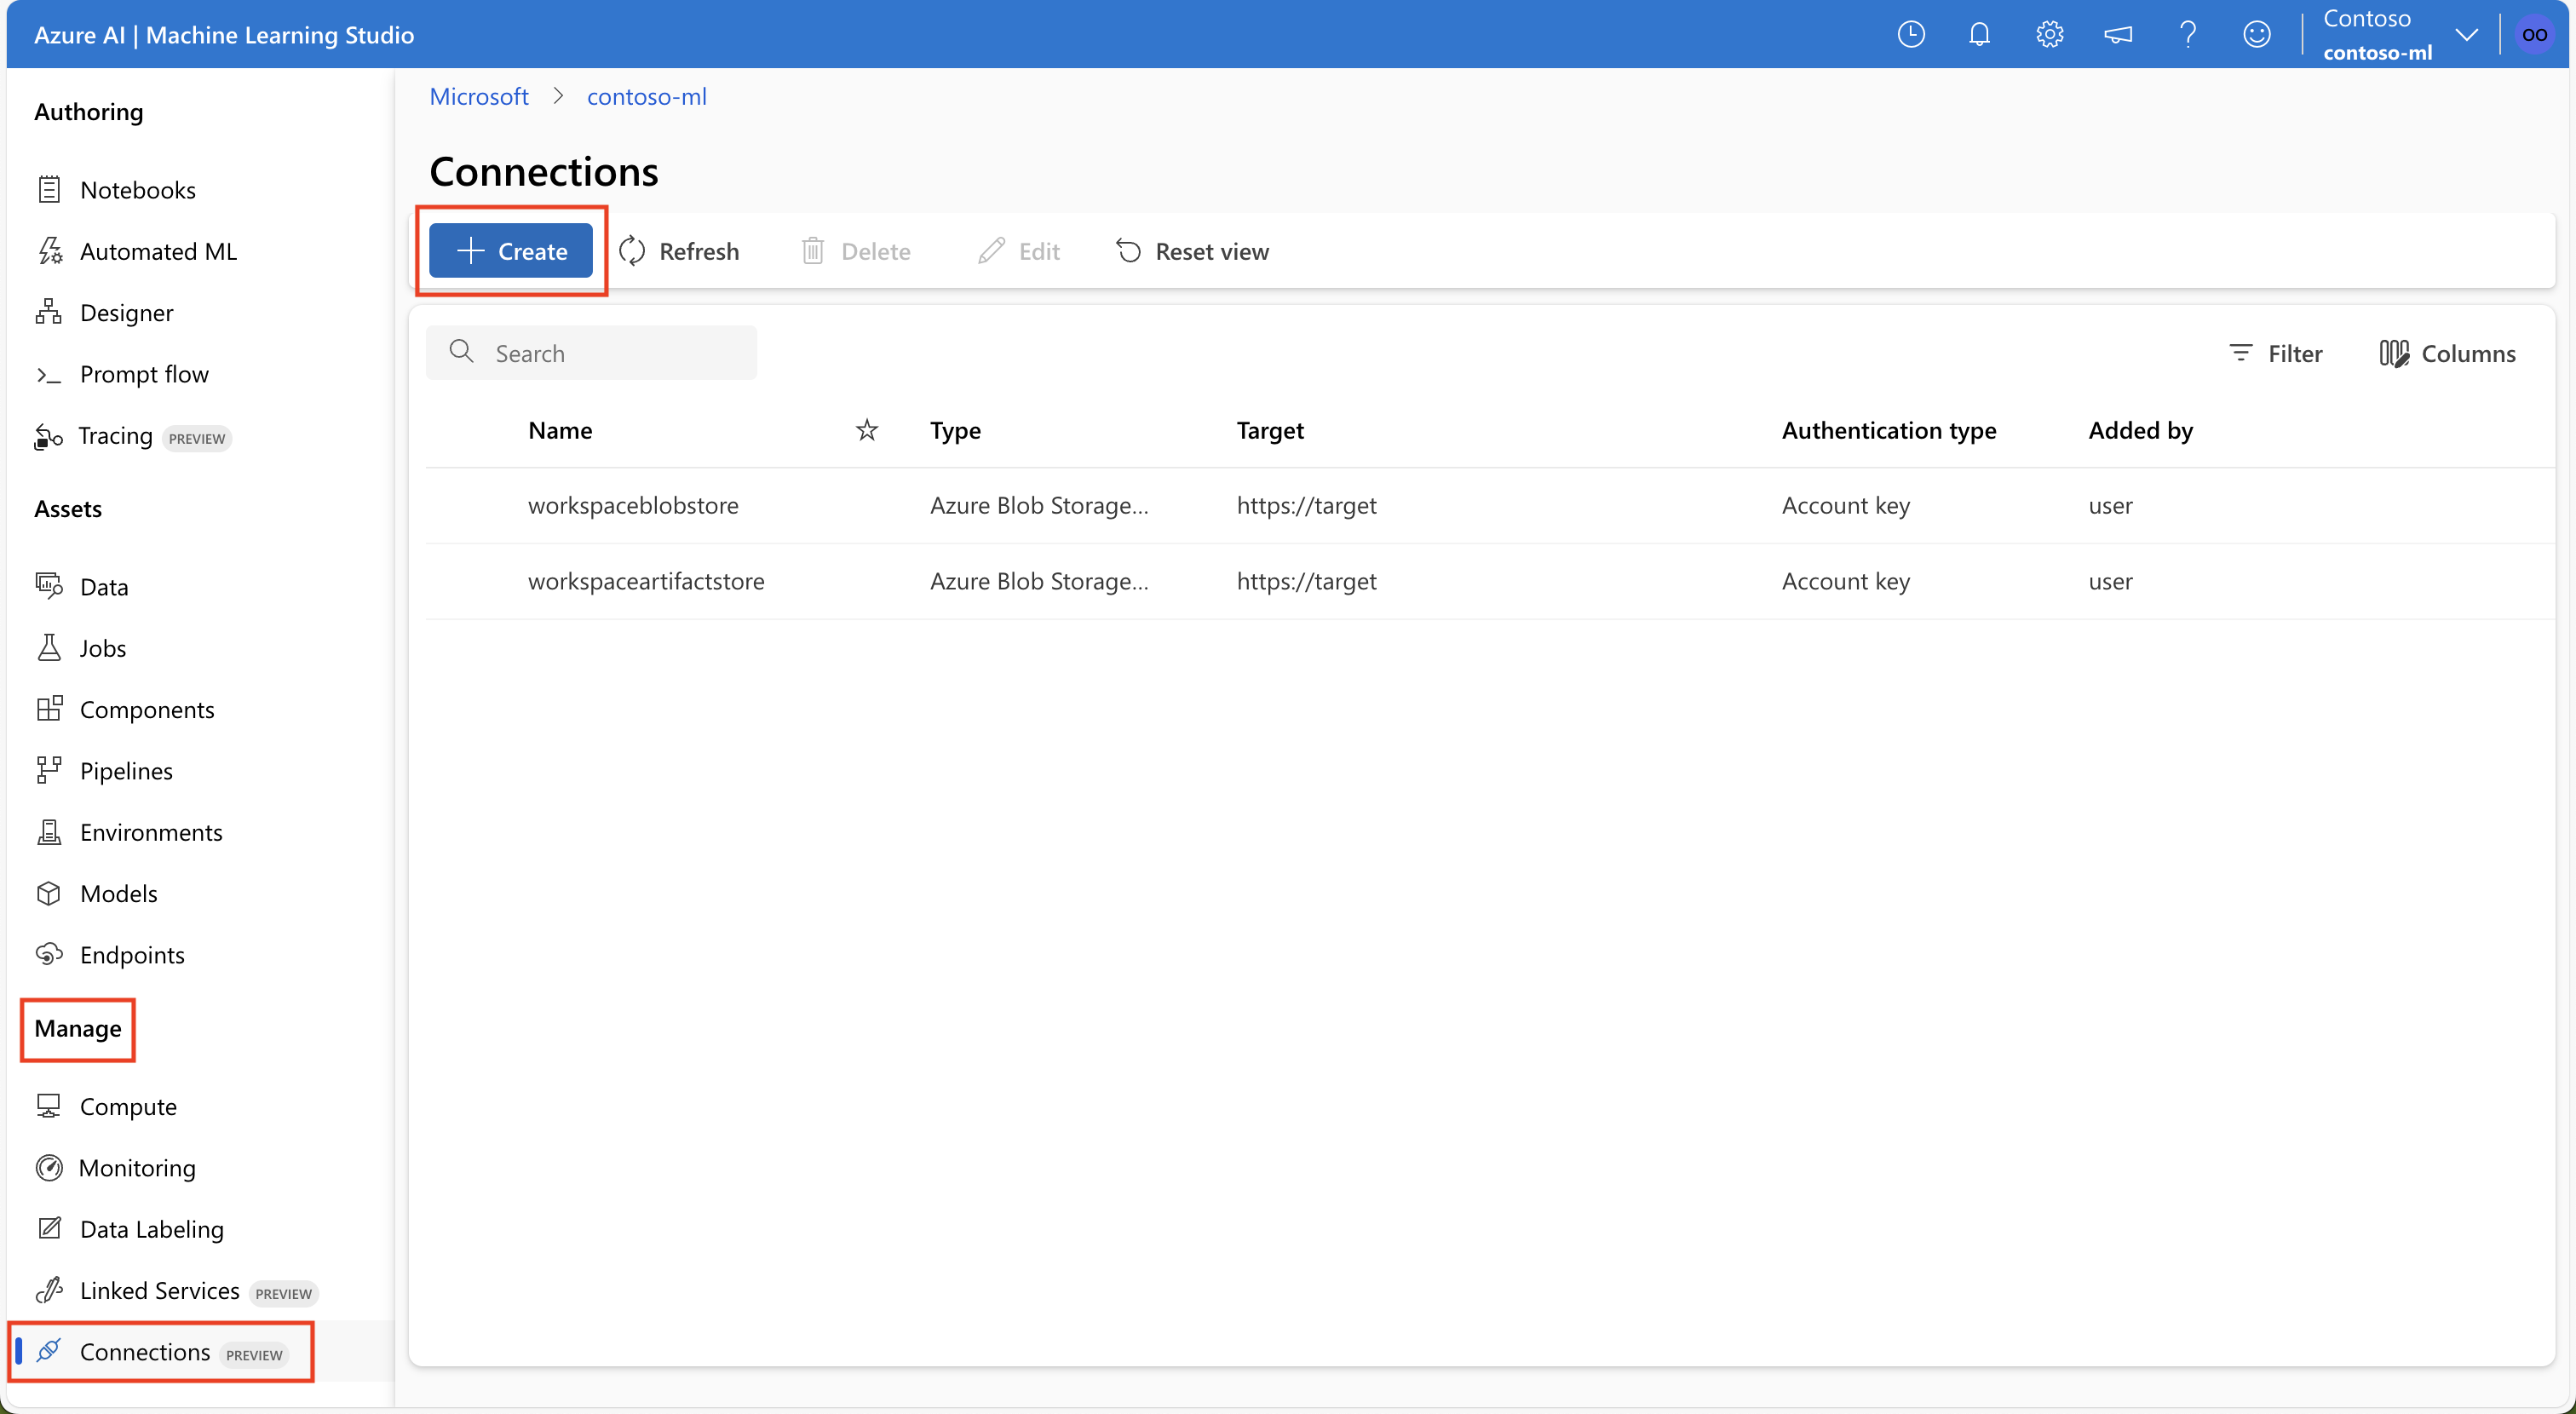
瀏覽至 Azure Machine Learning 工作室。
在左側瀏覽中選取 [管理],選取 [連線]然後選取 [建立]。
在 [其他資源類型] 下,選取 *[一般 Azure Container Registry]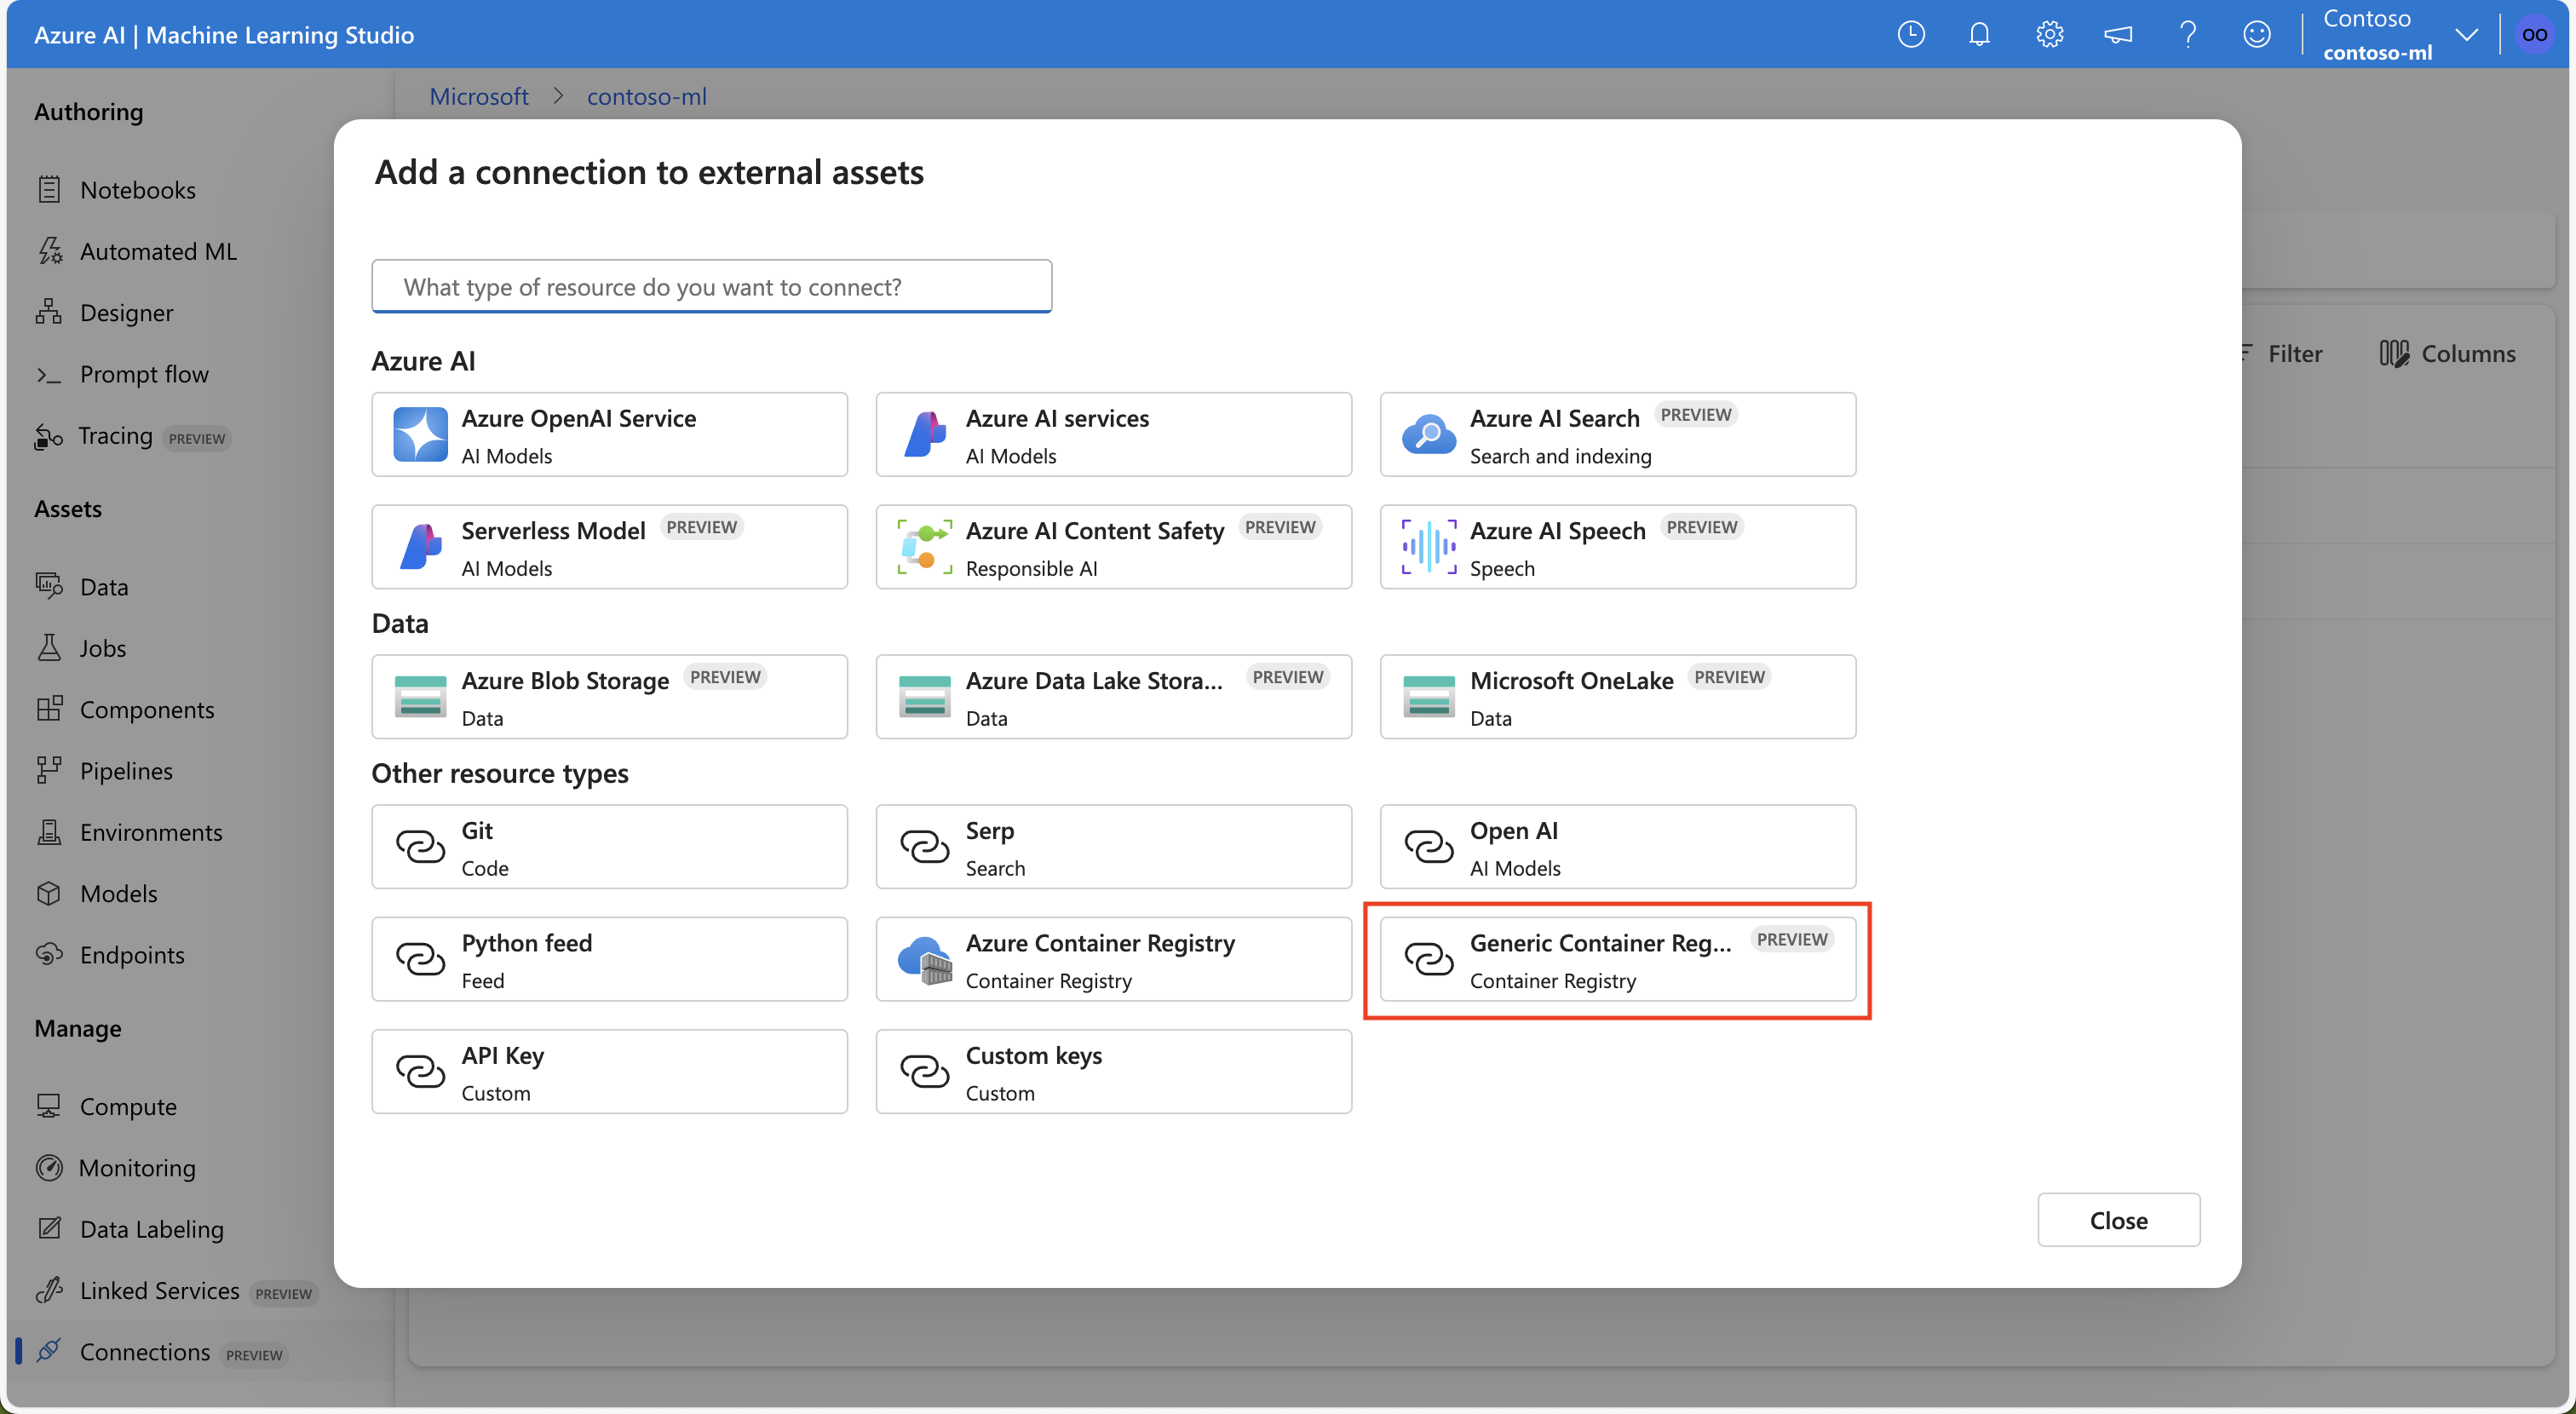
輸入必要的資訊,然後選取 [新增連線]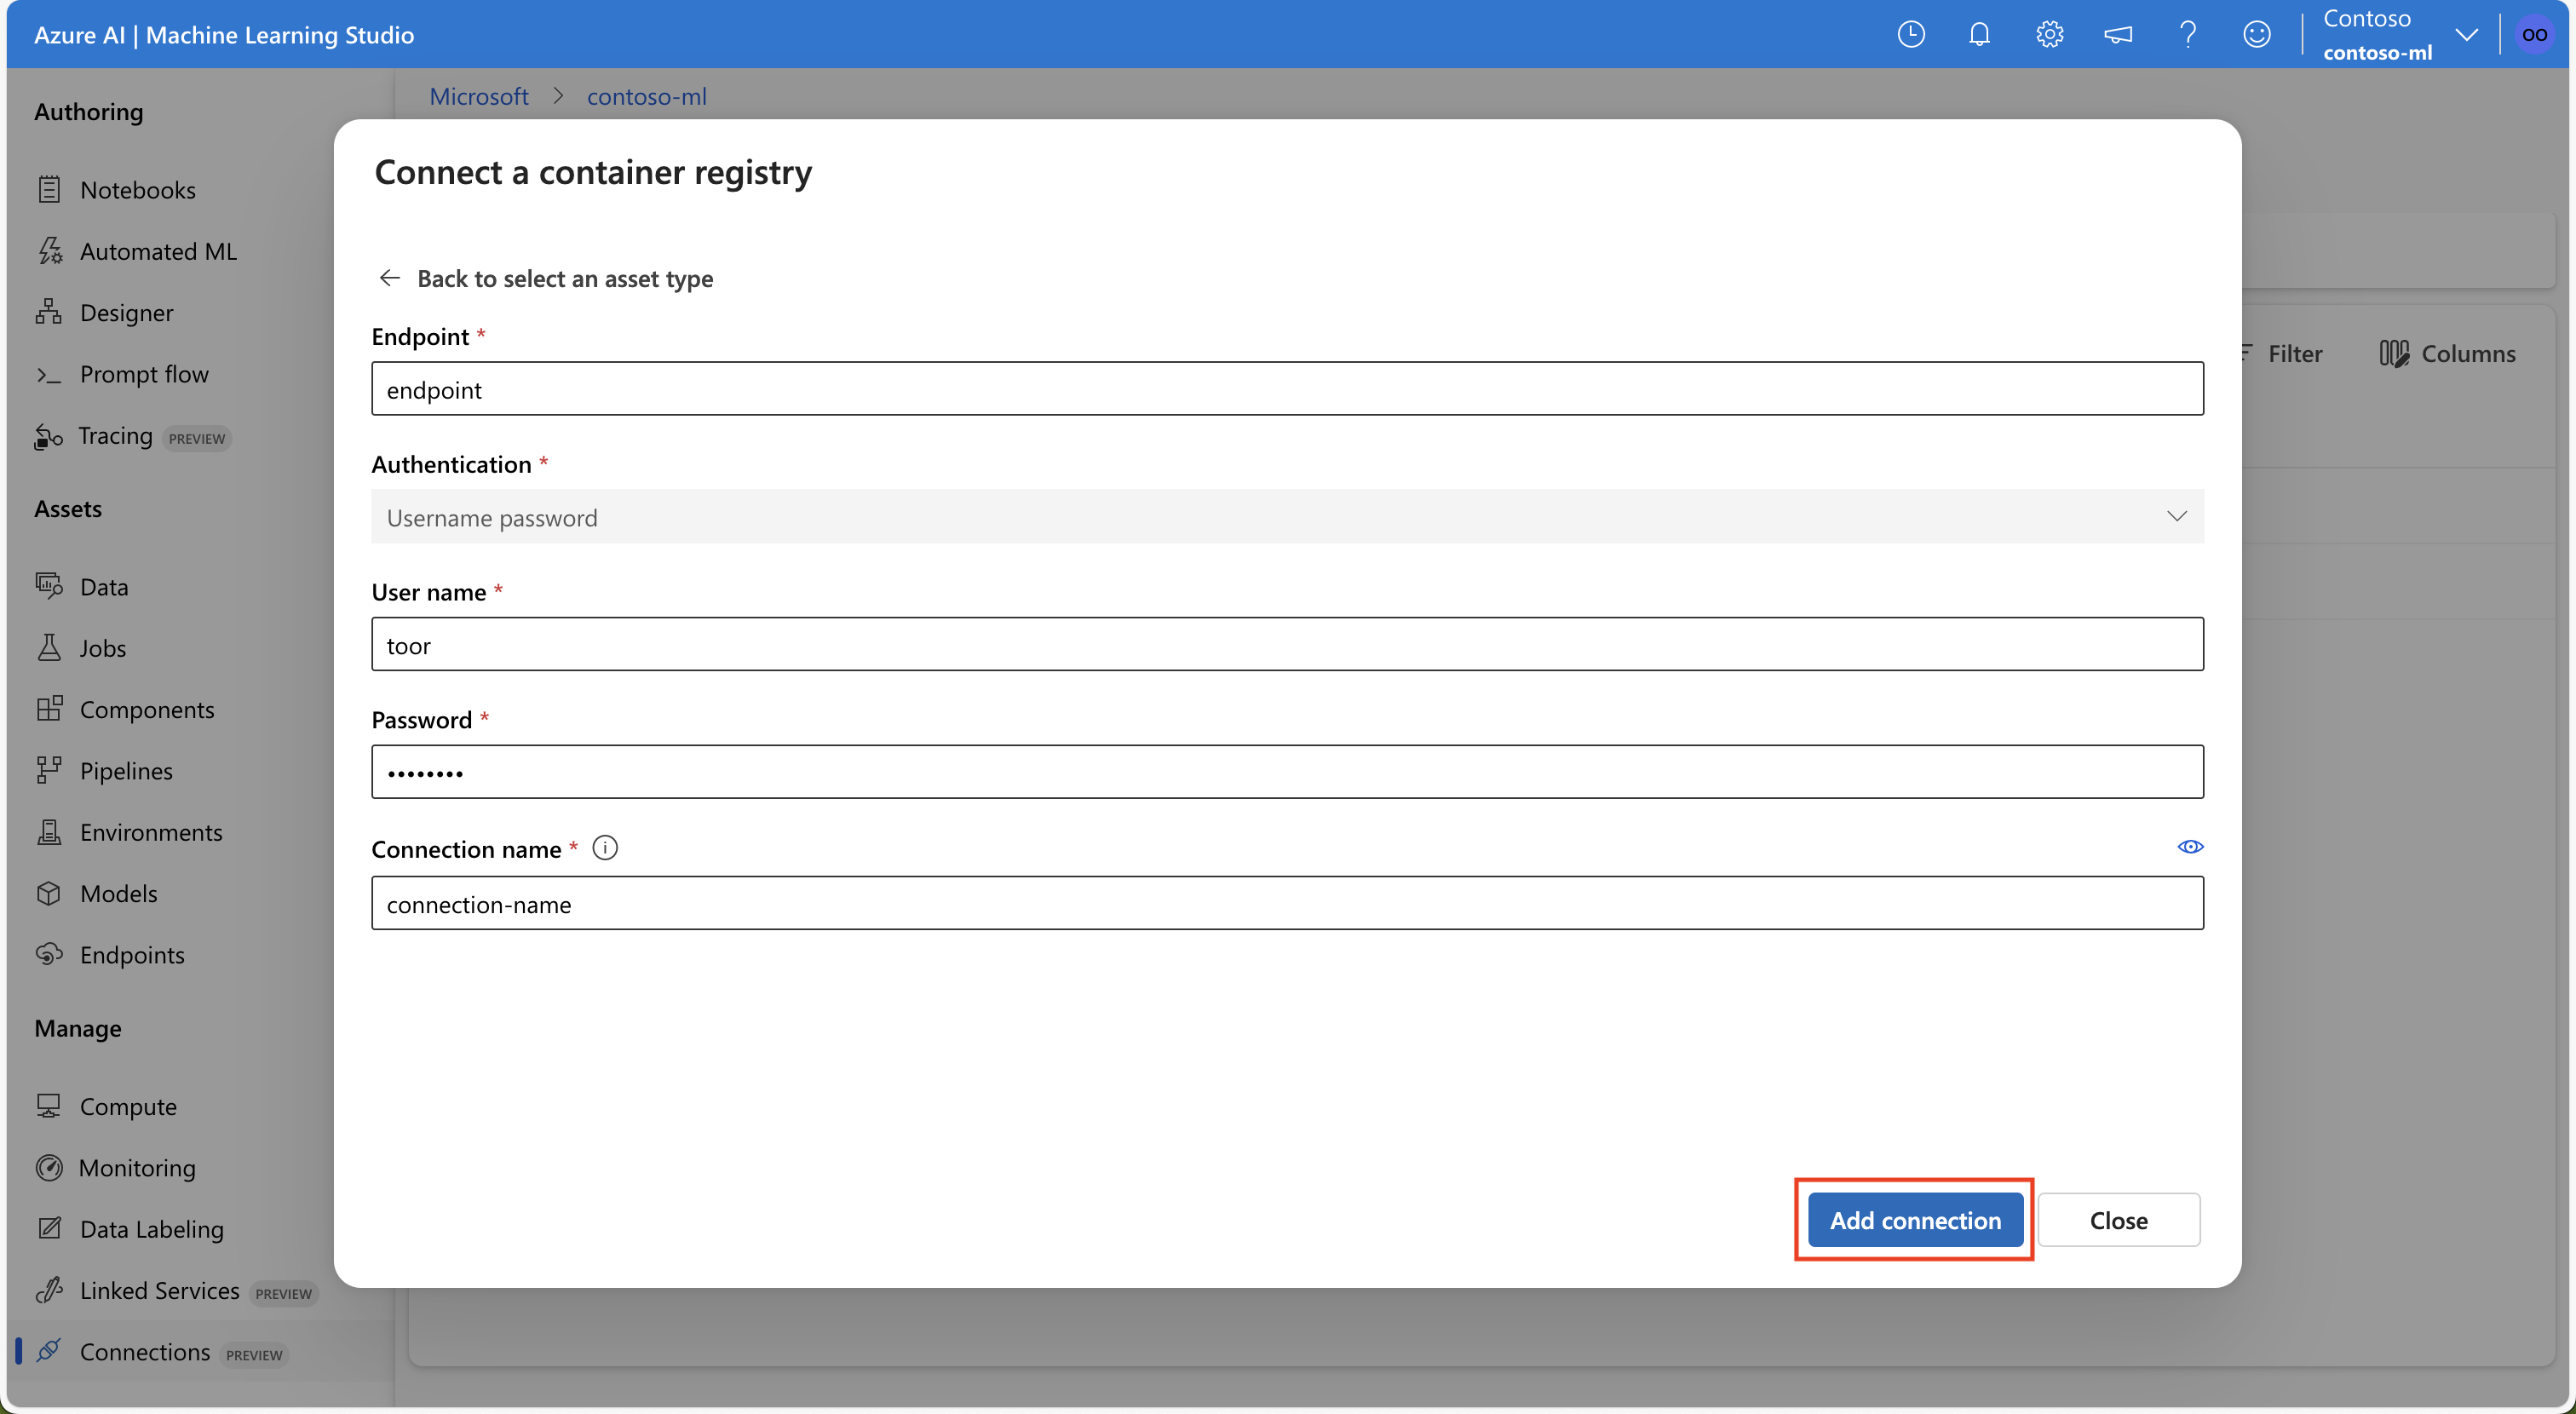
相關內容
如果您使用資料連線 (Snowflake DB、Amazon S3 或 Azure SQL DB),這些文章提供詳細資訊:


