Azure DevOps 服務 |Azure DevOps Server 2022 - Azure DevOps Server 2019
你可以使用 Azure DevOps 管線來自動化機器學習生命週期。 你可以自動化的一些操作包括:
- 資料準備(擷取、轉換、載入操作)。
- 透過按需擴容和擴充來訓練機器學習模型。
- 將機器學習模型部署為公開或私有的網路服務。
- 監控已部署的機器學習模型(例如用於效能或資料漂移分析)。
本文說明如何建立一套 Azure 管線,將機器學習模型建置並部署到 Azure Machine Learning。
本教學使用 Azure Machine Learning Python SDK v2 與 Azure CLI ML 擴充套件 v2。
先決條件
- 完成建立資源以開始操作的教學課程,將學到如何:
- 建立工作區。
- 建立一個雲端運算叢集 來訓練你的模型。
- 安裝 Python 3.10 或更新版本,以便在本地執行 Azure ML SDK v2 腳本。
- 安裝適用於 Azure Pipelines 的 Azure Machine Learning 擴充功能。 你可以從 Visual Studio marketplace 安裝這個擴充功能。
步驟 1:取得密碼
從 GitHub 中複製以下倉庫:
https://github.com/azure/azureml-examples
步驟二:建立專案
登入 Azure。 搜尋並選擇 Azure DevOps organizations。 選擇 「檢視我的組織」。 選擇你想使用的組織。
在你選擇的組織內,建立一個 專案。 如果你的組織裡沒有任何專案,你會看到「 建立專案以開始 」的畫面。 否則,請選擇儀表板右上角的New Project按鈕。
步驟 3:建立服務連結
你可以使用現有的服務連接。
你需要 Azure Resource Manager 連線才能與 Azure 入口網站進行認證。
在Azure DevOps中,選擇 Project settings,然後選擇 Service connections。
選擇 Create service connection,選擇 Azure Resource Manager,然後選擇 Next。
使用身份 類型 和 憑證的預設值。
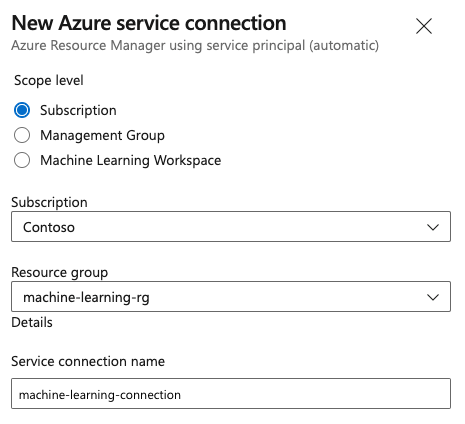
建立你的服務連結。 設定你偏好的範圍等級、訂閱、資源群組和連線名稱。
步驟四:建立管線
點到 「管線」,然後選擇 「建立管線」。
選擇 GitHub 作為原始碼的位置。
你可能會被導向到 GitHub 登入。 如果是的話,請輸入你的 GitHub 帳號。
當你看到儲存庫清單時,選擇你的儲存庫。
你可能會被導向到 GitHub 安裝 Azure Pipelines 應用程式。 如果是的話,請選擇 「批准並安裝」。
選擇 Starter pipeline。 你更新入門管道範本。
步驟 5:建立 YAML 管線以提交 Azure Machine Learning 職缺
刪除起始管線,並以以下 YAML 程式碼取代。 在此流程中,您:
- 使用 Python 版本任務來設定 Python 3.10 並安裝 SDK 需求。
- 使用 Bash 任務來執行 Azure Machine Learning SDK 和 CLI 的 bash 腳本。
- 使用 Azure CLI 任務提交 Azure Machine Learning 工作。
根據你使用的是 Azure Resource Manager 服務連線還是一般服務連線,請選擇以下其中一個分頁。 在管線 YAML中,將變數值替換成對應資源的值。
name: submit-azure-machine-learning-job

trigger:
- none

variables:
  service-connection: 'machine-learning-connection' # replace with your service connection name
  resource-group: 'machinelearning-rg' # replace with your resource group name
  workspace: 'docs-ws' # replace with your workspace name

jobs:
- job: SubmitAzureMLJob
  displayName: Submit AzureML Job
  timeoutInMinutes: 300
  pool:
    vmImage: ubuntu-latest
  steps:
  - task: UsePythonVersion@0
    displayName: Use Python >=3.10
    inputs:
      versionSpec: '>=3.10'

  - bash: |
      set -ex

      az version
      az extension add -n ml
    displayName: 'Add AzureML Extension'

  - task: AzureCLI@2
    name: submit_azureml_job_task
    displayName: Submit AzureML Job Task
    inputs:
      azureSubscription: $(service-connection)
      workingDirectory: 'cli/jobs/pipelines-with-components/nyc_taxi_data_regression'
      scriptLocation: inlineScript
      scriptType: bash
      inlineScript: |

        # submit component job and get the run name
        job_name=$(az ml job create --file single-job-pipeline.yml -g $(resource-group) -w $(workspace) --query name --output tsv)

        # set output variable for next task
        echo "##vso[task.setvariable variable=JOB_NAME;isOutput=true;]$job_name"
步驟 6:等待 Azure Machine Learning 工作完成
在步驟5,你新增了一個工作以提交 Azure Machine Learning 工作。 在此步驟中,你會新增另一個工作,等待 Azure Machine Learning 工作完成。
重要
此步驟中的等待機制(Azure Resource Manager 分頁的 AzureMLJobWaitTask@1 任務與 Generic 分頁的 InvokeRESTAPI@1 webhook 註冊)都依賴於工作結束後Azure Machine Learning向 Azure DevOps 發送 RunTerminated 通知。 此通知路徑目前正在調查中,可能未如預期完成,導致 WaitFor* 伺服器工作逾時,而非反映 Azure Machine Learning 工作狀態。 若遇到此行為,請使用az ml job show --query status輪詢代理工作中的作業狀態,直到返回終端狀態(Completed、Failed或Canceled),並以匹配狀態結束任務。
如果你使用 Resource Manager 服務連線,可以使用 機器學習 擴充功能。 你可以在 Azure DevOps extensions Marketplace 搜尋此擴充功能,或直接到 extension 頁面。 安裝 機器學習 擴充功能。
重要
不要安裝 機器學習(經典版) 擴充功能。 那是一個較舊的擴充功能,沒有提供相同的功能。
在管線審查視窗中,新增一個伺服器工作。 在作業的步驟部分中,選取顯示小幫手,然後搜尋 AzureML。 選擇 AzureML 工作等待 任務,然後提供該工作資訊。
此任務有四個輸入:Service Connection、Azure Resource Group Name、AzureML Workspace Name 以及 AzureML Job Name。 輸入這些資料。 這些步驟的最終 YAML 與以下範例相似:
註
- Azure Machine Learning 的作業等待任務會在伺服器作業上執行,不使用昂貴的代理資源池,並且不需要額外收費。 伺服器工作(以
pool: server表示)會和你的管線在同一台機器上執行。 欲了解更多資訊,請參閱 伺服器職缺。 - 一項 Azure Machine Learning 作業的等候工作只能用來等候一項作業。 您需要為每個想要等候的作業都個別設定一項工作。
- Azure Machine Learning 的工作等待任務最多可等待兩天。 這個限制是由 Azure DevOps 管線設定的硬性限制。
- job: WaitForAzureMLJobCompletion
  displayName: Wait for AzureML Job Completion
  pool: server
  timeoutInMinutes: 0
  dependsOn: SubmitAzureMLJob
  variables:
    # Save the name of the azureMl job submitted in the previous step to a variable. It will be used as an input to the AzureML Job Wait task.
    azureml_job_name_from_submit_job: $[ dependencies.SubmitAzureMLJob.outputs['submit_azureml_job_task.JOB_NAME'] ]
  steps:
  - task: AzureMLJobWaitTask@1
    inputs:
      serviceConnection: $(service-connection)
      resourceGroupName: $(resource-group)
      azureMLWorkspaceName: $(workspace)
      azureMLJobName: $(azureml_job_name_from_submit_job)
步驟 7:提交管線並確認管線執行
選擇 儲存並執行。 當第 6 步的等待機制如設計運作時,管線會等待 Azure Machine Learning 工作完成,並在 WaitForJobCompletion 下以與 Azure Machine Learning 工作相同的狀態結束任務。 例如:
Azure Machine Learning 作業
Succeeded==WaitForJobCompletion作業Succeeded中的 Azure DevOps 任務Azure Machine Learning 作業
Failed==WaitForJobCompletion作業Failed中的 Azure DevOps 任務Azure Machine Learning 作業
Cancelled==WaitForJobCompletion作業Cancelled中的 Azure DevOps 任務
註
由於步驟 6 中所提及的問題,WaitFor* 作業可能會逾時,而非反映 Azure Machine Learning 作業狀態。 使用 Azure Machine Learning 工作室 確認實際的工作結果,直到通知路徑恢復。
提示
你可以在Azure Machine Learning 工作室中查看完整的Azure Machine Learning工作。
清理資源
如果你不打算繼續使用你的管線,請刪除你的 Azure DevOps 專案。 在 Azure 入口網站中,刪除你的資源群組和 Azure Machine Learning 實例。