在 Azure Machine Learning 中使用已登錄模型
適用於: Azure CLI ml 延伸模組 v2 (目前)
 Python SDK azure-ai-ml v2 (目前)
本文將說明如何使用下列方式在 Azure Machine Learning 中登錄和使用模型:
- Azure Machine Learning 工作室 UI。
- Azure Machine Learning V2 CLI。
- Python Azure Machine Learning V2 SDK。
您將學習如何:
- 從本機檔案、資料存放區或作業輸出在模型登錄中建立已登錄的模型。
- 使用不同類型的模型,例如自訂、MLflow 和 Triton。
- 在定型作業中使用模型作為輸入或輸出。
- 管理模型資產的生命週期。
註冊模型
註冊模型可讓您在 Azure 雲端的工作區內儲存模型,以及設定模型的版本。 模型登錄可協助您組織和追蹤已定型模型。 您可以使用 Azure CLI、Python SDK 或 Machine Learning 工作室 UI,將模型登錄為 Azure Machine Learning 中的資產。
支援的路徑
若要登錄模型,您必須指定指向資料或作業位置的路徑。 以下表格顯示 Azure Machine Learning 支援的各種資料位置,以及 path 參數的語法:
| Location | 語法 |
|---|---|
| 本機電腦 | <model-folder>/<model-filename> |
| Azure Machine Learning 資料存放區 | azureml://datastores/<datastore-name>/paths/<path_on_datastore> |
| Azure Machine Learning 作業 | azureml://jobs/<job-name>/outputs/<output-name>/paths/<path-to-model-relative-to-the-named-output-location> |
| MLflow 作業 | runs:/<run-id>/<path-to-model-relative-to-the-root-of-the-artifact-location> |
| Machine Learning 工作區中的模型資產 | azureml:<model-name>:<version> |
| Machine Learning 登錄中的模型資產 | azureml://registries/<registry-name>/models/<model-name>/versions/<version> |
支援的模式
您將模型用於輸入或輸出時,可以指定下列模式的其中之一。 例如您可以指定模型是否應該唯讀裝載,或下載至計算目標。
ro_mount:將資料裝載至計算目標做為唯讀。rw_mount:讀寫裝載資料。download:將資料下載至計算目標。upload:由計算目標上傳資料。direct:在 URI 之中以字串的形式傳遞。
以下表格顯示不同模型類型輸入和輸出的可用模式選項。
| 類型 | upload |
download |
ro_mount |
rw_mount |
direct |
|---|---|---|---|---|---|
custom 檔案輸入 |
|||||
custom 資料夾輸入 |
✓ | ✓ | ✓ | ||
mlflow 輸入 |
✓ | ✓ | |||
custom 檔案輸出 |
✓ | ✓ | ✓ | ||
custom 資料夾輸出 |
✓ | ✓ | ✓ | ||
mlflow 輸出 |
✓ | ✓ | ✓ |
必要條件
- 具有免費或付費版 Azure Machine Learning 的 Azure 訂用帳戶。 如尚未擁有 Azure 訂用帳戶,請在開始之前先建立免費帳戶。
- Azure Machine Learning 工作區。
若要使用 Azure Machine Learning V2 CLI 或 Python Azure Machine Learning V2 SDK 執行本文中的程式碼範例,您也需要:
已安裝 Azure CLI version 2.38.0 版或更新版本。
執行下列命令以安裝
ml擴充 V2。 如需詳細資訊,請參閱安裝、設定和使用 CLI (v2)。az extension add -n ml
注意
V2 提供完整的回溯相容性。 您仍然可以從 v1 SDK 或 CLI 使用模型資產。 所有以 v1 CLI 或 SDK 登錄的模型都會獲指派類型 custom。
使用工作室 UI 登錄模型
若要使用 Azure Machine Learning 工作室 UI 登錄模型:
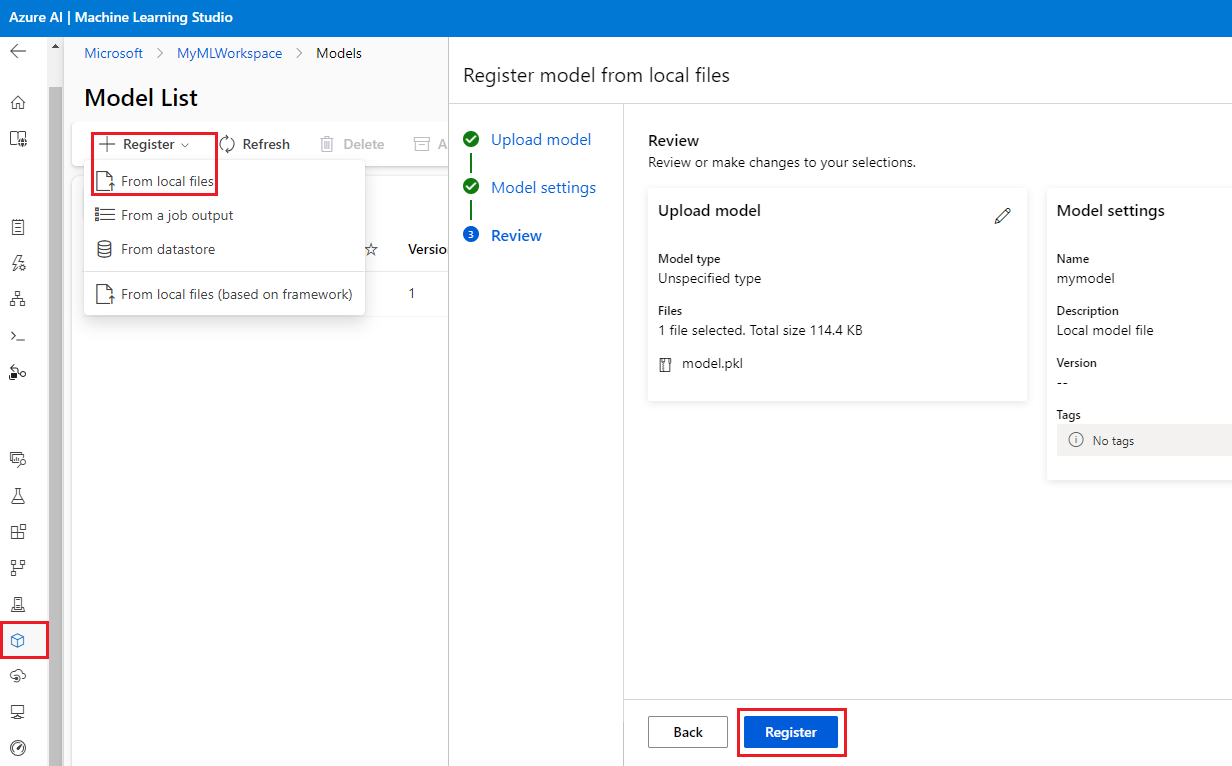
在工作室的工作區中,從左側瀏覽中選取 [模型]。
在 [模型清單] 頁面選取 [登錄],然後從下拉式清單中選取下列其中一個位置:
- [從本機檔案]
- [從作業輸出]
- [從資料存放區]
- [從本機檔案 (依據架構)]
在第一個 [登錄模型] 畫面上:
- 瀏覽至模型的本機檔案、資料存放區或作業輸出。
- 選取輸入模型類型:[MLflow]、[Triton]或 [未指定類型]。
在 [模型設定] 畫面提供已登錄模型的名稱和其他選用設定,然後選取 [下一頁]。
在 [檢閱] 畫面檢閱設定,然後選取 [登錄]。
使用 Azure CLI 或 Python SDK 登錄模型
下列程式碼片段說明如何使用 Azure CLI 或 Python SDK,在 Azure Machine Learning 中將模型登錄為資產。 這些程式碼片段會使用 custom 和 mlflow 模型類型。
custom類型是指以 Azure Machine Learning 目前不支援的自訂標準所定型的模型檔案或資料夾。mlflow是指以 MLflow 定型的模型。 MLflow 定型模型位於資料夾中,其中包含 MLmodel 檔案、模型檔案、conda 相依性檔案,以及 requirements.txt 檔案。
提示
您可在 azureml-examples 存放庫執行 model.ipynb 筆記本,以遵循下列範例的 Python 版本。
連線到您的工作區
工作區是 Azure Machine Learning 的最上層資源,其提供一個集中位置來處理您在使用 Azure Machine Learning 時建立的所有成品。 在本節中,您會連線到 Azure Machine Learning 工作區,以建立已登錄的模型。
請執行
az login並遵循提示以登入 Azure。在下列命令中,將
<subscription-id>、<workspace-name>、<resource-group>和<location>預留位置取代為您環境的值。az account set --subscription <subscription-id> az configure --defaults workspace=<workspace-name> group=<resource-group> location=<location>
建立已登錄的模型
您可以從下列模型建立已登錄模型:
- 位於本機電腦的模型。
- 位於 Azure Machine Learning 資料存放區的模型。
- 由 Azure Machine Learning 作業輸出的模型。
本機檔案或資料夾
建立名為 <file-name>.yml 的 YAML 檔案。 在檔案中提供已登錄模型的名稱、本機模型檔案的路徑以及說明。 例如:
$schema: https://azuremlschemas.azureedge.net/latest/model.schema.json
name: local-file-example
path: mlflow-model/model.pkl
description: Model created from local file.
執行下列命令,並使用您 YAML 檔案的名稱:
az ml model create -f <file-name>.yml
如需完整範例,請參閱模型 YAML。
Datastore
您可以使用下列任何支援的 URI 格式從雲端路徑建立模型。
下列範例會使用速記 azureml 配置,以使用語法 azureml://datastores/<datastore-name>/paths/<path_on_datastore> 來指向資料存放區上的路徑。
az ml model create --name my-model --version 1 --path azureml://datastores/myblobstore/paths/models/cifar10/cifar.pt
如需完整範例,請參閱 CLI 參考。
作業輸出
如果您的模型資料來自作業輸出,您有兩個選項可用來指定模型路徑。 您可以使用 MLflow runs: URI 格式或使用 azureml://jobs URI 格式。
注意
成品保留關鍵字代表從預設成品位置輸出。
MLflow 執行:URI 格式
此選項最適合 MLflow 使用者,因為這類使用者可能已熟悉 MLflow
runs:URI 格式。 此選項可從預設成品位置中的成品建立模型 (所有 MLflow 記錄的模型和成品所在位置)。 此選項也會在已登錄的模型與模型來自的執行之間建立譜系。格式:
runs:/<run-id>/<path-to-model-relative-to-the-root-of-the-artifact-location>範例:
az ml model create --name my-registered-model --version 1 --path runs:/my_run_0000000000/model/ --type mlflow_model
azureml://作業 URI 格式
azureml://jobs參考 URI 選項可讓您從任何作業輸出路徑的成品登錄模型。 此格式與現有azureml://datastores參考 URI 格式一致,也支援從預設成品位置以外的具名輸出參考成品。如果您沒有使用 MLflow 在定型指令碼中直接登錄模型,您可使用此選項在已登錄模型與定型該模型的作業之間建立譜系。
格式:
azureml://jobs/<run-id>/outputs/<output-name>/paths/<path-to-model>- 預設成品位置:
azureml://jobs/<run-id>/outputs/artifacts/paths/<path-to-model>/。 這個位置相當於 MLflowruns:/<run-id>/<model>。 - 具名輸出資料夾:
azureml://jobs/<run-id>/outputs/<named-output-folder> - 具名輸出資料夾內的特定檔案:
azureml://jobs/<run-id>/outputs/<named-output-folder>/paths/<model-filename> - 具名輸出資料夾內的特定資料夾路徑:
azureml://jobs/<run-id>/outputs/<named-output-folder>/paths/<model-folder-name>
範例:
從具名輸出資料夾儲存模型:
az ml model create --name run-model-example --version 1 --path azureml://jobs/my_run_0000000000/outputs/artifacts/paths/model/如需完整範例,請參閱 CLI 參考。
- 預設成品位置:
使用模型進行定型
v2 Azure CLI 和 Python SDK 也可讓您在定型作業中使用模型作為輸入或輸出。
在定型作業中使用模型作為輸入
建立作業規格 YAML 檔案 <file-name>.yml。 在作業的
inputs區段中指定:- 模型
type,可為mlflow_model、custom_model或triton_model。 - 模型所在的
path可以是下列範例註解中所列的任何路徑。
$schema: https://azuremlschemas.azureedge.net/latest/commandJob.schema.json # Possible Paths for models: # AzureML Datastore: azureml://datastores/<datastore-name>/paths/<path_on_datastore> # MLflow run: runs:/<run-id>/<path-to-model-relative-to-the-root-of-the-artifact-location> # Job: azureml://jobs/<job-name>/outputs/<output-name>/paths/<path-to-model-relative-to-the-named-output-location> # Model Asset: azureml:<my_model>:<version> command: | ls ${{inputs.my_model}} inputs: my_model: type: mlflow_model # List of all model types here: https://learn.microsoft.com/azure/machine-learning/reference-yaml-model#yaml-syntax path: ../../assets/model/mlflow-model environment: azureml://registries/azureml/environments/sklearn-1.5/labels/latest- 模型
執行下列命令,取代為您的 YAML 檔案名稱。
az ml job create -f <file-name>.yml
如需完整範例,請參閱模型 GitHub 存放庫。
將模型寫入為作業的輸出
您的作業可使用「輸出」將模型寫入至您的雲端式儲存體。
建立作業規格 YAML 檔案 <file-name>.yml。 使用輸出模型類型和路徑填入
outputs區段。$schema: https://azuremlschemas.azureedge.net/latest/commandJob.schema.json # Possible Paths for Model: # Local path: mlflow-model/model.pkl # AzureML Datastore: azureml://datastores/<datastore-name>/paths/<path_on_datastore> # MLflow run: runs:/<run-id>/<path-to-model-relative-to-the-root-of-the-artifact-location> # Job: azureml://jobs/<job-name>/outputs/<output-name>/paths/<path-to-model-relative-to-the-named-output-location> # Model Asset: azureml:<my_model>:<version> code: src command: >- python hello-model-as-output.py --input_model ${{inputs.input_model}} --custom_model_output ${{outputs.output_folder}} inputs: input_model: type: mlflow_model # mlflow_model,custom_model, triton_model path: ../../assets/model/mlflow-model outputs: output_folder: type: custom_model # mlflow_model,custom_model, triton_model environment: azureml://registries/azureml/environments/sklearn-1.5/labels/latest使用 CLI 建立作業:
az ml job create --file <file-name>.yml
如需完整範例,請參閱模型 GitHub 存放庫。
管理模型
Azure CLI 及 Python SDK 也可讓您管理 Azure Machine Learning 模型資產的生命週期。
清單
列出工作區中的所有模型:
az ml model list
列出指定名稱下的所有模型版本:
az ml model list --name run-model-example
顯示
取得特定模型的詳細資料:
az ml model show --name run-model-example --version 1
更新
更新特定模型的可變屬性:
重要
模型只能更新 description 和 tags。 其他都是不可變的屬性;如果您需要變更任何屬性,請建立新版本的模型。
az ml model update --name run-model-example --version 1 --set description="This is an updated description." --set tags.stage="Prod"
封存
如果封存模型,預設會將其從清單查詢 (例如 az ml model list) 隱藏。 您可以繼續在工作流程中參考並使用封存的模型。
您可以封存模型的所有版本或僅封存特定版本。 如果您未指定版本,則會封存模型的所有版本。 如果您在封存模型容器下建立新的模型版本,該新版本也會自動設定為封存。
封存模型的所有版本:
az ml model archive --name run-model-example
封存特定模型版本:
az ml model archive --name run-model-example --version 1
