適用於: Azure CLI ml 延伸模組 v2 (目前)Python SDK azure-ai-ml v2 (目前)
在 Azure Machine Learning 中,您可以使用模型監視來持續追蹤生產環境中機器學習模型的效能。 模型監控讓您能全面掌握監控指標。 它也會提醒您有潛在問題。 當您監視生產環境中模型的訊號和效能計量時,可以大幅評估模型固有的風險。 您也可以識別可能對您的業務造成負面影響的盲點。
在本文中,您將瞭解如何執行下列工作:
- 針對部署至 Azure Machine Learning 線上端點的模型執行立即可用和進階監視設定
- 針對生產環境中的模型監視效能計量
- 針對部署在 Azure Machine Learning 外部或部署至 Azure Machine Learning 批次端點的模型設定監視
- 設定自訂訊號和計量以用於模型監視
- 解譯監視結果
- 整合 Azure Machine Learning 模型監視與 Azure 事件方格
先決條件
Azure CLI 和
mlAzure CLI 的擴充功能,已安裝並設定。 如需詳細資訊,請參閱 安裝和設定 CLI (v2) 。Bash 殼層或相容的殼層,例如 Linux 系統上的殼層或 Windows 子系統 Linux 版 (部分內容可能是機器或 AI 翻譯)。 本文中的 Azure CLI 範例假設您使用這種類型的終端機。
Azure Machine Learning 工作區。 如需建立工作區的指示,請參閱 設定。
至少具有下列其中一個 Azure 角色型存取控制 (Azure RBAC) 角色的用戶帳戶:
- Azure Machine Learning 工作區的擁有者角色
- Azure Machine Learning 工作區的參與者角色
- 具有
Microsoft.MachineLearningServices/workspaces/onlineEndpoints/*許可權的自定義角色
如需詳細資訊,請參閱 管理 Azure Machine Learning 工作區。
用於監控 Azure Machine Learning 管理的線上端點或 Kubernetes 線上端點:
部署至 Azure Machine Learning 在線端點的模型。 支援受控在線端點和 Kubernetes 在線端點。 如需將模型部署至 Azure Machine Learning 在線端點的指示,請參閱 使用在線端點部署和評分機器學習模型。
為您的模型部署啟用資料收集。 您可以在 Azure Machine Learning 線上端點的部署步驟期間啟用資料收集。 如需詳細資訊,請參閱從部署的模型收集生產資料以進行即時推斷。
若要監視部署至 Azure Machine Learning 批次端點或部署在 Azure Machine Learning 外部的模型:
- 收集生產數據並將其註冊為 Azure Machine Learning 數據資產的方法
- 持續更新已註冊數據資產以進行模型監視的方法
- (建議)在 Azure Machine Learning 工作區中註冊模型,以進行譜系追蹤
設定無伺服器 Spark 計算集區
模型監視作業會排程在無伺服器 Spark 計算集區上執行。 支援下列 Azure 虛擬機器實例類型:
- Standard_E4s_v3
- Standard_E8s_v3
- Standard_E16s_v3
- Standard_E32s_v3
- Standard_E64s_v3
若要在遵循本文中的程式時指定虛擬機實例類型,請採取下列步驟:
當您使用 Azure CLI 來建立監視器時,您會使用 YAML 組態檔。 在該檔案中,將 create_monitor.compute.instance_type 值設定為您想要使用的型別。
設定立即可用的模型監視
請考慮在 Azure Machine Learning 在線端點中將模型部署至生產環境的案例,並在部署時間啟用 數據收集 。 在此情況下,Azure Machine Learning 會收集生產推斷數據,並自動將其儲存在 Azure Blob 記憶體中。 您可以使用 Azure Machine Learning 模型監視來持續監視此生產推斷數據。
您可以使用 Azure CLI、Python SDK 或工作室進行立即可用的模型監視設定。 立即可用的模型監視組態提供下列監視功能:
- Azure Machine Learning 會自動偵測與 Azure Machine Learning 在線部署相關聯的生產推斷數據資產,並使用數據資產進行模型監視。
- 比較參考數據資產會設定為最近的過去生產推斷數據資產。
- 監視設定會自動包含並追蹤下列內建監視訊號:數據漂移、預測漂移和數據品質。 針對每個監視訊號,Azure Machine Learning 會使用:
- 最近的過去生產推斷資料資產作為比較參考資料資產。
- 計量和閾值的智慧預設值。
- 監視作業已設定為依一般排程執行。 該作業會取得監視訊號,並根據其對應的閾值評估每個計量結果。 根據預設,當超過任何閾值時,Azure Machine Learning 會將警示電子郵件傳送給設定監視器的使用者。
若要設定立即可用的模型監視,請執行下列步驟。
在 Azure CLI 中,您可以使用 az ml schedule 來排程監視作業。
在 YAML 檔案中建立監視定義。 如需現成的定義範例,請參閱下列 YAML 程式碼,該程式碼也可在 azureml-examples 存放庫中取得。
使用此定義之前,請先調整值以符合您的環境。 針對
endpoint_deployment_id,請使用 格式azureml:<endpoint-name>:<deployment-name>的值。# out-of-box-monitoring.yaml $schema: http://azureml/sdk-2-0/Schedule.json name: credit_default_model_monitoring display_name: Credit default model monitoring description: Credit default model monitoring setup with minimal configurations trigger: # perform model monitoring activity daily at 3:15am type: recurrence frequency: day #can be minute, hour, day, week, month interval: 1 # #every day schedule: hours: 3 # at 3am minutes: 15 # at 15 mins after 3am create_monitor: compute: # specify a spark compute for monitoring job instance_type: standard_e4s_v3 runtime_version: "3.4" monitoring_target: ml_task: classification # model task type: [classification, regression, question_answering] endpoint_deployment_id: azureml:credit-default:main # azureml endpoint deployment id alert_notification: # emails to get alerts emails: - abc@example.com - def@example.com執行下列命令以建立模型:
az ml schedule create -f ./out-of-box-monitoring.yaml
![Azure Machine Learning Studio 工作區 [監視] 頁面的螢幕快照,其中已醒目提示 [監視] 和 [新增] 按鈕,並顯示一些監視器。](media/how-to-monitor-models/add-model-monitoring.png?view=azureml-api-2#lightbox)

設定進階模型監視
Azure Machine Learning 提供許多持續模型監視的功能。 如需這項功能的完整清單,請參閱 模型監視的功能。 在許多情況下,您需要設定支援進階監視工作的模型監視。 下一節提供一些進階監視範例:
- 使用多個監視訊號以獲得全面視野
- 使用歷程記錄模型定型數據或驗證數據作為比較參考數據資產
- 監測 N 個最重要特徵及個別特徵
設定特徵重要性
特徵重要性代表每個輸入特徵對模型輸出的相對重要性。 例如,溫度可能比海拔對模型的預測更重要。 當您開啟特徵重要度時,您可以對實際執行環境中不想發生漂移或有資料品質問題的特徵提供可見度。
若要開啟任何訊號的特徵重要度 (例如資料漂移或資料品質),您需要提供:
- 您的訓練資料資產作為
reference_data資料資產。 - 屬性
reference_data.data_column_names.target_column,這是模型輸出數據行或預測數據行的名稱。
開啟功能重要性之後,您會看到您在 Azure Machine Learning Studio 中監視的每個功能的功能重要性。
當您使用 Python SDK 或 Azure CLI 時,您可以設定 alert_enabled 屬性來開啟或關閉每個訊號的警示。
您可以使用 Azure CLI、Python SDK 或 Studio 來設定進階模型監視。
在 YAML 檔案中建立監視定義。 如需範例進階定義,請參閱下列 YAML 程式代碼,這也適用於 azureml-examples 存放庫。
使用此定義之前,請調整下列設定和任何其他設定,以符合您的環境需求:
- 針對
endpoint_deployment_id,請使用 格式azureml:<endpoint-name>:<deployment-name>的值。 - 在
path參考輸入數據區段中,請使用格式為azureml:<reference-data-asset-name>:<version>的值。 - 針對
target_column,請使用輸出資料列的名稱,其中包含模型預測的值,例如DEFAULT_NEXT_MONTH。 - 針對
features,列出您想要在進階資料質量訊號中使用的功能,例如SEX、EDUCATION和AGE。 - 請在
emails下方列出您想要用來接收通知的電子郵件地址。
# advanced-model-monitoring.yaml $schema: http://azureml/sdk-2-0/Schedule.json name: fraud_detection_model_monitoring display_name: Fraud detection model monitoring description: Fraud detection model monitoring with advanced configurations trigger: # perform model monitoring activity daily at 3:15am type: recurrence frequency: day #can be minute, hour, day, week, month interval: 1 # #every day schedule: hours: 3 # at 3am minutes: 15 # at 15 mins after 3am create_monitor: compute: instance_type: standard_e4s_v3 runtime_version: "3.4" monitoring_target: ml_task: classification endpoint_deployment_id: azureml:credit-default:main monitoring_signals: advanced_data_drift: # monitoring signal name, any user defined name works type: data_drift # reference_dataset is optional. By default referece_dataset is the production inference data associated with Azure Machine Learning online endpoint reference_data: input_data: path: azureml:credit-reference:1 # use training data as comparison reference dataset type: mltable data_context: training data_column_names: target_column: DEFAULT_NEXT_MONTH features: top_n_feature_importance: 10 # monitor drift for top 10 features alert_enabled: true metric_thresholds: numerical: jensen_shannon_distance: 0.01 categorical: pearsons_chi_squared_test: 0.02 advanced_data_quality: type: data_quality # reference_dataset is optional. By default reference_dataset is the production inference data associated with Azure Machine Learning online endpoint reference_data: input_data: path: azureml:credit-reference:1 type: mltable data_context: training features: # monitor data quality for 3 individual features only - SEX - EDUCATION alert_enabled: true metric_thresholds: numerical: null_value_rate: 0.05 categorical: out_of_bounds_rate: 0.03 feature_attribution_drift_signal: type: feature_attribution_drift # production_data: is not required input here # Please ensure Azure Machine Learning online endpoint is enabled to collected both model_inputs and model_outputs data # Azure Machine Learning model monitoring will automatically join both model_inputs and model_outputs data and used it for computation reference_data: input_data: path: azureml:credit-reference:1 type: mltable data_context: training data_column_names: target_column: DEFAULT_NEXT_MONTH alert_enabled: true metric_thresholds: normalized_discounted_cumulative_gain: 0.9 alert_notification: emails: - abc@example.com - def@example.com- 針對
執行下列命令以建立模型:
az ml schedule create -f ./advanced-model-monitoring.yaml
![[設定數據資產] 頁面的螢幕快照,其中一些數據資產列在數據表中,並醒目提示 [新增] 按鈕。](media/how-to-monitor-models/model-monitoring-advanced-configuration-data.png?view=azureml-api-2#lightbox)
![[選取監視訊號] 頁面的螢幕快照。會顯示三個預設監視訊號和按鈕,用於新增、編輯和刪除訊號。](media/how-to-monitor-models/model-monitoring-monitoring-signals.png?view=azureml-api-2#lightbox)
![數據漂移訊號的 [編輯訊號] 頁面螢幕快照。可見五個步驟,提供設定各種設定的方式。](media/how-to-monitor-models/model-monitoring-configure-signals.png?view=azureml-api-2#lightbox)
![[編輯訊號] 頁面的螢幕擷取畫面。已醒目提示 [特徵屬性偏移] 索引標籤,有四個步驟提供設定各種設定的方法。](media/how-to-monitor-models/model-monitoring-configure-feature-attribution-drift.png?view=azureml-api-2#lightbox)
![[選取監視訊號] 頁面的螢幕快照,其中顯示三個默認訊號和特徵屬性漂移訊號。](media/how-to-monitor-models/model-monitoring-configured-signals.png?view=azureml-api-2#lightbox)
![[檢閱監視詳細數據] 頁面的螢幕快照。基本設定、三個已設定的數據資產,以及四個已設定的訊號都可見。](media/how-to-monitor-models/model-monitoring-advanced-configuration-review.png?view=azureml-api-2#lightbox)
設定模型效能監視
當您使用 Azure Machine Learning 模型監視時,您可以計算其效能計量,以追蹤生產環境中模型的效能。 目前支援下列模型效能計量:
- 對於分類模型:
- Precision
- 精確度
- 召回
- 對於回歸模型:
- 平均絕對誤差 (MAE)
- 平均平方誤差 (MSE)
- 均方根誤差 (RMSE)
模型效能監視的必要條件
生產模型的輸出數據(模型預測),每個數據列都有唯一標識符。 如果您使用 Azure Machine Learning 數據收集器 來收集生產數據,則會針對每個推斷要求提供相互關聯標識符。 數據收集器也提供從應用程式記錄您自己的唯一標識碼的選項。
附註
針對 Azure Machine Learning 模型效能監視,建議您使用 Azure Machine Learning 數據收集器 ,在自己的數據行中記錄您的唯一標識符。
每個資料列唯一識別碼的有根據事實資料(實際值)。 指定數據列的唯一標識碼應該符合該特定推斷要求之模型輸出數據的唯一標識碼。 此唯一標識碼可用來將基礎真實數據資產與模型輸出數據聯結。
如果您沒有基礎真相數據,則無法執行模型效能監視。 在應用層級遇到有根據事實資料,所以您有責任在可用時加以收集。 您也應該在 Azure Machine Learning 中維護包含這項有根據事實資料的資料資產。
(選用) 具有預先聯結的表格式資料資產,且模型輸出資料和已聯結的有根據事實資料。
當您使用資料收集器時的模型效能監視需求
當您符合下列準則時,Azure Machine Learning 會為您產生相互關聯標識符:
- 您可以使用 Azure Machine Learning 數據收集器 來收集生產推斷數據。
- 您不會為每個資料列提供一個唯一ID做為個別的欄位。
產生的相互關聯標識碼會包含在記錄的 JSON 物件中。 不過,數據收集器 會批處理 彼此在短時間間隔內傳送的數據列。 批次數據列落在相同的 JSON 物件內。 在每個物件中,所有數據列都有相同的相互關聯標識碼。
為了區分 JSON 對象中的數據列,Azure Machine Learning 模型效能監視會使用索引來判斷物件內數據列的順序。 例如,如果批次包含三個數據列,而相互關聯標識碼為 test,則第一個數據列具有的識別碼 test_0、第二個數據列的識別碼為 ,而第三個數據列 test_1的識別碼 test_2為 。 若要將基礎事實數據資產的唯一標識碼與所收集生產推斷模型輸出數據的標識符相符,請適當地將索引套用至每個相互關聯標識碼。 如果記錄的 JSON 物件只有一個數據列,請使用 correlationid_0 作為 correlationid 值。
若要避免使用此索引編製,建議您在單獨欄位中記錄唯一ID。 將該數據行放在 Azure Machine Learning 數據收集器 記錄的 pandas 數據框架中。 在模型監視組態中,您接著可以指定此資料行的名稱,以將模型輸出數據與您的基礎事實數據聯結。 只要這兩個數據資產中的每個數據列標識符都相同,Azure Machine Learning 模型監視就可以執行模型效能監視。
監視模型效能的範例工作流程
若要瞭解與模型效能監視相關聯的概念,請考慮下列範例工作流程。 其適用於您部署模型以預測信用卡交易是否為詐騙的案例:
- 將您的部署設定為使用資料收集器來收集模型的生產推斷資料 (輸入和輸出資料)。 將輸出資料儲存在名為
is_fraud的數據行中。 - 針對所收集推斷資料的每個資料列,記錄唯一識別碼。 唯一標識碼可以來自您的應用程式,或者您可以使用
correlationidAzure Machine Learning 針對每個記錄的 JSON 物件唯一產生的值。 - 當有根據事實 (或實際)
is_fraud資料可用時,記錄每個資料列並將它對應至模型輸出資料中為對應資料列記錄的相同唯一識別碼。 - 在 Azure Machine Learning 中註冊數據資產,並使用它來收集和維護基本事實
is_fraud數據。 - 建立一個模型效能監控訊號,使用唯一ID欄位來結合模型的生產預測數據和真實數據資產。
- 計算模型效能計量。
滿足 模型效能監視的必要條件之後,請採取下列步驟來設定模型監視:
在 YAML 檔案中建立監視定義。 下列範例規格會使用生產推斷數據來定義模型監視。 使用此定義之前,請調整下列設定和任何其他設定,以符合您的環境需求:
- 針對
endpoint_deployment_id,請使用 格式azureml:<endpoint-name>:<deployment-name>的值。 - 針對輸入數據區段中的每個
path值,請使用 格式azureml:<data-asset-name>:<version>的值。 - 若要針對
prediction值,請使用包含模型預測值的輸出欄位名稱。 - 對於
actual值,請使用有根據事實資料行的名稱,該資料行包含模型嘗試預測的實際值。 - 對於
correlation_id值,請使用用來聯結輸出數據和地面真實數據的欄位名稱。 - 請在
emails下方列出您想要用來接收通知的電子郵件地址。
# model-performance-monitoring.yaml $schema: http://azureml/sdk-2-0/Schedule.json name: model_performance_monitoring display_name: Credit card fraud model performance description: Credit card fraud model performance trigger: type: recurrence frequency: day interval: 7 schedule: hours: 10 minutes: 15 create_monitor: compute: instance_type: standard_e8s_v3 runtime_version: "3.3" monitoring_target: ml_task: classification endpoint_deployment_id: azureml:loan-approval-endpoint:loan-approval-deployment monitoring_signals: fraud_detection_model_performance: type: model_performance production_data: input_data: path: azureml:credit-default-main-model_outputs:1 type: mltable data_column_names: prediction: is_fraud correlation_id: correlation_id reference_data: input_data: path: azureml:my_model_ground_truth_data:1 type: mltable data_column_names: actual: is_fraud correlation_id: correlation_id data_context: ground_truth alert_enabled: true metric_thresholds: tabular_classification: accuracy: 0.95 precision: 0.8 alert_notification: emails: - abc@example.com- 針對
執行下列命令以建立模型:
az ml schedule create -f ./model-performance-monitoring.yaml
![[設定數據資產] 頁面的螢幕快照。可見兩個已設定的數據資產,並醒目提示 [新增] 按鈕。](media/how-to-monitor-models/model-monitoring-configure-data-asset.png?view=azureml-api-2#lightbox)
![[設定資料資產] 頁面的螢幕擷取畫面。可看見有根據事實、輸入和輸出資料資產。輸出和有根據事實資產會醒目提示。](media/how-to-monitor-models/model-monitoring-added-ground-truth-data-asset.png?view=azureml-api-2#lightbox)
![[編輯訊號] 頁面的螢幕快照。[模型效能] 索引標籤隨即開啟,且會顯示三個步驟,以提供設定各種設定的方式。](media/how-to-monitor-models/model-monitoring-configure-model-performance.png?view=azureml-api-2#lightbox)
![[選取監視訊號] 頁面的螢幕快照。可看見已設定的模型效能訊號。](media/how-to-monitor-models/model-monitoring-configured-model-performance-signal.png?view=azureml-api-2#lightbox)
![[檢閱監視詳細數據] 頁面的螢幕快照。基本設定、三個已設定的數據資產,以及一個已設定的效能訊號都可見。](media/how-to-monitor-models/model-monitoring-review-monitoring-details.png?view=azureml-api-2#lightbox)
設定生產資料的模型監視
您也可以監視部署至 Azure Machine Learning 批次端點或部署在 Azure Machine Learning 外部的模型。 如果您沒有部署,但您有生產數據,您可以使用數據來執行持續模型監視。 若要監視這些模型,您必須能夠:
- 從實際執行環境中部署的模型收集生產推斷資料。
- 將生產推斷資料註冊為 Azure Machine Learning 資料資產,並確保資料持續更新。
- 如果您未使用 數據收集器 收集數據,請提供自定義數據前置處理元件,並將其註冊為 Azure Machine Learning 元件。 如果沒有這個自定義數據前置處理元件,Azure Machine Learning 模型監視系統就無法將數據處理成支持時間範圍的表格式窗體。
您的自訂前置處理元件必須具有下列輸入和輸出簽章:
| 輸入或輸出 | 簽章名稱 | 類型 | 描述 | 範例值 |
|---|---|---|---|---|
| 輸入 | data_window_start |
常值、字串 | ISO8601格式的數據窗口開始時間 | 2023-05-01T04:31:57.012Z |
| 輸入 | data_window_end |
常值、字串 | ISO8601格式的數據時段結束時間 | 2023-05-01T04:31:57.012Z |
| 輸入 | input_data |
uri_folder | 收集的生產推斷數據,其註冊為 Azure Machine Learning 數據資產 | azureml:myproduction_inference_data:1 |
| 輸出 | preprocessed_data |
mltable | 符合參考數據架構子集的表格式數據資產 |
如需自訂資料前置處理元件的範例,請參閱 azuremml-examples GitHub 存放庫中的 custom_preprocessing。
如需註冊 Azure Machine Learning 元件的指示,請參閱 在工作區中註冊元件。
註冊生產數據和前置處理元件之後,您可以設定模型監視。
建立類似下列的監視定義 YAML 檔案。 使用此定義之前,請調整下列設定和任何其他設定,以符合您的環境需求:
- 針對
endpoint_deployment_id,請使用 格式azureml:<endpoint-name>:<deployment-name>的值。 - 針對
pre_processing_component,請使用 格式azureml:<component-name>:<component-version>的值。 指定確切的版本,例如1.0.0,而非1。 - 針對每個
path,請使用 格式azureml:<data-asset-name>:<version>的值。 - 若要針對
target_column值,請使用包含模型預測值的輸出欄位名稱。 - 請在
emails下方列出您想要用來接收通知的電子郵件地址。
# model-monitoring-with-collected-data.yaml $schema: http://azureml/sdk-2-0/Schedule.json name: fraud_detection_model_monitoring display_name: Fraud detection model monitoring description: Fraud detection model monitoring with your own production data trigger: # perform model monitoring activity daily at 3:15am type: recurrence frequency: day #can be minute, hour, day, week, month interval: 1 # #every day schedule: hours: 3 # at 3am minutes: 15 # at 15 mins after 3am create_monitor: compute: instance_type: standard_e4s_v3 runtime_version: "3.4" monitoring_target: ml_task: classification endpoint_deployment_id: azureml:fraud-detection-endpoint:fraud-detection-deployment monitoring_signals: advanced_data_drift: # monitoring signal name, any user defined name works type: data_drift # define production dataset with your collected data production_data: input_data: path: azureml:my_production_inference_data_model_inputs:1 # your collected data is registered as Azure Machine Learning asset type: uri_folder data_context: model_inputs pre_processing_component: azureml:production_data_preprocessing:1.0.0 reference_data: input_data: path: azureml:my_model_training_data:1 # use training data as comparison baseline type: mltable data_context: training data_column_names: target_column: is_fraud features: top_n_feature_importance: 20 # monitor drift for top 20 features alert_enabled: true metric_thresholds: numerical: jensen_shannon_distance: 0.01 categorical: pearsons_chi_squared_test: 0.02 advanced_prediction_drift: # monitoring signal name, any user defined name works type: prediction_drift # define production dataset with your collected data production_data: input_data: path: azureml:my_production_inference_data_model_outputs:1 # your collected data is registered as Azure Machine Learning asset type: uri_folder data_context: model_outputs pre_processing_component: azureml:production_data_preprocessing:1.0.0 reference_data: input_data: path: azureml:my_model_validation_data:1 # use training data as comparison reference dataset type: mltable data_context: validation alert_enabled: true metric_thresholds: categorical: pearsons_chi_squared_test: 0.02 alert_notification: emails: - abc@example.com - def@example.com- 針對
執行下列命令以建立模型。
az ml schedule create -f ./model-monitoring-with-collected-data.yaml
使用自訂訊號和計量設定模型監視
當您使用 Azure Machine Learning 模型監視時,您可以定義自定義訊號,並實作您選擇的任何計量來監視模型。 您可以將自定義訊號註冊為 Azure Machine Learning 元件。 當您的模型監視作業在其指定的排程上執行時,它會計算自定義訊號內定義的計量,就像針對數據漂移、預測漂移和數據品質預先建置訊號所做的一樣。
若要設定要用於模型監視的自訂訊號,您必須先定義自訂訊號,並將其註冊為 Azure Machine Learning 元件。 Azure Machine Learning 元件必須具有下列輸入和輸出簽章。
元件輸入簽章
組件輸入資料框應包含下列項目:
-
mltable結構,包含前置處理元件中已處理的數據。 - 任意數目的常值,每個常值都代表已實作計量作為自訂訊號元件的一部分。 例如,如果您實作
std_deviation計量,則需要std_deviation_threshold的輸入。 一般而言,每個指標應該有一個名為<metric-name>_threshold的輸入。
| 簽章名稱 | 類型 | 描述 | 範例值 |
|---|---|---|---|
production_data |
mltable | 符合參考數據架構子集的表格式數據資產 | |
std_deviation_threshold |
常值、字串 | 實作計量的個別臨界值 | 2 |
元件輸出簽章
元件輸出埠應具有下列簽章:
| 簽章名稱 | 類型 | 描述 |
|---|---|---|
signal_metrics |
mltable | 包含計算度量標準的 mltable 結構。 如需此簽章的架構,請參閱下一節 signal_metrics架構。 |
signal_metrics schema
元件輸出資料框架應包含四個資料列: group、 metric_name、 metric_value和 threshold_value。
| 簽章名稱 | 類型 | 描述 | 範例值 |
|---|---|---|---|
group |
常值、字串 | 要套用至自定義計量的最上層邏輯群組 | 交易金額 |
metric_name |
常值、字串 | 自訂計量的名稱 | std_deviation |
metric_value |
數值 | 自訂計量的值 | 44,896.082 |
threshold_value |
數值 | 自定義計量的臨界值 | 2 |
下表顯示計算 std_deviation 計量之自訂訊號元件的範例輸出:
| 組成群組 | metric_value | metric_name | 閾值 |
|---|---|---|---|
| 交易金額 | 44,896.082 | std_deviation | 2 |
| LOCALHOUR | 3.983 | std_deviation | 2 |
| 交易金額(美元) | 54,004.902 | std_deviation | 2 |
| DIGITALITEMCOUNT | 7.238 | std_deviation | 2 |
| PHYSICALITEMCOUNT | 5.509 | std_deviation | 2 |
若要查看自定義訊號元件定義和計量計算程式代碼的範例,請參閱 azureml-examples 存放庫中的custom_signal。
如需註冊 Azure Machine Learning 元件的指示,請參閱 在工作區中註冊元件。
在 Azure Machine Learning 中建立和註冊自定義訊號元件之後,請採取下列步驟來設定模型監視:
在 YAML 檔案中建立類似下列的監視定義。 使用此定義之前,請調整下列設定和任何其他設定,以符合您的環境需求:
- 針對
component_id,請使用 格式azureml:<custom-signal-name>:1.0.0的值。 - 在
path輸入資料區段中,請使用 格式azureml:<production-data-asset-name>:<version>的值。 - 針對
pre_processing_component:- 如果您使用 資料收集器 收集資料,您可以省略
pre_processing_component屬性。 - 如果您不使用數據收集器,而且想要使用元件來前置處理生產數據,請使用 格式
azureml:<custom-preprocessor-name>:<custom-preprocessor-version>的值。
- 如果您使用 資料收集器 收集資料,您可以省略
- 請在
emails下方列出您想要用來接收通知的電子郵件地址。
# custom-monitoring.yaml $schema: http://azureml/sdk-2-0/Schedule.json name: my-custom-signal trigger: type: recurrence frequency: day # Possible frequency values include "minute," "hour," "day," "week," and "month." interval: 7 # Monitoring runs every day when you use the value 1. create_monitor: compute: instance_type: "standard_e4s_v3" runtime_version: "3.3" monitoring_signals: customSignal: type: custom component_id: azureml:my_custom_signal:1.0.0 input_data: production_data: input_data: type: uri_folder path: azureml:my_production_data:1 data_context: test data_window: lookback_window_size: P30D lookback_window_offset: P7D pre_processing_component: azureml:custom_preprocessor:1.0.0 metric_thresholds: - metric_name: std_deviation threshold: 2 alert_notification: emails: - abc@example.com- 針對
執行下列命令以建立模型:
az ml schedule create -f ./custom-monitoring.yaml
解譯監視結果
設定模型監視器並完成第一次執行之後,您可以在 Azure Machine Learning Studio 中檢視結果。
在 Studio 的 [ 管理] 下,選取 [ 監視]。 在 [監視] 頁面中,選取模型監視器的名稱以查看其概觀頁面。 此頁面會顯示監視模型、端點和部署。 它也提供有關已設定訊號的詳細資訊。 下圖顯示監視概觀頁面,其中包含數據漂移和數據質量訊號。
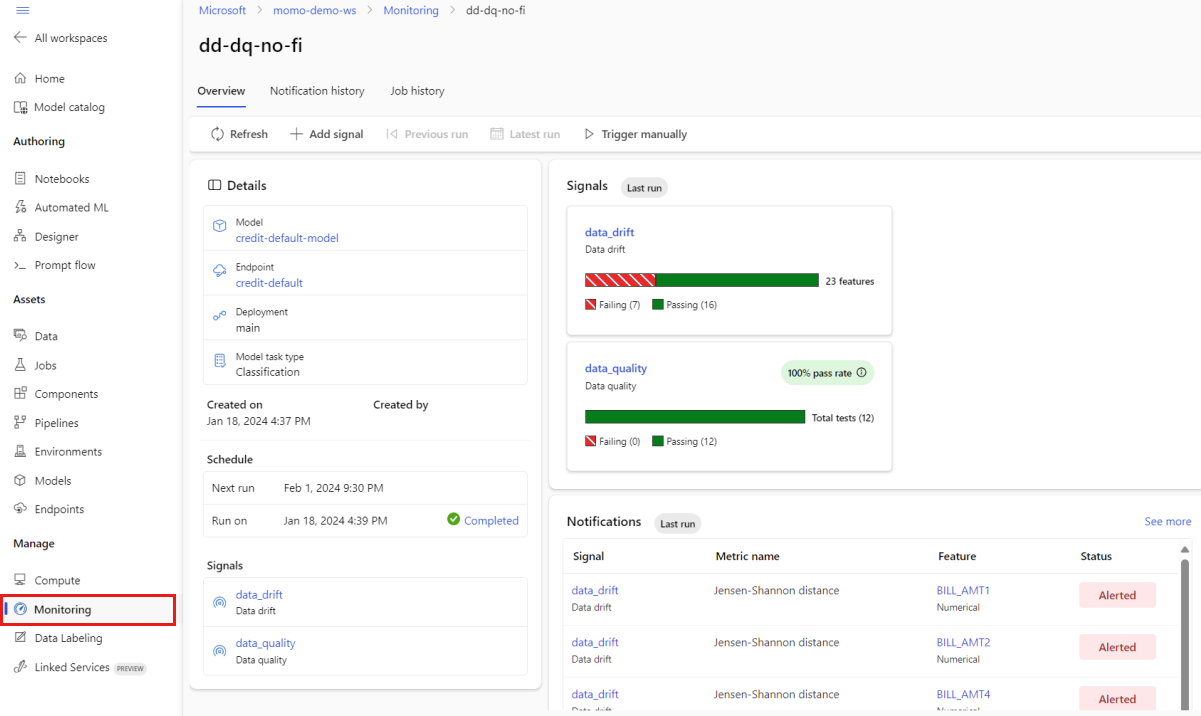
查看概觀頁面的 [ 通知] 區段。 在本節中,您可以看到每個訊號的特徵,這些訊號超過其各自衡量指標的已設定閾值。
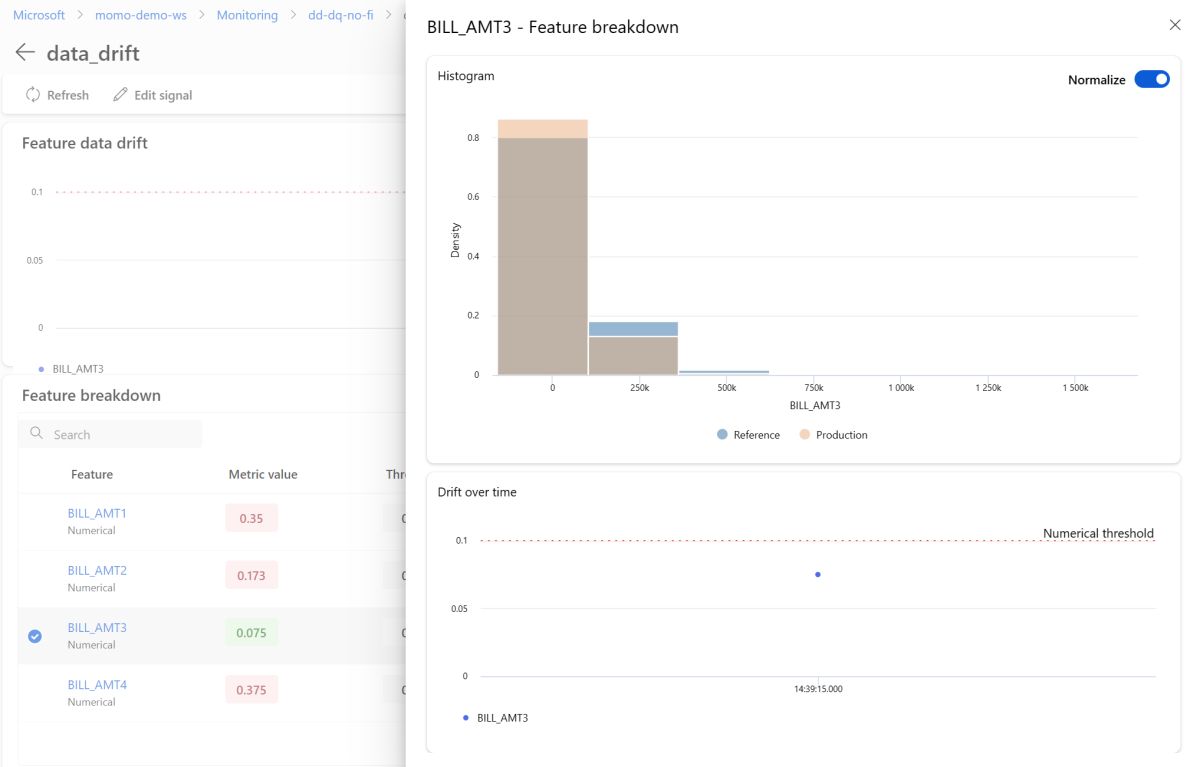
在 [ 訊號] 區 段中,選取 [data_drift 以查看數據漂移訊號的詳細資訊。 在詳細數據頁面上,您可以看到監視組態所包含的每個數值和類別功能的數據漂移計量值。 如果您的監視有多個執行,您會看到每個特徵的趨勢線。

在詳細數據頁面上,選取個別功能的名稱。 一個詳細檢視隨即開啟,以顯示生產分配與參考分配的比較。 您也可以使用此視圖來追蹤該功能隨時間變化的偏移。
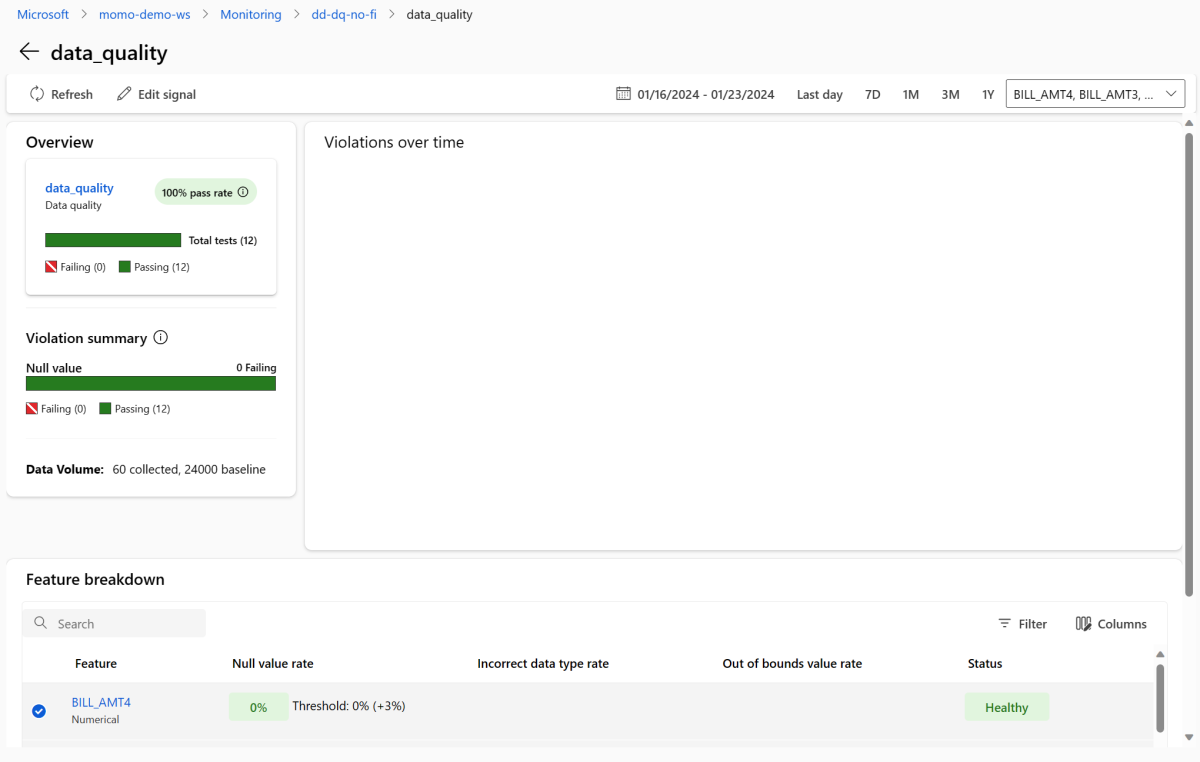
返回監視概觀頁面。 在 [ 訊號] 區 段中,選取 [data_quality ],以檢視此訊號的詳細資訊。 在此頁面上,您可以看到您監視之每項功能的 Null 值速率、超出界限的速率和數據類型錯誤率。


模型監視是一個連續的程序。 當您使用 Azure Machine Learning 模型監視時,您可以設定多個監視訊號,以取得生產環境中模型效能的廣泛檢視。
整合 Azure Machine Learning 模型監視與事件方格
當您使用 事件方格時,您可以設定 Azure Machine Learning 模型監視所產生的事件,以觸發應用程式、進程和 CI/CD 工作流程。 您可以透過各種事件處理程式取用事件,例如 Azure 事件中樞、Azure Functions 和 Azure Logic Apps。 當您的監視器偵測漂移時,您可以以程式設計方式採取動作,例如執行機器學習管線來重新定型模型並重新部署模型。
若要整合 Azure Machine Learning 模型監視與事件方格,請執行下列各節中的步驟。
建立系統主題
如果您沒有用於監視的事件方格系統主題,請建立一個。 如需指示,請參閱 在 Azure 入口網站中建立、檢視及管理事件方格系統主題。
建立事件訂閱
在 Azure 入口網站中,移至您的 Azure Machine Learning 工作區。
選取 [事件],然後選取 [事件訂閱]。
![顯示 Azure Machine Learning 工作區 [事件] 頁面的螢幕快照。事件與事件訂閱被標示出來。](media/how-to-monitor-models/add-event-subscription.png?view=azureml-api-2)
在 [名稱] 旁,輸入事件訂用帳戶的名稱,例如 MonitoringEvent。
在 [事件類型] 底下,僅選取 [執行狀態變更]。
警告
只選取 執行狀態變更 作為事件類型 請勿選取 偵測到的數據集漂移,這適用於數據漂移 v1,而不是 Azure Machine Learning 模型監視。
選取 [ 篩選] 索引標籤。在 [ 進階篩選] 底下,選取 [ 新增篩選],然後輸入下列值:
- 在 [金鑰] 之下,輸入 data.RunTags.azureml_modelmonitor_threshold_breached。
- 在 [運算子] 之下,選取 [字串包含]。
- 在 值 底下,輸入 因一或多個特徵違反指標閾值而失敗。
![Azure 入口網站中 [建立事件描述] 頁面的螢幕快照。[篩選] 索引標籤和 [索引鍵]、[運算子] 和 [值] 底下的值被突顯顯示。](media/how-to-monitor-models/add-advanced-filter.png?view=azureml-api-2)
當您使用此篩選時,會在 Azure Machine Learning 工作區中任何監視器的執行狀態變更時產生事件。 執行狀態可以從已完成變更為失敗,或從失敗變更為已完成。
若要在監視層級進行篩選,請再次選取 [ 新增篩選 ],然後輸入下列值:
- 在 [金鑰] 之下,輸入 data.RunTags.azureml_modelmonitor_threshold_breached。
- 在 [運算子] 之下,選取 [字串包含]。
- 在 [值] 之下,輸入您要篩選事件的監視訊號名稱,例如 credit_card_fraud_monitor_data_drift。 您輸入的名稱必須符合監視訊號的名稱。 您在篩選中使用的任何訊號都應該具有格式
<monitor-name>_<signal-description>的名稱,其中包含監視名稱和訊號的描述。
選取 [基本資料] 索引標籤。設定您想作為事件處理常式的端點,例如事件中樞。
選取 [建立] 以建立事件訂閱。
![Azure 入口網站中 [建立事件描述] 頁面的螢幕快照。[篩選] 索引標籤和 [索引鍵]、[運算子] 和 [值] 底下的值被突顯顯示。](media/how-to-monitor-models/add-advanced-filter.png?view=azureml-api-2#lightbox)
檢視事件
擷取事件之後,您可以在事件處理程式端點頁面上檢視它們:

您也可以在 Azure 監視器的 [計量] 索引標籤中檢視事件:
![[監視計量] 頁面的螢幕快照。折線圖顯示過去一小時內共有三個事件。](media/how-to-monitor-models/events-in-azure-monitor-metrics-tab.png?view=azureml-api-2#lightbox)