適用於: Azure CLI ml 延伸模組 v2 (目前)Python SDK azure-ai-ml v2 (目前)
在本文中,您將了解:
- 如何在 Azure Machine Learning 作業中從 Azure 儲存體讀取資料。
- 如何將資料從 Azure Machine Learning 作業寫入 Azure 儲存體。
- 掛接和下載模式之間的差異。
- 如何利用使用者身分識別和受控識別來存取資料。
- 作業中可用的掛接設定。
- 常見案例的最佳掛接設定。
- 如何存取 V1 資料資產。
先決條件
Azure 訂用帳戶。 如果您沒有 Azure 訂用帳戶,請在開始前先建立免費帳戶。 試用免費或付費版本的 Azure Machine Learning。
Azure Machine Learning 工作區
快速入門
在您探索存取資料時可用的詳細選項之前,我們會先說明資料存取的相關程式碼片段。
在 Azure Machine Learning 作業中從 Azure 儲存體讀取資料
在此範例中,您會提交 Azure Machine Learning 作業,從公用 Blob 儲存體帳戶存取資料。 不過,您可以調整程式碼片段,以存取您在私人 Azure 儲存體帳戶中的資料。 更新路徑,如這裡所述。 Azure Machine Learning 使用 Microsoft Entra 傳遞順暢地處理雲端儲存體的驗證。 提交作業時,可以選擇:
- 使用者身分識別:傳遞 Microsoft Entra 身分識別以存取資料
- 受控識別:使用計算目標的受控識別來存取資料
- 無:不指定身分識別來存取資料。 使用認證型 (金鑰/SAS 權杖) 資料存放區或存取公用資料時,請使用 [無]
秘訣
如果您使用密鑰或 SAS 令牌進行驗證,建議您建立 Azure Machine Learning 資料存放區。 運行時間會自動連線到記憶體,而不會公開您的認證。
from azure.ai.ml import command, Input, MLClient, UserIdentityConfiguration, ManagedIdentityConfiguration
from azure.ai.ml.entities import Data
from azure.ai.ml.constants import AssetTypes, InputOutputModes
from azure.identity import DefaultAzureCredential

# Set your subscription, resource group and workspace name:
subscription_id = "<SUBSCRIPTION_ID>"
resource_group = "<RESOURCE_GROUP>"
workspace = "<AML_WORKSPACE_NAME>"

# connect to the AzureML workspace
ml_client = MLClient(
    DefaultAzureCredential(), subscription_id, resource_group, workspace
)

# ==============================================================
# Set the URI path for the data.
# Supported `path` formats for input include:
# local: `./<path>
# Blob: wasbs://<container_name>@<account_name>.blob.core.windows.net/<path>
# ADLS: abfss://<file_system>@<account_name>.dfs.core.windows.net/<path>
# Datastore: azureml://datastores/<data_store_name>/paths/<path>
# Data Asset: azureml:<my_data>:<version>
# Supported `path` format for output is:
# Datastore: azureml://datastores/<data_store_name>/paths/<path>
# We set the input path to a file on a public blob container
# ==============================================================
path = "wasbs://data@azuremlexampledata.blob.core.windows.net/titanic.csv"


# ==============================================================
# What type of data does the path point to? Options include:
# data_type = AssetTypes.URI_FILE # a specific file
# data_type = AssetTypes.URI_FOLDER # a folder
# data_type = AssetTypes.MLTABLE # an mltable
# The path we set above is a specific file
# ==============================================================
data_type = AssetTypes.URI_FILE

# ==============================================================
# Set the mode. The popular modes include:
# mode = InputOutputModes.RO_MOUNT # Read-only mount on the compute target
# mode = InputOutputModes.DOWNLOAD # Download the data to the compute target
# ==============================================================
mode = InputOutputModes.RO_MOUNT

# ==============================================================
# You can set the identity you want to use in a job to access the data. Options include:
# identity = UserIdentityConfiguration() # Use the user's identity
# identity = ManagedIdentityConfiguration() # Use the compute target managed identity
# ==============================================================
# This example accesses public data, so we don't need an identity.
# You also set identity to None if you use a credential-based datastore
identity = None

# Set the input for the job:
inputs = {
    "input_data": Input(type=data_type, path=path, mode=mode)
}

# This command job uses the head Linux command to print the first 10 lines of the file
job = command(
    command="head ${{inputs.input_data}}",
    inputs=inputs,
    environment="azureml://registries/azureml/environments/sklearn-1.1/versions/4",
    compute="cpu-cluster",
    identity=identity,
)

# Submit the command
ml_client.jobs.create_or_update(job)
將資料從 Azure Machine Learning 作業寫入 Azure 儲存體
在此範例中,您會提交 Azure Machine Learning 作業,將資料寫入預設的 Azure Machine Learning 資料存放區。 您可以選擇性地設定資料資產的 name 值,以在輸出中建立資料資產。
from azure.ai.ml import command, Input, Output, MLClient
from azure.ai.ml.constants import AssetTypes, InputOutputModes
from azure.identity import DefaultAzureCredential

# Set your subscription, resource group and workspace name:
subscription_id = "<SUBSCRIPTION_ID>"
resource_group = "<RESOURCE_GROUP>"
workspace = "<AML_WORKSPACE_NAME>"

# connect to the AzureML workspace
ml_client = MLClient(
    DefaultAzureCredential(), subscription_id, resource_group, workspace
)

# ==============================================================
# Set the URI path for the data.
# Supported `path` formats for input include:
# local: `./<path>
# Blob: wasbs://<container_name>@<account_name>.blob.core.windows.net/<path>
# ADLS: abfss://<file_system>@<account_name>.dfs.core.windows.net/<path>
# Datastore: azureml://datastores/<data_store_name>/paths/<path>
# Data Asset: azureml:<my_data>:<version>
# Supported `path` format for output is:
# Datastore: azureml://datastores/<data_store_name>/paths/<path>
# As an example, we set the input path to a file on a public blob container
# As an example, we set the output path to a folder in the default datastore
# ==============================================================
input_path = "wasbs://data@azuremlexampledata.blob.core.windows.net/titanic.csv"
output_path = "azureml://datastores/workspaceblobstore/paths/quickstart-output/titanic.csv"

# ==============================================================
# What type of data are you pointing to?
# AssetTypes.URI_FILE (a specific file)
# AssetTypes.URI_FOLDER (a folder)
# AssetTypes.MLTABLE (a table)
# The path we set above is a specific file
# ==============================================================
data_type = AssetTypes.URI_FILE

# ==============================================================
# Set the input mode. The most commonly-used modes:
# InputOutputModes.RO_MOUNT
# InputOutputModes.DOWNLOAD
# Set the mode to Read Only (RO) to mount the data
# ==============================================================
input_mode = InputOutputModes.RO_MOUNT

# ==============================================================
# Set the output mode. The most commonly-used modes:
# InputOutputModes.RW_MOUNT
# InputOutputModes.UPLOAD
# Set the mode to Read Write (RW) to mount the data
# ==============================================================
output_mode = InputOutputModes.RW_MOUNT

# Set the input and output for the job:
inputs = {
    "input_data": Input(type=data_type, path=input_path, mode=input_mode)
}

outputs = {
    "output_data": Output(type=data_type,
                          path=output_path,
                          mode=output_mode,
                          # optional: if you want to create a data asset from the output,
                          # then uncomment `name` (`name` can be set without setting `version`, and in this way, we will set `version` automatically for you)
                          # name = "<name_of_data_asset>", # use `name` and `version` to create a data asset from the output
                          # version = "<version>",
                  )
}

# This command job copies the data to your default Datastore
job = command(
    command="cp ${{inputs.input_data}} ${{outputs.output_data}}",
    inputs=inputs,
    outputs=outputs,
    environment="azureml://registries/azureml/environments/sklearn-1.1/versions/4",
    compute="cpu-cluster",
)

# Submit the command
ml_client.jobs.create_or_update(job)
Azure Machine Learning 資料執行階段
提交作業時,Azure Machine Learning 資料執行階段會控制從儲存體位置到計算目標的資料載入。 Azure Machine Learning 資料執行階段已針對機器學習工作的速度和效率進行最佳化。 主要優點包括:
- 資料載入以 Rust 語言撰寫,這是一種以高速和高記憶體效率著稱的語言。 就並行資料下載而言,Rust 可避免 Python 全域解譯器鎖定 (GIL) 的問題
- 輕量;Rust 與其他技術沒有相依性,例如 JVM。 因此,執行階段會快速安裝,而且不會在計算目標上耗用額外的資源 (CPU、記憶體)
- 多流程 (平行) 資料載入
- 在進行深度學習時,一個或多個 CPU 以背景工作的方式預先擷取數據,以提高 GPU 的利用率。
- 雲端儲存體的無縫驗證處理
- 提供掛接資料 (資料流) 或下載所有資料的選項。 如需詳細資訊,請參閱掛接 (串流) 和下載小節。
- 與 fsspec 緊密整合 - 一個統一的 pythonic 介面,適用於本地、遠端和內嵌的文件系統和位元組儲存。
秘訣
建議您在訓練程式碼中使用 Azure Machine Learning 數據執行環境,而非建立自己的掛載/下載功能。 如果用戶端程式碼使用 Python 從儲存體下載資料,我們觀察到儲存體輸送量受到限制,這是由於全域解譯器鎖定 (GIL) 的問題所致。
路徑
當您提供資料輸入或輸出給作業時,您必須指定 path 指向資料位置的參數。 下表顯示 Azure Machine Learning 支援的不同資料位置,並提供 path 參數範例:
| 地點 | 範例 | 輸入 | 輸出 |
|---|---|---|---|
| 本機電腦上的路徑 | ./home/username/data/my_data |
Y | N |
| 公用 HTTP(S) 伺服器上的路徑 | https://raw.githubusercontent.com/pandas-dev/pandas/main/doc/data/titanic.csv |
Y | N |
| Azure 儲存體上的路徑 | wasbs://<container_name>@<account_name>.blob.core.windows.net/<path>abfss://<file_system>@<account_name>.dfs.core.windows.net/<path> |
Y,僅適用於身分識別型驗證 | N |
| Azure Machine Learning 資料存放區上的路徑 | azureml://datastores/<data_store_name>/paths/<path> |
Y | Y |
| 資料資產的路徑 | azureml:<my_data>:<version> |
Y | N,但您可以使用 name 和 version 從輸出建立資料資產 |
模式
使用資料輸入/輸出執行作業時,可以從下列模式 選項中選取:
ro_mount: 在本機磁碟 (SSD) 計算目標上,將儲存體位置裝載爲唯讀。rw_mount: 在本機磁碟 (SSD) 計算目標上,將儲存體位置裝載爲讀取和寫入。download: 將資料從儲存體位置下載到本機磁碟 (SSD) 計算目標。upload: 將資料從計算目標上傳至儲存體位置。eval_mount/eval_download:這些模式是 MLTable 特有的。在某些情況下,MLTable 可能會產生檔案,這些檔案可能位於與裝載 MLTable 檔案之儲存體帳戶不同的儲存體帳戶中。 或者,MLTable 可以對位於儲存體資源中的資料進行子集或隨機顯示。 只有 Azure Machine Learning 資料執行階段實際評估 MLTable 檔案時,才會顯示子集/隨機顯示的檢視。 例如,此圖表顯示搭配eval_mount或eval_download使用的 MLTable 可如何從兩個不同的儲存體容器中擷取映像,以及位於不同儲存體帳戶中的註釋檔案,然後掛接/下載至遠端計算目標的檔案系統。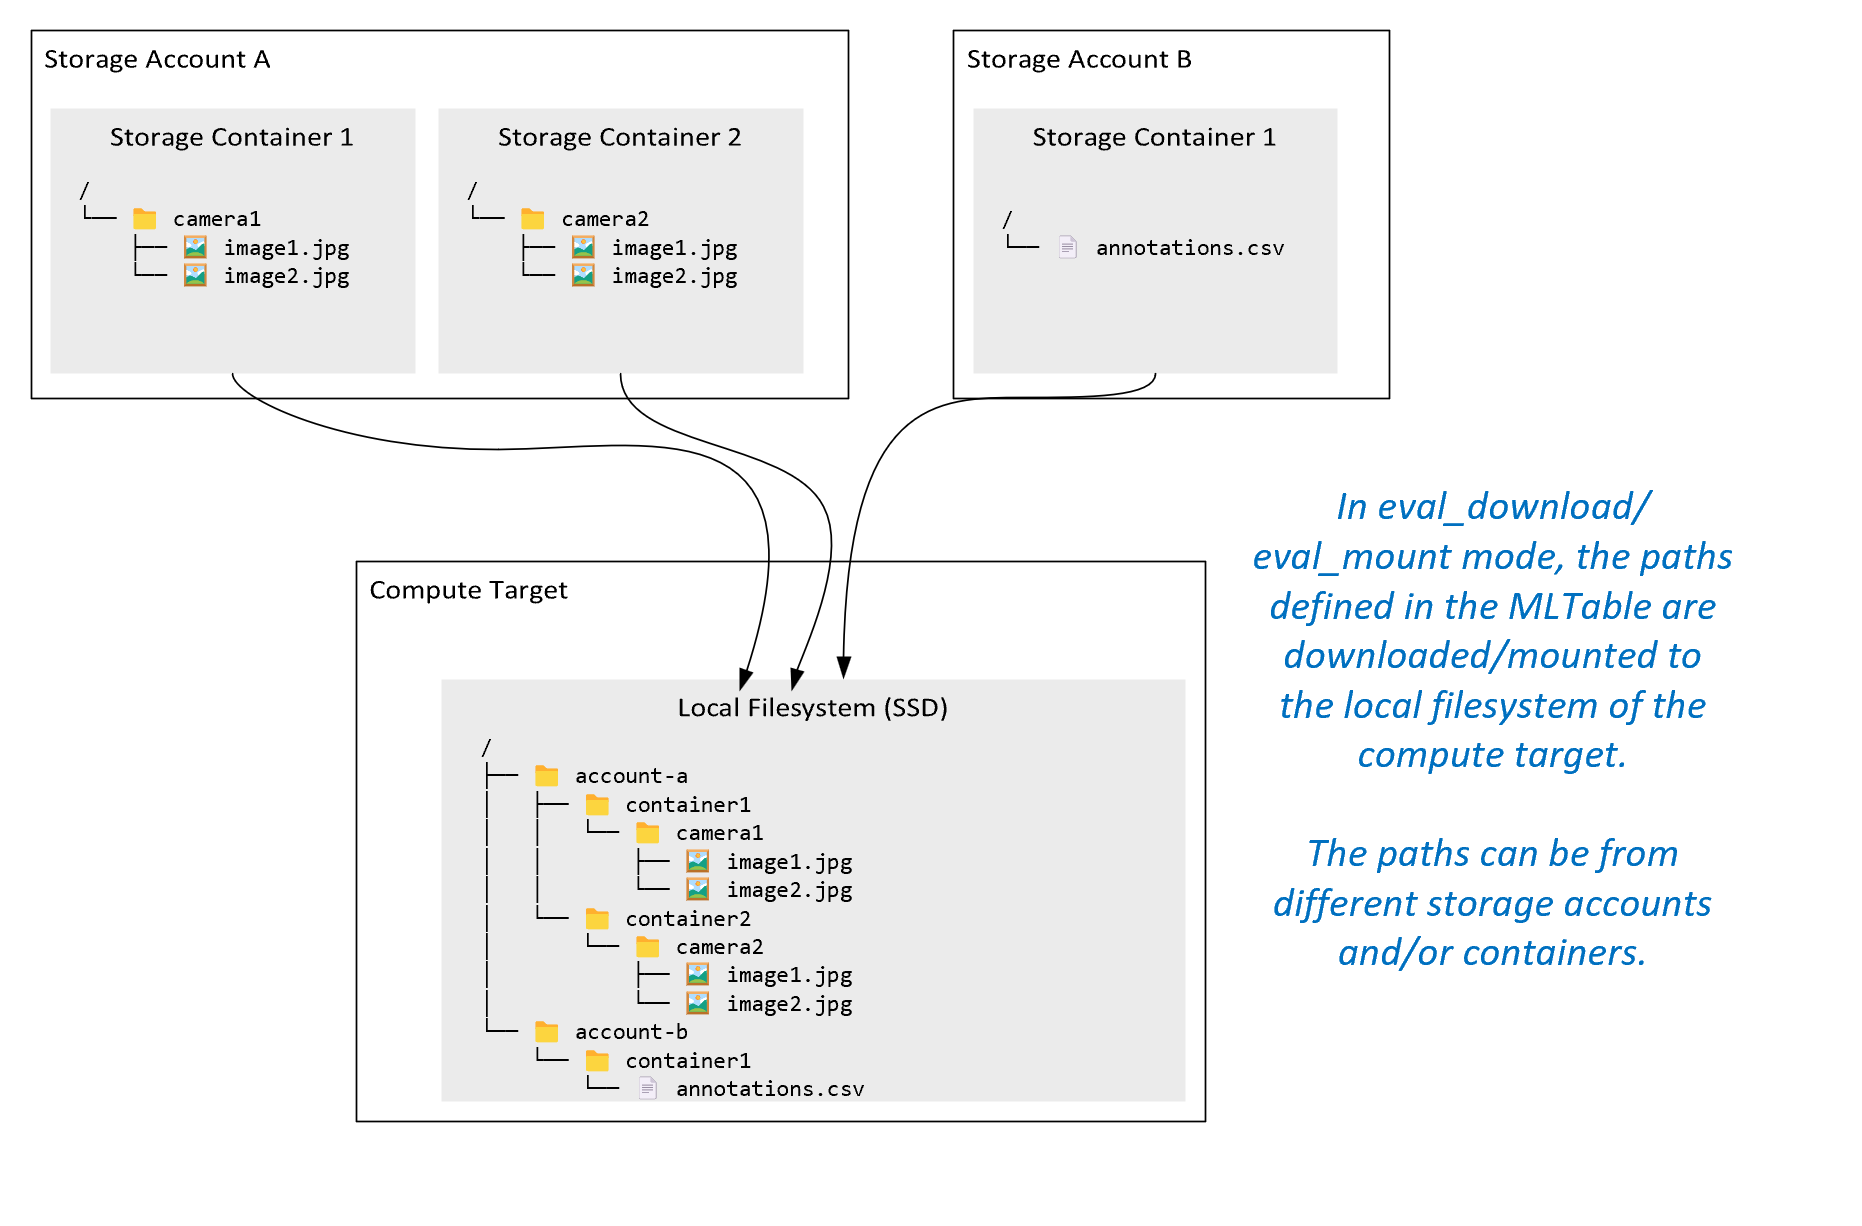
接著,在計算目標的檔案系統中,
camera1資料夾、camera2資料夾和annotations.csv檔案可以資料夾結構的形式供存取:/INPUT_DATA ├── account-a │ ├── container1 │ │ └── camera1 │ │ ├── image1.jpg │ │ └── image2.jpg │ └── container2 │ └── camera2 │ ├── image1.jpg │ └── image2.jpg └── account-b └── container1 └── annotations.csvdirect: 您可能想要透過其他 API 直接從 URI 讀取資料,而不是透過 Azure Machine Learning 資料執行階段。 例如,您可能想要使用 boto s3 用戶端存取 s3 貯體上的資料 (使用「虛擬-裝載」樣式或「路徑」樣式的httpsURL)。 您不妨使用 模式以direct形式來取得輸入的 URI。 您會在 Spark 作業中看到直接模式的使用,因為spark.read_*()方法知道如何處理 URI。 若為非 Spark 作業,您必須負責管理存取認證。 例如,您必須明確使用計算 MSI 或其他訊息代理程式存取。

下表顯示不同類型/模式/輸入/輸出組合的可能模式:
| 類型 | 輸入/輸出 | upload |
download |
ro_mount |
rw_mount |
direct |
eval_download |
eval_mount |
|---|---|---|---|---|---|---|---|---|
uri_folder |
輸入 | ✓ | ✓ | ✓ | ||||
uri_file |
輸入 | ✓ | ✓ | ✓ | ||||
mltable |
輸入 | ✓ | ✓ | ✓ | ✓ | ✓ | ||
uri_folder |
輸出 | ✓ | ✓ | |||||
uri_file |
輸出 | ✓ | ✓ | |||||
mltable |
輸出 | ✓ | ✓ | ✓ |
下載
在下載模式中,所有輸入資料都會複製到計算目標的本機磁碟 (SSD)。 複製所有資料後,Azure Machine Learning 資料執行階段就會啟動使用者定型指令碼。 使用者指令碼啟動時,該指令碼會從本機磁碟讀取資料,就像任何其他檔案一樣。 作業完成時,資料會從計算目標的磁碟中移除。
| 優點 | 缺點 |
|---|---|
| 定型開始時,所有資料將可在計算目標的本機磁碟 (SSD) 上供定型指令碼使用。 不需要 Azure 儲存體/網路互動。 | 資料集必須完全符合計算目標磁碟。 |
| 使用者指令碼啟動後,儲存體/網路可靠性沒有任何相依性。 | 系統會下載整個資料集 (如果定型只需要隨機選取一小部分的資料,那麼大部分下載的資料就會浪費掉)。 |
| Azure Machine Learning 資料執行階段可以將下載平行處理 (對許多小檔案有顯著的效果) 並最大化網路/儲存體輸送量。 | 作業會等到所有資料下載到計算目標的本機磁碟為止。 若為提交的深度學習作業,GPU 會閒置直到資料就緒為止。 |
| FUSE 層不會增加不可避免的額外負荷 (往返:使用者指令碼中的使用者空間呼叫 → 核心 → 使用者空間融合精靈 → 核心 → 回應使用者空間中的使用者指令碼) | 下載完成後,儲存體變更不會反映在資料上。 |
使用下載的時機
- 資料小到可以放在計算目標的磁碟上,而不會干擾其他定型
- 定型會使用大部分或所有資料集
- 定型會多次從資料集中讀取檔案
- 定型必須跳至大型檔案的隨機位置
- 在定型開始前,等待所有資料下載完成是可以接受的
可用的下載設定
您可以使用作業中的這些環境變數來微調下載設定:
| 環境變數名稱 | 類型 | 預設值 | 描述 |
|---|---|---|---|
RSLEX_DOWNLOADER_THREADS |
u64 | NUMBER_OF_CPU_CORES * 4 |
並行執行緒下載數目可以使用 |
AZUREML_DATASET_HTTP_RETRY_COUNT |
u64 | 7 | 從暫時性錯誤復原的個別儲存體/ http 要求重試次數。 |
在作業中,您不妨藉由設定環境變數來變更上述預設值,例如:
為了簡潔起見,我們只示範如何在作業中定義環境變數。
from azure.ai.ml import command

env_var = {
"RSLEX_DOWNLOADER_THREADS": 64,
"AZUREML_DATASET_HTTP_RETRY_COUNT": 10
}

job = command(
        environment_variables=env_var
)
下載效能計量
計算目標的 VM 大小會影響資料的下載時間。 具體來說:
- 核心數目。 可用的核心越多,並行存取越多,因此下載速度就越快。
- 預期的網路頻寬。 Azure 中的每個 VM 都有來自網路介面卡 (NIC) 的最大輸送量。
附註
對於 A100 GPU VM,將資料下載至計算目標時,Azure Machine Learning 資料執行階段可能會使 NIC (網路介面卡) 飽和 (~24 Gbit/秒):理論上的最大輸送量。
下表顯示 Azure Machine Learning 資料執行階段可在 Standard_D15_v2 VM 上處理 100 GB 檔案的下載效能 (20 核心、25 Gbit/秒的網路輸送量):
| 資料結構 | 僅下載 (秒) | 下載並計算 MD5 (秒) | 達成的輸送量 (Gbit/秒) |
|---|---|---|---|
| 10 x 10 GB 檔案 | 55.74 | 260.97 | 14.35 Gbit/秒 |
| 100 x 1 GB 檔案 | 58.09 | 259.47 | 13.77 Gbit/秒 |
| 1 x 100 GB 檔案 | 96.13 | 300.61 | 8.32 Gbit/秒 |
我們可以看到,將一個較大的檔案分成較小的檔案,可以因為平行處理原則而改善下載效能。 建議您避免檔案變得太小 (小於 4 MB),因為相對於下載承載所花費的時間,儲存體要求提交所需的時間會增加。 如需詳細資訊,請參閱許多小型檔案問題。
掛接 (串流)
在掛接模式中,Azure Machine Learning 資料功能會使用 FUSE (使用者空間中的檔案系統) Linux 功能來建立模擬的檔案系統。 執行階段可以即時回應使用者的指令碼動作,而不是將所有資料下載到計算目標的本機磁碟 (SSD)。 例如,"open file"、"read 2-KB chunk from position X"、"list directory content"。
| 優點 | 缺點 |
|---|---|
| 可以使用超過計算目標本機磁碟容量的資料 (不受計算硬體限制) | Linux FUSE 模組的額外負荷。 |
| 定型開始時不會延遲 (與下載模式不同)。 | 依賴於使用者的程式代碼行為(如果定型程式代碼在單個線程中循序讀取小型檔案,同時也向儲存要求數據,則可能無法將網路或儲存通量最大化)。 |
| 更多可用的設定可微調使用案例。 | 不支援 Windows。 |
| 只有定型所需的資料會從儲存體讀取。 |
使用掛接的時機
- 數據很大,無法裝進計算目標的本機磁碟。
- 叢集中的每個個別計算節點都不需要讀取整個資料集 (隨機檔案或 csv 檔案選取範圍中的資料列等等)。
- 等待所有資料下載完成後再開始定型可能會導致延遲,這可能成為問題 (閒置的 GPU 時間)。
可用的掛接設定
您可以使用作業中的這些環境變數來調整掛接設定:
| Env 變數名稱 | 類型 | 預設值 | 描述 |
|---|---|---|---|
DATASET_MOUNT_ATTRIBUTE_CACHE_TTL |
u64 | 未設定 (快取永不過期) | 時間,以毫秒為單位,需要在快取中保留 getattr 呼叫結果,並避免從儲存體再次要求此資訊。 |
DATASET_RESERVED_FREE_DISK_SPACE |
u64 | 150 MB | 適用於系統設定,以保持計算狀況良好。 無論其他設定的值為何,Azure Machine Learning 資料執行階段都不會使用磁碟空間的最後 RESERVED_FREE_DISK_SPACE 位元組。 |
DATASET_MOUNT_CACHE_SIZE |
usize | 無限制 | 控制可以使用多少磁碟空間掛接。 正值會以位元組為單位設定絕對值。 負值會設定保留多少磁碟空間。 此表提供更多的磁碟快取選項。 為了方便起見,支援 KB、MB 和 GB 修飾元。 |
DATASET_MOUNT_FILE_CACHE_PRUNE_THRESHOLD |
f64 | 1.0 | 快取填滿至 AVAILABLE_CACHE_SIZE * DATASET_MOUNT_FILE_CACHE_PRUNE_THRESHOLD 時,磁碟區掛接會啟動快取剪除。 應介於 0 到 1 之間。 設定為 < 1 會更早觸發背景快取剪除。
AVAILABLE_CACHE_SIZE 不是您可以直接修改或檢視的環境變數。 在此內容中,它會參考「系統計算為可用於快取的位元數」。此值取決於磁碟大小、系統健康情況所需的磁碟空間量,以及環境變數中設定的組態 (例如 DATASET_RESERVED_FREE_DISK_SPACE 和 DATASET_MOUNT_CACHE_SIZE)。 |
DATASET_MOUNT_FILE_CACHE_PRUNE_TARGET |
f64 | 0.7 | 剪除快取會嘗試釋放至少 (1-DATASET_MOUNT_FILE_CACHE_PRUNE_TARGET) 的快取空間。 |
DATASET_MOUNT_READ_BLOCK_SIZE |
usize | 2 MB | 串流讀取區塊大小。 檔案夠大時,請至少從儲存體要求 DATASET_MOUNT_READ_BLOCK_SIZE 的資料,並且即使 fuse 要求的讀取作業少於此資料量,也會進行快取。 |
DATASET_MOUNT_READ_BUFFER_BLOCK_COUNT |
usize | 32 | 要預先擷取的區塊數目 (讀取區塊 k 會觸發區塊 k+1、...、k.+ DATASET_MOUNT_READ_BUFFER_BLOCK_COUNT 的背景預先擷取) |
DATASET_MOUNT_READ_THREADS |
usize | NUMBER_OF_CORES * 4 |
背景預先擷取執行緒的數目。 |
DATASET_MOUNT_BLOCK_BASED_CACHE_ENABLED |
布爾 (bool) | 假的 | 啟用區塊式快取。 |
DATASET_MOUNT_MEMORY_CACHE_SIZE |
usize | 128 MB | 僅適用於區塊式快取。 RAM 區塊式快取的大小可以使用。 值為 0 會完全停用記憶體快取。 |
DATASET_MOUNT_BLOCK_FILE_CACHE_ENABLED |
布爾 (bool) | 是 | 僅適用於區塊式快取。 設為 true 時,區塊式快取會使用本機硬碟來快取區塊。 |
DATASET_MOUNT_BLOCK_FILE_CACHE_MAX_QUEUE_SIZE |
usize | 512 MB | 僅適用於區塊式快取。 區塊式快取會將快取區塊寫入背景中的本機磁碟。 此設定可控制記憶體掛接可用來儲存等候排清至本機磁碟快取的區塊。 |
DATASET_MOUNT_BLOCK_FILE_CACHE_WRITE_THREADS |
usize | NUMBER_OF_CORES * 2 |
僅適用於區塊式快取。 背景執行緒區塊式快取的數目,用來將下載的區塊寫入計算目標的本機磁碟。 |
DATASET_UNMOUNT_TIMEOUT_SECONDS |
u64 | 30 | 在強制終止掛接訊息迴圈之前,unmount 完成所有擱置作業的時間 (以秒為單位),例如排清呼叫。 |
在作業中,您不妨藉由設定環境變數來變更上述預設值,例如:
from azure.ai.ml import command

env_var = {
"DATASET_MOUNT_BLOCK_FILE_CACHE_ENABLED": True
}

job = command(
        environment_variables=env_var
)
區塊式開啟模式
區塊式開啟模式會將每個檔案分割成預先定義大小的區塊 (最後一個區塊除外)。 來自指定位置的讀取要求會向儲存體要求對應的區塊,並立即傳回要求的資料。 讀取也會觸發 N 個後續區塊的背景預先擷取 ,使用多個執行緒 (對循序讀取進行最佳化)。 下載的區塊會在兩層快取中快取 (RAM 和本機磁碟)。
| 優點 | 缺點 |
|---|---|
| 將資料快速傳遞至定型指令碼 (對尚未要求之區塊的封鎖較少)。 | 隨機讀取可能會浪費向前預先擷取的區塊。 |
| 更多工作卸載至背景執行緒 (預先擷取/快取)。 接著,定型便可繼續進行。 | 相較於從本機磁碟快取上的檔案直接讀取 (例如,在全檔快取模式下),在快取之間導覽新增了負荷。 |
| 只會從儲存體讀取要求的資料 (加上預先擷取)。 | |
| 對於足夠小的資料,會使用快速 RAM 式快取。 |
使用區塊式開啟模式的時機
建議用於大多數案例,但需要從隨機檔案位置快速讀取時除外。 在這些情況下,請使用全檔快取開啟模式。
全檔快取開啟模式
在全檔模式中開啟掛接資料夾下的檔案時 (例如 f = open(path, args)),呼叫會遭到封鎖,直到將整個檔案下載到磁碟上的計算目標快取資料夾為止。 所有後續讀取呼叫都會重新導向至快取的檔案,因此不需要任何儲存體互動。 如果快取沒有足夠的可用空間來容納目前的檔案,掛接會嘗試從快取中剪除最近最少使用的檔案。 如果檔案無法放入磁碟上(相對於快取設定),數據運行時間會回復為串流模式。
| 優點 | 缺點 |
|---|---|
| 開啟檔案之後,沒有儲存體可靠性/輸送量相依性。 | 開啟呼叫會遭到封鎖,直到下載整個檔案為止。 |
| 快速隨機讀取 (從檔案的隨機位置讀取區塊)。 | 即使不需要檔案的某些部分,整個檔案仍會從儲存體讀取。 |
使用時機
對於超過 128 MB 的相對大型檔案,需要隨機讀取時。
使用量
將作業中的環境變數 DATASET_MOUNT_BLOCK_BASED_CACHE_ENABLED 設為 false:
from azure.ai.ml import command

env_var = {
"DATASET_MOUNT_BLOCK_BASED_CACHE_ENABLED": False
}

job = command(
        environment_variables=env_var
)
掛接:列出檔案
使用數百萬個檔案時,請避免遞迴清單,例如 ls -R /mnt/dataset/folder/。 遞迴清單會觸發許多呼叫,以列出父目錄的目錄內容。 然後,其會對所有子層級內的每個目錄,要求個別的遞迴呼叫。 一般而言,Azure 記憶體允許每個單一清單要求只傳回 5,000 個元素。 因此,包含每個 10 個檔案的 100 萬個資料夾的遞迴清單需要對儲存體發出 1,000,000 / 5000 + 1,000,000 = 1,000,200 次要求。 相比之下,具有 10,000 個檔案的 1,000 個資料夾只需要 1,001 個要求才能儲存遞歸清單。
Azure Machine Learning 掛接會以延遲方式處理清單。 因此,若要列出許多小型檔案,最好是使用反覆式用戶端程式庫呼叫 (例如,Python 中的 os.scandir()),而不是傳回完整清單的用戶端程式庫呼叫 (例如, Python 中的 os.listdir())。 反覆式用戶端程式庫呼叫會傳回產生器,這表示不需要等到系統載入整份清單。 然後,便可更快繼續執行作業。
下表比較 Python os.scandir() 和 os.listdir() 函式在一般結構中列出包含 ~4M 檔案的資料夾所需時間:
| 計量 | os.scandir() |
os.listdir() |
|---|---|---|
| 取得第一個項目的時間 (秒) | 0.67 | 553.79 |
| 取得前 5 萬個項目的時間 (秒) | 9.56 | 562.73 |
| 取得所有項目的時間 (秒) | 558.35 | 582.14 |
常見案例的最佳掛接設定
在某些常見案例中,我們會顯示您在 Azure Machine Learning 作業中設定的最佳掛接設定。
循序讀取大型檔案一次 (csv 檔案中的處理行)
在 Azure Machine Learning 作業的 environment_variables 區段中包含這些掛接設定:
附註
若要使用無伺服器計算,請刪除此程式碼中的 compute="cpu-cluster",。
from azure.ai.ml import command

env_var = {
  "DATASET_MOUNT_BLOCK_BASED_CACHE_ENABLED": True, # Enable block-based caching
  "DATASET_MOUNT_BLOCK_FILE_CACHE_ENABLED": False, # Disable caching on disk
  "DATASET_MOUNT_MEMORY_CACHE_SIZE": 0, # Disabling in-memory caching

  # Increase the number of blocks used for prefetch. This leads to use of more RAM (2 MB * #value set).
  # Can adjust up and down for fine-tuning, depending on the actual data processing pattern.
  # An optimal setting based on our test ~= the number of prefetching threads (#CPU_CORES * 4 by default)
  "DATASET_MOUNT_READ_BUFFER_BLOCK_COUNT": 80,
}

job = command(
        environment_variables=env_var
)
從多個執行緒讀取大型檔案一次 (處理多個執行緒中分割的 csv 檔案)
在 Azure Machine Learning 作業的 environment_variables 區段中包含這些掛接設定:
from azure.ai.ml import command

env_var = {
  "DATASET_MOUNT_BLOCK_BASED_CACHE_ENABLED": True, # Enable block-based caching
  "DATASET_MOUNT_BLOCK_FILE_CACHE_ENABLED": False, # Disable caching on disk
  "DATASET_MOUNT_MEMORY_CACHE_SIZE": 0, # Disabling in-memory caching
}

job = command(
        environment_variables=env_var
)
從多個執行緒讀取數百萬個小檔案 (映像) 一次 (映像上的單一 Epoch 定型)
在 Azure Machine Learning 作業的 environment_variables 區段中包含這些掛接設定:
from azure.ai.ml import command

env_var = {
  "DATASET_MOUNT_BLOCK_BASED_CACHE_ENABLED": True, # Enable block-based caching
  "DATASET_MOUNT_BLOCK_FILE_CACHE_ENABLED": False, # Disable caching on disk
  "DATASET_MOUNT_MEMORY_CACHE_SIZE": 0, # Disabling in-memory caching
}

job = command(
        environment_variables=env_var
)
從多個執行緒讀取數百萬個小檔案 (映像) 多次 (映像上的多次 Epoch 定型)
在 Azure Machine Learning 作業的 environment_variables 區段中包含這些掛接設定:
from azure.ai.ml import command

env_var = {
  "DATASET_MOUNT_BLOCK_BASED_CACHE_ENABLED": True, # Enable block-based caching
}

job = command(
        environment_variables=env_var
)
讀取內含隨機搜尋的大型檔案 (例如從掛接的資料夾提供檔案資料庫)
在 Azure Machine Learning 作業的 environment_variables 區段中包含這些掛接設定:
from azure.ai.ml import command

env_var = {
  "DATASET_MOUNT_BLOCK_BASED_CACHE_ENABLED": False, # Disable block-based caching
}

job = command(
        environment_variables=env_var
)
診斷和解決資料載入瓶頸
Azure Machine Learning 作業以資料執行時,輸入的 mode 會決定如何從儲存體讀取位元組,並在計算目標本機 SSD 磁碟上快取位元組。 針對下載模式,在使用者程式代碼開始執行之前,所有數據會快取在磁碟上。 數個因素會影響下載速度上限:
- 平行線程數目
- 檔案數目
- 檔案大小
針對掛載模式,使用者程式碼必須在數據開始快取前先開啟檔案。 不同的掛接設定會導致不同的讀取和快取行為。 各種因素會影響數據從記憶體載入的速度:
- 要計算的資料位置:儲存體和計算目標位置應該相同。 如果儲存體和計算目標位於不同的區域,效能會降低,因為資料必須跨區域傳送。 如需如何確保資料與計算共置的詳細資訊,請造訪與計算共置資料。
-
計算目標大小:相較於較大的計算大小,小型計算有較低的核心計數 (較少平行處理原則) 和較小的預期網路頻寬,這兩個因素都會影響資料載入效能。
- 例如,如果您使用小型 VM 大小,例如
Standard_D2_v2(2 核心、1,500 Mbps NIC),而且您嘗試載入 50,000 MB (50 GB) 的數據,最佳可達成的數據載入時間會是 ~270 秒(假設您在 187.5 MB/秒的輸送量中飽和 NIC)。 相較之下,Standard_D5_v2(16 核心、12,000 Mbps) 會在 ~33 秒內載入相同的資料 (假設您在 1500 MB/秒的輸送量中使 NIC 達到飽和)。
- 例如,如果您使用小型 VM 大小,例如
- 儲存層:對於大部分案例,包括大型語言模型 (LLM),標準儲存體可提供最佳的成本/效能設定檔。 不過,如有許多小型檔案,進階儲存體可提供更好的成本/效能設定檔。 如需詳細資訊,請參閱 Azure 儲存體選項。
- 儲存體負載:如果儲存體帳戶負載過高,例如,叢集中的許多 GPU 節點要求資料,則您有可能達到儲存體的輸出容量。 如需詳細資訊,請參閱儲存體負載。 如果您有許多小型檔案需要同時存取,您可能會達到儲存體的要求限制。 請參閱調整標準儲存體帳戶的目標中針對輸出容量和儲存體要求限制的最新資訊。
- 使用者程式碼中的資料存取模式:使用掛接模式時,會根據程式碼中的開啟/讀取動作來擷取資料。 例如,讀取大型檔案的隨機區段時,掛接的預設資料預先擷取設定可能會導致將不會讀取的區塊下載。 您可能需要調整一些設定,才能達到最大輸送量。 如需詳細資訊,請參閱常見案例的最佳掛接設定。
使用記錄來診斷問題
若要從作業存取資料執行階段的記錄:
- 從作業頁面選取 [輸出+記錄] 索引標籤。
- 選取 system_logs 資料夾,後面接著 data_capability 資料夾。
- 您應該會看到兩個記錄檔:
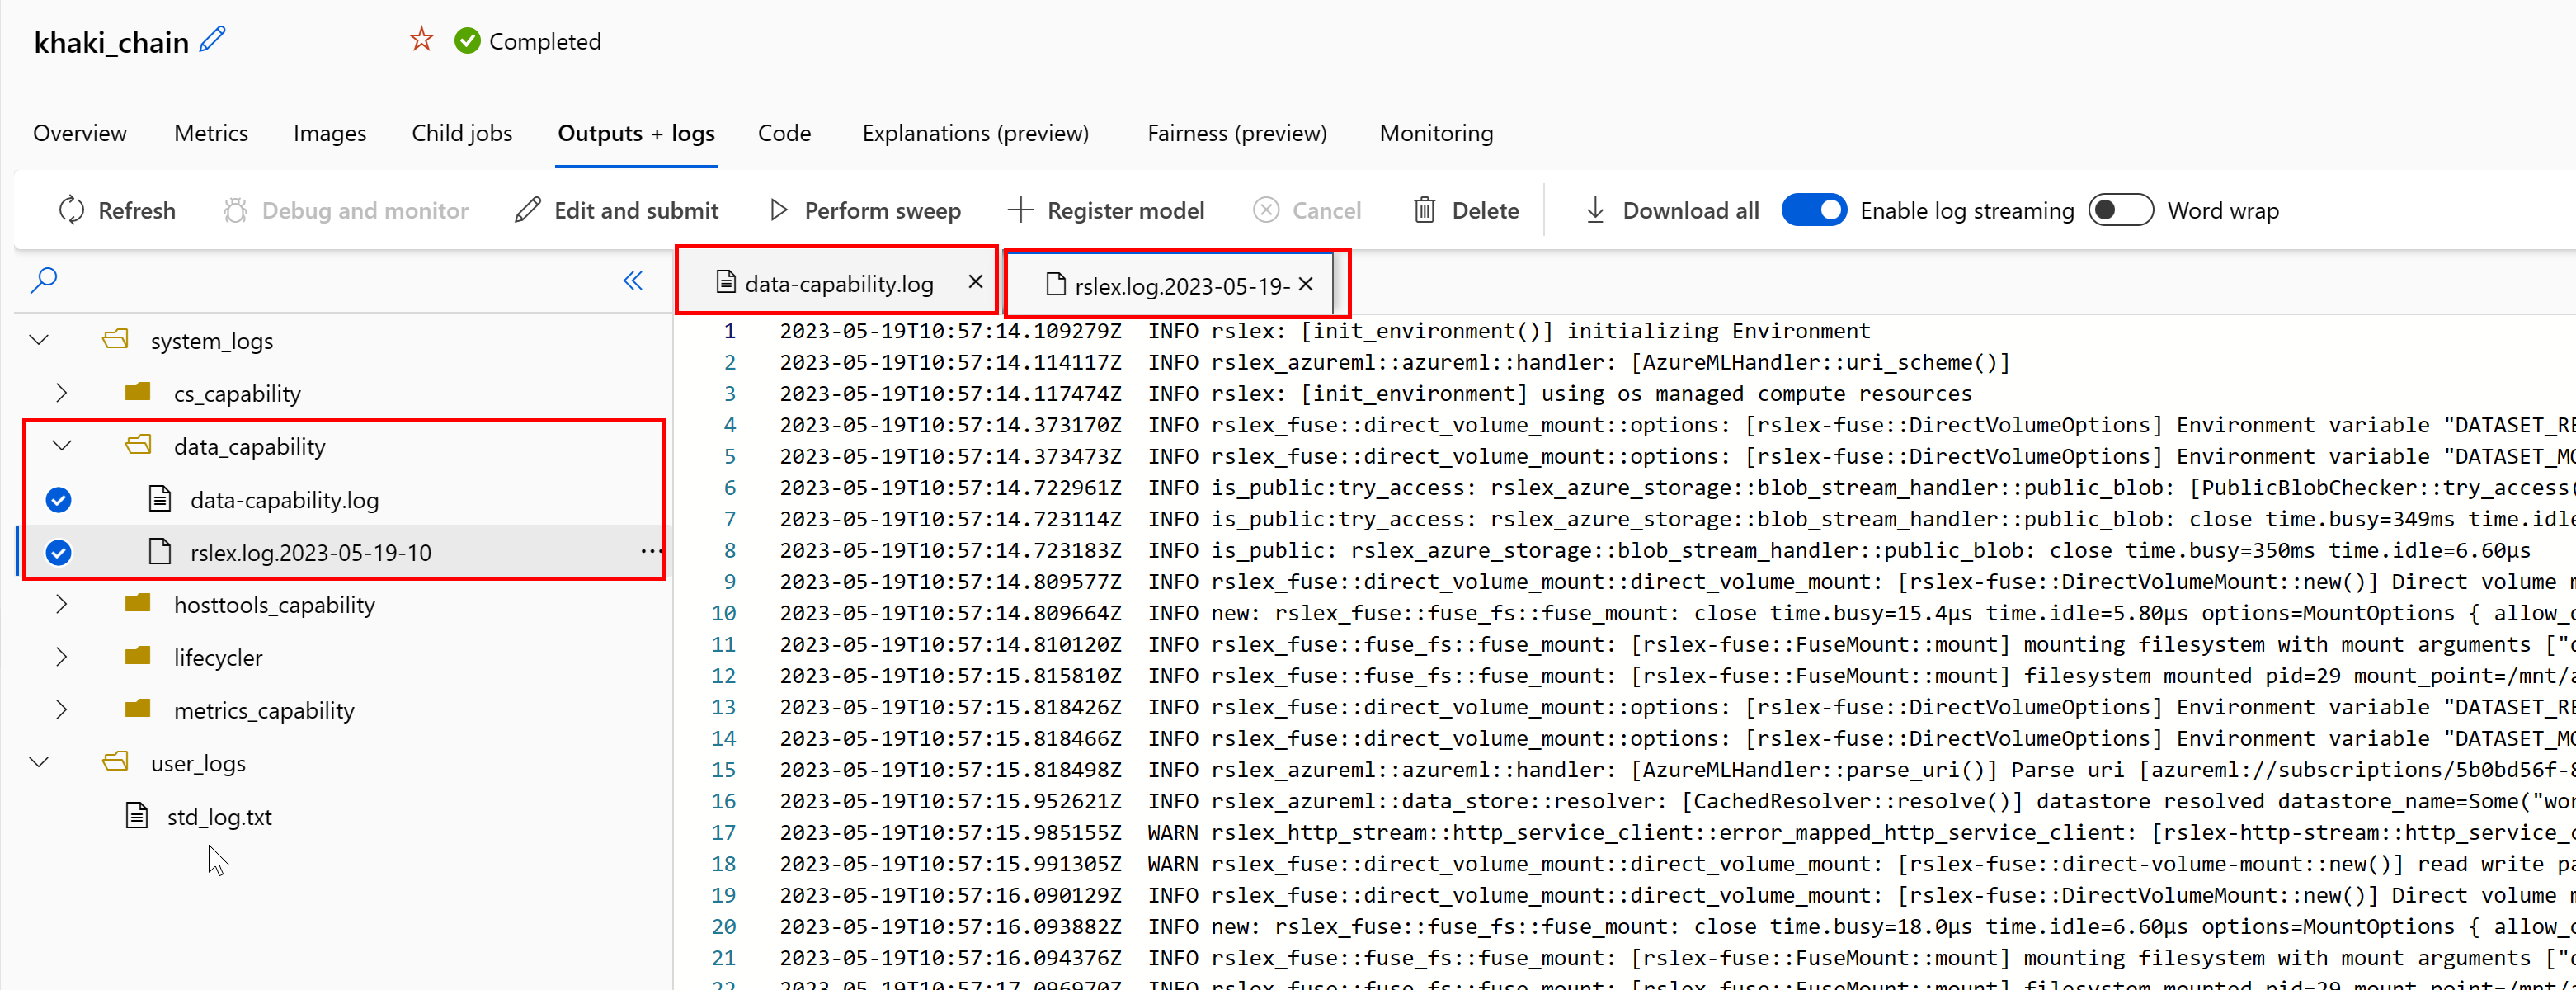

記錄檔 data-capability.log 顯示主要資料載入工作所花費時間的詳細資訊。 例如,下載資料時,執行階段會記錄下載活動的開始和完成時間:
INFO 2023-05-18 17:14:47,790 sdk_logger.py:44 [28] - ActivityStarted, download
INFO 2023-05-18 17:14:50,295 sdk_logger.py:44 [28] - ActivityCompleted: Activity=download, HowEnded=Success, Duration=2504.39 [ms]
如果下載輸送量是 VM 大小預期的網路頻寬的一小部分,即可檢查記錄檔 rslex.log.<TIMESTAMP>。 此檔案包含來自 Rust 型執行階段的所有精細記錄;例如,平行處理:
2023-05-18T14:08:25.388670Z  INFO copy_uri:copy_uri:copy_dataset:write_streams_to_files:collect:reduce:reduce_and_combine:reduce:get_iter: rslex::prefetching: close time.busy=23.2µs time.idle=1.90µs sessionId=012ea46a-341c-4258-8aba-90bde4fdfb51 source=Dataset[Partitions: 1, Sources: 1] file_name_column=None break_on_first_error=true skip_existing_files=false parallelization_degree=4 self=Dataset[Partitions: 1, Sources: 1] parallelization_degree=4 self=Dataset[Partitions: 1, Sources: 1] parallelization_degree=4 self=Dataset[Partitions: 1, Sources: 1] parallelization_degree=4 i=0 index=0
2023-05-18T14:08:25.388731Z  INFO copy_uri:copy_uri:copy_dataset:write_streams_to_files:collect:reduce:reduce_and_combine:reduce: rslex::dataset_crossbeam: close time.busy=90.9µs time.idle=9.10µs sessionId=012ea46a-341c-4258-8aba-90bde4fdfb51 source=Dataset[Partitions: 1, Sources: 1] file_name_column=None break_on_first_error=true skip_existing_files=false parallelization_degree=4 self=Dataset[Partitions: 1, Sources: 1] parallelization_degree=4 self=Dataset[Partitions: 1, Sources: 1] parallelization_degree=4 self=Dataset[Partitions: 1, Sources: 1] parallelization_degree=4 i=0
2023-05-18T14:08:25.388762Z  INFO copy_uri:copy_uri:copy_dataset:write_streams_to_files:collect:reduce:reduce_and_combine:combine: rslex::dataset_crossbeam: close time.busy=1.22ms time.idle=9.50µs sessionId=012ea46a-341c-4258-8aba-90bde4fdfb51 source=Dataset[Partitions: 1, Sources: 1] file_name_column=None break_on_first_error=true skip_existing_files=false parallelization_degree=4 self=Dataset[Partitions: 1, Sources: 1] parallelization_degree=4 self=Dataset[Partitions: 1, Sources: 1] parallelization_degree=4 self=Dataset[Partitions: 1, Sources: 1] parallelization_degree=4
rslex.log 檔案提供所有檔案複製的詳細資料,不論您選擇掛接或下載模式。 此檔案也會描述所使用的設定 (環境變數)。 若要開始偵錯,請檢查您是否設定常見案例的最佳掛接設定。
監視 Azure 儲存體
在 Azure 入口網站中,您可以選取儲存體帳戶,然後選取 [計量],以查看儲存體計量:

接著,您會使用 SuccessServerLatency 來繪製 SuccessE2ELatency。 如果計量顯示高 SuccessE2ELatency 和低 SuccessServerLatency,表示可用執行緒有限,或 CPU、記憶體或網路頻寬等資源不足,您應該:
- 使用 Azure Machine Learning 工作室中的監視檢視來檢查作業的 CPU 和記憶體使用率。 如果您 CPU 和記憶體不足,請考慮增加計算目標 VM 大小。
- 如果您要下載,且未使用 CPU 和記憶體,請考慮增加
RSLEX_DOWNLOADER_THREADS。 如果您使用掛接,則應增加DATASET_MOUNT_READ_BUFFER_BLOCK_COUNT以執行更多預先擷取,並增加DATASET_MOUNT_READ_THREADS以使用更多讀取執行緒。
如果計量顯示低 SuccessE2ELatency 和 低 SuccessServerLatency,但用戶端遇到高延遲,則表示到達服務的儲存體要求有所延遲。 您應該檢查:
- 相對於計算目標上可用的核心數目,用於掛接/下載的執行緒數目 (
DATASET_MOUNT_READ_THREADS/RSLEX_DOWNLOADER_THREADS) 是否太低。 如果設定太低,請增加執行緒數目。 - 下載的重試次數 (
AZUREML_DATASET_HTTP_RETRY_COUNT) 是否設定太高。 如果是,請減少重試次數。
監視作業期間的磁碟使用量
從 Azure Machine Learning 工作室,您也可以在作業執行期間監視計算目標磁碟 IO 和使用量。 瀏覽至工作,然後選取 [監視] 索引標籤。此索引標籤會根據 30 天的累計來提供工作資源的深入解析。 例如:

附註
作業監視僅支援 Azure Machine Learning 所管理的計算資源。 執行階段少於 5 分鐘的作業將會沒有足夠的資料填入此檢視。
Azure Machine Learning 資料執行階段不會使用磁碟空間的最後 RESERVED_FREE_DISK_SPACE 位元組,以保持計算狀況良好 (預設值為 150MB)。 如果磁碟已滿,程式碼會將檔案寫入磁碟,而不將檔案宣告為輸出。 因此,請檢查程式碼,以確定資料不會錯誤地寫入暫存磁碟。 如果您必須將檔案寫入暫存磁碟,且該資源已滿,請考慮:
- 將 VM 大小增加為有較大暫存磁碟的 VM 大小
- 在快取資料上設定 TTL (
DATASET_MOUNT_ATTRIBUTE_CACHE_TTL),以從磁碟清除資料
與計算共置資料
注意
如果儲存體與計算位於不同的區域,效能會降低,因為資料必須跨區域傳送。 這會增加成本。 請確定儲存體帳戶和計算資源位於相同的區域中。
如果資料和 Azure Machine Learning 工作區儲存在不同的區域中,建議您使用 azcopy 公用程式,將資料複製到相同區域中的儲存體帳戶。 AzCopy 會使用伺服器對伺服器 API,讓資料直接在儲存體伺服器之間複製。 這些複製作業不會使用您電腦的網路頻寬。 您可以使用 AZCOPY_CONCURRENCY_VALUE 環境變數來增加這些作業的輸送量。 若要深入了解,請參閱增加並行。
儲存體負載
單一儲存體帳戶處於高負載時,其可能會出現節流情況:
- 作業使用許多 GPU 節點
- 儲存體帳戶有許多並行使用者/應用程式,會在您執行作業時存取資料
本節會顯示計算內容,以判斷節流是否可能成為工作負載的問題,以及如何減少節流情況。
計算頻寬限制
Azure 儲存體帳戶的預設 輸出限制為 120 Gbit/秒。 Azure VM 有不同的網路頻寬,這會影響達到儲存體最大預設輸出容量所需的計算節點數目:
| 大小 | GPU 卡 | vCPU | 記憶體:GiB | 暫存儲存體 (SSD) GiB | GPU 卡數目 | GPU 記憶體:GiB | 預期的網路頻寬 (Gbit/秒) | 儲存體帳戶輸出預設值最大值 (Gbit/秒)* | 要達到預設輸出容量的節點數目 |
|---|---|---|---|---|---|---|---|---|---|
| Standard_ND96asr_v4 | A100 | 96 | 900 | 六千 | 8 | 40 | 24 | 120 | 5 |
| Standard_ND96amsr_A100_v4 | A100 | 96 | 1900 | 6400 | 8 | 80 | 24 | 120 | 5 |
| Standard_NC6s_v3 | V100 | 6 | 112 | 736 | 1 | 16 | 24 | 120 | 5 |
| Standard_NC12s_v3 | V100 | 12 | 224 | 1474 | 2 | 32 | 24 | 120 | 5 |
| Standard_NC24s_v3 | V100 | 24 | 448 | 2948 | 4 | 64 | 24 | 120 | 5 |
| Standard_NC24rs_v3 | V100 | 24 | 448 | 2948 | 4 | 64 | 24 | 120 | 5 |
| Standard_NC4as_T4_v3 | T4 | 4 | 28 | 180 | 1 | 16 | 8 | 120 | 15 |
| Standard_NC8as_T4_v3 | T4 | 8 | 56 | 360 | 1 | 16 | 8 | 120 | 15 |
| Standard_NC16as_T4_v3 | T4 | 16 | 110 | 360 | 1 | 16 | 8 | 120 | 15 |
| Standard_NC64as_T4_v3 | T4 | 64 | 440 | 2880 | 4 | 64 | 32 | 120 | 3 |
A100/V100 SKU 每個節點的網路頻寬上限為 24 Gbit/秒。 如果從單一帳戶讀取資料的每個節點都可以接近理論上的最大值 24 Gbit/秒,則五個節點將達到輸出容量。 使用六個以上的計算節點會開始降低所有節點的資料輸送量。
重要事項
如果您的工作負載需要 A100/V100 的六個以上的節點,或您相信您將超過記憶體的默認輸出容量(120Gbit/s),請連絡支援人員(透過 Azure 入口網站),並要求增加記憶體輸出限制。
跨多個儲存體帳戶進行調整
您可能會超過儲存體的最大輸出容量,以及/或可能會達到要求速率限制。 如果發生這些問題,建議您先連絡支援人員,以增加儲存體帳戶的這些限制上限。
如果您無法增加輸出容量或要求速率上限,便應該考慮跨多個儲存體帳戶複寫資料。 使用 Azure Data Factory、Azure 儲存體總管或 azcopy,將資料複製到多個帳戶,並在定型作業中掛接所有帳戶。 只會下載掛接上存取的資料。 因此,定型程式碼可以從環境變數讀取 RANK,以挑選要從多個輸入掛接中讀取哪一個。 工作定義會傳入儲存體帳戶的清單:
$schema: https://azuremlschemas.azureedge.net/latest/commandJob.schema.json
code: src
command: >-
  python train.py
  --epochs ${{inputs.epochs}}
  --learning-rate ${{inputs.learning_rate}}
  --data ${{inputs.cifar_storage1}}, ${{inputs.cifar_storage2}}
inputs:
  epochs: 1
  learning_rate: 0.2
  cifar_storage1:
    type: uri_folder
    path: azureml://datastores/storage1/paths/cifar
  cifar_storage2:
    type: uri_folder
    path: azureml://datastores/storage2/paths/cifar
environment: azureml:AzureML-pytorch-1.9-ubuntu18.04-py37-cuda11-gpu@latest
compute: azureml:gpu-cluster
distribution:
  type: pytorch
  process_count_per_instance: 1
resources:
  instance_count: 2
display_name: pytorch-cifar-distributed-example
experiment_name: pytorch-cifar-distributed-example
description: Train a basic convolutional neural network (CNN) with PyTorch on the CIFAR-10 dataset, distributed via PyTorch.
定型 Python 程式碼接著可以使用 RANK 來取得該節點專屬的儲存體帳戶:
import argparse
import os

parser = argparse.ArgumentParser()
parser.add_argument('--data', nargs='+')
args = parser.parse_args()

world_size = int(os.environ["WORLD_SIZE"])
rank = int(os.environ["RANK"])
local_rank = int(os.environ["LOCAL_RANK"])

data_path_for_this_rank = args.data[rank]
許多小型檔案問題
從儲存體讀取檔案牽涉到對每個檔案提出要求。 每個檔案的要求計數會根據檔案大小和處理檔案讀取的軟體設定而有所不同。
檔案會以大小 1-4 MB 的 區塊 讀取。 小於區塊的檔案會以單一要求讀取 (GET file.jpg 0-4MB),而大於區塊的檔案會針對每個區塊提出一個要求 (GET file.jpg 0-4MB、GET file.jpg 4-8 MB)。 下表顯示,相較於較大的檔案,小於 4 MB 區塊的檔案會導致更多的儲存體要求:
| # 檔案 | 檔案大小 | 資料大小總計 | 區塊大小 | # 儲存體要求 |
|---|---|---|---|---|
| 2,000,000 | 500KB | 1 TB | 4 MB | 2,000,000 |
| 1,000 | 1 GB | 1 TB | 4 MB | 256,000 |
對於小型檔案,延遲間隔大多牽涉到處理對儲存體的要求,而不是資料傳輸。 因此,我們提供這些建議來增加檔案大小:
- 針對非結構化數據(影像、視訊等)、封存 (zip/tar) 小型檔案,將它們儲存為可讀取多個區塊的較大檔案。 這些較大的封存檔案可以在計算資源中開啟,而 PyTorch Archive DataPipes 可以擷取較小的檔案。
- 若為結構化資料 (CSV、parquet 等),請檢查 ETL 處理序,以確定其會聯合檔案以增加大小。 Spark 有
repartition()和coalesce()方法來協助增加檔案大小。
如果您無法增加檔案大小,請探索 Azure 儲存體選項。
Azure 儲存體選項
Azure 儲存體提供兩個層級 - 標準和進階:
| 儲存體 | 狀況 |
|---|---|
| Azure Blob - 標準 (HDD) | 資料會以較大的 Blob 加以結構化:影像、影片等。 |
| Azure Blob - 進階 (SSD) | 高交易速率、較小的物件,或持續低儲存體延遲需求 |
秘訣
對於「許多」小型檔案 (KB 大小),我們建議使用進階 (SSD),因為儲存體成本低於執行 GPU 計算的成本。
讀取 V1 資料資產
本節說明如何在 V2 作業中讀取 V1 FileDataset 和 TabularDataset 資料實體。
讀取 FileDataset
在 Input 物件中,將 type 指定為 AssetTypes.MLTABLE 以及將 mode 指定為 InputOutputModes.EVAL_MOUNT:
附註
若要使用無伺服器計算,請刪除此程式碼中的 compute="cpu-cluster",。
如需 MLClient 物件、MLClient 物件初始化選項,以及如何連線到工作區的詳細資訊,請造訪連線到工作區。
from azure.ai.ml import command
from azure.ai.ml.entities import Data
from azure.ai.ml import Input
from azure.ai.ml.constants import AssetTypes, InputOutputModes
from azure.ai.ml import MLClient

ml_client = MLClient.from_config(credential=DefaultAzureCredential())

filedataset_asset = ml_client.data.get(name="<filedataset_name>", version="<version>")

my_job_inputs = {
    "input_data": Input(
            type=AssetTypes.MLTABLE,
            path=filedataset_asset.id,
            mode=InputOutputModes.EVAL_MOUNT
    )
}

job = command(
    code="./src",  # Local path where the code is stored
    command="ls ${{inputs.input_data}}",
    inputs=my_job_inputs,
    environment="<environment_name>:<version>",
    compute="cpu-cluster",
)

# Submit the command
returned_job = ml_client.jobs.create_or_update(job)
# Get a URL for the job status
returned_job.services["Studio"].endpoint
讀取 TabularDataset
在 Input 物件中,將 type 指定為 AssetTypes.MLTABLE 以及將 mode 指定為 InputOutputModes.DIRECT:
附註
若要使用無伺服器計算,請刪除此程式碼中的 compute="cpu-cluster",。
from azure.ai.ml import command
from azure.ai.ml.entities import Data
from azure.ai.ml import Input
from azure.ai.ml.constants import AssetTypes, InputOutputModes
from azure.ai.ml import MLClient

ml_client = MLClient.from_config(credential=DefaultAzureCredential())

filedataset_asset = ml_client.data.get(name="<tabulardataset_name>", version="<version>")

my_job_inputs = {
    "input_data": Input(
            type=AssetTypes.MLTABLE,
            path=filedataset_asset.id,
            mode=InputOutputModes.DIRECT
    )
}

job = command(
    code="./src",  # Local path where the code is stored
    command="python train.py --inputs ${{inputs.input_data}}",
    inputs=my_job_inputs,
    environment="<environment_name>:<version>",
    compute="cpu-cluster",
)

# Submit the command
returned_job = ml_client.jobs.create_or_update(job)
# Get a URL for the status of the job
returned_job.services["Studio"].endpoint