在 Azure Machine Learning 中使用 MLflow 專案定型 (預覽)
在本文中,了解如何透過使用 Azure Machine Learning 工作區進行追蹤的 MLflow 專案提交定型作業。 您可以提交作業,且只使用 Azure Machine Learning 追蹤作業,或將您的執行移轉至雲端,以在 Aazure Machine Learning Compute 上完全執行。
警告
Azure Machine Learning 中的 MLproject 檔案 (MLflow 專案) 支援將於 2026 年 9 月完全淘汰。 MLflow 仍然完全支援,而且仍然是追蹤 Azure Machine Learning 中機器學習工作負載的建議方式。
當您繼續使用 MLflow 時,建議您使用 Azure CLI 或適用於 Python 的 Azure Machine Learning SDK (v2),從 MLproject 檔案轉換至 Azure Machine Learning 作業。 如需 Azure Machine Learning 作業的詳細資訊,請參閱使用 MLflow 追蹤 ML 實驗和模型。
MLflow Projects 可讓您組織和描述程式碼,供其他資料科學家 (或自動化工具) 執行。 MLflow Projects 搭配 Azure Machine Learning 可讓您在工作區追蹤和管理定型執行。
重要
此功能目前處於公開預覽。 此預覽版本沒有服務等級協定,不建議用於處理生產工作負載。 可能不支援特定功能,或可能已經限制功能。
如需詳細資訊,請參閱 Microsoft Azure 預覽版增補使用條款。
深入了解 MLflow 和 Azure Machine Learning 整合。
必要條件
安裝 MLflow SDK 套件
mlflow和適用於 MLflow 的 Azure Machine Learningazureml-mlflow外掛程式:pip install mlflow azureml-mlflow提示
您可使用
mlflow-skinny套件,這是輕量型 MLflow 套件,沒有 SQL 儲存體、伺服器、UI 或資料科學相依性。 如果使用者主要需要 MLflow 的追蹤和記錄功能,而不需匯入包含部署在內的完整功能套件,則建議使用mlflow-skinny。Azure Machine Learning 工作區。 若要建立工作區,請參閱 建立機器學習資源教學課程。 檢閱您在工作區中執行 MLflow 作業所需的存取權限。
如果您要執行遠端追蹤 (也就是追蹤在 Azure Machine Learning 外部執行的實驗),請將 MLflow 設定為指向 Azure Machine Learning 工作區的追蹤 URI。 如需如何將 MLflow 連線至工作區的詳細資訊,請參閱設定適用於 Azure Machine Learning 的 MLflow。
使用 Azure Machine Learning 作為 MLflow 專案的後端需要套件
azureml-core:pip install azureml-core
連線到您的工作區
如果您要在 Azure Machine Learning 外部工作,則必須將 MLflow 設定為指向 Azure Machine Learning 工作區的追蹤 URI。 您可以在設定適用於 Azure Machine Learning 的 MLflow 中找到指示。
在 Azure Machine Learning 工作區中追蹤 MLflow 專案
此範例示範如何使用 Azure Machine Learning 提交 MLflow 專案並加以追蹤。
將
azureml-mlflow封裝當作 pip 相依性新增至環境設定檔,以追蹤工作區中的計量和主要成品。conda.yaml
name: mlflow-example
channels:
  - defaults
dependencies:
  - numpy>=1.14.3
  - pandas>=1.0.0
  - scikit-learn
  - pip:
    - mlflow
    - azureml-mlflow
提交本機執行並確定您已設定參數
backend = "azureml",這會新增對自動追蹤、模型擷取、記錄檔、快照集和工作區中列印錯誤的支援。 在此範例中,我們假設您嘗試執行的 MLflow 專案位於您目前所在的相同資料夾uri="."。mlflow run . --experiment-name --backend azureml --env-manager=local -P alpha=0.3在 Azure Machine Learning 工作室中檢視執行和計量。
在 Azure Machine Learning 作業中定型 MLflow 專案
此範例示範如何將 MLflow 專案提交為在 Azure Machine Learning 計算上執行的作業。
建立後端組態物件,在此案例中,我們即將指出
COMPUTE。 此參數會參考您要用來執行專案的遠端計算叢集名稱。 如果COMPUTE存在,專案會自動以 Azure Machine Learning 作業的形式提交至指定的計算。backend_config.json
{ "COMPUTE": "cpu-cluster" }將
azureml-mlflow封裝當作 pip 相依性新增至環境設定檔,以追蹤工作區中的計量和主要成品。conda.yaml
name: mlflow-example
channels:
  - defaults
dependencies:
  - numpy>=1.14.3
  - pandas>=1.0.0
  - scikit-learn
  - pip:
    - mlflow
    - azureml-mlflow
提交本機執行並確定您已設定參數
backend = "azureml",這會新增對自動追蹤、模型擷取、記錄檔、快照集和工作區中列印錯誤的支援。 在此範例中,我們假設您嘗試執行的 MLflow 專案位於您目前所在的相同資料夾uri="."。mlflow run . --backend azureml --backend-config backend_config.json -P alpha=0.3注意
由於 Azure Machine Learning 作業一律在環境中執行,因此會忽略
env_manager參數。在 Azure Machine Learning 工作室中檢視執行和計量。
清除資源
如果您不打算在工作區使用已記錄的計量和成品,則目前無法個別刪除這些項目。 請改以刪除包含儲存體帳戶和工作區的資源群組,以免產生任何費用:
在 Azure 入口網站中,選取最左邊的 [資源群組]。
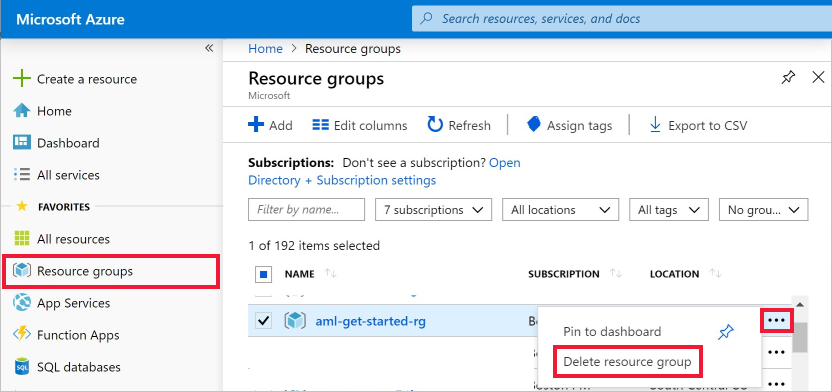
在清單中,選取您所建立的資源群組。
選取 [刪除資源群組]。
輸入資源群組名稱。 接著選取刪除。
Notebook 範例
使用搭配 Azure Machine Learning 筆記本的 MLflow 示範和擴充本文所述的概念。
注意
您可以在 https://github.com/Azure/azureml-examples 上找到 Mlflow 使用範例的社群導向存放庫。