將 Azure 監視器 - Log Analytics 工作區重新放置到另一個區域
有各種原因讓您想要將現有的 Azure 資源從某個區域移至另一個區域。 您可能想要:
- 利用新的 Azure 區域。
- 只部署特定區域中可用的功能或服務。
- 符合內部原則和治理需求。
- 與公司合併和收購保持一致
- 符合容量規劃需求。
Log Analytics 工作區的重新配置計畫必須包含使用 Log Analytics工作區記錄資料的任何資源重新配置。
Log Analytics 工作區原本就不支援將工作區資料從某個區域移轉至其他和關聯的裝置。 相反地,您必須在目標區域中建立新的 Log Analytics 工作區,然後在新的工作區中重新設定裝置和設定。
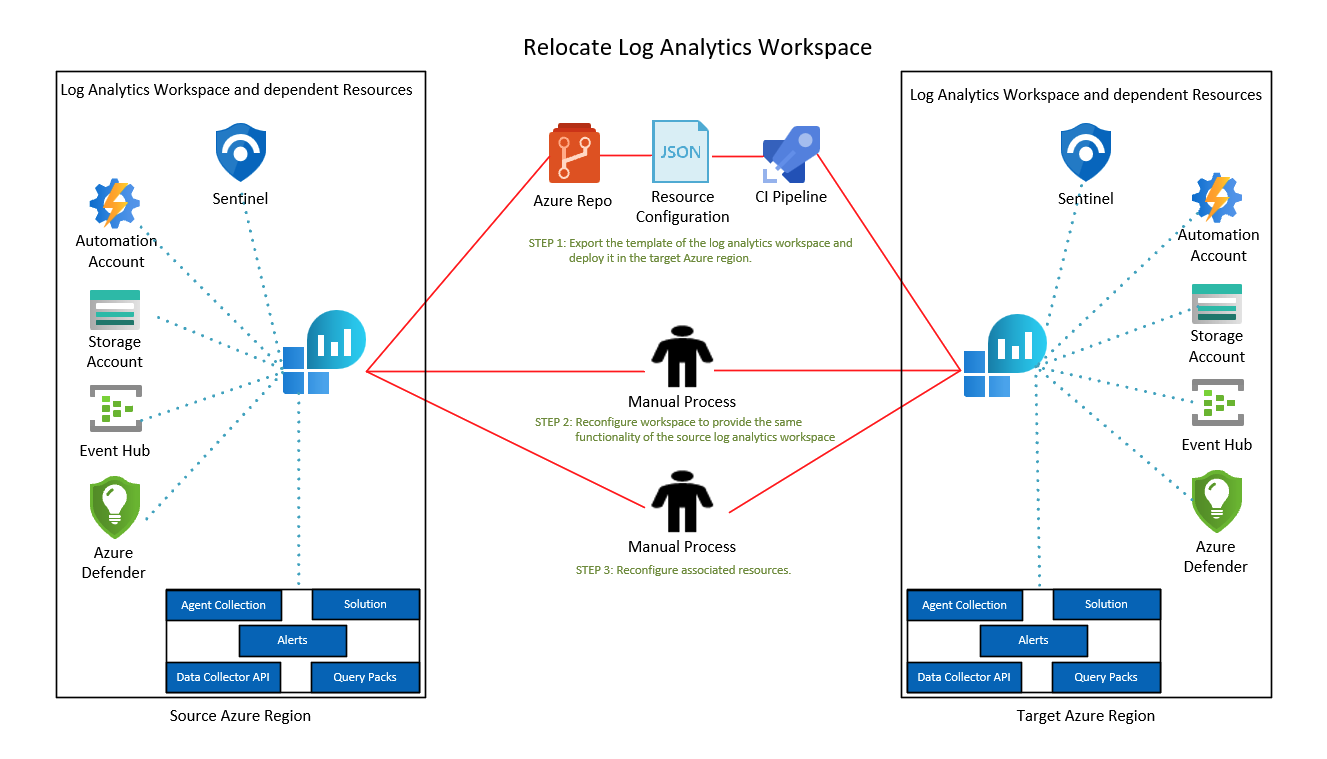
下圖說明 Log Analytics 工作區的重新放置模式。 紅色流程線條代表目標執行個體的重新部署,以及資料移動和更新網域和端點。
重新放置至可用性區域支援
Azure 可用性區域是每個 Azure 區域內至少三個實體獨立的資料中心群組。 每個區域內的資料中心都配備了獨立的電源、冷卻系統和網路基礎結構。 在本機區域失敗的案例中,可用性區域的設計在於,當一個區域受影響時,讓其餘兩個區域支援區域服務、容量和高可用性。
這類失敗的範圍可從軟體和硬體故障,擴及到如地震、淹水和火災的事件。 透過 Azure 服務的備援和邏輯隔離,實現對失敗的容錯。 如需深入了解 Azure 的可用性區域,請參閱區域和可用性區域。
已啟用 Azure 可用性區域的服務旨在提供正確程度的可靠性和彈性。 您可以透過兩種方式加以設定。 它們可以是區域備援,具有跨區域自動複寫功能,或者是區域性的,將執行個體釘選在特定區域。 兩種方法可以結合使用。 如需深入了解區域和區域備援結構,請參閱使用可用性區域和區域的建議。
如果您要將 Log Analytics 工作區重新放置到支援可用性區域的區域:
- 閱讀 Azure 可用性區域移轉基準,以評估工作負載或應用程式的可用性區域整備程度。
- 請遵循將 Log Analytics 移轉至可用性區域支援中的指導。
必要條件
若要匯出工作區設定至可部署在另一個區域的範本,您需要 Log Analytics 參與者,或監視參與者角色或更新版本。
識別目前工作區相關的所有資源,包括:
連線的代理程式:在工作區中輸入記錄,並查詢活動訊號資料表,列出連線的代理程式。
Heartbeat | summarize by Computer, Category, OSType, _ResourceId診斷設定:資源可以傳送記錄至工作區中的 Azure 診斷或專用資料表。 在工作區中輸入記錄,然後執行此查詢,取得傳送資料至
AzureDiagnostics資料表的資源:AzureDiagnostics | where TimeGenerated > ago(12h) | summarize by ResourceProvider , ResourceType, Resource | sort by ResourceProvider, ResourceType執行此查詢,取得傳送資料至專用資料表的資源:
search * | where TimeGenerated > ago(12h) | where isnotnull(_ResourceId) | extend ResourceProvider = split(_ResourceId, '/')[6] | where ResourceProvider !in ('microsoft.compute', 'microsoft.security') | extend ResourceType = split(_ResourceId, '/')[7] | extend Resource = split(_ResourceId, '/')[8] | summarize by tostring(ResourceProvider) , tostring(ResourceType), tostring(Resource) | sort by ResourceProvider, ResourceType已安裝的解決方案:在工作區瀏覽窗格上選取 [舊版解決方案],取得已安裝的解決方案清單。
資料收集器 API:透過資料收集器 API送達的資料,會儲存在自訂記錄資料表中。 如需自訂記錄資料表的清單,請在工作區流覽窗格上,選取 [記錄],然後在 [結構描述] 窗格上,選取 [自訂記錄]。
連結服務:工作區可能有相依資源的連結服務,例如 Azure 自動化帳戶、儲存體帳戶或專用叢集。 從工作區移除連結服務。 在目標工作區中手動重新設定連結服務。
警示:若要列出警示,請在工作區瀏覽窗格上選取 [警示],然後在工具列上選取 [管理警示規則]。 在 2019 年 6 月 1 日後建立的工作區,或從 Log Analytics 警示 API 升級至 scheduledQueryRules API 的工作區中的警示,都可以包含在範本中。
您可以檢查 scheduledQueryRules API 是否用於工作區中的警示。 或者,您可以在目標工作區中手動設定警示。
查詢套件:工作區可以與多個查詢套件關聯。 若要識別工作區中的查詢套件,請在工作區瀏覽窗格上選取 [記錄]、在左窗格上選取 [查詢],然後選取搜尋方塊右側的省略符號。 右側會開啟所選查詢套件的對話方塊。 如果您的查詢套件與您移動的工作區位於相同的資源群組,即可包含在此移轉中。
請確認 Azure 訂閱允許您在在目標區域中建立 Log Analytics 工作區。
停機
若要瞭解可能的停機情況,請參閱適用於 Azure 的雲端採用架構:選取重新配置方法。
準備
下列程序示範如何使用 Resource Manager 範本,準備移動工作區和資源。
注意
並非所有資源都可以透過範本匯出。 您必須在目標區域中建立工作區,才能個別設定這些資源。
登入 Azure 入口網站,然後選取 [資源群組]。
尋找並選取包含工作區的資源群組。
若要檢視警示資源,請選取 [顯示隱藏的類型] 核取方塊。
選取 [類型] 篩選。 選取 [Log Analytics 工作區]、[解決方案]、[SavedSearches]、[microsoft.insights/scheduledqueryrules]、[defaultQueryPack],及您使用的其他工作區相關資源 (例如自動化帳戶)。 接著選取套用。
選取工作區、解決方案、已儲存的搜尋、警示、查詢套件,及您使用的其他工作區相關資源 (例如自動化帳戶)。 然後在工具列上選取 [匯出範本]。
注意
無法使用範本匯出 Microsoft Sentinel。 您必須 將 Sentinel 上線至目標工作區。
在工具列上選取 [部署],編輯並準備部署範本。
在工具列上選取 [編輯參數],並在線上編輯器中開啟 [parameters.json] 檔案。
若要編輯參數,請變更
parameters下的value屬性。 以下是範例:{ "$schema": "https://schema.management.azure.com/schemas/2019-04-01/deploymentParameters.json#", "contentVersion": "1.0.0.0", "parameters": { "workspaces_name": { "value": "my-workspace-name" }, "workspaceResourceId": { "value": "/subscriptions/resource-id/resourceGroups/resource-group-name/providers/Microsoft.OperationalInsights/workspaces/workspace-name" }, "alertName": { "value": "my-alert-name" }, "querypacks_name": { "value": "my-default-query-pack-name" } } }在編輯器中選取 [儲存]。
編輯範本
在工具列上選取 [編輯範本],並在線上編輯器中開啟 [template.json] 檔案。
若要編輯部署 Log Analytics 工作區的目標區域,請在線上編輯器中的
resources下,變更location屬性。若要取得區域位置代碼,請參閱 Azure 中的資料落地。 區域代碼是沒有空格的區域名稱。 例如,美國中部應該是
centralus。如果連結服務資源 (
microsoft.operationalinsights/workspaces/linkedservices) 存在範本中,請移除這些資源。 您應該在目標工作區中手動重新設定這些資源。下列範例範本包含工作區、已儲存的搜尋、解決方案、警示和查詢套件:
{
  "$schema": "https://schema.management.azure.com/schemas/2019-04-01/deploymentTemplate.json#",
  "contentVersion": "1.0.0.0",
  "parameters": {
    "workspaces_name": {
      "type": "String"
    },
    "workspaceResourceId": {
      "type": "String"
    },
    "alertName": {
      "type": "String"
    },
    "querypacks_name": {
      "type": "String"
    }
  },
  "variables": {},
  "resources": [
    {
      "type": "microsoft.operationalinsights/workspaces",
      "apiVersion": "2020-08-01",
      "name": "[parameters('workspaces_name')]",
      "location": "france central",
      "properties": {
        "sku": {
          "name": "pergb2018"
        },
        "retentionInDays": 30,
        "features": {
          "enableLogAccessUsingOnlyResourcePermissions": true
        },
        "workspaceCapping": {
          "dailyQuotaGb": -1
        },
        "publicNetworkAccessForIngestion": "Enabled",
        "publicNetworkAccessForQuery": "Enabled"
      }
    },
    {
      "type": "Microsoft.OperationalInsights/workspaces/savedSearches",
      "apiVersion": "2020-08-01",
      "name": "[concat(parameters('workspaces_name'), '/2b5112ec-5ad0-5eda-80e9-ad98b51d4aba')]",
      "dependsOn": [
        "[resourceId('Microsoft.OperationalInsights/workspaces', parameters('workspaces_name'))]"
      ],
      "properties": {
        "category": "VM Monitoring",
        "displayName": "List all versions of curl in use",
        "query": "VMProcess\n| where ExecutableName == \"curl\"\n| distinct ProductVersion",
        "tags": [],
        "version": 2
      }
    },
    {
      "type": "Microsoft.OperationsManagement/solutions",
      "apiVersion": "2015-11-01-preview",
      "name": "[concat('Updates(', parameters('workspaces_name'))]",
      "location": "france central",
      "dependsOn": [
        "[resourceId('microsoft.operationalinsights/workspaces', parameters('workspaces_name'))]"
      ],
      "plan": {
        "name": "[concat('Updates(', parameters('workspaces_name'))]",
        "promotionCode": "",
        "product": "OMSGallery/Updates",
        "publisher": "Microsoft"
      },
      "properties": {
        "workspaceResourceId": "[resourceId('microsoft.operationalinsights/workspaces', parameters('workspaces_name'))]",
        "containedResources": [
          "[concat(resourceId('microsoft.operationalinsights/workspaces', parameters('workspaces_name')), '/views/Updates(', parameters('workspaces_name'), ')')]"
        ]
      }
    }
    {
      "type": "Microsoft.OperationsManagement/solutions",
      "apiVersion": "2015-11-01-preview",
      "name": "[concat('VMInsights(', parameters('workspaces_name'))]",
      "location": "france central",
      "plan": {
        "name": "[concat('VMInsights(', parameters('workspaces_name'))]",
        "promotionCode": "",
        "product": "OMSGallery/VMInsights",
        "publisher": "Microsoft"
      },
      "properties": {
        "workspaceResourceId": "[resourceId('microsoft.operationalinsights/workspaces', parameters('workspaces_name'))]",
        "containedResources": [
          "[concat(resourceId('microsoft.operationalinsights/workspaces', parameters('workspaces_name')), '/views/VMInsights(', parameters('workspaces_name'), ')')]"
        ]
      }
    },
    {
      "type": "microsoft.insights/scheduledqueryrules",
      "apiVersion": "2021-08-01",
      "name": "[parameters('alertName')]",
      "location": "france central",
      "properties": {
        "displayName": "[parameters('alertName')]",
        "severity": 3,
        "enabled": true,
        "evaluationFrequency": "PT5M",
        "scopes": [
          "[parameters('workspaceResourceId')]"
        ],
        "windowSize": "PT15M",
        "criteria": {
          "allOf": [
            {
              "query": "Heartbeat | where computer == 'my computer name'",
              "timeAggregation": "Count",
              "operator": "LessThan",
              "threshold": 14,
              "failingPeriods": {
                "numberOfEvaluationPeriods": 1,
                "minFailingPeriodsToAlert": 1
              }
            }
          ]
        },
        "autoMitigate": true,
        "actions": {}
      }
    },
    {
      "type": "Microsoft.OperationalInsights/querypacks",
      "apiVersion": "2019-09-01-preview",
      "name": "[parameters('querypacks_name')]",
      "location": "francecentral",
      "properties": {}
    },
    {
      "type": "Microsoft.OperationalInsights/querypacks/queries",
      "apiVersion": "2019-09-01-preview",
      "name": "[concat(parameters('querypacks_name'), '/00000000-0000-0000-0000-000000000000')]",
      "dependsOn": [
        "[resourceId('Microsoft.OperationalInsights/querypacks', parameters('querypacks_name'))]"
      ],
      "properties": {
        "displayName": "my-query-name",
        "body": "my-query-text",
        "related": {
          "categories": [],
          "resourceTypes": [
              "microsoft.operationalinsights/workspaces"
          ]
        },
        "tags": {
          "labels": []
        }
      }
    }
  ]
}
在線上編輯器中選取 [儲存]。
重新部署
選取 [訂閱],並選擇要部署目標工作區的訂閱。
選取 [資源群組],並選擇要部署目標工作區的資源群組。 您可以選取 [建立新資源群組],建立目標工作區的新資源群組。
確認 [區域] 已設為您要部署網路安全性群組的目標位置。
選取 [檢閱 + 建立] 按鈕,驗證範本。
選取 [建立],在目標區域部署工作區和選取的資源。
您的工作區,包括選取的資源已部署在目標區域中。 您可以在工作區中完成其餘設定,配對功能與原始工作區。
- 連線代理程式:使用任何可用的選項 (包括資料收集規則),在虛擬機器和虛擬機器擴展集上設定必要的代理程式,並指定新的目標工作區指定為目的地。
- 診斷設定:使用目標工作區作為目的地,更新已識別資源的診斷設定。
- 安裝解決方案:部分解決方案 (例如 Microsoft Sentinel) 需要特定的上線程序,而且不包含在範本中。 您應該將這些解決方案個別上線至新的工作區。
- 設定資料收集器 API:設定資料收集器 API 執行個體,並傳送資料至目標工作區。
- 設定警示規則:當範本未匯出警示時,您必須在目標工作區中手動設定警示。
確認新資料未內嵌至原始工作區。 在原始工作區中執行下列查詢,並觀察移轉後是否內嵌:
search *
| where TimeGenerated > ago(12h)
| summarize max(TimeGenerated) by Type
資料來源連線目標工作區後,內嵌的資料會儲存在目標工作區中。 舊版資料會保留在原始工作區中,並遵守保留原則。 您可以執行跨工作區查詢。 如果兩個工作區都指派相同的名稱,請在工作區參考中使用限定名稱 (subscriptionName/resourceGroup/componentName)。
以下是兩個名稱相同的工作區查詢範例:
union
  workspace('subscription-name1/<resource-group-name1/<original-workspace-name>')Update,
  workspace('subscription-name2/<resource-group-name2/<target-workspace-name>').Update,
| where TimeGenerated >= ago(1h)
| where UpdateState == "Needed"
| summarize dcount(Computer) by Classification
捨棄
如果您要捨棄來源工作區,請刪除匯出的資源或包含這些資源的資源群組:
在 Azure 入口網站中,選取目標資源群組。
移至 [概觀] 頁面:
- 如果您為此部署建立新的資源群組,請在工具列上選取 [刪除資源群組],刪除資源群組。
- 如果範本已部署至現有的資源群組,請選取使用範本部署的資源,然後在工具列上選取 [刪除],刪除選取的資源。
清理
如果新工作區內嵌新資料,原始工作區中的舊版資料仍可供查詢使用,並遵守工作區中定義的保留原則。 需要跨工作區查詢舊版資料時,建議您繼續保留原始工作區。
如果您不再需要存取原始工作區中的舊版資料:
- 請在 Azure 入口網站中,選取原始資源群組。
- 選取您要移除的任何資源,然後在工具列上選取 [刪除]。
相關內容
將資源移到新的資源群組或訂用帳戶 \(部分機器翻譯\)
意見反應
即將登場:在 2024 年,我們將逐步淘汰 GitHub 問題作為內容的意見反應機制,並將它取代為新的意見反應系統。 如需詳細資訊,請參閱:https://aka.ms/ContentUserFeedback。
提交並檢視相關的意見反應