在本教學課程中,您將瞭解如何撰寫基本量子程式 Q# ,以利用量子力學的本質來產生隨機數。
在此教學課程中,您需要:
- 建立 Q# 程式。
- 檢閱程式的主要元件 Q# 。
- 定義問題的邏輯。
- 結合傳統和量子作業來解決問題。
- 使用量子位元與疊加來建置量子亂數產生器。
提示
如果你想加速你的量子運算旅程,不妨看看 Microsoft Quantum 網站上獨特的功能「Code with Microsoft Quantum」。 在這裡,您可以執行內建 Q# 範例或您自己的 Q# 程式,從提示產生新 Q# 程式碼,一鍵在 VS Code 網頁版 中開啟並執行程式碼,並向 Copilot 詢問有關量子運算的問題。
必要條件
要在 Microsoft Quantum 的 Copilot 中執行程式碼範例,您必須擁有 Microsoft(MSA)電子郵件帳號。
要在 Visual Studio Code(VS Code)和 Jupyter Notebook 中開發並執行範例程式碼,請安裝以下程式:
最新版 VS Code 或開啟 VS Code for the Web。
最新版本 Microsoft Quantum Development Kit 的(QDK)擴充功能。 如需安裝詳細資料,請參閱 設定 QDK 擴充功能。
最新的
qdkPython 函式庫,具有額外的功能jupyter。 安裝這些程式時,請開啟終端機並執行以下指令:pip install --upgrade "qdk[jupyter]"
縮小問題的範圍
經典計算機不產生隨機數,而是產生偽隨機數。 偽隨機數產生器根據某個初始值(稱為種子)產生確定性的數字序列。 為了更精確地估計隨機值,此種子通常是 CPU 時鐘的目前時間。
另一方面,量子電腦可以產生真正的亂數。 這是因為疊加中的量子位元測量是概率流程。 測量的結果是隨機的,且無法預測結果。 這是量子亂數產生器的基本原則。
量子位是可以迭加的量子信息單位。 測量時,量子位只能處於 0 狀態或 1 狀態。 不過,在測量之前,量子位元的狀態代表讀取測量值 0 或 1 的機率。
首先在基礎狀態(例如零)配置量子位元。 隨機數產生器的第一步是使用 Hadamard 運算將量子位元置於相等的疊加狀態。 此狀態的測量會產生一個零或一個具有每個結果 50% 機率的零或一個,這是一個真正的隨機位。
在迭加中測量量子位之後,無法得知您取得的內容,而且每次叫用程式代碼時,結果都會是不同的值。 但是,您可以如何使用此行為來產生較大的亂數?
假設您重複該程序四次,產生此二進位數字序列:
$${0,1,1,0}$$
如果您將這些位串連或結合成位元字串,則可以形成更大的數字。 在此範例中,位元序列 ${0110}$ 相當於十進位中的六。
$${0110_{\ 二進制} \equiv 6_{\ 十進制}}$$
如果您多次重複此程式,便能結合多個位元來形成任何更大的數字。 使用此方法,您可以建立數位作為安全密碼,因為您可以確定沒有駭客可以判斷測量序列的結果。
定義亂數產生器邏輯
讓我們概述隨機數產生器的邏輯應該是什麼:
- 將
max定義為您想要產生的最大數字。 - 定義您必須產生的隨機位元數目。 這是藉由計算多少位
nBits來完成,您必須將整數表示為max。 - 產生長度為
nBits的隨機位元字串。 - 如果位元字串代表的數字大於
max,則回到步驟三。 - 否則,程序即完成。 以整數形式傳回產生的數字。
舉例來說,讓我們將 max 設定為 12。 也就是說,12 是您想要作為密碼使用的最大數位。
您需要 ${\lfloor ln(12) / ln(2) + 1 \rfloor}$,或 4 位元來表示 0 與 12 之間的每個數字。 我們可以使用內建函式 BitSizeI,它會接受任何整數,並傳回代表它所需的位數。
假設您產生位元字串 ${1101_{\ binary}}$,這相當於 ${13_{\ decimal}}$。 因為 13 大於 12,所以您重複該程序。
接下來,您產生位元字串 ${0110_{\ binary}}$,這相當於 ${6_{\ decimal}}$。 因為 6 小於 12,所以程序完成。
量子隨機數產生器會傳回數位 6 作為密碼。 在實務上,通常會將較大的數字設定為最大值,因為只要嘗試所有可能的密碼,就能輕鬆破解較小的數字。 事實上,若要提高猜測或破解密碼的困難,您可以使用 ASCII 碼將二進位碼轉換成文字,並使用數字、符號和混合大小寫字母來產生密碼。
寫入隨機位產生器
第一個步驟是撰寫 Q# 產生隨機位的作業。 這項作業將是隨機數產生器的其中一個建置組塊。
operation GenerateRandomBit() : Result {
    // Allocate a qubit.
    use q = Qubit();

    // Set the qubit into superposition of 0 and 1 using the Hadamard
    H(q);

    // At this point the qubit `q` has 50% chance of being measured in the
    // |0〉 state and 50% chance of being measured in the |1〉 state.
    // Measure the qubit value using the `M` operation, and store the
    // measurement value in the `result` variable.
    let result = M(q);

    // Reset qubit to the |0〉 state.
    // Qubits must be in the |0〉 state by the time they are released.
    Reset(q);

    // Return the result of the measurement.
    return result;
}
現在看看新的程序代碼。
- 您可以定義
GenerateRandomBit作業,其不會接受任何輸入,併產生 類型的Result值。 型Result別代表度量的結果,而且可以有兩個可能的值:Zero或One。 - 您可以使用 關鍵詞來配置單一量子位
use。 配置時,量子位一律處於 |0} 狀態。 - 您可以使用
H作業將量子位放在相等迭加中。 - 您可以使用
M作業來測量量子位,並傳回測量值 (Zero或One)。 - 您可以使用
Reset作業,將量子位重設為 |0} 狀態。
藉由將量子位置於迭加與 H 作業,並使用作業來測量, M 每次叫用程式代碼時,結果都會是不同的值。
使用 Bloch 球將程式 Q# 代碼可視化
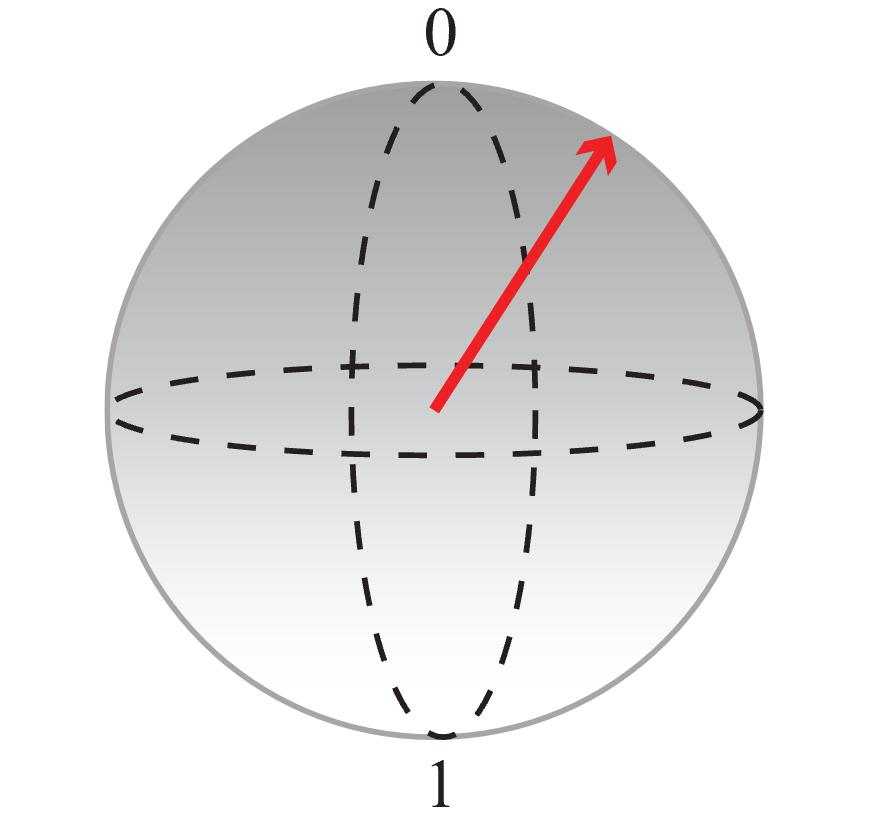
在布洛赫球中,北極代表經典值 0,南極代表經典值 1。 任何迭加都可以以球體上的點來表示(以箭號表示)。 箭號的結尾越接近極點,量子位在測量時會折迭到指派給該極點的傳統值機率越高。 例如,如果您測量,下圖中箭號所代表的量子位元狀態會提供值 0 的機率較高。
您可以使用此表示法,將程式代碼正在執行的動作視覺化:
首先,從在 |0〉 狀態下初始化的量子位開始,並套用運算
H來建立相等的疊加,其中 0 和 1 的機率相同。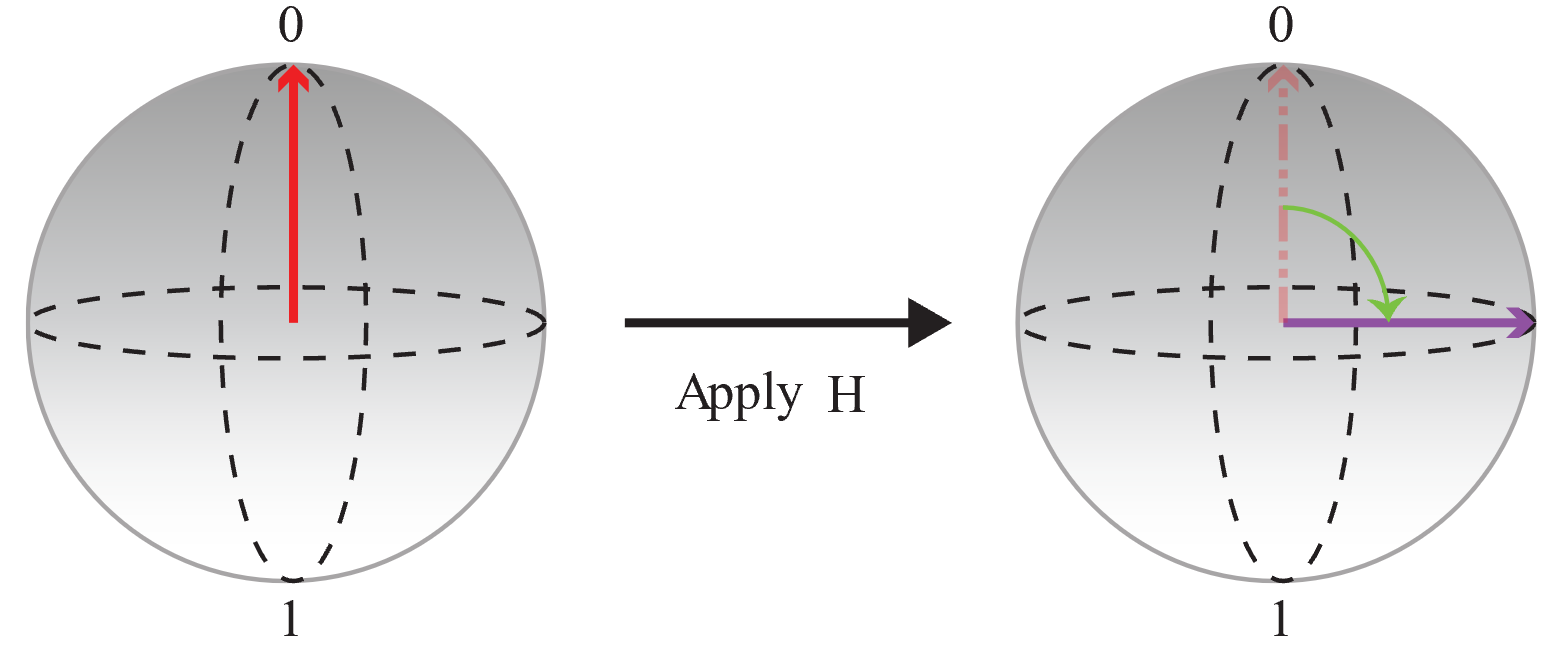
然後測量量子位並儲存輸出:
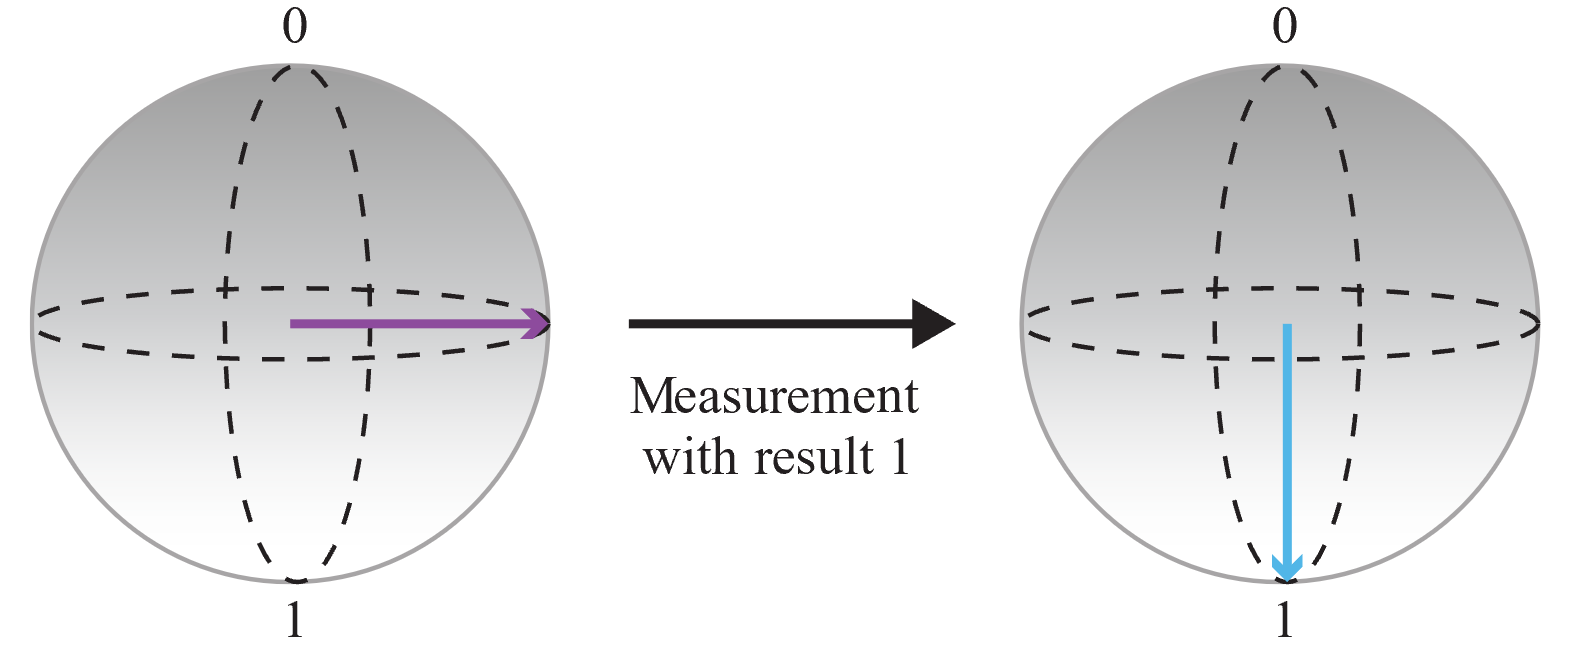
由於測量結果是隨機的,並且測量 0 和 1 的機率相同,因此您得到了一個完全隨機的位。 您可以多次呼叫此作業來建立整數。 例如,如果您呼叫作業三次以取得三個隨機位,您可以建置隨機 3 位數位(也就是介於 0 到 7 之間的隨機數)。
撰寫完整的隨機數產生器
首先,您必須將所需的命名空間從 Q# 標準連結庫匯入程式。 編譯程式 Q# 會自動載入許多常見的函式和作業,不過對於完整的隨機數產生器,您需要兩 Q# 個命名空間的一些額外函式和作業:
Std.Math和Std.Convert。import Std.Convert.*; import Std.Math.*;接下來,您會定義
GenerateRandomNumberInRange作業。 此作業會重複呼叫GenerateRandomBit作業,以建立位元字串。/// Generates a random number between 0 and `max`. operation GenerateRandomNumberInRange(max : Int) : Int { // Determine the number of bits needed to represent `max` and store it // in the `nBits` variable. Then generate `nBits` random bits which will // represent the generated random number. mutable bits = []; let nBits = BitSizeI(max); for idxBit in 1..nBits { bits += [GenerateRandomBit()]; } let sample = ResultArrayAsInt(bits); // Return random number if it is within the requested range. // Generate it again if it is outside the range. return sample > max ? GenerateRandomNumberInRange(max) | sample; }讓我們花一點時間檢閱新程式碼。
- 您必須計算表示整數上限
max所需的位元數。 命名空間中的BitSizeI函Std.Math式會將整數轉換成表示它所需的位數。 -
SampleRandomNumberInRange作業會使用for迴圈來產生亂數,直到產生一個等於或小於max的亂數為止。for迴圈的運作方式與其他程式設計語言中的for迴圈完全相同。 - 變數
bits是可變動的變數。 可變變數是在計算期間可以變更的變數。 您可以使用set指示詞來變更可變變數的值。 - 函
ResultArrayAsInt式會從預設Std.Convert命名空間將位字串轉換成正整數。
- 您必須計算表示整數上限
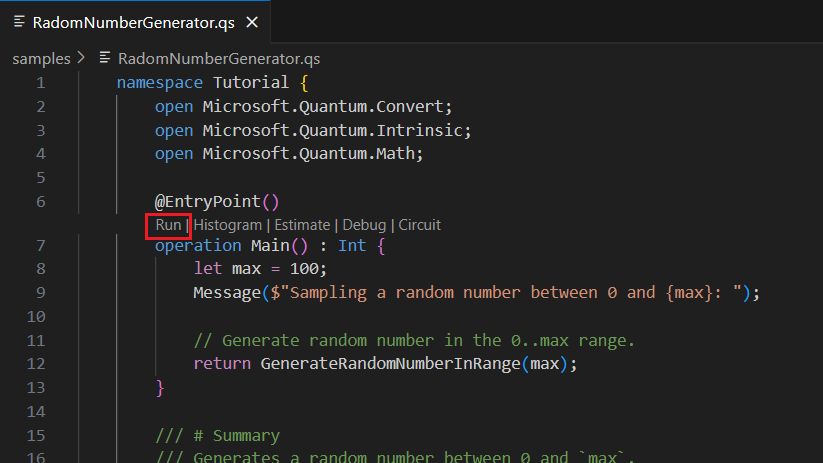
最後,您會將進入點新增至程式。 根據預設,編譯程式 Q# 會尋找
Main作業,並開始在那裡處理。 它會呼叫GenerateRandomNumberInRange作業,以產生介於 0 到 100 之間的隨機數位。operation Main() : Int { let max = 100; Message($"Sampling a random number between 0 and {max}: "); // Generate random number in the 0..max range. return GenerateRandomNumberInRange(max); }let指示詞宣告在計算期間不會變更的變數。 在這裡,您會將最大值定義為100。如需作業的詳細資訊
Main,請參閱 進入點。隨機數產生器的完整程式碼如下所示:
import Std.Convert.*;
import Std.Math.*;
operation Main() : Int {
let max = 100;
Message($"Sampling a random number between 0 and {max}: ");
// Generate random number in the 0..max range.
return GenerateRandomNumberInRange(max);
}
/// Generates a random number between 0 and `max`.
operation GenerateRandomNumberInRange(max : Int) : Int {
    // Determine the number of bits needed to represent `max` and store it
    // in the `nBits` variable. Then generate `nBits` random bits which will
    // represent the generated random number.
    mutable bits = [];
    let nBits = BitSizeI(max);
    for idxBit in 1..nBits {
        bits += [GenerateRandomBit()];
    }
    let sample = ResultArrayAsInt(bits);

    // Return random number if it is within the requested range.
    // Generate it again if it is outside the range.
    return sample > max ? GenerateRandomNumberInRange(max) | sample;
}
operation GenerateRandomBit() : Result {
// Allocate a qubit.
use q = Qubit();
// Set the qubit into superposition of 0 and 1 using a Hadamard operation
H(q);
// At this point the qubit `q` has 50% chance of being measured in the
// |0〉 state and 50% chance of being measured in the |1〉 state.
// Measure the qubit value using the `M` operation, and store the
// measurement value in the `result` variable.
let result = M(q);
// Reset qubit to the |0〉 state.
// Qubits must be in the |0〉 state by the time they are released.
Reset(q);
// Return the result of the measurement.
return result;
}
執行隨機數產生器程式
你可以在 Microsoft Quantum 裡用 Copilot 執行這個程式,也可以在 Visual Studio Code 中當作獨立 Q# 應用程式或使用 Python 主機程式執行。
你可以免費用 Microsoft Quantum 的 Copilot 測試你的 Q# 程式碼——你只需要一個 Microsoft(MSA)的電子郵件帳號。 欲了解更多關於 Microsoft Quantum 中 Copilot 的資訊,請參閱 探索 Azure Quantum。
將下列程式代碼複製並貼到程式碼編輯器中。
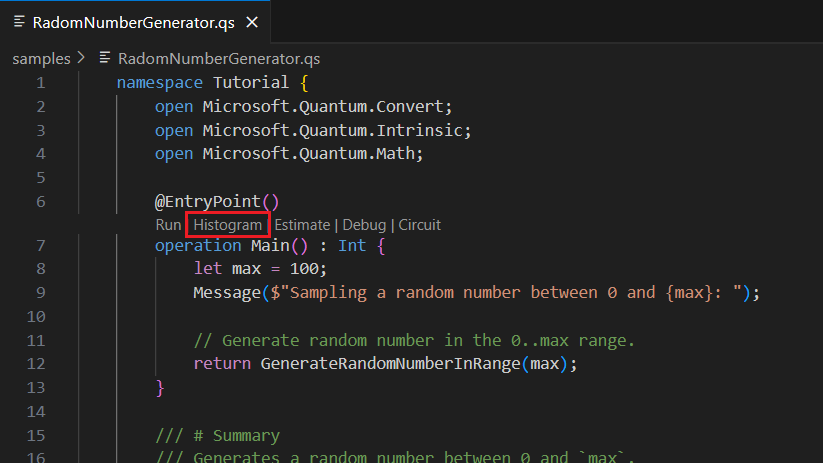
import Std.Convert.*;
import Std.Math.*;

operation Main() : Int {
    let max = 100;
    Message($"Sampling a random number between 0 and {max}: ");

    // Generate random number in the 0..max range.
    return GenerateRandomNumberInRange(max);
}

/// # Summary
/// Generates a random number between 0 and `max`.
operation GenerateRandomNumberInRange(max : Int) : Int {
    // Determine the number of bits needed to represent `max` and store it
    // in the `nBits` variable. Then generate `nBits` random bits which will
    // represent the generated random number.
    mutable bits = [];
    let nBits = BitSizeI(max);
    for idxBit in 1..nBits {
        bits += [GenerateRandomBit()];
    }
    let sample = ResultArrayAsInt(bits);

    // Return random number if it is within the requested range.
    // Generate it again if it is outside the range.
    return sample > max ? GenerateRandomNumberInRange(max) | sample;
}

/// # Summary
/// Generates a random bit.
operation GenerateRandomBit() : Result {
    // Allocate a qubit.
    use q = Qubit();

    // Set the qubit into superposition of 0 and 1 using the Hadamard
    // operation `H`.
    H(q);

    // At this point the qubit `q` has 50% chance of being measured in the
    // |0〉 state and 50% chance of being measured in the |1〉 state.
    // Measure the qubit value using the `M` operation, and store the
    // measurement value in the `result` variable.
    let result = M(q);

    // Reset qubit to the |0〉 state.
    // Qubits must be in the |0〉 state by the time they are released.
    Reset(q);

    // Return the result of the measurement.
    return result;

    // Note that Qubit `q` is automatically released at the end of the block.
}
選取要執行的拍攝次數,然後選取 [ 執行]。
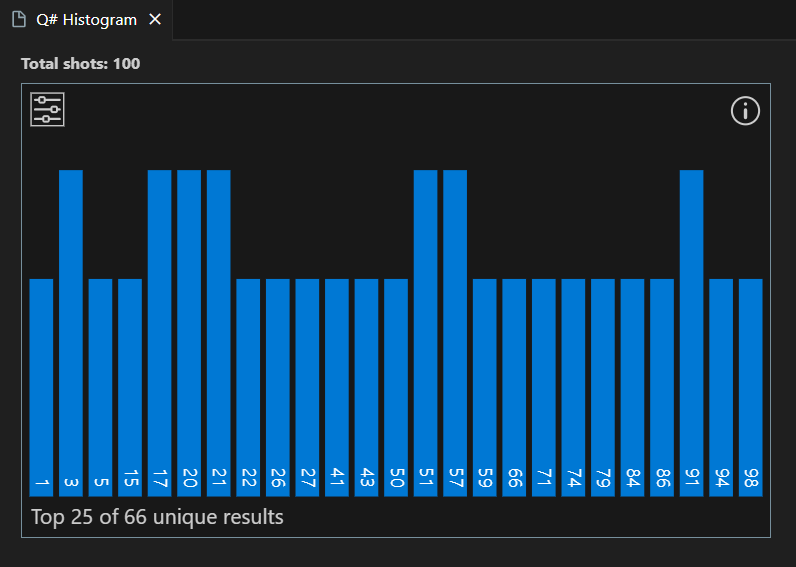
結果會顯示在直方圖和 [結果] 欄位中。
選取 [說明程序代碼 ] 以提示 Copilot 向您說明程式代碼。
提示
在 Microsoft Quantum 的 Copilot 中,你可以透過程式碼編輯器右上角的 VS Code 標誌按鈕,在 VS Code for the Web 中開啟程式。
注意
此程式碼片段目前不會在任何可用的 Azure Quantum 硬體 targets上執行,因為可呼叫專案 ResultArrayAsInt 需要具有 完整計算配置檔的 QPU。
相關內容
探索其他 Q# 教學課程:
- 量子糾纏 示範如何撰寫 Q# 程式,以操作和測量量子位,並示範迭加和糾纏的效果。
- Grover 的搜尋演算法 示範如何撰寫 Q# 使用 Grover 搜尋演算法的程式。
- Quantum Fourier Transforms 會探索如何撰寫 Q# 直接尋址特定量子位的程式。
- Quantum Katas 是自我節奏的教學課程和程序設計練習,旨在同時教學量子運算和Q#程序設計元素。