在本快速入門中,您將瞭解如何從以 TypeScript 語言撰寫的 Node.js 應用程式使用 Azure 受控 Redis 快取,並使用 Microsoft Entra ID 來驗證 Redis 連線。
先決條件
Azure 訂用帳戶 - 建立免費帳戶
安裝 Node.js LTS
安裝 TypeScript
將本快速入門中使用的套件新增至您的專案:
npm install redis @redis/entraid @redis/client使用 Azure CLI 向開發環境的 Azure 進行驗證:
az login
本文中的快速入門範例程式碼可在 GitHub 上取得。
建立 Azure 受控 Redis 實例
首先,在 Azure 入口網站中建立 Azure 受控 Redis 快取。
當您建立快取時,預設會啟用 Microsoft Entra ID 驗證,這可從一開始就確保安全。 在本快速入門中,快取會使用公用端點。 在生產環境中,請考慮使用私人端點和其他網路控制項。
- 若要使用入口網站建立快取,請遵循下列其中一個程式:
-
或者,您可以使用 Azure CLI、PowerShell 或您偏好的任何工具來建立快取。
連線到 Redis 快取的程式碼
在 TypeScript 程式碼範例檔案的第一部分中, index.ts設定快取的連線:
import { DefaultAzureCredential } from '@azure/identity';
import { EntraIdCredentialsProviderFactory, REDIS_SCOPE_DEFAULT } from '@redis/entraid';
import { createCluster, RedisClusterType, RedisModules, RedisFunctions, RedisScripts } from '@redis/client';
import * as net from 'node:net';

const redisEndpoint = process.env.REDIS_ENDPOINT!;
if (!redisEndpoint) {
    console.error('REDIS_ENDPOINT is not set. It should look like: `cache-name.region-name.redis.azure.net:<PORT>`. Find the endpoint in the Azure portal.');
    process.exit(1);
}

const [redisHostName, _] = redisEndpoint.split(":");

let client;

function createRedisClient(): RedisClusterType<RedisModules, RedisFunctions, RedisScripts>  {

    const credential = new DefaultAzureCredential();

    const provider = EntraIdCredentialsProviderFactory.createForDefaultAzureCredential({
        credential,
        scopes: REDIS_SCOPE_DEFAULT,
        options: {},
        tokenManagerConfig: {
            expirationRefreshRatio: 0.8
        }
    });

    const client = createCluster<RedisModules, RedisFunctions, RedisScripts>({
        rootNodes: [{ url: `rediss://${redisEndpoint}` }],
        defaults: {
            credentialsProvider: provider,
            socket: {
                connectTimeout: 15000,
                tls: true,

                // This quickstart code uses a fail fast `reconnectStrategy` which
                // is suitable only in sample code. The purpose is to quickly
                // demonstrate the functionality without getting stuck in
                // reconnection loops if your endpoint or authentication is not
                // correctly configured. In production code, a more robust
                // `reconnectStrategy` should be implemented.
                reconnectStrategy: () => new Error('Failure to connect')
            }

        },
        nodeAddressMap(incomingAddress) {
            const [hostNameOrIP, port] = incomingAddress.split(":");

            const address =
                net.isIP(hostNameOrIP) !== 0
                    ? redisHostName
                    : hostNameOrIP;

            return {
                host: address,
                port: Number(port),
            };
        }

    });

    client.on('error', (err) => console.error('Redis cluster error:', err));

    return client;
}
使用這個 createRedisClient() 函式建立一個 node-redis 用戶端連線到 Redis 快取。
client = createRedisClient();
await client.connect();
測試連線的程式碼
在下一節中,使用 Redis PING 命令測試連線。 Redis 伺服器傳回 PONG.
const pingResult = await client.ping();
console.log('Ping result:', pingResult);
程式碼設定金鑰,取得金鑰
在本節中,使用 SET 和 GET 命令以最簡單的方式開始寫入和讀取 Redis 快取中的資料。
const setResult = await client.set("Message", "Hello! The cache is working from Node.js!");
console.log('Set result:', setResult);

const getResult = await client.get("Message");
console.log('Get result:', getResult);
執行程式碼
建置並執行 Node.js 應用程式。
tsc
node index.js
結果如下所示:
Ping result: PONG
Set result: OK
Get result: Hello! The cache is working from Node.js!
在這裡,您可以完整地看到此程式碼範例。
import { DefaultAzureCredential } from '@azure/identity';
import { EntraIdCredentialsProviderFactory, REDIS_SCOPE_DEFAULT } from '@redis/entraid';
import { createCluster, RedisClusterType, RedisModules, RedisFunctions, RedisScripts } from '@redis/client';
import * as net from 'node:net';

const redisEndpoint = process.env.REDIS_ENDPOINT!;
if (!redisEndpoint) {
    console.error('REDIS_ENDPOINT is not set. It should look like: `cache-name.region-name.redis.azure.net:<PORT>`. Find the endpoint in the Azure portal.');
    process.exit(1);
}

const [redisHostName, _] = redisEndpoint.split(":");

let client;

function createRedisClient(): RedisClusterType<RedisModules, RedisFunctions, RedisScripts>  {

    const credential = new DefaultAzureCredential();

    const provider = EntraIdCredentialsProviderFactory.createForDefaultAzureCredential({
        credential,
        scopes: REDIS_SCOPE_DEFAULT,
        options: {},
        tokenManagerConfig: {
            expirationRefreshRatio: 0.8
        }
    });

    const client = createCluster<RedisModules, RedisFunctions, RedisScripts>({
        rootNodes: [{ url: `rediss://${redisEndpoint}` }],
        defaults: {
            credentialsProvider: provider,
            socket: {
                connectTimeout: 15000,
                tls: true,

                // This quickstart code uses a fail fast `reconnectStrategy` which
                // is suitable only in sample code. The purpose is to quickly
                // demonstrate the functionality without getting stuck in
                // reconnection loops if your endpoint or authentication is not
                // correctly configured. In production code, a more robust
                // `reconnectStrategy` should be implemented.
                reconnectStrategy: () => new Error('Failure to connect')
            }

        },
        nodeAddressMap(incomingAddress) {
            const [hostNameOrIP, port] = incomingAddress.split(":");

            const address =
                net.isIP(hostNameOrIP) !== 0
                    ? redisHostName
                    : hostNameOrIP;

            return {
                host: address,
                port: Number(port),
            };
        }

    });

    client.on('error', (err) => console.error('Redis cluster error:', err));

    return client;
}

try {

    client = createRedisClient();

    await client.connect();

    const pingResult = await client.ping();
    console.log('Ping result:', pingResult);

    const setResult = await client.set("Message", "Hello! The cache is working from Node.js!");
    console.log('Set result:', setResult);

    const getResult = await client.get("Message");
    console.log('Get result:', getResult);

} catch (err) {
    console.error('Error:', err);
} finally {
    if (client) {
        try {
            await client.quit();
        } catch (quitErr) {
            console.error('Error occurred while quitting Redis client:', quitErr);

        }
    }
}
清理資源
如果您想要繼續使用在本文中建立的資源,請保留該資源群組。
否則,若已完成資源使用,則可刪除您建立的 Azure 資源群組,以避免衍生費用。
這很重要
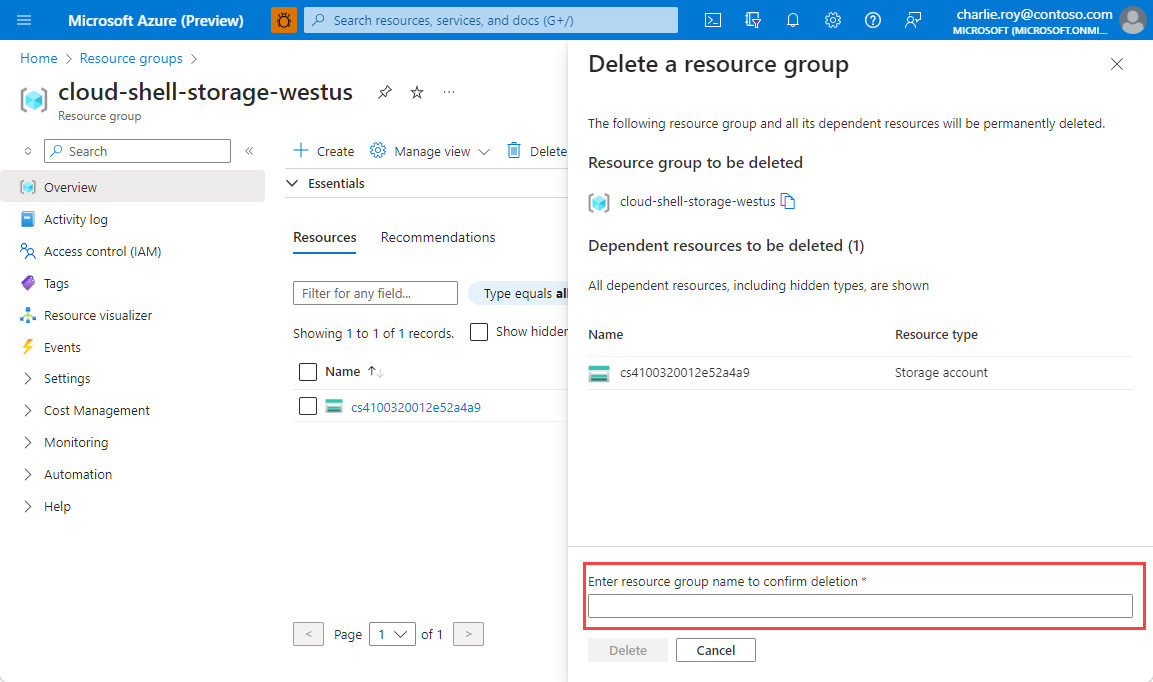
刪除資源群組是無法回復的動作。 當您刪除資源群組時,其中包含的所有資源都將永久刪除。 請確定您不會不小心刪除錯誤的資源群組或資源。 如果您是在包含需保留資源的現有資源群組內部建立資源,則可以個別刪除每個資源,而不必刪除整個資源群組。
刪除資源群組
登入 Azure 入口網站,然後選取 [資源群組]。
選取您想要刪除的資源群組。
如果有許多資源群組,請使用 [篩選任何欄位] 方塊,並輸入您針對本文所建立資源群組的名稱。 選取結果清單中的資源群組。
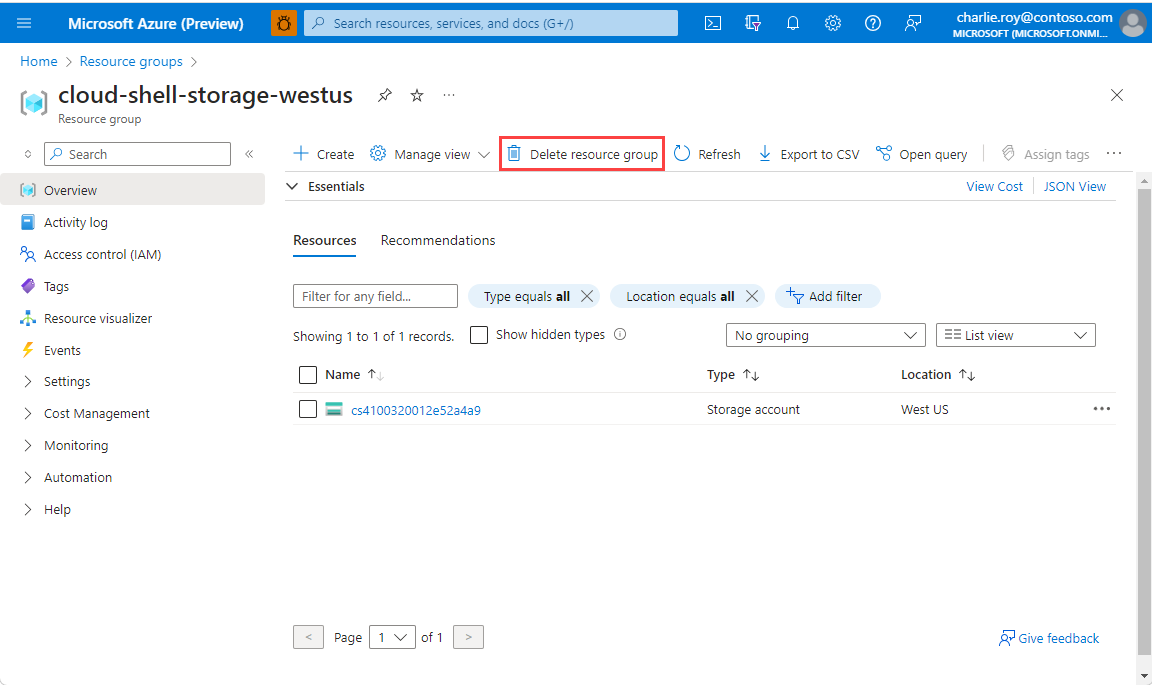
選擇 ,刪除資源群組。
系統將會要求您確認是否刪除資源群組。 輸入您的資源群組名稱以進行確認,然後選取 [刪除]。
不久後,系統便會刪除該資源群組及其所有的資源。