在本文中,您將學習如何使用 Azure 管理的 Redis 快取與 Python 語言,並使用 Microsoft Entra ID 進行連線。
先決條件
- Azure 訂用帳戶 - 建立免費帳戶
- 安裝 Python 3.7+ 語言環境
- 將這些匯入新增至您的專案和開發環境中
-
redis- Redis Python 用戶端 -
redis-entraid- Redis Microsoft Entra ID 驗證擴充功能 -
azure-identity- Azure 驗證連結庫
-
建立 Azure 受控 Redis 實例
首先,建立快取。 您可以透過 Azure 入口網站,使用 Azure Managed Redis 或 Azure Cache for Redis 來建立快取。 在本快速入門中,我們使用 Azure 托管 Redis。
當您建立快取時,預設會啟用 Microsoft Entra ID,使其從頭開始受到保護。 對於此快速入門,您的快取也必須使用公用端點。
若要使用入口網站建立快取,請遵循下列其中一個程序:
您可以選擇性地使用 Azure CLI、PowerShell 來建立快取,無論您偏好哪一個。
連接至 Redis 快取的程式代碼
在範例程式碼的第一個部分,設定快取的連線。
- Azure Managed Redis 和企業快取的連接埠: 10000
- Azure Cache for Redis 實例的埠號:6380
import redis
from azure.identity import DefaultAzureCredential
from redis_entraid.cred_provider import create_from_default_azure_credential
# Connection details for your cache
# Get the connection details for the Redis instance
redis_host = "contosob116.westus3.redis.azure.net"
redis_port = 10000 #For an Azure
print("🚀 Starting Azure Redis Cache connection test...")
print(f"📡 Connecting to: {redis_host}:{redis_port}")
# Validate configuration
if not redis_host or not redis_port:
print("❌ Error: Redis host and port must be configured")
exit(1)
print() # Add a new line
try:
# Create credential provider using DefaultAzureCredential for Azure Entra ID authentication
credential_provider = create_from_default_azure_credential(
("https://redis.azure.com/.default",),)
# Create a Redis client with Azure Entra ID authentication
r = redis.Redis(host=redis_host,
port=redis_port,
ssl=True,
decode_responses=True,
credential_provider=credential_provider,
socket_timeout=10,
socket_connect_timeout=10
)
測試連線的程序代碼
在下一節中,使用會傳回ping值的 Redis 命令True來測試連線。
# Ping the Redis server to test the connection
result = r.ping()
if result:
print("Ping returned: ", result)
程式碼設定金鑰,取得金鑰
在本節中,使用基本 set 和 get 序列,以最簡單的方式開始使用 Redis 快取。
# Create a simple set and get operation
result = r.set("Message", "Hello, The cache is working with Python!")
print("✅ SET Message succeeded: " + str(result))
print() # Add a new line
value = r.get("Message")
if value is not None:
print("✅ GET Message returned : " + str(value))
print() # Add a new line
else:
print("⚠️ GET Message returned None")
print() # Add a new line
print("🎉 All Redis operations completed successfully!")
print() # Add a new line
您必須先將自己新增為 Redis 使用者至快取,才能執行此程式碼。
您也必須使用 Azure 命令列或 Azure 開發人員命令列 (azd),從命令列中授權您與 Azure 的連線。
您也應該 將使用者或系統主體新增至快取。 新增任何可能在 Redis 快取上以使用者身分執行程序的人員。
結果如下所示:
C:\utils\python-quickstart>python quickstart-amr.py
🚀 Starting Azure Redis Cache connection test...
📡 Connecting to: contosob116.westus3.redis.azure.net:10000
✅ Ping returned : True
✅ SET Message succeeded: True
✅ GET Message returned : Hello, The cache is working with Python!
🎉 All Redis operations completed successfully!
🔐 Redis connection closed
您可以在這裡完整查看此程式碼範例。 程式代碼包含從先前的程式代碼說明中省略的一些錯誤檢查,以方便起見。 最後一個步驟是關閉快取連線。
# Python Quickstart using Azure Entra ID authentication
# Azure Managed Redis cache that you created using the Azure portal, or CLI
# This script demonstrates secure connection using Microsoft Entra ID authentication
# This script demonstrates secure connection using the default Azure credential provider
# You should be a user on the cache and logged in to Azure CLI with the same account using `az login`
import redis
from azure.identity import DefaultAzureCredential
from redis_entraid.cred_provider import create_from_default_azure_credential
# Connection details for your cache
# Get the connection details for the Redis instance
redis_host = "<host-url>" # Replace with your cache info
redis_port = <port number> # Replace with your cache info
print("🚀 Starting Azure Redis Cache connection test...")
print(f"📡 Connecting to: {redis_host}:{redis_port}")
# Validate configuration
if not redis_host or not redis_port:
print("❌ Error: Redis host and port must be configured")
exit(1)
print() # Add a new line
try:
# Create credential provider using DefaultAzureCredential for Azure Entra ID authentication
credential_provider = create_from_default_azure_credential(
("https://redis.azure.com/.default",),)
# Create a Redis client with Azure Entra ID authentication
r = redis.Redis(host=redis_host,
port=redis_port,
ssl=True,
decode_responses=True,
credential_provider=credential_provider,
socket_timeout=10,
socket_connect_timeout=10
)
# Test connection
result = r.ping()
print("✅ Ping returned : " + str(result))
print() # Add a new line
# Create a simple set and get operation
result = r.set("Message", "Hello, The cache is working with Python!")
print("✅ SET Message succeeded: " + str(result))
print() # Add a new line
value = r.get("Message")
if value is not None:
print("✅ GET Message returned : " + str(value))
print() # Add a new line
else:
print("⚠️ GET Message returned None")
print() # Add a new line
print("🎉 All Redis operations completed successfully!")
print() # Add a new line
except redis.ConnectionError as e:
print(f"❌ Connection error: {e}")
print("💡 Check if Redis host and port are correct, and ensure network connectivity")
print() # Add a new line
except redis.AuthenticationError as e:
print(f"❌ Authentication error: {e}")
print("💡 Check if Azure Entra ID authentication is properly configured")
print() # Add a new line
except redis.TimeoutError as e:
print(f"❌ Timeout error: {e}")
print("💡 Check network latency and Redis server performance")
print() # Add a new line
except Exception as e:
print(f"❌ Unexpected error: {e}")
if "999" in str(e):
print("💡 Error 999 typically indicates a network connectivity issue or firewall restriction")
print(" - Verify the Redis hostname is correct")
print(" - Verify that you have logged in with Az CLI")
print(" - Ensure the Redis cache is running and accessible")
print() # Add a new line
finally:
# Clean up connection if it exists
if 'r' in locals():
try:
r.close()
print("🔐 Redis connection closed")
except Exception as e:
print(f"❌ Error closing connection: {e}")
清理資源
如果您想要繼續使用在本文中建立的資源,請保留該資源群組。
否則,若已完成資源使用,則可刪除您建立的 Azure 資源群組,以避免衍生費用。
這很重要
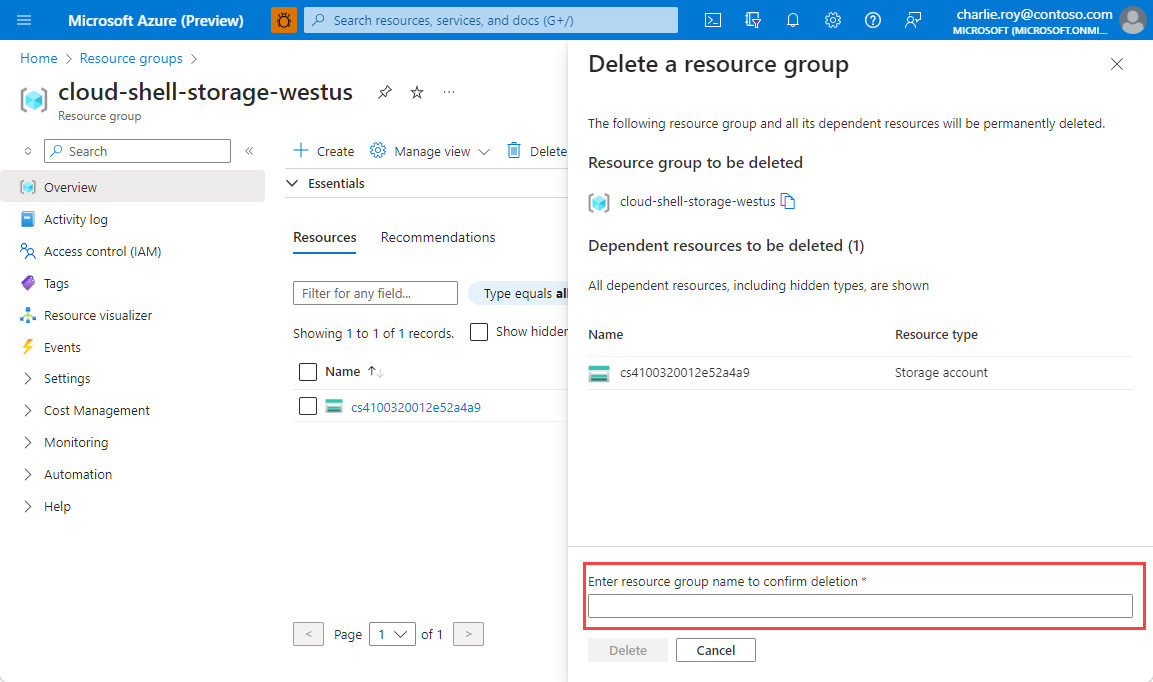
刪除資源群組是無法回復的動作。 當您刪除資源群組時,其中包含的所有資源都將永久刪除。 請確定您不會不小心刪除錯誤的資源群組或資源。 如果您是在包含需保留資源的現有資源群組內部建立資源,則可以個別刪除每個資源,而不必刪除整個資源群組。
刪除資源群組
登入 Azure 入口網站,然後選取 [資源群組]。
選取您想要刪除的資源群組。
如果有許多資源群組,請使用 [篩選任何欄位] 方塊,並輸入您針對本文所建立資源群組的名稱。 選取結果清單中的資源群組。
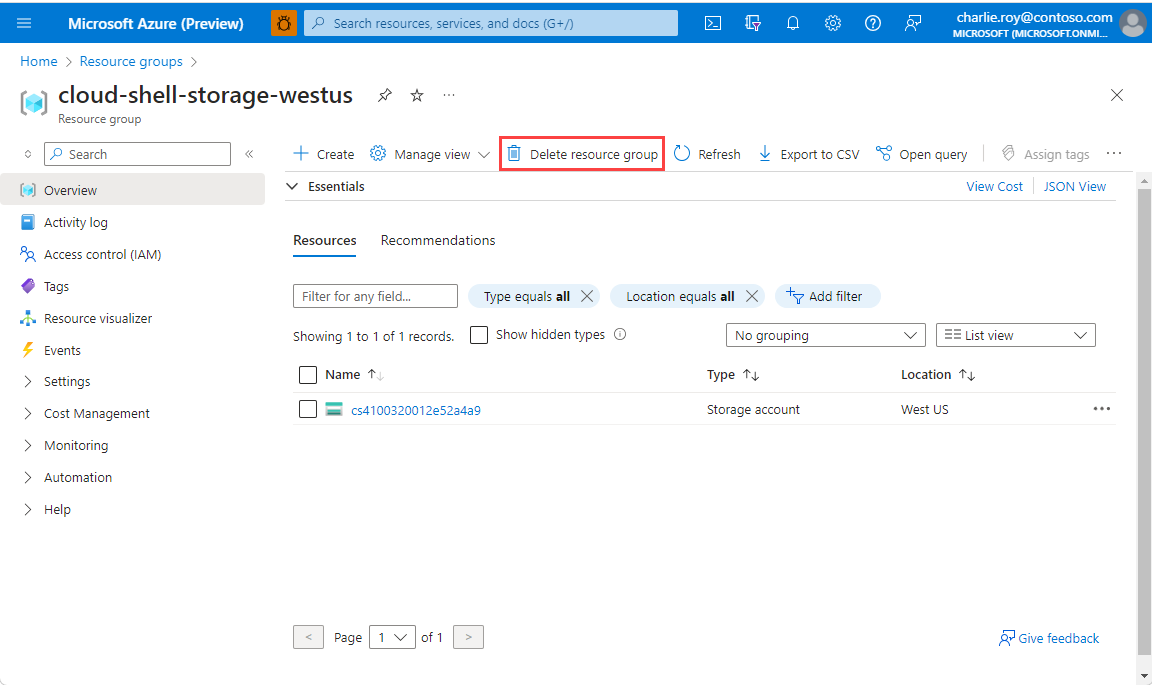
選擇 ,刪除資源群組。
系統將會要求您確認是否刪除資源群組。 輸入您的資源群組名稱以進行確認,然後選取 [刪除]。
不久後,系統便會刪除該資源群組及其所有的資源。