使用ARM樣本建立或更新 Azure 自定義角色
如果 Azure 內建角色不符合組織的特定需求,您可以建立自己的自定義角色。 本文說明如何使用 Azure Resource Manager 範本建立或更新自定義角色(ARM 範本)。
Azure Resource Manager 範本是 JavaScript 物件表示法 (JSON) 檔案,可定義專案的基礎結構和組態。 範本使用宣告式語法。 您不需要撰寫程式設計命令順序來建立部署,即可描述預定的部署。
若要建立自定義角色,您可以指定角色名稱、許可權,以及可以使用角色的位置。 在本文中,您會建立名為 自定義角色 - RG 讀取器 的角色,其資源許可權可在訂用帳戶範圍或更低層級指派。
如果您的環境符合必要條件,而且您很熟悉 ARM 範本,請選取 [部署至 Azure] 按鈕。 範本會在 Azure 入口網站中開啟。

必要條件
若要建立自定義角色,您必須具備:
- 建立自定義角色的許可權,例如使用者存取 管理員 istrator。
您必須使用以下版本:
2018-07-01(含) 以後版本
如需詳細資訊,請參閱 Azure RBAC REST API 的 API 版本。
檢閱範本
本文中使用的範本是來自 Azure 快速入門範本。 範本有四個參數和資源區段。 四個參數為:
- 預設值為
["Microsoft.Resources/subscriptions/resourceGroups/read"]的動作陣列。 - 具有空白預設值的
notActions陣列。 - 具有預設值的角色
Custom Role - RG Reader名稱。 - 具有預設值的角色
Subscription Level Deployment of a Role Definition描述。
可指派此自定義角色的範圍會設定為目前的訂用帳戶。
{
  "$schema": "https://schema.management.azure.com/schemas/2018-05-01/subscriptionDeploymentTemplate.json#",
  "contentVersion": "1.0.0.0",
  "metadata": {
    "_generator": {
      "name": "bicep",
      "version": "0.25.53.49325",
      "templateHash": "16704138909949665309"
    }
  },
  "parameters": {
    "actions": {
      "type": "array",
      "defaultValue": [
        "Microsoft.Resources/subscriptions/resourceGroups/read"
      ],
      "metadata": {
        "description": "Array of actions for the roleDefinition"
      }
    },
    "notActions": {
      "type": "array",
      "defaultValue": [],
      "metadata": {
        "description": "Array of notActions for the roleDefinition"
      }
    },
    "roleName": {
      "type": "string",
      "defaultValue": "Custom Role - RG Reader",
      "metadata": {
        "description": "Friendly name of the role definition"
      }
    },
    "roleDescription": {
      "type": "string",
      "defaultValue": "Subscription Level Deployment of a Role Definition",
      "metadata": {
        "description": "Detailed description of the role definition"
      }
    }
  },
  "variables": {
    "roleDefName": "[guid(parameters('roleName'))]"
  },
  "resources": [
    {
      "type": "Microsoft.Authorization/roleDefinitions",
      "apiVersion": "2022-04-01",
      "name": "[variables('roleDefName')]",
      "properties": {
        "roleName": "[parameters('roleName')]",
        "description": "[parameters('roleDescription')]",
        "type": "customRole",
        "permissions": [
          {
            "actions": "[parameters('actions')]",
            "notActions": "[parameters('notActions')]"
          }
        ],
        "assignableScopes": [
          "[subscription().id]"
        ]
      }
    }
  ]
}
樣本中定義的資源為:
部署範本
請遵循下列步驟來部署上一個範本。
登入 Azure 入口網站。
開啟適用於 PowerShell 的 Azure Cloud Shell。
將下列腳本複製並貼到 Cloud Shell 中。
$location = Read-Host -Prompt "Enter a location (i.e. centralus)"
[string[]]$actions = Read-Host -Prompt "Enter actions as a comma-separated list (i.e. action1,action2)"
$actions = $actions.Split(',')
$templateUri = "https://raw.githubusercontent.com/Azure/azure-quickstart-templates/master/subscription-deployments/create-role-def/azuredeploy.json"
New-AzDeployment -Location $location -TemplateUri $templateUri -actions $actions
輸入部署的位置,例如
centralus。輸入自訂角色的動作清單做為逗號分隔清單,例如
Microsoft.Resources/resources/read,Microsoft.Resources/subscriptions/resourceGroups/read。如有必要,請按 Enter 鍵以執行
New-AzDeployment命令。New-AzDeployment 命令會部署範本來建立自定義角色。
您應該會看到如下輸出:
PS> New-AzDeployment -Location $location -TemplateUri $templateUri -actions $actions

Id                      : /subscriptions/{subscriptionId}/providers/Microsoft.Resources/deployments/azuredeploy
DeploymentName          : azuredeploy
Location                : centralus
ProvisioningState       : Succeeded
Timestamp               : 6/25/2020 8:08:32 PM
Mode                    : Incremental
TemplateLink            :
                          Uri            : https://raw.githubusercontent.com/Azure/azure-quickstart-templates/master/subscription-deployments/create-role-def/azuredeploy.json
                          ContentVersion : 1.0.0.0

Parameters              :
                          Name               Type                       Value
                          =================  =========================  ==========
                          actions            Array                      [
                            "Microsoft.Resources/resources/read",
                            "Microsoft.Resources/subscriptions/resourceGroups/read"
                          ]
                          notActions         Array                      []
                          roleName           String                     Custom Role - RG Reader
                          roleDescription    String                     Subscription Level Deployment of a Role Definition

Outputs                 :
DeploymentDebugLogLevel :
檢閱已部署的資源
請遵循下列步驟來確認已建立自定義角色。
執行 Get-AzRoleDefinition 命令以列出自定義角色。
Get-AzRoleDefinition "Custom Role - RG Reader" | ConvertTo-Json您應該會看到如下輸出:
{
  "Name": "Custom Role - RG Reader",
  "Id": "11111111-1111-1111-1111-111111111111",
  "IsCustom": true,
  "Description": "Subscription Level Deployment of a Role Definition",
  "Actions": [
    "Microsoft.Resources/resources/read",
    "Microsoft.Resources/subscriptions/resourceGroups/read"
  ],
  "NotActions": [],
  "DataActions": [],
  "NotDataActions": [],
  "AssignableScopes": [
    "/subscriptions/{subscriptionId}"
  ]
}
在 Azure 入口網站 中,開啟您的訂用帳戶。
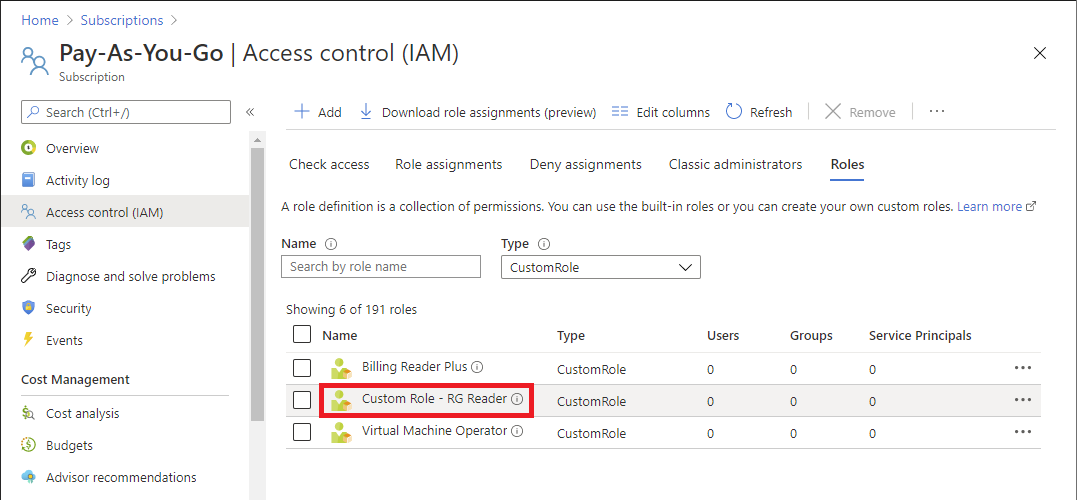
在左側功能表中,選取 [存取控制 (IAM)]。
選取 [角色] 索引標籤。
將 [ 類型 ] 列表設定為 CustomRole。
確認已 列出自定義角色 - RG 讀取者 角色。
更新自定義角色
類似於建立自定義角色,您可以使用範本來更新現有的自定義角色。 若要更新自定義角色,您必須指定您要更新的角色。
以下是您需要對先前的快速入門範本進行變更,以更新自定義角色。
包含角色識別碼做為參數。
    ...
    "roleDefName": {
      "type": "string",
      "metadata": {
        "description": "ID of the role definition"
      }
    ...
在角色定義中包含角色識別元參數。
  ...
  "resources": [
    {
      "type": "Microsoft.Authorization/roleDefinitions",
      "apiVersion": "2022-04-01",
      "name": "[parameters('roleDefName')]",
      "properties": {
        ...
以下是如何部署範例。
$location = Read-Host -Prompt "Enter a location (i.e. centralus)"
[string[]]$actions = Read-Host -Prompt "Enter actions as a comma-separated list (i.e. action1,action2)"
$actions = $actions.Split(',')
$roleDefName = Read-Host -Prompt "Enter the role ID to update"
$templateFile = "rg-reader-update.json"
New-AzDeployment -Location $location -TemplateFile $templateFile -actions $actions -roleDefName $roleDefName
清除資源
若要移除自定義角色,請遵循下列步驟。
執行下列命令以移除自定義角色。
Get-AzRoleDefinition -Name "Custom Role - RG Reader" | Remove-AzRoleDefinition輸入 Y 以確認您想要移除自訂角色。