教學課程:使用 Azure Spatial Anchors 建立新 Android 應用程式的逐步指示
本教學課程將示範如何建立新的 Android 應用程式,以整合 ARCore 功能與 Azure Spatial Anchors。
必要條件
若要完成本教學課程,請確定您具有下列項目︰
開始使用
啟動 Android Studio。 在 [ 歡迎使用 Android Studio] 視窗中,按兩下 [ 啟動新的 Android Studio 專案]。
- 選取 [ 檔案->新增專案]。
- 在 [建立新專案] 視窗中,於 [電話 和平板計算機] 區段底下,選擇 [空白活動],然後按 [下一步]。
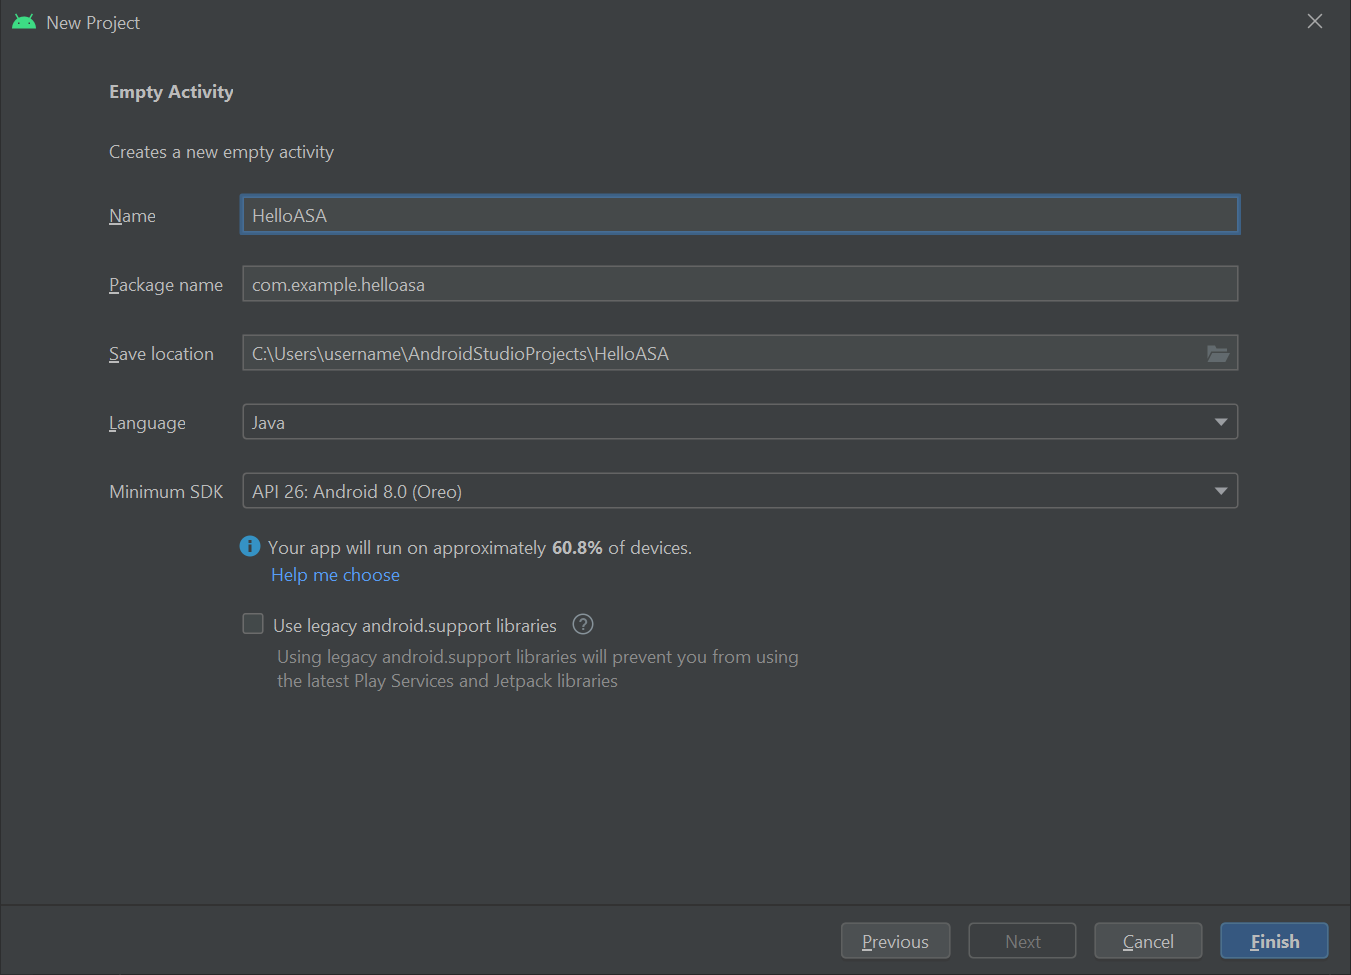
- 在 [新增專案 - 空白活動] 視窗中,變更下列值:
- 將 [名稱]、[套件名稱] 和 [儲存位置] 變更為您想要的值
- 設定 語言 為
Java - 將 [最低 API 層級] 設定為
API 26: Android 8.0 (Oreo) - 保留其他選項
- 按一下完成。
- 元件 安裝程式 將會執行。 經過一些處理之後,Android Studio 會開啟 IDE。
試用
若要測試新的應用程式,請使用USB纜線將已啟用開發人員的裝置連線到開發電腦。 在 Android Studio 的右上方,選取已連線的裝置,然後按兩下 [ 執行 'app' ] 圖示。 Android Studio 會在連線的裝置上安裝應用程式,並加以啟動。 您現在應該看到在裝置上執行的應用程式中顯示的 「Hello World!“ 。 按兩下 [執行>停止][應用程式]。

整合 ARCore
ARCore 是Google建置擴增實境體驗的平臺,可讓您的裝置在行動時追蹤其位置,並自行了解真實世界。
修改 app\manifests\AndroidManifest.xml 以在根 <manifest> 節點內包含下列專案。 此代碼段會執行一些動作:
- 它可讓您的應用程式存取您的裝置相機。
- 它也可確保您的應用程式只會在 Google Play 商店中看到支援 ARCore 的裝置。
- 它會將Google Play Store 設定為下載並安裝ARCore,如果尚未安裝,則安裝您的應用程式。
<manifest ...>

    <uses-permission android:name="android.permission.CAMERA" />
    <uses-feature android:name="android.hardware.camera.ar" />

    <application>
        ...
        <meta-data android:name="com.google.ar.core" android:value="required" />
        ...
    </application>

</manifest>
修改 Gradle Scripts\build.gradle (Module: app) 以包含下列專案。 此程式代碼可確保您的應用程式以ARCore 1.25版為目標。 在此變更之後,您可能會收到 Gradle 的通知,要求您同步處理:按兩下 [ 立即同步處理]。
dependencies {
    ...
    implementation 'com.google.ar:core:1.25.0'
    ...
}
整合 Sceneform
Sceneform 可讓您輕鬆地在擴增實境應用程式中呈現逼真的 3D 場景,而不需要學習 OpenGL。
修改 Gradle Scripts\build.gradle (Module: app) 以包含下列專案。 此程式代碼可讓您的應用程式使用 Java 8 的語言建構,這 Sceneform 需要。 它也可確保您的應用程式以1.15版為目標 Sceneform 。 在此變更之後,您可能會收到 Gradle 的通知,要求您同步處理:按兩下 [ 立即同步處理]。
android {
    ...

    compileOptions {
        sourceCompatibility JavaVersion.VERSION_1_8
        targetCompatibility JavaVersion.VERSION_1_8
    }
}

dependencies {
    ...
    implementation 'com.google.ar.sceneform.ux:sceneform-ux:1.15.0'
    ...
}
開啟 您的 app\res\layout\activity_main.xml,並以下列 ArFragment 取代現有的 Hello Wolrd <TextView ... /> 元素。 此程式代碼會導致相機摘要顯示在畫面上,讓ARCore能夠在裝置行動時追蹤您的裝置位置。
<fragment android:name="com.google.ar.sceneform.ux.ArFragment"
    android:id="@+id/ux_fragment"
    android:layout_width="match_parent"
    android:layout_height="match_parent" />
注意
若要查看主要活動的原始 XML,請按下 Android Studio 右上方的 [程序代碼] 或 [分割] 按鈕。
將您的應用程式重新部署 至您的裝置,以再次驗證它。 這次,您應該要求相機許可權。 核准之後,您應該會在畫面上看到相機摘要轉譯。
將物件放在真實世界中
讓我們使用您的應用程式來建立和放置物件。 首先,將下列匯入新增至 :app\java\<PackageName>\MainActivity
import com.google.ar.core.HitResult;
import com.google.ar.core.Plane;
import com.google.ar.sceneform.AnchorNode;
import com.google.ar.sceneform.math.Vector3;
import com.google.ar.sceneform.rendering.Color;
import com.google.ar.sceneform.rendering.MaterialFactory;
import com.google.ar.sceneform.rendering.Renderable;
import com.google.ar.sceneform.rendering.ShapeFactory;
import com.google.ar.sceneform.ux.ArFragment;

import android.view.MotionEvent;
然後,將下列成員變數新增至您的 MainActivity 類別:
private boolean tapExecuted = false;
private final Object syncTaps = new Object();
private ArFragment arFragment;
private AnchorNode anchorNode;
private Renderable nodeRenderable = null;
private float recommendedSessionProgress = 0f;
接下來,將下列程式代碼新增至 您的 app\java\<PackageName>\MainActivityonCreate() 方法。 此程式代碼會連結名為 handleTap()的接聽程式,以偵測使用者何時點選裝置上的畫面。 如果點選碰巧位於已由ARCore追蹤辨識的實際表面,則接聽程式會執行。
@Override
protected void onCreate(Bundle savedInstanceState) {
    super.onCreate(savedInstanceState);
    setContentView(R.layout.activity_main);

    this.arFragment = (ArFragment) getSupportFragmentManager().findFragmentById(R.id.ux_fragment);
    this.arFragment.setOnTapArPlaneListener(this::handleTap);
}
最後,新增下列 handleTap() 方法,將一切系結在一起。 它會建立球體,並將它放在點選的位置。 球體一開始會是黑色的,因為 this.recommendedSessionProgress 現在設定為零。 此值稍後將會調整。
protected void handleTap(HitResult hitResult, Plane plane, MotionEvent motionEvent) {
    synchronized (this.syncTaps) {
        if (this.tapExecuted) {
            return;
        }

        this.tapExecuted = true;
    }

    this.anchorNode = new AnchorNode();
    this.anchorNode.setAnchor(hitResult.createAnchor());

    MaterialFactory.makeOpaqueWithColor(this, new Color(
            this.recommendedSessionProgress,
            this.recommendedSessionProgress,
            this.recommendedSessionProgress))
            .thenAccept(material -> {
                this.nodeRenderable = ShapeFactory.makeSphere(0.1f, new Vector3(0.0f, 0.15f, 0.0f), material);
                this.anchorNode.setRenderable(nodeRenderable);
                this.anchorNode.setParent(arFragment.getArSceneView().getScene());
            });
}
將您的應用程式重新部署 至您的裝置,以再次驗證它。 這次,您可以四處移動來取得 ARCore 以開始辨識您的環境。 然後,點選螢幕以建立和將黑色球體放在您選擇的表面。
附加本機 Azure Spatial Anchor
修改 Gradle Scripts\build.gradle (Module: app) 以包含下列專案。 此範例代碼段是以 Azure Spatial Anchors SDK 2.10.2 版為目標。 請注意,SDK 2.7.0 版目前是最低支援的版本,而且參考任何較新版本的 Azure Spatial Anchors 也應該正常運作。 我們建議使用最新版的 Azure Spatial Anchors SDK。 您可以在這裡找到 SDK 版本資訊 。
dependencies {
    ...
    implementation 'com.microsoft.azure.spatialanchors:spatialanchors_jni:[2.10.2]'
    implementation 'com.microsoft.azure.spatialanchors:spatialanchors_java:[2.10.2]'
    ...
}
如果您的目標是 Azure Spatial Anchors SDK 2.10.0 或更新版本,請在專案檔案的 settings.gradle 存放庫區段中包含下列專案。 這包括裝載適用於 SDK 2.10.0 或更新版本的 Azure Spatial Anchors Android 套件 Maven 套件摘要的 URL:
dependencyResolutionManagement {
    ...
    repositories {
        ...
        maven {
            url 'https://pkgs.dev.azure.com/aipmr/MixedReality-Unity-Packages/_packaging/Maven-packages/maven/v1'
        }
        ...
    }
}
以滑鼠右鍵按兩下 app\java\<PackageName>->New-Java> 類別。 將 [名稱] 設定為 [MyFirstApp],然後選取 [類別]。 將會建立名為 MyFirstApp.java 的檔案。 將下列匯入新增至其中:
import com.microsoft.CloudServices;
將定義為 android.app.Application 其超級類別。
public class MyFirstApp extends android.app.Application {...
然後,在新的 MyFirstApp 類別內新增下列程式代碼,以確保 Azure Spatial Anchors 已使用應用程式的內容初始化。
    @Override
    public void onCreate() {
        super.onCreate();
        CloudServices.initialize(this);
    }
現在,修改 app\manifests\AndroidManifest.xml 以在根 <application> 節點中包含下列專案。 此程式代碼會將您建立的應用程式類別連結至您的應用程式。
    <application
        android:name=".MyFirstApp"
        ...
    </application>
回到 app\java\<PackageName>\MainActivity,將下列匯入新增至其中:
import android.view.MotionEvent;
import android.util.Log;

import com.google.ar.sceneform.ArSceneView;
import com.google.ar.sceneform.Scene;
import com.microsoft.azure.spatialanchors.CloudSpatialAnchor;
import com.microsoft.azure.spatialanchors.CloudSpatialAnchorSession;
import com.microsoft.azure.spatialanchors.SessionLogLevel;
然後,將下列成員變數新增至您的 MainActivity 類別:
private float recommendedSessionProgress = 0f;

private ArSceneView sceneView;
private CloudSpatialAnchorSession cloudSession;
private boolean sessionInitialized = false;
接下來,讓我們在 類別內mainActivity新增下列initializeSession()方法。 呼叫之後,可確保在啟動應用程式期間建立並正確初始化 Azure Spatial Anchors 會話。 此程式代碼可確保透過呼叫傳遞至 ASA 工作階段的 cloudSession.setSession sceneview 會話不是 Null,方法是提前傳回。
private void initializeSession() {
    if (sceneView.getSession() == null) {
        //Early return if the ARCore Session is still being set up
        return;
    }

    if (this.cloudSession != null) {
        this.cloudSession.close();
    }
    this.cloudSession = new CloudSpatialAnchorSession();
    this.cloudSession.setSession(sceneView.getSession());
    this.cloudSession.setLogLevel(SessionLogLevel.Information);
    this.cloudSession.addOnLogDebugListener(args -> Log.d("ASAInfo", args.getMessage()));
    this.cloudSession.addErrorListener(args -> Log.e("ASAError", String.format("%s: %s", args.getErrorCode().name(), args.getErrorMessage())));

    sessionInitialized = true;
}
由於 initializeSession() 如果 sceneView 會話尚未設定,可以進行早期傳回 (亦即,如果 sceneView.getSession() 為 null),因此我們會新增 onUpdate 呼叫,以確保在建立 sceneView 會話之後,ASA 會話會初始化。
private void scene_OnUpdate(FrameTime frameTime) {
    if (!sessionInitialized) {
        //retry if initializeSession did an early return due to ARCore Session not yet available (i.e. sceneView.getSession() == null)
        initializeSession();
    }
}
現在,讓我們將 和 initializeSession()scene_OnUpdate(...) 方法連結至 您的 onCreate() 方法。 此外,我們將確保相機摘要中的畫面會傳送至 Azure Spatial Anchors SDK 進行處理。
@Override
protected void onCreate(Bundle savedInstanceState) {
    super.onCreate(savedInstanceState);
    setContentView(R.layout.activity_main);

    this.arFragment = (ArFragment) getSupportFragmentManager().findFragmentById(R.id.ux_fragment);
    this.arFragment.setOnTapArPlaneListener(this::handleTap);

    this.sceneView = arFragment.getArSceneView();
    Scene scene = sceneView.getScene();
    scene.addOnUpdateListener(frameTime -> {
        if (this.cloudSession != null) {
            this.cloudSession.processFrame(sceneView.getArFrame());
        }
    });
    scene.addOnUpdateListener(this::scene_OnUpdate);
    initializeSession();
}
最後,將下列程式代碼新增至 您的 handleTap() 方法。 它會將本機 Azure Spatial Anchor 附加至我們在真實世界中放置的黑色球體。
protected void handleTap(HitResult hitResult, Plane plane, MotionEvent motionEvent) {
    synchronized (this.syncTaps) {
        if (this.tapExecuted) {
            return;
        }

        this.tapExecuted = true;
    }

    this.anchorNode = new AnchorNode();
    this.anchorNode.setAnchor(hitResult.createAnchor());
    CloudSpatialAnchor cloudAnchor = new CloudSpatialAnchor();
    cloudAnchor.setLocalAnchor(this.anchorNode.getAnchor());

    MaterialFactory.makeOpaqueWithColor(this, new Color(
            this.recommendedSessionProgress,
            this.recommendedSessionProgress,
            this.recommendedSessionProgress))
            .thenAccept(material -> {
                this.nodeRenderable = ShapeFactory.makeSphere(0.1f, new Vector3(0.0f, 0.15f, 0.0f), material);
                this.anchorNode.setRenderable(nodeRenderable);
                this.anchorNode.setParent(arFragment.getArSceneView().getScene());
            });
}
再次重新部署 您的應用程式。 在裝置周圍移動、點選螢幕,然後放置黑色球體。 不過,這次,您的程式代碼將會建立並附加本機 Azure Spatial Anchor 至您的球體。
在繼續進行之前,如果您還沒有 Azure Spatial Anchors 帳戶,您必須建立 Azure Spatial Anchors 帳戶,以取得帳戶標識碼、密鑰和網域。 請遵循下一節來取得它們。
建立 Spatial Anchors 資源
前往 Azure 入口網站。
在左窗格中,選取 [建立資源]。
使用搜尋方塊來搜尋 Spatial Anchors。
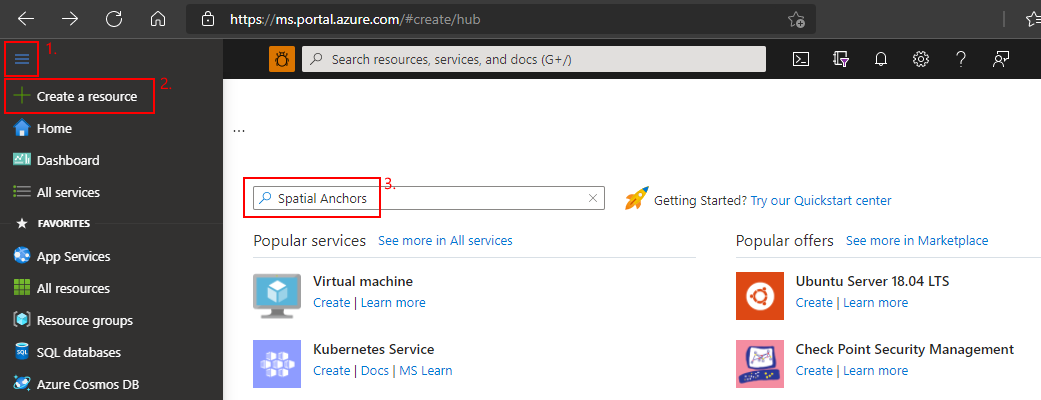
選取 [空間錨點],然後選取 [ 建立]。
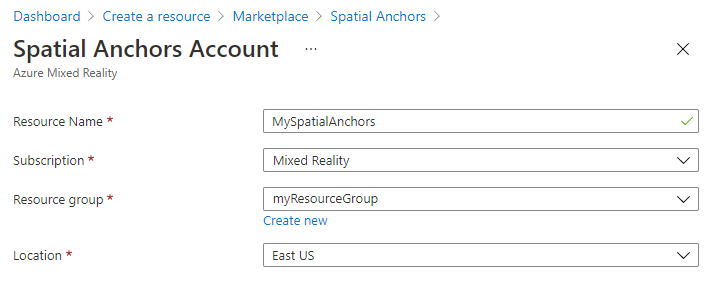
在 [ 空間錨點帳戶 ] 窗格上,執行下列動作:
使用一般英數位元輸入唯一的資源名稱。
選取您要附加資源的訂用帳戶。
選取 [新建] 以建立資源群組。 將它命名為 myResourceGroup,然後選取 [ 確定]。
資源群組是一個邏輯容器,其中會部署和管理 Azure 資源,例如 Web 應用程式、資料庫和記憶體帳戶。 例如,您可以選擇稍後在一個簡單的步驟中刪除整個資源群組。
選取要放置資源的位置(區域)。
選取 [建立] 以開始建立資源。
建立資源之後,Azure 入口網站 會顯示您的部署已完成。
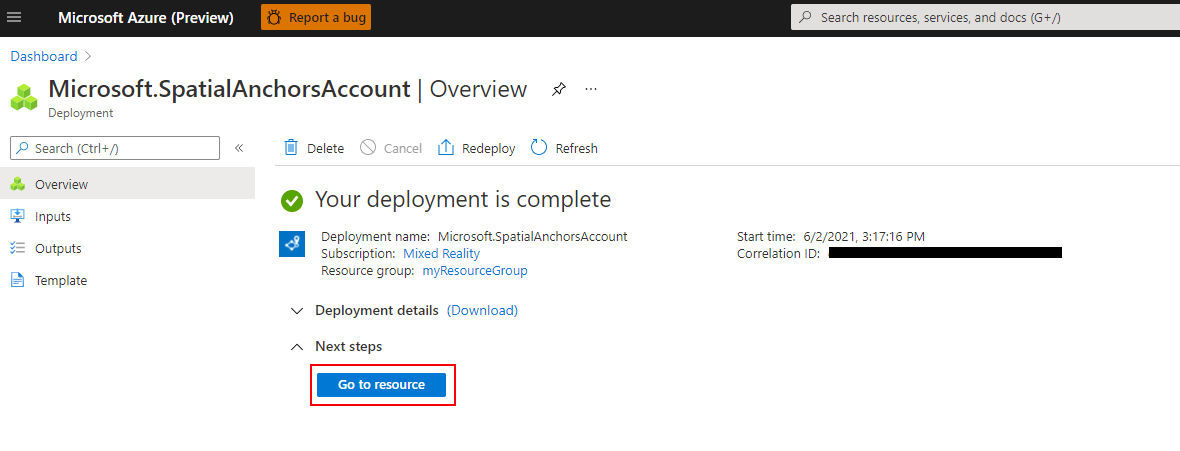
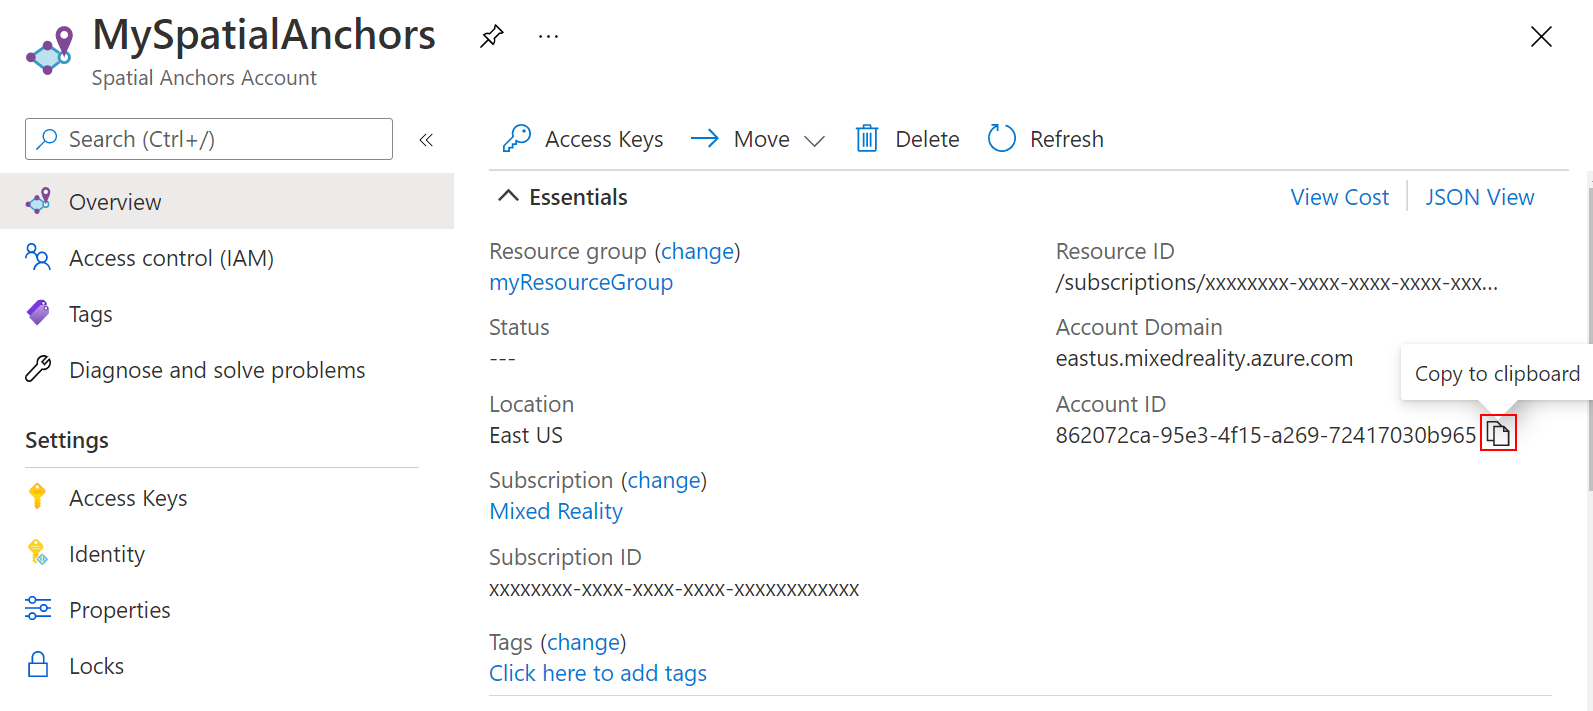
選取 [前往資源] 。 您現在可以檢視資源屬性。
將資源的 [帳戶標識符 ] 值複製到文本編輯器中,以供稍後使用。
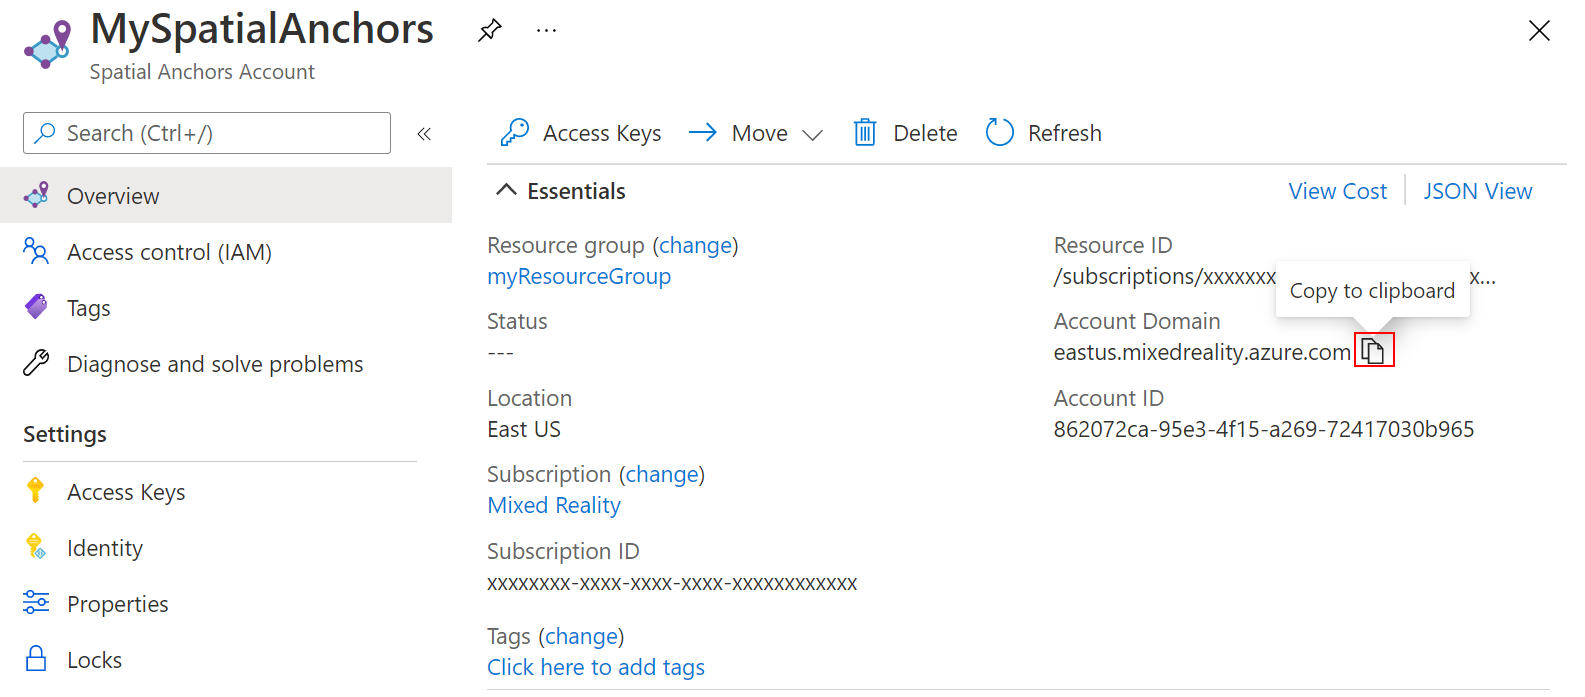
此外,將資源的 帳戶網域 值複製到文本編輯器中,以供稍後使用。
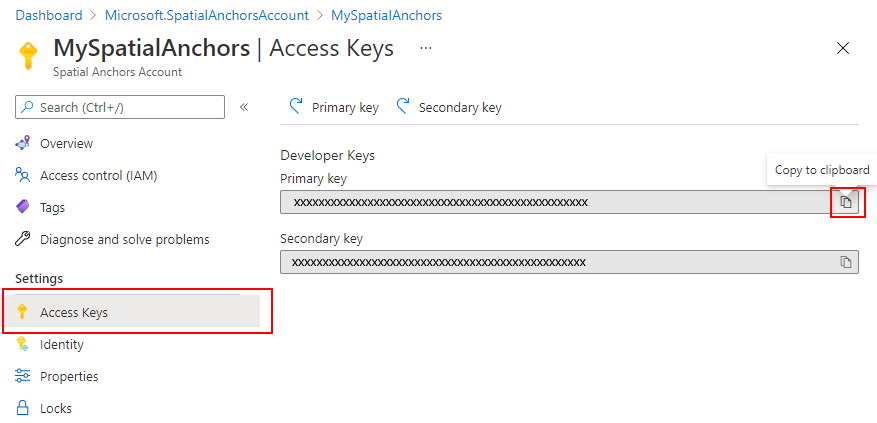
在 [設定] 下,選取 [存取密鑰]。 將 [主要金鑰] 值 [帳戶金鑰] 複製到文字編輯器,以供稍後使用。

將您的本機錨點上傳至雲端
當您擁有 Azure Spatial Anchors 帳戶標識碼、密鑰和網域之後,我們可以返回 app\java\<PackageName>\MainActivity,將下列匯入新增至其中:
import com.microsoft.azure.spatialanchors.SessionLogLevel;

import java.util.concurrent.CompletableFuture;
import java.util.concurrent.ExecutionException;
import java.util.concurrent.ExecutorService;
import java.util.concurrent.Executors;
然後,將下列成員變數新增至您的 MainActivity 類別:
private boolean sessionInitialized = false;

private String anchorId = null;
private boolean scanningForUpload = false;
private final Object syncSessionProgress = new Object();
private ExecutorService executorService = Executors.newSingleThreadExecutor();
現在,將下列程式代碼新增至 您的 initializeSession() 方法。 首先,此程式代碼可讓您的應用程式監視 Azure Spatial Anchors SDK 從相機摘要收集畫面時所做的進度。 和它一樣,球體的顏色會開始從原來的黑色變成灰色。 然後,收集足夠的畫面格後,它會變成白色,以將您的錨點提交至雲端。 其次,此程式代碼會提供與雲端後端通訊所需的認證。 以下是您將設定應用程式使用帳戶標識碼、金鑰和網域的位置。 您在設定 Spatial Anchors 資源時,將它們複製到文字編輯器中。
private void initializeSession() {
    if (sceneView.getSession() == null) {
        //Early return if the ARCore Session is still being set up
        return;
    }

    if (this.cloudSession != null) {
        this.cloudSession.close();
    }
    this.cloudSession = new CloudSpatialAnchorSession();
    this.cloudSession.setSession(sceneView.getSession());
    this.cloudSession.setLogLevel(SessionLogLevel.Information);
    this.cloudSession.addOnLogDebugListener(args -> Log.d("ASAInfo", args.getMessage()));
    this.cloudSession.addErrorListener(args -> Log.e("ASAError", String.format("%s: %s", args.getErrorCode().name(), args.getErrorMessage())));

    sessionInitialized = true;

    this.cloudSession.addSessionUpdatedListener(args -> {
        synchronized (this.syncSessionProgress) {
            this.recommendedSessionProgress = args.getStatus().getRecommendedForCreateProgress();
            Log.i("ASAInfo", String.format("Session progress: %f", this.recommendedSessionProgress));
            if (!this.scanningForUpload) {
                return;
            }
        }

        runOnUiThread(() -> {
            synchronized (this.syncSessionProgress) {
                MaterialFactory.makeOpaqueWithColor(this, new Color(
                        this.recommendedSessionProgress,
                        this.recommendedSessionProgress,
                        this.recommendedSessionProgress))
                        .thenAccept(material -> {
                            this.nodeRenderable.setMaterial(material);
                        });
            }
        });
    });

    this.cloudSession.getConfiguration().setAccountId(/* Copy your account Identifier in here */);
    this.cloudSession.getConfiguration().setAccountKey(/* Copy your account Key in here */);
    this.cloudSession.getConfiguration().setAccountDomain(/* Copy your account Domain in here */);
    this.cloudSession.start();
}
接下來,在類別mainActivity內新增下列uploadCloudAnchorAsync()方法。 呼叫之後,這個方法會以異步方式等候,直到從您的裝置收集到足夠的畫面。 一旦發生這種情況,它會將您的球體色彩切換為黃色,然後開始將本機 Azure Spatial Anchor 上傳至雲端。 上傳完成後,程式代碼會傳回錨點標識碼。
private CompletableFuture<String> uploadCloudAnchorAsync(CloudSpatialAnchor anchor) {
    synchronized (this.syncSessionProgress) {
        this.scanningForUpload = true;
    }


    return CompletableFuture.runAsync(() -> {
        try {
            float currentSessionProgress;
            do {
                synchronized (this.syncSessionProgress) {
                    currentSessionProgress = this.recommendedSessionProgress;
                }
                if (currentSessionProgress < 1.0) {
                    Thread.sleep(500);
                }
            }
            while (currentSessionProgress < 1.0);

            synchronized (this.syncSessionProgress) {
                this.scanningForUpload = false;
            }
            runOnUiThread(() -> {
                MaterialFactory.makeOpaqueWithColor(this, new Color(android.graphics.Color.YELLOW))
                        .thenAccept(yellowMaterial -> {
                            this.nodeRenderable.setMaterial(yellowMaterial);
                        });
            });

            this.cloudSession.createAnchorAsync(anchor).get();
        } catch (InterruptedException | ExecutionException e) {
            Log.e("ASAError", e.toString());
            throw new RuntimeException(e);
        }
    }, executorService).thenApply(ignore -> anchor.getIdentifier());
}
最後,讓我們把一切連結在一起。 在您的 handleTap() 方法中,新增下列程序代碼。 它會在建立球體后立即叫用您的 uploadCloudAnchorAsync() 方法。 方法傳回之後,下列程式代碼將會對您的球體執行最後一個更新,並將其色彩變更為藍色。
protected void handleTap(HitResult hitResult, Plane plane, MotionEvent motionEvent) {
    synchronized (this.syncTaps) {
        if (this.tapExecuted) {
            return;
        }

        this.tapExecuted = true;
    }

    this.anchorNode = new AnchorNode();
    this.anchorNode.setAnchor(hitResult.createAnchor());
    CloudSpatialAnchor cloudAnchor = new CloudSpatialAnchor();
    cloudAnchor.setLocalAnchor(this.anchorNode.getAnchor());

    MaterialFactory.makeOpaqueWithColor(this, new Color(
            this.recommendedSessionProgress,
            this.recommendedSessionProgress,
            this.recommendedSessionProgress))
            .thenAccept(material -> {
                this.nodeRenderable = ShapeFactory.makeSphere(0.1f, new Vector3(0.0f, 0.15f, 0.0f), material);
                this.anchorNode.setRenderable(nodeRenderable);
                this.anchorNode.setParent(arFragment.getArSceneView().getScene());
            });


    uploadCloudAnchorAsync(cloudAnchor)
            .thenAccept(id -> {
                this.anchorId = id;
                Log.i("ASAInfo", String.format("Cloud Anchor created: %s", this.anchorId));
                runOnUiThread(() -> {
                    MaterialFactory.makeOpaqueWithColor(this, new Color(android.graphics.Color.BLUE))
                            .thenAccept(blueMaterial -> {
                                this.nodeRenderable.setMaterial(blueMaterial);
                                synchronized (this.syncTaps) {
                                    this.tapExecuted = false;
                                }
                            });
                });
            });
}
再次重新部署 您的應用程式。 在裝置周圍移動、點選螢幕,然後放置球體。 不過,這次,您的球體會將其色彩從黑色變更為白色,因為收集相機畫面。 一旦我們有足夠的畫面格,球體就會變成黃色,而雲端上傳將會開始。 請確定您的手機已連線到因特網。 上傳完成後,您的球體會變成藍色。 您可以選擇性地監視 Logcat Android Studio 中的視窗,以檢視應用程式正在傳送的記錄訊息。 記錄的訊息範例包括畫面格擷取期間的會話進度,以及雲端在上傳完成後傳回的錨點標識碼。
注意
如果您看不到的值 recommendedSessionProgress (在稱為 Session progress的偵錯記錄檔中)變更,請確定您正在 移動手機,並在您放置的球體周圍旋轉 手機。
找出您的雲端空間錨點
將您的錨點上傳至雲端之後,我們即可再次嘗試尋找它。 首先,讓我們將下列匯入新增至您的程序代碼。
import java.util.concurrent.Executors;

import com.microsoft.azure.spatialanchors.AnchorLocateCriteria;
import com.microsoft.azure.spatialanchors.LocateAnchorStatus;
然後,讓我們將下列程式代碼新增至您的 handleTap() 方法。 此程式碼會:
- 從畫面中移除現有的藍色球體。
- 再次初始化 Azure Spatial Anchors 會話。 此動作可確保我們要找出的錨點來自雲端,而不是我們建立的本機錨點。
- 針對我們上傳至雲端的錨點發出查詢。
protected void handleTap(HitResult hitResult, Plane plane, MotionEvent motionEvent) {
    synchronized (this.syncTaps) {
        if (this.tapExecuted) {
            return;
        }

        this.tapExecuted = true;
    }

    if (this.anchorId != null) {
        this.anchorNode.getAnchor().detach();
        this.anchorNode.setParent(null);
        this.anchorNode = null;
        initializeSession();
        AnchorLocateCriteria criteria = new AnchorLocateCriteria();
        criteria.setIdentifiers(new String[]{this.anchorId});
        cloudSession.createWatcher(criteria);
        return;
    }

    this.anchorNode = new AnchorNode();
    this.anchorNode.setAnchor(hitResult.createAnchor());
    CloudSpatialAnchor cloudAnchor = new CloudSpatialAnchor();
    cloudAnchor.setLocalAnchor(this.anchorNode.getAnchor());

    MaterialFactory.makeOpaqueWithColor(this, new Color(
            this.recommendedSessionProgress,
            this.recommendedSessionProgress,
            this.recommendedSessionProgress))
            .thenAccept(material -> {
                this.nodeRenderable = ShapeFactory.makeSphere(0.1f, new Vector3(0.0f, 0.15f, 0.0f), material);
                this.anchorNode.setRenderable(nodeRenderable);
                this.anchorNode.setParent(arFragment.getArSceneView().getScene());
            });


    uploadCloudAnchorAsync(cloudAnchor)
            .thenAccept(id -> {
                this.anchorId = id;
                Log.i("ASAInfo", String.format("Cloud Anchor created: %s", this.anchorId));
                runOnUiThread(() -> {
                    MaterialFactory.makeOpaqueWithColor(this, new Color(android.graphics.Color.BLUE))
                            .thenAccept(blueMaterial -> {
                                this.nodeRenderable.setMaterial(blueMaterial);
                                synchronized (this.syncTaps) {
                                    this.tapExecuted = false;
                                }
                            });
                });
            });
}
現在,讓我們鏈接當我們查詢的錨點所在的錨點時,將叫用的程序代碼。 在您的 initializeSession() 方法內,新增下列程序代碼。 此代碼段會在找到雲端空間錨點后建立並放置綠色球體。 它也會再次啟用螢幕點選功能,讓您可以再次重複整個案例:建立另一個本機錨點、上傳它,然後再次找到它。
private void initializeSession() {
    if (sceneView.getSession() == null) {
        //Early return if the ARCore Session is still being set up
        return;
    }

    if (this.cloudSession != null) {
        this.cloudSession.close();
    }
    this.cloudSession = new CloudSpatialAnchorSession();
    this.cloudSession.setSession(sceneView.getSession());
    this.cloudSession.setLogLevel(SessionLogLevel.Information);
    this.cloudSession.addOnLogDebugListener(args -> Log.d("ASAInfo", args.getMessage()));
    this.cloudSession.addErrorListener(args -> Log.e("ASAError", String.format("%s: %s", args.getErrorCode().name(), args.getErrorMessage())));

    sessionInitialized = true;

    this.cloudSession.addSessionUpdatedListener(args -> {
        synchronized (this.syncSessionProgress) {
            this.recommendedSessionProgress = args.getStatus().getRecommendedForCreateProgress();
            Log.i("ASAInfo", String.format("Session progress: %f", this.recommendedSessionProgress));
            if (!this.scanningForUpload) {
                return;
            }
        }

        runOnUiThread(() -> {
            synchronized (this.syncSessionProgress) {
                MaterialFactory.makeOpaqueWithColor(this, new Color(
                        this.recommendedSessionProgress,
                        this.recommendedSessionProgress,
                        this.recommendedSessionProgress))
                        .thenAccept(material -> {
                            this.nodeRenderable.setMaterial(material);
                        });
            }
        });
    });

    this.cloudSession.addAnchorLocatedListener(args -> {
        if (args.getStatus() == LocateAnchorStatus.Located) {
            runOnUiThread(() -> {
                this.anchorNode = new AnchorNode();
                this.anchorNode.setAnchor(args.getAnchor().getLocalAnchor());
                MaterialFactory.makeOpaqueWithColor(this, new Color(android.graphics.Color.GREEN))
                        .thenAccept(greenMaterial -> {
                            this.nodeRenderable = ShapeFactory.makeSphere(0.1f, new Vector3(0.0f, 0.15f, 0.0f), greenMaterial);
                            this.anchorNode.setRenderable(nodeRenderable);
                            this.anchorNode.setParent(arFragment.getArSceneView().getScene());

                            this.anchorId = null;
                            synchronized (this.syncTaps) {
                                this.tapExecuted = false;
                            }
                        });
            });
        }
    });

    this.cloudSession.getConfiguration().setAccountId(/* Copy your account Identifier in here */);
    this.cloudSession.getConfiguration().setAccountKey(/* Copy your account Key in here */);
    this.cloudSession.getConfiguration().setAccountDomain(/* Copy your account Domain in here */);
    this.cloudSession.start();
}
介紹完畢 上次重新部署 您的應用程式一次,以嘗試整個案例的端對端。 在裝置周圍移動,並放置黑色球體。 然後,繼續移動您的裝置以擷取相機畫面,直到球體變成黃色為止。 您的本機錨點將會上傳,而您的球體會變成藍色。 最後,再次點選您的畫面,以移除您的本機錨點,然後我們會查詢其雲端對應專案。 繼續移動您的裝置,直到您的雲端空間錨點找到為止。 綠色球體應該會出現在正確的位置,而您可以再次沖洗和重複整個案例。
將所有專案放在一起
以下是所有不同元素都放在一起之後,完整 MainActivity 類別檔案的外觀。 您可以使用它做為參考來與您自己的檔案進行比較,並找出是否有任何差異。
package com.example.myfirstapp;

import android.os.Bundle;
import android.util.Log;
import android.view.MotionEvent;

import androidx.appcompat.app.AppCompatActivity;

import com.google.ar.core.HitResult;
import com.google.ar.core.Plane;
import com.google.ar.sceneform.AnchorNode;
import com.google.ar.sceneform.ArSceneView;
import com.google.ar.sceneform.FrameTime;
import com.google.ar.sceneform.Scene;
import com.google.ar.sceneform.math.Vector3;
import com.google.ar.sceneform.rendering.Color;
import com.google.ar.sceneform.rendering.MaterialFactory;
import com.google.ar.sceneform.rendering.Renderable;
import com.google.ar.sceneform.rendering.ShapeFactory;
import com.google.ar.sceneform.ux.ArFragment;

import com.microsoft.azure.spatialanchors.AnchorLocateCriteria;
import com.microsoft.azure.spatialanchors.CloudSpatialAnchor;
import com.microsoft.azure.spatialanchors.CloudSpatialAnchorSession;
import com.microsoft.azure.spatialanchors.LocateAnchorStatus;
import com.microsoft.azure.spatialanchors.SessionLogLevel;

import java.util.concurrent.CompletableFuture;
import java.util.concurrent.ExecutionException;
import java.util.concurrent.ExecutorService;
import java.util.concurrent.Executors;

public class MainActivity extends AppCompatActivity {

    private boolean tapExecuted = false;
    private final Object syncTaps = new Object();
    private ArFragment arFragment;
    private AnchorNode anchorNode;
    private Renderable nodeRenderable = null;
    private float recommendedSessionProgress = 0f;

    private ArSceneView sceneView;
    private CloudSpatialAnchorSession cloudSession;
    private boolean sessionInitialized = false;

    private String anchorId = null;
    private boolean scanningForUpload = false;
    private final Object syncSessionProgress = new Object();
    private ExecutorService executorService = Executors.newSingleThreadExecutor();

    @Override
    protected void onCreate(Bundle savedInstanceState) {
        super.onCreate(savedInstanceState);
        setContentView(R.layout.activity_main);

        this.arFragment = (ArFragment) getSupportFragmentManager().findFragmentById(R.id.ux_fragment);
        this.arFragment.setOnTapArPlaneListener(this::handleTap);

        this.sceneView = arFragment.getArSceneView();
        Scene scene = sceneView.getScene();
        scene.addOnUpdateListener(frameTime -> {
            if (this.cloudSession != null) {
                this.cloudSession.processFrame(sceneView.getArFrame());
            }
        });
        scene.addOnUpdateListener(this::scene_OnUpdate);
        initializeSession();
    }

    // <scene_OnUpdate>
    private void scene_OnUpdate(FrameTime frameTime) {
        if (!sessionInitialized) {
            //retry if initializeSession did an early return due to ARCore Session not yet available (i.e. sceneView.getSession() == null)
            initializeSession();
        }
    }
    // </scene_OnUpdate>

    // <initializeSession>
    private void initializeSession() {
        if (sceneView.getSession() == null) {
            //Early return if the ARCore Session is still being set up
            return;
        }

        if (this.cloudSession != null) {
            this.cloudSession.close();
        }
        this.cloudSession = new CloudSpatialAnchorSession();
        this.cloudSession.setSession(sceneView.getSession());
        this.cloudSession.setLogLevel(SessionLogLevel.Information);
        this.cloudSession.addOnLogDebugListener(args -> Log.d("ASAInfo", args.getMessage()));
        this.cloudSession.addErrorListener(args -> Log.e("ASAError", String.format("%s: %s", args.getErrorCode().name(), args.getErrorMessage())));

        sessionInitialized = true;

        this.cloudSession.addSessionUpdatedListener(args -> {
            synchronized (this.syncSessionProgress) {
                this.recommendedSessionProgress = args.getStatus().getRecommendedForCreateProgress();
                Log.i("ASAInfo", String.format("Session progress: %f", this.recommendedSessionProgress));
                if (!this.scanningForUpload) {
                    return;
                }
            }

            runOnUiThread(() -> {
                synchronized (this.syncSessionProgress) {
                    MaterialFactory.makeOpaqueWithColor(this, new Color(
                            this.recommendedSessionProgress,
                            this.recommendedSessionProgress,
                            this.recommendedSessionProgress))
                            .thenAccept(material -> {
                                this.nodeRenderable.setMaterial(material);
                            });
                }
            });
        });

        this.cloudSession.addAnchorLocatedListener(args -> {
            if (args.getStatus() == LocateAnchorStatus.Located) {
                runOnUiThread(() -> {
                    this.anchorNode = new AnchorNode();
                    this.anchorNode.setAnchor(args.getAnchor().getLocalAnchor());
                    MaterialFactory.makeOpaqueWithColor(this, new Color(android.graphics.Color.GREEN))
                            .thenAccept(greenMaterial -> {
                                this.nodeRenderable = ShapeFactory.makeSphere(0.1f, new Vector3(0.0f, 0.15f, 0.0f), greenMaterial);
                                this.anchorNode.setRenderable(nodeRenderable);
                                this.anchorNode.setParent(arFragment.getArSceneView().getScene());

                                this.anchorId = null;
                                synchronized (this.syncTaps) {
                                    this.tapExecuted = false;
                                }
                            });
                });
            }
        });

        this.cloudSession.getConfiguration().setAccountId(/* Copy your account Identifier in here */);
        this.cloudSession.getConfiguration().setAccountKey(/* Copy your account Key in here */);
        this.cloudSession.getConfiguration().setAccountDomain(/* Copy your account Domain in here */);
        this.cloudSession.start();
    }
    // </initializeSession>

    // <handleTap>
    protected void handleTap(HitResult hitResult, Plane plane, MotionEvent motionEvent) {
        synchronized (this.syncTaps) {
            if (this.tapExecuted) {
                return;
            }

            this.tapExecuted = true;
        }

        if (this.anchorId != null) {
            this.anchorNode.getAnchor().detach();
            this.anchorNode.setParent(null);
            this.anchorNode = null;
            initializeSession();
            AnchorLocateCriteria criteria = new AnchorLocateCriteria();
            criteria.setIdentifiers(new String[]{this.anchorId});
            cloudSession.createWatcher(criteria);
            return;
        }

        this.anchorNode = new AnchorNode();
        this.anchorNode.setAnchor(hitResult.createAnchor());
        CloudSpatialAnchor cloudAnchor = new CloudSpatialAnchor();
        cloudAnchor.setLocalAnchor(this.anchorNode.getAnchor());

        MaterialFactory.makeOpaqueWithColor(this, new Color(
                this.recommendedSessionProgress,
                this.recommendedSessionProgress,
                this.recommendedSessionProgress))
                .thenAccept(material -> {
                    this.nodeRenderable = ShapeFactory.makeSphere(0.1f, new Vector3(0.0f, 0.15f, 0.0f), material);
                    this.anchorNode.setRenderable(nodeRenderable);
                    this.anchorNode.setParent(arFragment.getArSceneView().getScene());
                });


        uploadCloudAnchorAsync(cloudAnchor)
                .thenAccept(id -> {
                    this.anchorId = id;
                    Log.i("ASAInfo", String.format("Cloud Anchor created: %s", this.anchorId));
                    runOnUiThread(() -> {
                        MaterialFactory.makeOpaqueWithColor(this, new Color(android.graphics.Color.BLUE))
                                .thenAccept(blueMaterial -> {
                                    this.nodeRenderable.setMaterial(blueMaterial);
                                    synchronized (this.syncTaps) {
                                        this.tapExecuted = false;
                                    }
                                });
                    });
                });
    }
    // </handleTap>

    // <uploadCloudAnchorAsync>
    private CompletableFuture<String> uploadCloudAnchorAsync(CloudSpatialAnchor anchor) {
        synchronized (this.syncSessionProgress) {
            this.scanningForUpload = true;
        }


        return CompletableFuture.runAsync(() -> {
            try {
                float currentSessionProgress;
                do {
                    synchronized (this.syncSessionProgress) {
                        currentSessionProgress = this.recommendedSessionProgress;
                    }
                    if (currentSessionProgress < 1.0) {
                        Thread.sleep(500);
                    }
                }
                while (currentSessionProgress < 1.0);

                synchronized (this.syncSessionProgress) {
                    this.scanningForUpload = false;
                }
                runOnUiThread(() -> {
                    MaterialFactory.makeOpaqueWithColor(this, new Color(android.graphics.Color.YELLOW))
                            .thenAccept(yellowMaterial -> {
                                this.nodeRenderable.setMaterial(yellowMaterial);
                            });
                });

                this.cloudSession.createAnchorAsync(anchor).get();
            } catch (InterruptedException | ExecutionException e) {
                Log.e("ASAError", e.toString());
                throw new RuntimeException(e);
            }
        }, executorService).thenApply(ignore -> anchor.getIdentifier());
    }
    // </uploadCloudAnchorAsync>

}
下一步
在本教學課程中,您已瞭解如何建立新的 Android 應用程式,以整合 ARCore 功能與 Azure Spatial Anchors。 若要深入瞭解 Azure Spatial Anchors 連結庫,請繼續閱讀如何建立和尋找錨點的指南。