適用於:✔️ Windows VM
您可以透過 Azure 入口網站建立 Azure 虛擬機器 (VM)。 此方法可提供以瀏覽器為基礎的使用者介面,以便建立 VM 及其相關聯的資源。 本快速入門說明如何使用 Azure 入口網站,在 Azure 中部署執行 Windows Server 2022 Datacenter 的虛擬機(VM)。 若要查看作用中的 VM,接著要以 RDP 連線至 VM,並安裝 IIS 網頁伺服器。
如尚未擁有 Azure 訂用帳戶,請在開始之前先建立免費帳戶。
重要
本快速入門中所述的步驟僅供教育用途使用,不適用於部署至生產環境。
登入 Azure
登入 Azure 入口網站。
建立虛擬機器
在 [搜尋] 中,輸入虛擬機器。
在 [服務] 底下,選取 [虛擬機器]。
在 [虛擬機器] 頁面中,選取 [建立],然後選取 [Azure 虛擬機器]。 [建立虛擬機器] 頁面隨即開啟。
在 [執行個體詳細資料] 底下的 [虛擬機器名稱] 輸入 myVM,並在 [映像] 中選擇 [Windows Server 2022 Datacenter: Azure Edition - x64 Gen 2]。 其他部分保留預設值。
![[執行個體詳細資料] 區段的螢幕擷取畫面,您在其中提供虛擬機器的名稱,並選取其區域、映像與大小。](media/quick-create-portal/instance-details.png)
注意
有些使用者現在會看到在多個區域中建立 VM 的選項。 若要深入瞭解這項新功能,請參閱在可用性區域中建立虛擬機器。

在 [系統管理員帳戶] 下方提供使用者名稱 (例如 azureuser) 和密碼。 密碼長度至少必須有 12 個字元,而且符合定義的複雜度需求。

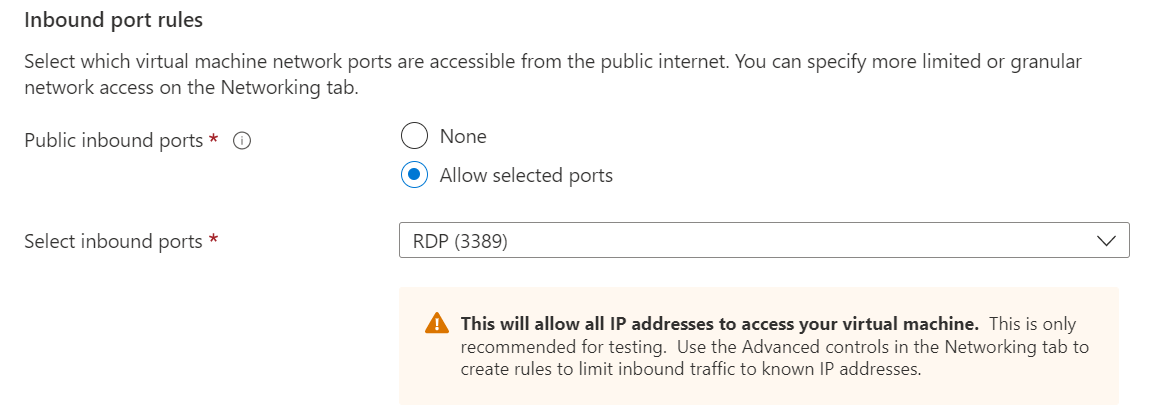
在 [輸入連接埠規則] 底下,選擇 [允許選取的連接埠],然後從下拉式清單中選取 [RDP (3389)] 和 [HTTP (80)]。
保留其餘預設值,然後在頁面底部選取 [檢閱 + 建立] 按鈕。
![顯示頁面底部 [檢閱 + 建立] 按鈕的螢幕快照。](media/quick-create-portal/review-create.png)
執行驗證後,選取頁面底部的 按鈕。
![顯示已通過驗證的螢幕快照。選取 [建立] 按鈕以建立 VM。](media/quick-create-portal/validation.png)
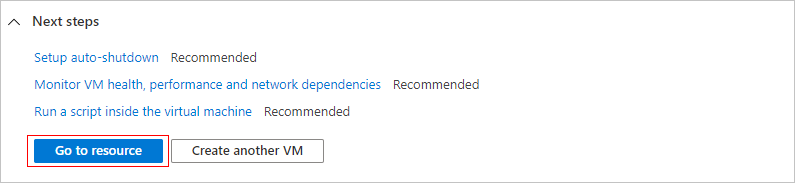
當部署完成時,選取 [前往資源]。
![[執行個體詳細資料] 區段的螢幕擷取畫面,您在其中提供虛擬機器的名稱,並選取其區域、映像與大小。](media/quick-create-portal/instance-details.png#lightbox)
![顯示已通過驗證的螢幕快照。選取 [建立] 按鈕以建立 VM。](media/quick-create-portal/validation.png#lightbox)
連線至虛擬機器
建立虛擬機器的遠端桌面連線。 這些指示會告訴您如何從 Windows 電腦連線到 VM。 在 Mac 上,您需要 RDP 用戶端,例如來自 Mac App Store 的遠端桌面用戶端。
在虛擬機器的概觀頁面上,選取 [連線]>[RDP]。
![顯示 [連線] 按鈕位置的虛擬機概觀頁面螢幕快照。](media/quick-create-portal/portal-quick-start-9.png)
在 [使用 RDP 連線] 索引標籤中,保留以 IP 位址透過連接埠 3389 進行連線的預設選項,然後按一下 [下載 RDP 檔案]。
開啟下載的 RDP 檔案,然後在出現提示時按一下 [連線]。
在 [Windows 安全性] 視窗中,選取 [其他選擇],然後選取 [使用不同的帳戶]。 輸入使用者名稱 localhost\username,並輸入您為虛擬機器建立的密碼,然後按一下 [確定]。
您可能會在登入程序期間收到憑證警告。 按一下 [是] 或 [繼續] 以建立連線。
安裝 Web 伺服器
若要查看作用中的 VM,請安裝 IIS 網頁伺服器。 在 VM 上開啟 PowerShell 提示字元並執行下列命令:
Install-WindowsFeature -name Web-Server -IncludeManagementTools
完成時,關閉與 VM 的 RDP 連線。
檢視 IIS 歡迎使用頁面
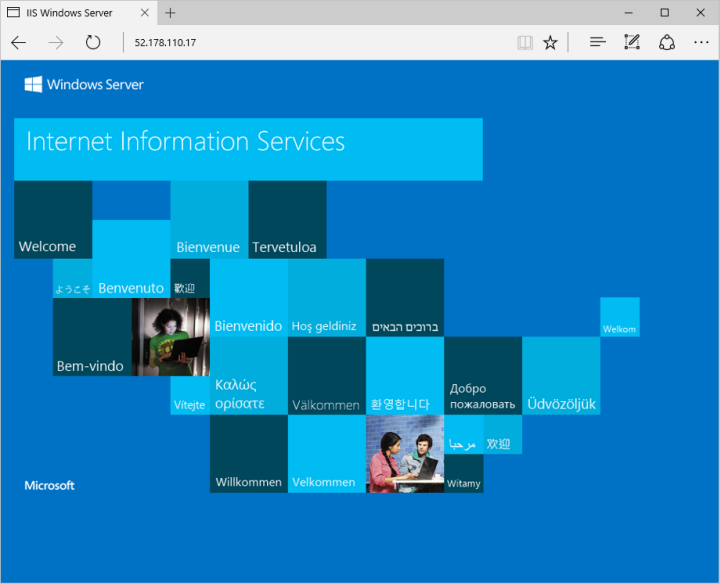
在入口網站中選取 VM,並在 VM 概觀中,將滑鼠停留在 IP 位址上方以顯示 [複製到剪貼簿]。 複製 IP 位址,並將其貼到瀏覽器索引標籤中。預設的 IIS 歡迎使用頁面將會開啟,而且應如下所示:
清除資源
刪除資源
如果不再需要,您可以刪除資源群組、虛擬機器和所有相關資源。
- 在 VM 的 [概述] 頁上,選擇 [資源群組] 連結。
- 在資源群組的頁面頂端,選取 [刪除資源群組]。
- 頁面會開啟,警告您即將刪除資源。 輸入資源群組的名稱,然後選取 [刪除],即可刪除該資源和資源群組。
自動關機
如果仍需要 VM,Azure 會為虛擬機器提供自動關機功能,以協助管理成本,並確保不會針對未使用的資源向您收費。
- 在 VM 的 [作業] 區段上,選取 [自動關機] 選項。
- 頁面隨即開啟,您可以在其中設定自動關機時間。 選取 [開啟] 選項以啟用,然後設定適合您的時間。
- 設定好時間後,請選取頂端的 [儲存] 以啟用自動關機組態。
注意
請記得正確設定時區以符合您的要求,因為 (UTC) 國際標準時間是 [時區] 下拉式選單中的預設設定。
如需詳細資訊,請參閱自動關機。
下一步
在此快速入門中,您已部署簡單的虛擬機器、開啟針對網路流量的網路連接埠,以及安裝基本的網頁伺服器。 若要深入了解 Azure 虛擬機器,請繼續 Windows VM 的教學課程。