Azure 虛擬機器 HA for SAP NetWeaver on RHEL 與適用於 SAP 應用程式的 Azure NetApp Files
本文說明如何使用 Azure NetApp Files 部署虛擬機(VM)、設定 VM、安裝叢集架構,以及安裝高可用性 SAP NetWeaver 7.50 系統。 在範例組態和安裝命令中,ASCS 實例為數位 00、ERS 實例為數位 01、主要應用程式實例 (PAS) 為 02,而應用程式實例 (AAS) 為 03。 使用 SAP 系統識別碼 QAS。
本文並未詳細說明資料庫層。
必要條件
請先閱讀下列 SAP 附註和檔案:
SAP 附注 1928533,其具有:
- 部署 SAP 軟體所支援的 Azure VM 大小清單。
- Azure VM 大小的重要容量資訊。
- 支援的 SAP 軟體和作業系統 (OS) 和資料庫組合。
- Microsoft Azure 上 Windows 和 Linux 的必要 SAP 核心版本。
SAP 附註 2015553 列出 Azure 中 SAP 支援 SAP 軟體部署的必要條件。
SAP 附注 2002167 具有 Red Hat Enterprise Linux 的建議 OS 設定。
SAP 附注 2009879 具有適用於 Red Hat Enterprise Linux 的 SAP HANA 指導方針。
SAP 附注 2178632 有 Azure 中針對 SAP 報告的所有監視計量詳細資訊。
SAP 附注 2191498 Azure 中具有適用於 Linux 的必要 SAP 主機代理程式版本。
SAP 附注 2243692 有 Azure 中 Linux 上的 SAP 授權相關信息。
SAP 附注 1999351 有更多適用於 SAP 的 Azure 增強監視擴充功能疑難解答資訊。
SAP Community WIKI 具有適用於 Linux 的所有必要 SAP 附注。
一般 Red Hat Enterprise Linux (RHEL) 檔:
Azure 特定的 RHEL 文件:
概觀
SAP NetWeaver 中央服務的高可用性 (HA) 需要共用記憶體。 在 Red Hat Linux 上達成 HA 之前,必須建置個別高可用性 GlusterFS 叢集。
現在可以使用部署在 Azure NetApp Files 上的共用記憶體來達成 SAP NetWeaver HA。 針對共用記憶體使用 Azure NetApp Files 可免除更多 GlusterFS 叢集的需求。 SAP NetWeaver 中央服務的 HA 仍然需要 Pacemaker(ASCS/SCS)。
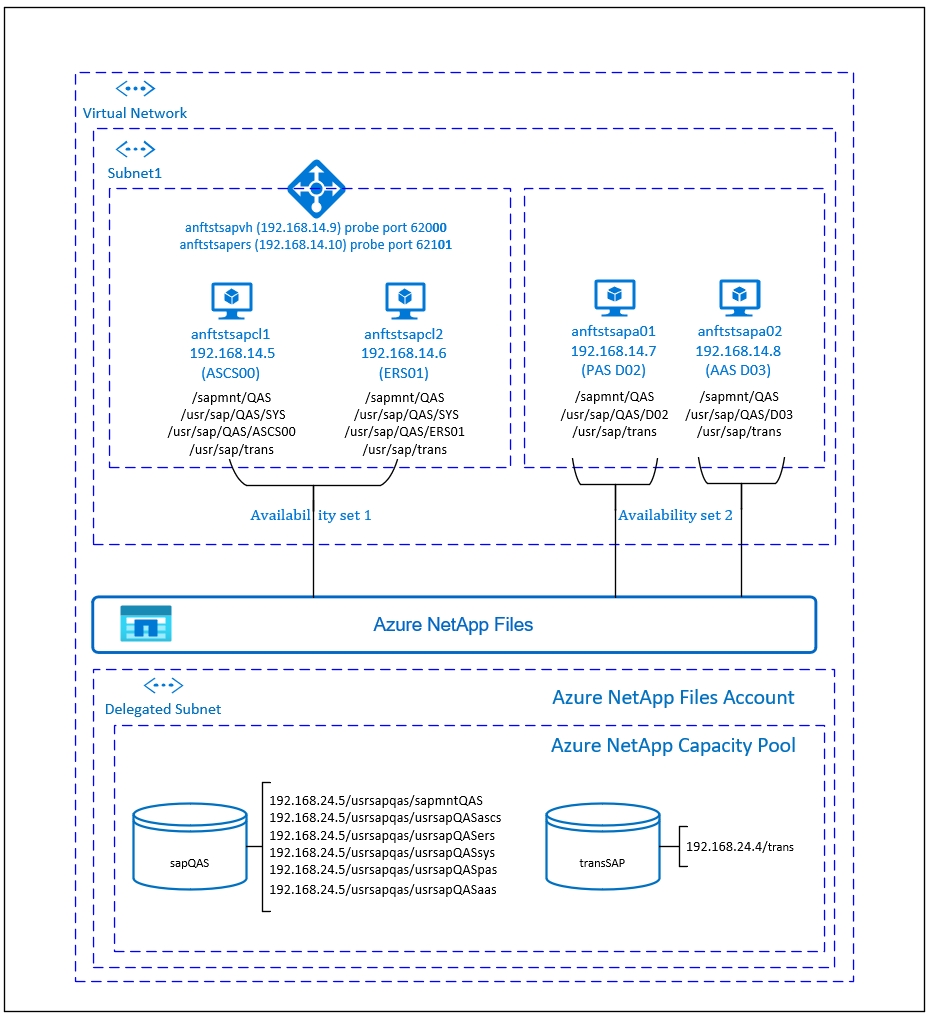
SAP NetWeaver ASCS、SAP NetWeaver SCS、SAP NetWeaver ERS 和 SAP HANA 資料庫會使用虛擬主機名和虛擬 IP 位址。 在 Azure 上必須有負載平衡器才能使用虛擬 IP 位址。 我們建議使用 Azure Load Balancer Standard。 此處的組態顯示具有下列的負載平衡器:
- 適用於 ASCS 的前端 IP 位址 192.168.14.9。
- ERS 的前端IP位址192.168.14.10。
- ASCS 的探查埠 62000。
- ERS 的探查埠 62101。
設定 Azure NetApp Files 基礎結構
SAP NetWeaver 需要傳輸和設定檔目錄的共享記憶體。 在繼續設定 Azure NetApp Files 基礎結構之前,請先熟悉 Azure NetApp Files 檔。 檢查您選取的 Azure 區域是否提供 Azure NetApp Files。 如需依 Azure 區域提供 Azure NetApp Files 的可用性,請參閱 Azure 區域的 Azure NetApp Files 可用性。
Azure NetApp Files 可在數 個 Azure 區域中使用。
部署 Azure NetApp Files 資源
這些步驟假設您已部署 Azure 虛擬網絡。 Azure NetApp Files 資源和將掛接 Azure NetApp Files 資源的 VM 必須部署在相同的 Azure 虛擬網路或對等互連 Azure 虛擬網路中。
依照 建立 Azure NetApp Files 帳戶的指示,在選取的 Azure 區域中建立 Azure NetApp Files 帳戶。
遵循 如何設定 Azure NetApp Files 容量集區的指示來設定 Azure NetApp Files 容量集區。 本文中顯示的 SAP NetWeaver 架構會使用單一 Azure NetApp Files 容量集區,進階版 SKU。 針對 Azure 上的 SAP NetWeaver 應用程式工作負載,我們建議使用 Azure NetApp Files 進階版 SKU。
將子網委派給 Azure NetApp Files,如如何將子網委派給 Azure NetApp Files 的指示所述。
遵循 指示來建立 Azure NetApp Files 的磁碟區,以部署 Azure NetApp Files 磁碟區。 在指定的 Azure NetApp Files 子網中部署磁碟區。 Azure NetApp 磁碟區的IP位址會自動指派。 Azure NetApp Files 資源和 Azure VM 必須位於相同的 Azure 虛擬網路或對等互連 Azure 虛擬網路中。 在此範例中,我們使用兩個 Azure NetApp Files 磁碟區:sapQAS 和 transSAP。 掛接至對應裝入點的檔案路徑為 /usrsapqas/sapmntQAS 和 /usrsap qas/usrsapQASsys。
- 磁碟區 sapQAS (nfs://192.168.24.5/usrsapqas/sapmntQAS)
- 磁碟區 sapQAS (nfs://192.168.24.5/usrsapqas/usrsapQASascs)
- 磁碟區 sapQAS (nfs://192.168.24.5/usrsapqas/usrsapQASsys)
- 磁碟區 sapQAS (nfs://192.168.24.5/usrsapqas/usrsapQASers)
- 磁碟區 transSAP (nfs://192.168.24.4/transSAP)
- 磁碟區 sapQAS (nfs://192.168.24.5/usrsapqas/usrsapQASpas)
- 磁碟區 sapQAS (nfs://192.168.24.5/usrsapqas/usrsapQASaas)
在此範例中,我們針對所有 SAP NetWeaver 文件系統使用 Azure NetApp Files 來示範如何使用 Azure NetApp Files。 不需要透過 NFS 掛接的 SAP 檔案系統也可以部署為 Azure 磁碟記憶體。 在此範例中,a-e 必須在 Azure NetApp Files 和 f-g 上(也就是 /usr/sap/QAS/D 02 和 /usr/sap/QAS/D03)部署為 Azure 磁碟記憶體。
重要考量
當您考慮 Azure NetApp Files for the SAP NetWeaver on RHEL HA 架構時,請注意下列重要考慮:
- 最小容量集區為 4 TiB。 您可以增加 1 TiB 增量的容量集區大小。
- 最小磁碟區為100 GiB。
- Azure NetApp Files 和將掛接 Azure NetApp Files 磁碟區的所有 VM 必須位於相同的 Azure 虛擬網路或 相同區域中的對等互連虛擬網路 中。 現在支援透過相同區域中虛擬網路對等互連的 Azure NetApp Files 存取。 尚不支援透過全域對等互連存取 Azure NetApp Files。
- 選取的虛擬網路必須具有委派給 Azure NetApp Files 的子網。
- Azure NetApp Files 磁碟區的輸送量和效能特性是磁碟區配額和服務等級的功能。 如需詳細資訊,請參閱 Azure NetApp Files 的服務等級。 當您調整 SAP Azure NetApp 磁碟區的大小時,請確定產生的輸送量符合應用程式需求。
- Azure NetApp Files 提供 導出原則。 您可以控制允許的用戶端和存取類型(例如讀取/寫入和唯讀)。
- Azure NetApp Files 功能尚無法感知區域。 目前,Azure NetApp Files 功能不會部署在 Azure 區域的所有可用性區域中。 請注意部分 Azure 區域中的潛在延遲影響。
- 您可以將 Azure NetApp Files 磁碟區部署為 NFSv3 或 NFSv4.1 磁碟區。 SAP 應用層支援這兩種通訊協定(ASCS/ERS、SAP 應用程式伺服器)。
準備基礎結構
Azure Marketplace 包含具有高可用性附加元件之 SAP 的映像,您可以使用各種版本的 Red Hat 來部署新的 VM。
透過 Azure 入口網站 手動部署Linux VM
本檔假設您已部署 Azure 虛擬網路、子網和資源群組。
部署 SAP ASCS、ERS 和應用程式伺服器的 VM。 選擇 SAP 系統支援的合適 RHEL 映像。 您可以在任一可用性選項中部署 VM:虛擬機擴展集、可用性區域或可用性設定組。
設定 Azure 負載平衡器
在 VM 設定期間,您可以選擇在網路區段中建立或選取結束的負載平衡器。 請遵循下列步驟來設定標準負載平衡器,以設定SAP ASCS和SCS的高可用性設定。
請遵循建立負載平衡器指南,使用 Azure 入口網站 為高可用性 SAP 系統設定標準負載平衡器。 在設定負載平衡器期間,請考慮下列幾點。
- 前端IP組態: 建立兩個前端IP,一個用於ASCS,另一個用於ERS。 選取與您 ASCS/ERS 虛擬機相同的虛擬網路和子網。
- 後端集區: 建立後端集區,並新增 ASCS 和 ERS VM。
- 輸入規則: 建立兩個負載平衡規則,一個用於 ASCS,另一個用於 ERS。 針對這兩個負載平衡規則,請遵循相同的步驟。
- 前端IP位址:選取前端IP
- 後端集區:選取後端集區
- 檢查「高可用性埠」
- 通訊協定:TCP
- 健康情況探查:使用下列詳細數據建立健康情況探查(適用於 ASCS 或 ERS)
- 通訊協定:TCP
- 埠:[例如:620<實例否。> 適用於 ASCS,621<實例否。> ERS]
- 間隔:5
- 探查臨界值:2
- 閑置逾時(分鐘):30
- 檢查 [啟用浮動 IP]
注意
健康情況探查組態屬性 numberOfProbes,否則在入口網站中稱為「狀況不良閾值」,則不會受到尊重。 因此,若要控制連續探查成功或失敗的數目,請將屬性 “probeThreshold” 設定為 2。 目前無法使用 Azure 入口網站 來設定此屬性,因此請使用 Azure CLI 或 PowerShell 命令。
重要
負載平衡案例中的 NIC 次要IP組態不支援浮動IP。 如需詳細資訊,請參閱 Azure Load Balancer 限制。 如果您需要更多 VM 的 IP 位址,請部署第二個 NIC。
注意
當沒有公用IP位址的VM放在內部(無公用IP位址)標準負載平衡器的後端集區時,除非執行更多組態以允許路由傳送至公用端點,否則不會有輸出因特網連線能力。 如需如何達成輸出連線的詳細資訊,請參閱 在 SAP 高可用性案例中使用 Azure Standard Load Balancer 進行 VM 的公用端點連線。
重要
請勿在位於 Azure Load Balancer 後方的 Azure VM 上啟用 TCP 時間戳。 啟用 TCP 時間戳可能會導致健康情況探查失敗。 將參數 net.ipv4.tcp_timestamps 設為 0。 如需詳細資訊,請參閱 Load Balancer健康情況探查。
停用識別碼對應(如果您使用 NFSv4.1)
本節中的指示僅適用於搭配 NFSv4.1 通訊協定的 Azure NetApp Files 磁碟區。 在將掛接 Azure NetApp Files NFSv4.1 磁碟區的所有 VM 上執行設定。
確認 NFS 網域設定。 請確定網域已設定為預設的 Azure NetApp Files 網域,
defaultv4iddomain.com也就是 ,且對應設定為 沒有人。重要
請務必在 VM 上設定 NFS 網域
/etc/idmapd.conf,以符合 Azure NetApp Files 上的預設網域組態:defaultv4iddomain.com。 如果 NFS 用戶端上的網域組態(也就是 VM)和 NFS 伺服器(也就是 Azure NetApp 組態)上網域設定不符,則掛接在 VM 上之 Azure NetApp 磁碟區上的檔案權限會顯示為nobody。sudo cat /etc/idmapd.conf # Example [General] Domain = defaultv4iddomain.com [Mapping] Nobody-User = nobody Nobody-Group = nobody
下列 [A] 前置詞同時適用於 PAS 和 AAS。
[A] 驗證
nfs4_disable_idmapping。 它應該設定為 Y。若要建立所在的nfs4_disable_idmapping目錄結構,請執行掛接命令。 您無法手動建立下的/sys/modules目錄,因為存取權會保留給核心和驅動程式。# Check nfs4_disable_idmapping cat /sys/module/nfs/parameters/nfs4_disable_idmapping # If you need to set nfs4_disable_idmapping to Y mkdir /mnt/tmp mount 192.168.24.5:/sapQAS umount /mnt/tmp echo "Y" > /sys/module/nfs/parameters/nfs4_disable_idmapping # Make the configuration permanent echo "options nfs nfs4_disable_idmapping=Y" >> /etc/modprobe.d/nfs.conf
設定 (A)SCS
接下來,您將準備並安裝 SAP ASCS 和 ERS 實例。
建立 Pacemaker 叢集
遵循在 Azure 中的 Red Hat Enterprise Linux 上設定 Pacemaker 中的步驟,為此 (A)SCS 伺服器建立基本的 Pacemaker 叢集。
準備 SAP NetWeaver 安裝
下列專案前面會加上下列專案:
- [A]: 適用於所有節點
- [1]: 僅適用於節點 1
- [2]: 僅適用於節點 2
[A] 設定主機名解析。
您可以使用 DNS 伺服器或修改
/etc/hosts所有節點上的檔案。 此範例示範如何使用/etc/hosts檔案。 在下列命令中取代 IP 位址與主機名稱:sudo vi /etc/hosts將下列幾行插入 。
/etc/hosts變更IP位址和主機名以符合您的環境。# IP address of cluster node 1 192.168.14.5 anftstsapcl1 # IP address of cluster node 2 192.168.14.6 anftstsapcl2 # IP address of the load balancer frontend configuration for SAP Netweaver ASCS 192.168.14.9 anftstsapvh # IP address of the load balancer frontend configuration for SAP Netweaver ERS 192.168.14.10 anftstsapers[1] 在 Azure NetApp Files 磁碟區中建立 SAP 目錄。 暫時在其中一部 VM 上掛接 Azure NetApp Files 磁碟區,並建立 SAP 目錄(檔案路徑)。
# mount temporarily the volume
sudo mkdir -p /saptmp

# If using NFSv3
sudo mount -t nfs -o rw,hard,rsize=65536,wsize=65536,nfsvers=3,tcp 192.168.24.5:/sapQAS /saptmp

# If using NFSv4.1
sudo mount -t nfs -o rw,hard,rsize=65536,wsize=65536,nfsvers=4.1,sec=sys,tcp 192.168.24.5:/sapQAS /saptmp

# create the SAP directories
sudo cd /saptmp
sudo mkdir -p sapmntQAS
sudo mkdir -p usrsapQASascs
sudo mkdir -p usrsapQASers
sudo mkdir -p usrsapQASsys
sudo mkdir -p usrsapQASpas
sudo mkdir -p usrsapQASaas

# unmount the volume and delete the temporary directory
sudo cd ..
sudo umount /saptmp
sudo rmdir /saptmp
[A] 建立共享目錄。
sudo mkdir -p /sapmnt/QAS
sudo mkdir -p /usr/sap/trans
sudo mkdir -p /usr/sap/QAS/SYS
sudo mkdir -p /usr/sap/QAS/ASCS00
sudo mkdir -p /usr/sap/QAS/ERS01

sudo chattr +i /sapmnt/QAS
sudo chattr +i /usr/sap/trans
sudo chattr +i /usr/sap/QAS/SYS
sudo chattr +i /usr/sap/QAS/ASCS00
sudo chattr +i /usr/sap/QAS/ERS01
[A] 安裝 NFS 用戶端和其他需求。
sudo yum -y install nfs-utils resource-agents resource-agents-sap[A] 檢查 的版本
resource-agents-sap。請確定已安裝
resource-agents-sap的套件版本至少3.9.5-124.el7為 。sudo yum info resource-agents-sap # Loaded plugins: langpacks, product-id, search-disabled-repos # Repodata is over 2 weeks old. Install yum-cron? Or run: yum makecache fast # Installed Packages # Name : resource-agents-sap # Arch : x86_64 # Version : 3.9.5 # Release : 124.el7 # Size : 100 k # Repo : installed # From repo : rhel-sap-for-rhel-7-server-rpms # Summary : SAP cluster resource agents and connector script # URL : https://github.com/ClusterLabs/resource-agents # License : GPLv2+ # Description : The SAP resource agents and connector script interface with # : Pacemaker to allow SAP instances to be managed in a cluster # : environment.[A] 新增掛接專案。
如果您使用 NFSv3:
sudo vi /etc/fstab

# Add the following lines to fstab, save and exit
192.168.24.5:/sapQAS/sapmntQAS /sapmnt/QAS nfs rw,hard,rsize=65536,wsize=65536,nfsvers=3
192.168.24.5:/sapQAS/usrsapQASsys /usr/sap/QAS/SYS nfs rw,hard,rsize=65536,wsize=65536,nfsvers=3
192.168.24.4:/transSAP /usr/sap/trans nfs rw,hard,rsize=65536,wsize=65536,nfsvers=3
如果您使用 NFSv4.1:
sudo vi /etc/fstab

# Add the following lines to fstab, save and exit
192.168.24.5:/sapQAS/sapmntQAS /sapmnt/QAS nfs rw,hard,rsize=65536,wsize=65536,nfsvers=4.1,sec=sys
192.168.24.5:/sapQAS/usrsapQASsys /usr/sap/QAS/SYS nfs rw,hard,rsize=65536,wsize=65536,nfsvers=4.1,sec=sys
192.168.24.4:/transSAP /usr/sap/trans nfs rw,hard,rsize=65536,wsize=65536,nfsvers=4.1,sec=sys
注意
當您掛接磁碟區時,請務必符合 Azure NetApp Files 磁碟區的 NFS 通訊協定版本。 如果 Azure NetApp Files 磁碟區建立為 NFSv3 磁碟區,請使用對應的 NFSv3 組態。 如果 Azure NetApp Files 磁碟區建立為 NFSv4.1 磁碟區,請遵循指示來停用標識符對應,並確定使用對應的 NFSv4.1 設定。 在此範例中,Azure NetApp Files 磁碟區會建立為 NFSv3 磁碟區。
掛接新的共用。
sudo mount -a[A] 設定 SWAP 檔案。
sudo vi /etc/waagent.conf

# Set the property ResourceDisk.EnableSwap to y
# Create and use swapfile on resource disk.
ResourceDisk.EnableSwap=y

# Set the size of the SWAP file with property ResourceDisk.SwapSizeMB
# The free space of resource disk varies by VM size. Make sure that you do not set a value that is too big. You can check the SWAP space with command swapon
# Size of the swapfile.
ResourceDisk.SwapSizeMB=2000
重新啟動代理程式以啟用變更。
sudo service waagent restart[A] 執行 RHEL OS 設定。
安裝 SAP NetWeaver ASCS/ERS
[1] 設定叢集預設屬性。
pcs resource defaults resource-stickiness=1
pcs resource defaults migration-threshold=3
[1] 建立 ASCS 實例的虛擬IP資源和健康情況探查。
sudo pcs node standby anftstsapcl2

# If using NFSv3
sudo pcs resource create fs_QAS_ASCS Filesystem device='192.168.24.5:/sapQAS/usrsapQASascs' \
  directory='/usr/sap/QAS/ASCS00' fstype='nfs' force_unmount=safe \
  op start interval=0 timeout=60 op stop interval=0 timeout=120 op monitor interval=200 timeout=40 \
  --group g-QAS_ASCS

# If using NFSv4.1
sudo pcs resource create fs_QAS_ASCS Filesystem device='192.168.24.5:/sapQAS/usrsapQASascs' \
  directory='/usr/sap/QAS/ASCS00' fstype='nfs' force_unmount=safe options='sec=sys,nfsvers=4.1' \
  op start interval=0 timeout=60 op stop interval=0 timeout=120 op monitor interval=200 timeout=105 \
  --group g-QAS_ASCS

sudo pcs resource create vip_QAS_ASCS IPaddr2 \
  ip=192.168.14.9 \
  --group g-QAS_ASCS

sudo pcs resource create nc_QAS_ASCS azure-lb port=62000 \
  --group g-QAS_ASCS
請確定叢集狀態良好,且所有資源都已啟動。 資源執行所在的節點並不重要。
sudo pcs status

# Node anftstsapcl2: standby
# Online: [ anftstsapcl1 ]
#
# Full list of resources:
#
# rsc_st_azure    (stonith:fence_azure_arm):      Started anftstsapcl1
#  Resource Group: g-QAS_ASCS
#      fs_QAS_ASCS        (ocf::heartbeat:Filesystem):    Started anftstsapcl1
#      nc_QAS_ASCS        (ocf::heartbeat:azure-lb):      Started anftstsapcl1
#      vip_QAS_ASCS       (ocf::heartbeat:IPaddr2):       Started anftstsapcl1
[1] 安裝 SAP NetWeaver ASCS。
使用虛擬主機名,將 SAP NetWeaver ASCS 安裝為第一個節點上的根目錄,以對應至 ASCS 之負載平衡器前端組態的 IP 位址,例如,anftstsapvh、 192.168.14.9,以及您用於探查負載平衡器的實例編號, 例如 00。
您可以使用
sapinst參數SAPINST_REMOTE_ACCESS_USER來允許非根使用者連線到sapinst。# Allow access to SWPM. This rule is not permanent. If you reboot the machine, you have to run the command again. sudo firewall-cmd --zone=public --add-port=4237/tcp sudo <swpm>/sapinst SAPINST_REMOTE_ACCESS_USER=sapadmin SAPINST_USE_HOSTNAME=<virtual_hostname>如果安裝無法在 /usr/sap/QAS/ASCS00 中建立子資料夾,請嘗試設定 ASCS00 資料夾的擁有者和群組,然後重試。
sudo chown qasadm /usr/sap/QAS/ASCS00
sudo chgrp sapsys /usr/sap/QAS/ASCS00
[1] 建立 ERS 實例的虛擬IP資源和健康情況探查。
sudo pcs node unstandby anftstsapcl2
sudo pcs node standby anftstsapcl1

# If using NFSv3
sudo pcs resource create fs_QAS_AERS Filesystem device='192.168.24.5:/sapQAS/usrsapQASers' \
  directory='/usr/sap/QAS/ERS01' fstype='nfs' force_unmount=safe \
  op start interval=0 timeout=60 op stop interval=0 timeout=120 op monitor interval=200 timeout=40 \
 --group g-QAS_AERS

# If using NFSv4.1
sudo pcs resource create fs_QAS_AERS Filesystem device='192.168.24.5:/sapQAS/usrsapQASers' \
  directory='/usr/sap/QAS/ERS01' fstype='nfs' force_unmount=safe options='sec=sys,nfsvers=4.1' \
  op start interval=0 timeout=60 op stop interval=0 timeout=120 op monitor interval=200 timeout=105 \
 --group g-QAS_AERS

sudo pcs resource create vip_QAS_AERS IPaddr2 \
  ip=192.168.14.10 \
 --group g-QAS_AERS

sudo pcs resource create nc_QAS_AERS azure-lb port=62101 \
 --group g-QAS_AERS
請確定叢集狀態良好,且所有資源都已啟動。 資源執行所在的節點並不重要。
sudo pcs status

# Node anftstsapcl1: standby
# Online: [ anftstsapcl2 ]
#
# Full list of resources:
#
# rsc_st_azure    (stonith:fence_azure_arm):      Started anftstsapcl2
#  Resource Group: g-QAS_ASCS
#      fs_QAS_ASCS        (ocf::heartbeat:Filesystem):    Started anftstsapcl2
#      nc_QAS_ASCS        (ocf::heartbeat:azure-lb):      Started anftstsapcl2<
#      vip_QAS_ASCS       (ocf::heartbeat:IPaddr2):       Started anftstsapcl2
#  Resource Group: g-QAS_AERS
#      fs_QAS_AERS        (ocf::heartbeat:Filesystem):    Started anftstsapcl2
#      nc_QAS_AERS        (ocf::heartbeat:azure-lb):      Started anftstsapcl2
#      vip_QAS_AERS       (ocf::heartbeat:IPaddr2):       Started anftstsapcl2
[2] 安裝 SAP NetWeaver ERS。
使用虛擬主機名,將 SAP NetWeaver ERS 安裝為第二個節點上的根目錄,以對應至 ERS 之負載平衡器前端組態的 IP 位址,例如,anftstsapers、 192.168.14.10,以及您用於探查負載平衡器的實例編號, 例如 01。
您可以使用
sapinst參數SAPINST_REMOTE_ACCESS_USER來允許非根使用者連線到sapinst。# Allow access to SWPM. This rule is not permanent. If you reboot the machine, you have to run the command again. sudo firewall-cmd --zone=public --add-port=4237/tcp sudo <swpm>/sapinst SAPINST_REMOTE_ACCESS_USER=sapadmin SAPINST_USE_HOSTNAME=<virtual_hostname>如果安裝無法在 /usr/sap/QAS/ERS01 中建立子資料夾,請嘗試設定 ERS01 資料夾的擁有者和群組,然後重試。
sudo chown qaadm /usr/sap/QAS/ERS01
sudo chgrp sapsys /usr/sap/QAS/ERS01
[1] 調整 ASCS/SCS 和 ERS 實例配置檔。
ASCS/SCS 設定檔
sudo vi /sapmnt/QAS/profile/QAS_ASCS00_anftstsapvh

# Change the restart command to a start command
#Restart_Program_01 = local $(_EN) pf=$(_PF)
Start_Program_01 = local $(_EN) pf=$(_PF)

# Add the keep alive parameter, if using ENSA1
enque/encni/set_so_keepalive = true
針對 ENSA1 和 ENSA2,請確定
keepalive已設定 OS 參數,如 SAP 附注 1410736中所述。ERS 配置檔
sudo vi /sapmnt/QAS/profile/QAS_ERS01_anftstsapers

# Change the restart command to a start command
#Restart_Program_00 = local $(_ER) pf=$(_PFL) NR=$(SCSID)
Start_Program_00 = local $(_ER) pf=$(_PFL) NR=$(SCSID)

# remove Autostart from ERS profile
# Autostart = 1
[A] 設定保持運作。
SAP NetWeaver 應用程式伺服器與 ASCS/SCS 之間的通訊會透過軟體負載平衡器路由傳送。 負載平衡器在可設定的逾時之後中斷非使用中聯機。 若要防止此動作,請在 SAP NetWeaver ASCS/SCS 配置檔中設定參數,如果您使用 ENSA1,並在 ENSA1/ENSA2 的所有 SAP 伺服器上變更 Linux 系統
keepalive設定。 如需詳細資訊,請參閱 SAP 附注1410736。# Change the Linux system configuration sudo sysctl net.ipv4.tcp_keepalive_time=300[A] 更新
/usr/sap/sapservices檔案。若要防止啟動腳本啟動實例
sapinit,Pacemaker 管理的所有實例都必須從/usr/sap/sapservices檔案中批注化。sudo vi /usr/sap/sapservices # Depending on whether the SAP Startup framework is integrated with systemd, you will observe one of the two entries on the ASCS node. You should comment out the line(s). # LD_LIBRARY_PATH=/usr/sap/QAS/ASCS00/exe:$LD_LIBRARY_PATH; export LD_LIBRARY_PATH; /usr/sap/QAS/ASCS00/exe/sapstartsrv pf=/usr/sap/QAS/SYS/profile/QAS_ASCS00_anftstsapvh -D -u qasadm # systemctl --no-ask-password start SAPQAS_00 # sapstartsrv pf=/usr/sap/QAS/SYS/profile/QAS_ASCS00_anftstsapvh # Depending on whether the SAP Startup framework is integrated with systemd, you will observe one of the two entries on the ASCS node. You should comment out the line(s). # LD_LIBRARY_PATH=/usr/sap/QAS/ERS01/exe:$LD_LIBRARY_PATH; export LD_LIBRARY_PATH; /usr/sap/QAS/ERS01/exe/sapstartsrv pf=/usr/sap/QAS/ERS01/profile/QAS_ERS01_anftstsapers -D -u qasadm # systemctl --no-ask-password start SAPQAS_01 # sapstartsrv pf=/usr/sap/QAS/ERS01/profile/QAS_ERS01_anftstsapers重要
使用以系統為基礎的 SAP 啟動架構,SAP 實例現在可以由 systemd 管理。 最低需要的 Red Hat Enterprise Linux (RHEL) 版本是適用於 SAP 的 RHEL 8。 如 SAP 附註 3115048所述,具有整合式系統型 SAP 啟動架構支援的 SAP 核心全新安裝一律會導致系統控制的 SAP 實例。 在將現有 SAP 安裝升級至具有系統型 SAP 啟動架構支援的核心之後,必須依照 SAP 附注 3115048 所述執行一些手動步驟,將現有的 SAP 啟動環境轉換成系統控制環境。
使用 Red Hat HA 服務進行 SAP(叢集組態)來管理 SAP 應用程式伺服器實例,例如 SAP ASCS 和 SAP ERS 時,必須進行其他修改,以確保 SAPInstance 資源代理程式與新的系統型 SAP 啟動架構之間的相容性。 因此,一旦根據 SAP 附註3115048安裝或切換至已啟用系統的 SAP 核心,Red Hat KBA 6884531中所述的步驟必須在所有叢集節點上順利完成。
[1] 建立 SAP 叢集資源。
視您執行 ENSA1 或 ENSA2 系統而定,選取個別索引標籤來定義資源。 SAP 在 SAP NetWeaver 7.52 中引進了 ENSA2 的支援,包括複寫。 從 ABAP Platform 1809 開始,預設會安裝 ENSA2。 針對 ENSA2 支援。 如需加入佇列伺服器 2 的支援,請參閱 SAP 附注2630416。
如果您使用加入佇列伺服器 2 架構 (ENSA2),請安裝資源代理程式 resource-agents-sap-4.1.1-12.el7.x86_64 或更新版本,並定義資源,如下所示:
sudo pcs property set maintenance-mode=true # If using NFSv3 sudo pcs resource create rsc_sap_QAS_ASCS00 SAPInstance \ InstanceName=QAS_ASCS00_anftstsapvh START_PROFILE="/sapmnt/QAS/profile/QAS_ASCS00_anftstsapvh" \ AUTOMATIC_RECOVER=false \ meta resource-stickiness=5000 migration-threshold=1 failure-timeout=60 \ op monitor interval=20 on-fail=restart timeout=60 \ op start interval=0 timeout=600 op stop interval=0 timeout=600 \ --group g-QAS_ASCS # If using NFSv4.1 sudo pcs resource create rsc_sap_QAS_ASCS00 SAPInstance \ InstanceName=QAS_ASCS00_anftstsapvh START_PROFILE="/sapmnt/QAS/profile/QAS_ASCS00_anftstsapvh" \ AUTOMATIC_RECOVER=false \ meta resource-stickiness=5000 migration-threshold=1 failure-timeout=60 \ op monitor interval=20 on-fail=restart timeout=105 \ op start interval=0 timeout=600 op stop interval=0 timeout=600 \ --group g-QAS_ASCS sudo pcs resource meta g-QAS_ASCS resource-stickiness=3000 # If using NFSv3 sudo pcs resource create rsc_sap_QAS_ERS01 SAPInstance \ InstanceName=QAS_ERS01_anftstsapers START_PROFILE="/sapmnt/QAS/profile/QAS_ERS01_anftstsapers" \ AUTOMATIC_RECOVER=false IS_ERS=true \ op monitor interval=20 on-fail=restart timeout=60 op start interval=0 timeout=600 op stop interval=0 timeout=600 \ --group g-QAS_AERS # If using NFSv4.1 sudo pcs resource create rsc_sap_QAS_ERS01 SAPInstance \ InstanceName=QAS_ERS01_anftstsapers START_PROFILE="/sapmnt/QAS/profile/QAS_ERS01_anftstsapers" \ AUTOMATIC_RECOVER=false IS_ERS=true \ op monitor interval=20 on-fail=restart timeout=105 op start interval=0 timeout=600 op stop interval=0 timeout=600 \ --group g-QAS_AERS sudo pcs constraint colocation add g-QAS_AERS with g-QAS_ASCS -5000 sudo pcs constraint location rsc_sap_QAS_ASCS00 rule score=2000 runs_ers_QAS eq 1 sudo pcs constraint order start g-QAS_ASCS then stop g-QAS_AERS kind=Optional symmetrical=false sudo pcs node unstandby anftstsapcl1 sudo pcs property set maintenance-mode=false如果您要從舊版升級並切換至加入佇列伺服器 2,請參閱 SAP 附注 2641322。
注意
由於通訊協定特定的暫停,當您使用NFSv4.1時建議的逾時時間較高,這與 NFSv4.1 租用更新有關。 如需詳細資訊,請參閱 NetApp 中的 NFS 最佳做法。 上述組態中的逾時只是範例,可能需要調整為特定的 SAP 設定。
請確定叢集狀態良好,且所有資源都已啟動。 資源執行所在的節點並不重要。
sudo pcs status

# Online: [ anftstsapcl1 anftstsapcl2 ]
#
# Full list of resources:
#
# rsc_st_azure    (stonith:fence_azure_arm):      Started anftstsapcl2
#  Resource Group: g-QAS_ASCS
#      fs_QAS_ASCS        (ocf::heartbeat:Filesystem):    Started anftstsapcl2
#      nc_QAS_ASCS        (ocf::heartbeat:azure-lb):      Started anftstsapcl2
#      vip_QAS_ASCS       (ocf::heartbeat:IPaddr2):       Started anftstsapcl2
#      rsc_sap_QAS_ASCS00 (ocf::heartbeat:SAPInstance):   Started anftstsapcl2
#  Resource Group: g-QAS_AERS
#      fs_QAS_AERS        (ocf::heartbeat:Filesystem):    Started anftstsapcl1
#      nc_QAS_AERS        (ocf::heartbeat:azure-lb):      Started anftstsapcl1
#      vip_QAS_AERS       (ocf::heartbeat:IPaddr2):       Started anftstsapcl1
#      rsc_sap_QAS_ERS01  (ocf::heartbeat:SAPInstance):   Started anftstsapcl1
[1] 執行下列步驟來設定
priority-fencing-delay(僅適用於 pacemaker-2.0.4-6.el8 或更高版本)。注意
如果您有兩個節點的叢集,則可以選擇設定
priority-fencing-delay叢集屬性。 當發生分割腦案例時,這個屬性會在隔離具有較高總資源優先順序的節點時,引入更多的延遲。 如需詳細資訊,請參閱 Pacemaker 是否可以使用最少執行的資源來隔離叢集節點?。屬性
priority-fencing-delay適用於 pacemaker-2.0.4-6.el8 版本或更新版本。 如果您要在現有的叢集上設定priority-fencing-delay,請務必清除pcmk_delay_max隔離裝置中的設定。sudo pcs resource defaults update priority=1 sudo pcs resource update rsc_sap_QAS_ASCS00 meta priority=10 sudo pcs property set priority-fencing-delay=15s[A] 在兩個節點上新增 ASCS 和 ERS 的防火牆規則。
# Probe Port of ASCS
sudo firewall-cmd --zone=public --add-port={62000,3200,3600,3900,8100,50013,50014,50016}/tcp --permanent
sudo firewall-cmd --zone=public --add-port={62000,3200,3600,3900,8100,50013,50014,50016}/tcp
# Probe Port of ERS
sudo firewall-cmd --zone=public --add-port={62101,3201,3301,50113,50114,50116}/tcp --permanent
sudo firewall-cmd --zone=public --add-port={62101,3201,3301,50113,50114,50116}/tcp
SAP NetWeaver 應用程式伺服器準備
某些資料庫要求在應用程式伺服器上執行資料庫實例安裝。 準備應用程式伺服器 VM,以在這些情況下使用它們。
下列步驟假設您在與 ASCS/SCS 和 HANA 伺服器不同的伺服器上安裝應用程式伺服器。 否則,不需要某些步驟(例如設定主機名解析)。
下列專案前面會加上下列專案:
- [A]:適用於 PAS 和 AAS
- [P]: 僅適用於 PAS
- [S]: 僅適用於 AAS
[A] 設定主機名解析。
您可以使用 DNS 伺服器或修改
/etc/hosts所有節點上的檔案。 此範例示範如何使用/etc/hosts檔案。 在下列命令中取代 IP 位址與主機名稱:sudo vi /etc/hosts將下列幾行插入 。
/etc/hosts變更IP位址和主機名以符合您的環境。# IP address of the load balancer frontend configuration for SAP NetWeaver ASCS 192.168.14.9 anftstsapvh # IP address of the load balancer frontend configuration for SAP NetWeaver ASCS ERS 192.168.14.10 anftstsapers 192.168.14.7 anftstsapa01 192.168.14.8 anftstsapa02[A] 建立
sapmnt目錄。sudo mkdir -p /sapmnt/QAS sudo mkdir -p /usr/sap/trans sudo chattr +i /sapmnt/QAS sudo chattr +i /usr/sap/trans[A] 安裝 NFS 用戶端和其他需求。
sudo yum -y install nfs-utils uuidd[A] 新增掛接專案。
如果您使用 NFSv3:
sudo vi /etc/fstab

# Add the following lines to fstab, save and exit
192.168.24.5:/sapQAS/sapmntQAS /sapmnt/QAS nfs rw,hard,rsize=65536,wsize=65536,nfsvers=3
192.168.24.4:/transSAP /usr/sap/trans nfs rw,hard,rsize=65536,wsize=65536,nfsvers=3
如果您使用 NFSv4.1:
sudo vi /etc/fstab

# Add the following lines to fstab, save and exit
192.168.24.5:/sapQAS/sapmntQAS /sapmnt/QAS nfs rw,hard,rsize=65536,wsize=65536,nfsvers=4.1,sec=sys
192.168.24.4:/transSAP /usr/sap/trans nfs rw,hard,rsize=65536,wsize=65536,nfsvers=4.1,sec=sys
掛接新的共用。
sudo mount -a[P] 建立並掛接 PAS 目錄。
如果您使用 NFSv3:
sudo mkdir -p /usr/sap/QAS/D02
sudo chattr +i /usr/sap/QAS/D02

sudo vi /etc/fstab
# Add the following line to fstab
92.168.24.5:/sapQAS/usrsapQASpas /usr/sap/QAS/D02 nfs rw,hard,rsize=65536,wsize=65536,nfsvers=3

# Mount
sudo mount -a
如果您使用 NFSv4.1:
sudo mkdir -p /usr/sap/QAS/D02
sudo chattr +i /usr/sap/QAS/D02

sudo vi /etc/fstab
# Add the following line to fstab
92.168.24.5:/sapQAS/usrsapQASpas /usr/sap/QAS/D02 nfs rw,hard,rsize=65536,wsize=65536,nfsvers=4.1,sec=sys

# Mount
sudo mount -a
[S] 建立並掛接 AAS 目錄。
如果您使用 NFSv3:
sudo mkdir -p /usr/sap/QAS/D03
sudo chattr +i /usr/sap/QAS/D03

sudo vi /etc/fstab
# Add the following line to fstab
92.168.24.5:/sapQAS/usrsapQASaas /usr/sap/QAS/D03 nfs rw,hard,rsize=65536,wsize=65536,nfsvers=3

# Mount
sudo mount -a
如果您使用 NFSv4.1:
sudo mkdir -p /usr/sap/QAS/D03
sudo chattr +i /usr/sap/QAS/D03

sudo vi /etc/fstab
# Add the following line to fstab
92.168.24.5:/sapQAS/usrsapQASaas /usr/sap/QAS/D03 nfs rw,hard,rsize=65536,wsize=65536,nfsvers=4.1,sec=sys

# Mount
sudo mount -a
[A] 設定 SWAP 檔案。
sudo vi /etc/waagent.conf

# Set the property ResourceDisk.EnableSwap to y
# Create and use swapfile on resource disk.
ResourceDisk.EnableSwap=y

# Set the size of the SWAP file with property ResourceDisk.SwapSizeMB
# The free space of resource disk varies by VM size. Make sure that you do not set a value that is too big. You can check the SWAP space with command swapon
# Size of the swapfile.
ResourceDisk.SwapSizeMB=2000
重新啟動代理程式以啟用變更。
sudo service waagent restart
安裝資料庫
在此範例中,SAP NetWeaver 會安裝在 SAP HANA 上。 您可以使用每個支援的資料庫來進行此安裝。 如需如何在 Azure 中安裝 SAP HANA 的詳細資訊,請參閱 Red Hat Enterprise Linux 上 Azure VM 上的 SAP HANA 高可用性。 如需支援的資料庫清單,請參閱 SAP 附注1928533。
執行 SAP 資料庫實例安裝。
使用對應至資料庫之負載平衡器前端組態 IP 位址的虛擬主機名,安裝 SAP NetWeaver 資料庫實例作為根目錄。
您可以使用
sapinst參數SAPINST_REMOTE_ACCESS_USER來允許非根使用者連線到sapinst。sudo <swpm>/sapinst SAPINST_REMOTE_ACCESS_USER=sapadmin
SAP NetWeaver 應用程式伺服器安裝
請遵循下列步驟來安裝 SAP 應用程式伺服器。
準備應用程式伺服器。
請遵循上一節 SAP NetWeaver 應用程式伺服器準備中的步驟來準備 應用程式伺服器。
安裝SAP NetWeaver 應用程式伺服器。
安裝主要或其他 SAP NetWeaver 應用程式伺服器。
您可以使用
sapinst參數SAPINST_REMOTE_ACCESS_USER來允許非根使用者連線到sapinst。sudo <swpm>/sapinst SAPINST_REMOTE_ACCESS_USER=sapadmin更新 SAP HANA 安全存放區。
更新 SAP HANA 安全存放區,以指向 SAP HANA 系統復寫設定的虛擬名稱。
執行下列命令,將專案 <列為sapsid>adm。
hdbuserstore List所有項目都應該列出,看起來類似:
DATA FILE       : /home/qasadm/.hdb/anftstsapa01/SSFS_HDB.DAT
KEY FILE        : /home/qasadm/.hdb/anftstsapa01/SSFS_HDB.KEY

KEY DEFAULT
  ENV : 192.168.14.4:30313
  USER: SAPABAP1
  DATABASE: QAS
輸出顯示預設進入的IP位址指向VM,而不是指向負載平衡器的IP位址。 您必須變更此專案,以指向負載平衡器的虛擬主機名。 請務必使用相同埠 (上述輸出中的 30313 ) 和資料庫名稱 (上述輸出中的 QAS )。
su - qasadm
hdbuserstore SET DEFAULT qasdb:30313@QAS SAPABAP1 <password of ABAP schema>
測試叢集設定
徹底測試 Pacemaker 叢集。 如需詳細資訊,請參閱 執行一般故障轉移測試。
下一步
- 若要部署在 RHEL 上使用 SAP NetWeaver HA 叢集部署 PAS 和 AAS 實例的成本優化案例,請參閱 在 RHEL 上使用 SAP ASCS/SCS 高可用性 VM 安裝 SAP 對話框實例。
- 請參閱 HA for SAP NW on Azure VM on RHEL for SAP applications multi-SID 指南。
- 請參閱適用於 SAP 的 Azure 虛擬機器 規劃和實作。
- 請參閱適用於 SAP 的 Azure 虛擬機器 部署。
- 請參閱適用於 SAP 的 Azure 虛擬機器 DBMS 部署。
- 若要瞭解如何建立 HA 並規劃 SAP HANA on Azure 的災害復原(大型實例),請參閱 AZURE 上的 SAP HANA(大型實例)高可用性和災害復原。
- 若要瞭解如何建立HA並規劃SAP HANA on Azure 虛擬機器的災害復原,請參閱 SAP HANA on Azure 虛擬機器 的高可用性。