Azure 虛擬機器 (VM) 可連接一或多個網路介面 (NIC)。 任何 NIC 都可以獲派一或多個靜態或動態公用及私人 IP 位址。
將多個 IP 位址指派給 VM 可啟用下列功能:
在單一伺服器上,以不同的 IP 位址和 TLS/SSL 憑證裝載多個網站或服務。
做為網路虛擬設備,例如防火牆或負載平衡器。
能夠將任何 NIC 的任何私人 IP 位址新增到 Azure Load Balancer 後端集區。 在過去,只能將主要 NIC 的主要 IP 位址新增到後端集區。 如需針對多個 IP 組態進行負載平衡的詳細資訊,請參閱針對多個 IP 組態進行負載平衡。
連接到 VM 的每個 NIC 皆有一或多個 IP 組態與其相關聯。 每個組態會獲派一個靜態或動態私人 IP 位址。 每個組態可能也會有一個關聯的公用 IP 位址資源。 若要深入了解 Azure 中的 IP 位址,請參閱 Azure 中的 IP 位址。
Note
單一 NIC 上的所有 IP 設定都必須關聯至相同的子網路。 如果需要不同子網路上的多個 IP,則可在 VM 上使用多個 NIC。 若要深入了解 Azure 中 VM 上的多個 NIC,請參閱建立具有多個 NIC 的 VM。
可以指派給一個 NIC 的私人 IP 位址數目有所限制。 Azure 訂用帳戶中可以使用的公用 IP 位址數目也有限制。 如需詳細資訊,請參閱 Azure 限制 一文。
本文說明如何使用 PowerShell 對虛擬機器指派多個 IP 位址。
Prerequisites
具有有效訂用帳戶的 Azure 帳戶。 免費建立帳戶。
在 Azure Cloud Shell 或本地安裝 Azure PowerShell 的 PowerShell 環境。 若要深入了解如何在 Azure Cloud Shell 中使用 PowerShell,請參閱 Azure Cloud Shell 快速入門。
- 如果您選擇在本機安裝和使用 PowerShell,本文會要求使用 Azure PowerShell 模組版本 5.4.1 或更新版本。 執行
Get-InstalledModule -Name Az來了解安裝的版本。 如果您需要升級,請參閱安裝 Azure PowerShell 模組。 請確定您的 Az.Network 模組是 4.3.0 或更新版本。 若要確認已安裝的模組,請使用Get-InstalledModule -Name "Az.Network"命令。 如果模組需要更新,可在必要時使用Update-Module -Name "Az.Network"命令。
- 如果您選擇在本機安裝和使用 PowerShell,本文會要求使用 Azure PowerShell 模組版本 5.4.1 或更新版本。 執行
登入 Azure PowerShell,並確定您已選取要使用此功能的訂用帳戶。 如需詳細資訊,請參閱使用 Azure PowerShell 登入 \(英文\)。
Note
雖然本文中的步驟會將所有 IP 組態指派給單一 NIC,您也可以指派多個 IP 組態給多個 NIC VM 中的任何 NIC。 若要了解如何建立具有多個 NIC 的 VM,請參閱建立具有多個 NIC 的 VM。
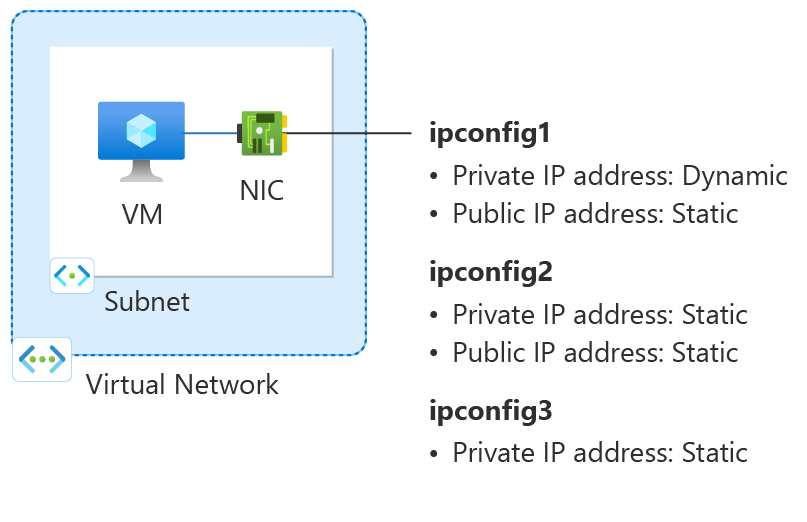
圖:此操作說明一文中建立的網路設定資源圖表。
建立資源群組
Azure 資源群組是在其中部署與管理 Azure 資源的邏輯容器。
在 eastus2 位置建立名為 myResourceGroup 的 New-AzResourceGroup 資源群組。
$rg =@{
    Name = 'myResourceGroup'
    Location = 'eastus2'
}
New-AzResourceGroup @rg
建立虛擬網路
在本節中,您會為虛擬機器建立虛擬網路。
使用 New-AzVirtualNetwork 和 New-AzVirtualNetworkSubnetConfig 來建立具有一個子網路的虛擬網路。
## Create backend subnet config ##
$subnet = @{
    Name = 'myBackendSubnet'
    AddressPrefix = '10.1.0.0/24'
}
$subnetConfig = New-AzVirtualNetworkSubnetConfig @subnet

## Create the virtual network ##
$vnet = @{
    Name = 'myVNet'
    ResourceGroupName = 'myResourceGroup'
    Location = 'eastus2'
    AddressPrefix = '10.1.0.0/16'
    Subnet = $subnetConfig
}
New-AzVirtualNetwork @vnet
建立主要公用 IP 位址
使用 New-AzPublicIpAddress 來建立主要公用 IP 位址。
$ip1 = @{
    Name = 'myPublicIP-1'
    ResourceGroupName = 'myResourceGroup'
    Location = 'eastus2'
    Sku = 'Standard'
    AllocationMethod = 'Static'
    IpAddressVersion = 'IPv4'
    Zone = 1,2,3
}
New-AzPublicIpAddress @ip1
建立網路安全性群組
在本節中,您會為虛擬機器和虛擬網路建立網路安全性群組。 您會建立規則允許以 SSH 連線到虛擬機器連接埠 22。
使用 New-AzNetworkSecurityGroup 和 New-AzNetworkSecurityRuleConfig 來建立網路安全性群組和規則。
## Create rule for network security group and place in variable. ##
$nsgrule1 = @{
    Name = 'myNSGRuleSSH'
    Description = 'Allow SSH'
    Protocol = '*'
    SourcePortRange = '*'
    DestinationPortRange = '22'
    SourceAddressPrefix = 'Internet'
    DestinationAddressPrefix = '*'
    Access = 'Allow'
    Priority = '200'
    Direction = 'Inbound'
}
$rule1 = New-AzNetworkSecurityRuleConfig @nsgrule1

## Create network security group ##
$nsg = @{
    Name = 'myNSG'
    ResourceGroupName = 'myResourceGroup'
    Location = 'eastus2'
    SecurityRules = $rule1
}
New-AzNetworkSecurityGroup @nsg
建立網路介面
使用 New-AzNetworkInterface 和 New-AzNetworkInterfaceIpConfig 為虛擬機器建立網路介面 (NIC)。 先前建立的公用 IP 位址和網路安全群組會與網路介面相關聯。 網路介面會附加至您先前建立的虛擬網路。
## Place the virtual network into a variable. ##
$net = @{
    Name = 'myVNet'
    ResourceGroupName = 'myResourceGroup'
}
$vnet = Get-AzVirtualNetwork @net

## Place the network security group into a variable. ##
$ns = @{
    Name = 'myNSG'
    ResourceGroupName = 'myResourceGroup'
}
$nsg = Get-AzNetworkSecurityGroup @ns

## Place the primary public IP address into a variable. ##
$pub1 = @{
    Name = 'myPublicIP-1'
    ResourceGroupName = 'myResourceGroup'
}
$pubIP1 = Get-AzPublicIPAddress @pub1

## Create a primary IP configuration for the network interface. ##
$IP1 = @{
    Name = 'ipconfig1'
    Subnet = $vnet.Subnets[0]
    PrivateIpAddressVersion = 'IPv4'
    PublicIPAddress = $pubIP1
}
$IP1Config = New-AzNetworkInterfaceIpConfig @IP1 -Primary

## Create a secondary IP configuration for the network interface. ##
$IP3 = @{
    Name = 'ipconfig3'
    Subnet = $vnet.Subnets[0]
    PrivateIpAddressVersion = 'IPv4'
    PrivateIpAddress = '10.1.0.6'
}
$IP3Config = New-AzNetworkInterfaceIpConfig @IP3

## Command to create a network interface. ##
$nic = @{
    Name = 'myNIC1'
    ResourceGroupName = 'myResourceGroup'
    Location = 'eastus2'
    NetworkSecurityGroup = $nsg
    IpConfiguration = $IP1Config,$IP3Config
}
New-AzNetworkInterface @nic
Note
新增靜態 IP 位址時,您必須在 NIC 所連接的子網路上指定未使用的有效位址。
建立虛擬機器
使用下列命令來建立虛擬機器:
$cred = Get-Credential

## Place network interface into a variable. ##
$nic = @{
    Name = 'myNIC1'
    ResourceGroupName = 'myResourceGroup'
}
$nicVM = Get-AzNetworkInterface @nic

## Create a virtual machine configuration for VMs ##
$vmsz = @{
    VMName = 'myVM'
    VMSize = 'Standard_DS1_v2'
}
$vmos = @{
    ComputerName = 'myVM'
    Credential = $cred
}
$vmimage = @{
    PublisherName = 'Debian'
    Offer = 'debian-11'
    Skus = '11'
    Version = 'latest'
}
$vmConfig = New-AzVMConfig @vmsz `
      | Set-AzVMOperatingSystem @vmos -Linux `
      | Set-AzVMSourceImage @vmimage `
      | Add-AzVMNetworkInterface -Id $nicVM.Id

## Create the virtual machine for VMs ##
$vm = @{
    ResourceGroupName = 'myResourceGroup'
    Location = 'eastus2'
    VM = $vmConfig
    SshKeyName = 'mySSHKey'
    }
New-AzVM @vm -GenerateSshKey
新增次要私人和公用 IP 位址
使用 New-AzPublicIpAddress 建立次要公用 IP 位址。
$ip2 = @{
    Name = 'myPublicIP-2'
    ResourceGroupName = 'myResourceGroup'
    Location = 'eastus2'
    Sku = 'Standard'
    AllocationMethod = 'Static'
    IpAddressVersion = 'IPv4'
    Zone = 1,2,3
}
New-AzPublicIpAddress @ip2
使用 New-AzNetworkInterfaceIpConfig 來建立虛擬機器的次要 IP 設定。
## Place the virtual network into a variable. ##
$net = @{
    Name = 'myVNet'
    ResourceGroupName = 'myResourceGroup'
}
$vnet = Get-AzVirtualNetwork @net

## Place your virtual network subnet into a variable. ##
$sub = @{
    Name = 'myBackendSubnet'
    VirtualNetwork = $vnet
}
$subnet = Get-AzVirtualNetworkSubnetConfig @sub

## Place the secondary public IP address you created previously into a variable. ##
$pip = @{
    Name = 'myPublicIP-2'
    ResourceGroupName = 'myResourceGroup'
}
$pubIP2 = Get-AzPublicIPAddress @pip

## Place the network interface into a variable. ##
$net = @{
    Name = 'myNIC1'
    ResourceGroupName = 'myResourceGroup'
}
$nic = Get-AzNetworkInterface @net

## Create a secondary IP configuration for the network interface. ##
$IPc2 = @{
    Name = 'ipconfig2'
    Subnet = $vnet.Subnets[0]
    PrivateIpAddressVersion = 'IPv4'
    PrivateIpAddress = '10.1.0.5'
    PublicIPAddress = $pubIP2
}
$IP2Config = New-AzNetworkInterfaceIpConfig @IPc2

## Add the IP configuration to the network interface. ##
$nic.IpConfigurations.Add($IP2Config)

## Save the configuration to the network interface. ##
$nic | Set-AzNetworkInterface
將 IP 位址新增至 VM 作業系統
連線並登入您使用多個私人 IP 位址建立的 VM。 您必須手動新增您新增至 VM 的所有私人 IP 位址,包括主要位址。 對您的 VM 作業系統完成下列步驟。
Windows 伺服器
展開
請開啟命令提示字元或 PowerShell。
在命令列上輸入
ipconfig /all。 您會看到透過 DHCP 指派的私人主要 IP 位址。在命令列中輸入
ncpa.cpl以開啟 網路連線 組態。開啟指派新 IP 位址之網路介面卡的 [屬性]。
按兩下 [網際網路通訊協定第 4 版 (TCP/IPv4)]。
選取 [使用下列的 IP 位址:]。 輸入下列值。
Setting Value IP位址: 輸入 主要 私有 IP 位址。 子網路遮罩: 根據您的 IP 位址輸入子網路遮罩。
例如,如果子網路是 /24 子網路,則子網路遮罩為 255.255.255.0。預設閘道: 子網路中的第一個 IP 位址。
如果您的子網路是 10.0.0.0/24,則閘道 IP 位址是 10.0.0.1。選取 [使用下列的 DNS 伺服器位址]。 輸入下列值。
Setting Value 慣用 DNS 伺服器: 輸入您的主要 DNS 伺服器。
輸入 IP 位址 168.63.129.16 以使用預設的 Azure 提供的 DNS。選取 進階 按鈕。
選取 ,然後新增。
輸入您新增至 Azure 網路介面的私人 IP 位址 。 輸入對應的 子網路遮罩。 選取 ,然後新增。
重複上述步驟,以新增您新增至 Azure 網路介面的任何更多私人 IP 位址。
Important
請勿手動指派在虛擬機器作業系統內已指派給 Azure 虛擬機器的公用 IP 位址。 當您手動設定作業系統內的 IP 位址時,請確保其位址與指派給 Azure 網路介面的私人 IP 位址相同。 無法正確指派位址可能會導致虛擬機器的連線中斷。 如需詳細資訊,請參閱變更 IP 位址設定。
如需私人 IP 位址的詳細資訊,請參閱私人 IP 位址。
選取 [ 確定 ] 以關閉次要 IP 位址設定。
選取 [ 確定 ] 以關閉配接器設定。 您的 RDP 連線已重新建立。
請開啟命令提示字元或 PowerShell。
在命令列上輸入
ipconfig /all。確認組態中存在主要和次要私人IP位址。
PS C:\Users\azureuser> ipconfig /all

Windows IP Configuration

   Host Name . . . . . . . . . . . . : myVM
   Primary Dns Suffix  . . . . . . . :
   Node Type . . . . . . . . . . . . : Hybrid
   IP Routing Enabled. . . . . . . . : No
   WINS Proxy Enabled. . . . . . . . : No

Ethernet adapter Ethernet:

   Connection-specific DNS Suffix  . :
   Description . . . . . . . . . . . : Microsoft Hyper-V Network Adapter
   Physical Address. . . . . . . . . : 00-0D-3A-E6-CE-A3
   DHCP Enabled. . . . . . . . . . . : No
   Autoconfiguration Enabled . . . . : Yes
   Link-local IPv6 Address . . . . . : fe80::a8d1:11d5:3ab2:6a51%5(Preferred)
   IPv4 Address. . . . . . . . . . . : 10.1.0.4(Preferred)
   Subnet Mask . . . . . . . . . . . : 255.255.255.0
   IPv4 Address. . . . . . . . . . . : 10.1.0.5(Preferred)
   Subnet Mask . . . . . . . . . . . : 255.255.255.0
   IPv4 Address. . . . . . . . . . . : 10.1.0.6(Preferred)
   Subnet Mask . . . . . . . . . . . : 255.255.255.0
   Default Gateway . . . . . . . . . : 10.1.0.1
   DHCPv6 IAID . . . . . . . . . . . : 100666682
   DHCPv6 Client DUID. . . . . . . . : 00-01-00-01-2A-A8-26-B1-00-0D-3A-E6-CE-A3
   DNS Servers . . . . . . . . . . . : 168.63.129.16
   NetBIOS over Tcpip. . . . . . . . : Enabled
確定 Windows 中使用的主要私人 IP 位址與 Azure VM 網路介面的主要 IP 位址相同。 如需詳細資訊,請參閱從具有多個 IP 位址的 Azure Windows VM 無權存取網際網路。
驗證 (Windows Server)
若要驗證透過公用 IP 從次要 IP 組態連線到網際網路的連線能力,請使用下列命令。 將 10.1.0.5 取代為您新增至 Azure VM 網路介面的次要私人 IP 位址。
ping -S 10.1.0.5 outlook.com
Note
對於次要 IP 組態,如果組態有與其相關聯的公用 IP 位址,您可以 Ping 網際網路。 對於主要 IP 組態,公用 IP 位址不需要 Ping 至網際網路。
SUSE Linux Enterprise 與 openSUSE
展開
SUSE 發行版本會使用cloud-netconfig 套件中的 cloud-netconfig-azure 外掛程式來管理 IP 配置。 系統管理員不需要手動步驟。 平台上設定之介面的第一個 IP 位址是透過 DHCP 指派。 Cloud-netconfig 外掛程式接著會持續探查 Azure 實例元數據服務 API(每分鐘一次),以取得指派給介面的更多 IP 位址,並自動新增/移除它們作為次要 IP 位址。
根據預設,應該在新影像上安裝並啟用此外掛程式。 您可以在這裡找到舊工作負載的設定步驟:https://www.suse.com/c/multi-nic-cloud-netconfig-ec2-azure/。
Ubuntu 14/16
展開
我們建議您查看 Linux 散發套件的最新文件。
開啟終端機視窗。
請確定您是根使用者。 如果不是,請輸入下列命令:
sudo -i更新網路介面的設定檔(假設 「eth0」)。
保留針對 dhcp 的現有行。 主要 IP 位址的設定仍然與先前一樣。
使用下列命令新增另一個靜態 IP 位址的組態:
cd /etc/network/interfaces.d/
ls
您應該會看到一個 .cfg 檔案。
開啟 檔案。 您應該會在檔案結尾看到下列這幾行:
auto eth0
iface eth0 inet dhcp
在檔案已有的幾行後面加入下列這幾行。 將
10.1.0.5取代為您的私人 IP 位址和子網路遮罩。iface eth0 inet static address 10.1.0.5 netmask 255.255.255.0若要新增其他私人IP位址,請編輯檔案,並在後續幾行上新增新的私人IP位址:
iface eth0 inet static address 10.1.0.5 netmask 255.255.255.0 iface eth0 inet static address 10.1.0.6 netmask 255.255.255.0使用下列命令儲存檔案︰
:wq使用下列命令重設網路介面︰
ifdown eth0 && ifup eth0Important
如果使用遠端連線,請在同一行中同時執行 ifdown 和 ifup。
使用下列命令確認 IP 位址已加入網路介面︰
ip addr list eth0您應該會在清單中看到您加入的 IP 位址。 Example:
2: eth0: <BROADCAST,MULTICAST,UP,LOWER_UP> mtu 1500 qdisc mq state UP group default qlen 1000 link/ether 00:0d:3a:04:45:16 brd ff:ff:ff:ff:ff:ff inet 10.1.0.5/24 brd 10.1.0.255 scope global eth0 valid_lft forever preferred_lft forever inet 10.1.0.6/24 brd 10.1.0.255 scope global secondary eth0 valid_lft forever preferred_lft forever inet 10.1.0.4/24 brd 10.1.0.255 scope global secondary eth0 valid_lft forever preferred_lft forever inet6 fe80::20d:3aff:fe04:4516/64 scope link valid_lft forever preferred_lft forever
驗證 (Ubuntu 14/16)
若要確保您能夠透過相關聯的公用 IP,從第二個 IP 組態連線到網際網路,請使用下列命令:
ping -I 10.1.0.5 outlook.com
Note
對於次要 IP 組態,如果組態有與其相關聯的公用 IP 位址,您只可以 Ping 網際網路。 對於主要 IP 組態,公用 IP 位址不需要 Ping 至網際網路。
對於 Linux VM,在嘗試驗證來自次要 NIC 的輸出連線能力時,您可能需要新增適當的路由。 請參閱您的 Linux 發佈的相關文件。 下列方法可達成此目標:
echo 150 custom >> /etc/iproute2/rt_tables
ip rule add from 10.1.0.5 lookup custom
ip route add default via 10.1.0.1 dev eth2 table custom
請務必取代:
將 10.1.0.5 取代為有相關聯公用 IP 位址的私人 IP 位址
10.1.0.1 設定為預設閘道
將次要網路介面的名稱設為 eth2
Ubuntu 18.04+
展開
從 18.04 開始, netplan Ubuntu 會用於網路管理。 我們建議您查看 Linux 散發套件的最新文件。
開啟終端機視窗。
請確定您是根使用者。 如果不是,請輸入下列命令:
sudo -i建立第二個介面的檔案,並在文字編輯器中開啟:
vi /etc/netplan/60-static.yaml將下列幾行新增至檔案,並將
10.1.0.5/24取代為您的 IP 和子網路遮罩:network: version: 2 ethernets: eth0: addresses: - 10.1.0.5/24若要新增私人IP位址,請編輯檔案,並在後續幾行上新增新的私人IP位址:
network: version: 2 ethernets: eth0: addresses: - 10.1.0.5/24 - 10.1.0.6/24使用下列命令儲存檔案︰
:wq使用 netplan try 測試更改以確認語法。
netplan tryNote
netplan try將會暫時套用變更,並在120秒後回復變更。 如果連線中斷,請等候 2 分鐘,然後重新連線。 在這段時間,變更將會復原。假設
netplan try沒有問題,請套用設定變更:netplan apply使用下列命令確認 IP 位址已加入網路介面︰
ip addr list eth0您應該會在清單中看到您加入的 IP 位址。 Example:
2: eth0: <BROADCAST,MULTICAST,UP,LOWER_UP> mtu 1500 qdisc mq state UP group default qlen 1000 link/ether 00:0d:3a:04:45:16 brd ff:ff:ff:ff:ff:ff inet 10.1.0.5/24 brd 10.1.0.255 scope global eth0 valid_lft forever preferred_lft forever inet 10.1.0.6/24 brd 10.1.0.255 scope global secondary eth0 valid_lft forever preferred_lft forever inet 10.1.0.4/24 brd 10.1.0.255 scope global secondary eth0 valid_lft forever preferred_lft forever inet6 fe80::20d:3aff:fe04:4516/64 scope link valid_lft forever preferred_lft forever
驗證 (Ubuntu 18.04+)
若要確保您能夠透過相關聯的公用 IP,從第二個 IP 組態連線到網際網路,請使用下列命令:
ping -I 10.1.0.5 outlook.com
Note
對於次要 IP 組態,如果組態有與其相關聯的公用 IP 位址,您只可以 Ping 網際網路。 對於主要 IP 組態,公用 IP 位址不需要 Ping 至網際網路。
對於 Linux VM,在嘗試驗證來自次要 NIC 的輸出連線能力時,您可能需要新增適當的路由。 請遵循適用於您的Linux發行版的文件。 下列方法是達成此目標的其中一種方式:
echo 150 custom >> /etc/iproute2/rt_tables
ip rule add from 10.1.0.5 lookup custom
ip route add default via 10.1.0.1 dev eth2 table custom
請確定您已取代:
將 10.1.0.5 取代為有相關聯公用 IP 位址的私人 IP 位址
10.1.0.1 設定為預設閘道
將次要網路介面的名稱設為 eth2
Red Hat Enterprise Linux 和其他項目
展開
Note
若要在 RHEL10.x 中設定額外的 IP 位址,可以透過下列命令重新啟動 NetworkManager:systemctl restart NetworkManger.service 或重新啟動系統。 不需要其他任何步驟。
開啟終端機視窗。
請確定您是根使用者。 如果不是,請輸入下列命令:
sudo -i輸入您的密碼,並且依照提示的指示。 成為根使用者之後,使用下列命令移至網路指令碼資料夾:
cd /etc/sysconfig/network-scripts使用下列命令列出相關的 ifcfg 檔案︰
ls ifcfg-*您應該會看到 ifcfg-eth0 是其中一個檔案。
為每個新增至系統的IP建立新的組態檔。
touch ifcfg-eth0:0使用下列命令開啟 ifcfg-eth0:0 檔案:
vi ifcfg-eth0:0使用下列命令將內容新增至檔案,在此案例中為 eth0:0 。 將
10.1.0.5替換為您的新私有 IP 位址和子網掩碼。DEVICE=eth0:0 BOOTPROTO=static ONBOOT=yes IPADDR=10.1.0.5 NETMASK=255.255.255.0使用下列命令儲存檔案︰
:wq為每個 IP 位址建立組態檔,以添加其對應的值。
touch ifcfg-eth0:1vi ifcfg-eth0:1DEVICE=eth0:1 BOOTPROTO=static ONBOOT=yes IPADDR=10.1.0.6 NETMASK=255.255.255.0:wq執行下列命令重新啟動網路服務,並確定所做的變更都成功︰
systemctl restart NetworkManager.service ifconfig您應該會在傳回的清單中看到您新增的 IP 位址或位址。
eth0: flags=4163<UP,BROADCAST,RUNNING,MULTICAST> mtu 1500 inet 10.1.0.4 netmask 255.255.255.0 broadcast 10.1.0.255 inet6 fe80::6245:bdff:fe7d:704a prefixlen 64 scopeid 0x20<link> ether 60:45:bd:7d:70:4a txqueuelen 1000 (Ethernet) RX packets 858 bytes 244215 (238.4 KiB) RX errors 0 dropped 0 overruns 0 frame 0 TX packets 1021 bytes 262077 (255.9 KiB) TX errors 0 dropped 0 overruns 0 carrier 0 collisions 0 eth0:0: flags=4163<UP,BROADCAST,RUNNING,MULTICAST> mtu 1500 inet 10.1.0.5 netmask 255.255.255.0 broadcast 10.1.0.255 ether 60:45:bd:7d:70:4a txqueuelen 1000 (Ethernet) eth0:1: flags=4163<UP,BROADCAST,RUNNING,MULTICAST> mtu 1500 inet 10.1.0.6 netmask 255.255.255.0 broadcast 10.1.0.255 ether 60:45:bd:7d:70:4a txqueuelen 1000 (Ethernet)
驗證 (Red Hat 和其他項目)
若要確保您能夠透過相關聯的公用 IP,從第二個 IP 組態連線到網際網路,請使用下列命令:
ping -I 10.0.0.5 outlook.com
Note
對於次要 IP 組態,如果組態有與其相關聯的公用 IP 位址,您只可以 Ping 網際網路。 對於主要 IP 組態,公用 IP 位址不需要 Ping 至網際網路。
對於 Linux VM,在嘗試驗證來自次要 NIC 的輸出連線能力時,您可能需要新增適當的路由。 請參閱您使用的Linux發行版本之文件。 下列方法可達成此目標:
echo 150 custom >> /etc/iproute2/rt_tables
ip rule add from 10.1.0.5 lookup custom
ip route add default via 10.1.0.1 dev eth2 table custom
請務必取代:
將 10.0.0.5 替換成有相關聯公用 IP 位址的私人 IP 位址
10.0.0.1 作為預設閘道
將次要網路介面的名稱設為 eth2
Debian GNU/Linux
展開
我們建議您查看 Linux 散發套件的最新文件。
開啟終端機視窗。
請確定您是根使用者。 如果不是,請輸入下列命令:
sudo -i更新網路介面的設定檔(假設 「eth0」)。
保留針對 dhcp 的現有行。 主要 IP 位址的設定仍然與先前一樣。
使用下列命令,為每個靜態 IP 位址新增組態:
cd /etc/network/interfaces.d/ ls您應該會看到一個 .cfg 檔案。
開啟 檔案。 您應該會在檔案結尾看到下列這幾行:
auto eth0 iface eth0 inet dhcp在檔案已有的幾行後面加入下列這幾行。 將
10.1.0.5取代為您的私人 IP 位址和子網路遮罩。iface eth0 inet static address 10.1.0.5 netmask 255.255.255.0在組態檔中新增新的 IP 位址資訊:
iface eth0 inet static
address 10.1.0.5
netmask 255.255.255.0
iface eth0 inet static
address 10.1.0.6
netmask 255.255.255.0
使用下列命令儲存檔案︰
:wq重新啟動網路服務,變更才會生效。 針對 Debian 8 和更新版本,請使用:
systemctl restart networking針對舊版 Debian,您可以使用下列命令:
service networking restart使用下列命令確認 IP 位址已加入網路介面︰
ip addr list eth0您應該會在清單中看到您加入的 IP 位址。 Example:
2: eth0: <BROADCAST,MULTICAST,UP,LOWER_UP> mtu 1500 qdisc mq state UP group default qlen 1000
link/ether 00:0d:3a:04:45:16 brd ff:ff:ff:ff:ff:ff
inet 10.1.0.5/24 brd 10.1.0.255 scope global eth0
   valid_lft forever preferred_lft forever
inet 10.1.0.6/24 brd 10.1.0.255 scope global secondary eth0
   valid_lft forever preferred_lft forever
inet 10.1.0.4/24 brd 10.1.0.255 scope global secondary eth0
   valid_lft forever preferred_lft forever
inet6 fe80::20d:3aff:fe04:4516/64 scope link
   valid_lft forever preferred_lft forever
驗證 (Debian GNU/Linux)
若要確保您能夠透過相關聯的公用 IP,從第二個 IP 組態連線到網際網路,請使用下列命令:
ping -I 10.1.0.5 outlook.com
Note
對於次要 IP 組態,如果組態有與其相關聯的公用 IP 位址,您只可以 Ping 網際網路。 對於主要 IP 組態,公用 IP 位址不需要 Ping 至網際網路。
對於 Linux VM,在嘗試驗證來自次要 NIC 的輸出連線能力時,您可能需要新增適當的路由。 請參閱您的 Linux 發佈的相關文件。 下列方法可達成此目標:
echo 150 custom >> /etc/iproute2/rt_tables

ip rule add from 10.1.0.5 lookup custom
ip route add default via 10.1.0.1 dev eth2 table custom
請務必取代:
將 10.1.0.5 取代為有相關聯公用 IP 位址的私人 IP 位址
10.1.0.1 設定為預設閘道
將次要網路介面的名稱設為 eth2
後續步驟
- 深入了解 Azure 中的公用 IP 位址。
- 深入了解 Azure 中的私人 IP 位址。
- 了解如何設定 Azure 網路介面的 IP 位址。