重要事項
本文中的部分資訊與發行前版本產品有關,在產品正式發行前可能會大幅度修改。 Microsoft 對此處提供的資訊,不提供任何明確或隱含的瑕疵擔保。
Microsoft Sentinel Model Context Protocol (MCP) server 中的代理建立工具集合,讓開發者能使用自然語言在相容的 MCP 整合開發環境中建置Security Copilot代理。
在這個入門階段,你會學到如何:
設定並驗證 MCP 伺服器
啟用 GitHub Copilot 代理模式
管理 MCP 工具的上下文
必要條件
支援的程式碼編輯器
Microsoft Sentinel 對 Security Copilot 代理建立 MCP 工具的支援,適用於以下 AI 驅動的程式碼編輯器:
設定並驗證 MCP 伺服器
安裝 MCP 伺服器的步驟如下:
啟動Visual Studio Code (VS代碼) 。
在 VS Code 中新增 MCP 伺服器連線。 輸入 按鍵
Ctrl + Shift + P開啟指令面板。 輸入符號>,接著是文字MCP: Add server。
選擇
HTTP (HTTP or Server-Sent Events)。
輸入以下伺服器網址並選擇 Enter。 此網址區分大小寫。
https://sentinel.microsoft.com/mcp/security-copilot-agent-creation輸入友善的伺服器 ID。

系統會提示 你信任伺服器 。
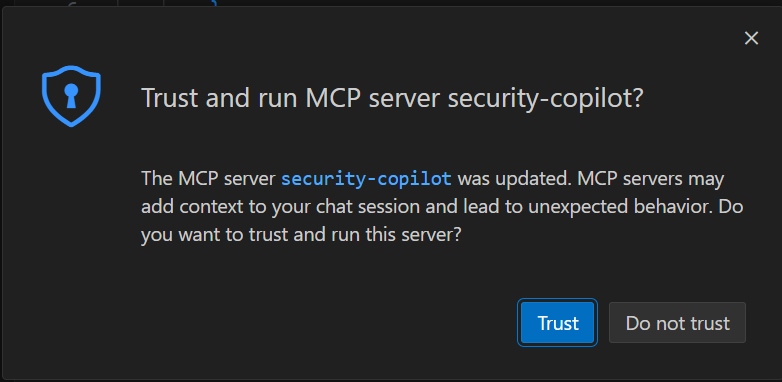
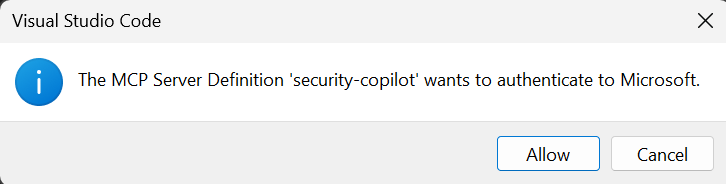
當被要求驗證伺服器定義時,選擇 允許 。
可以選擇讓伺服器在所有 VS Code 工作區都能使用,還是只在目前的 VS Code 工作區中開放。

一旦認證完成,伺服器應該會開始 執行 ,你會看到一個名為
mcp.jsonVS Code 工作區的 MCP 伺服器設定的檔案。


啟用 GitHub Copilot 代理模式
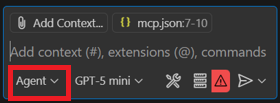
開啟 VS Code 的聊天室 >查看 選單 >聊天 或按
CRTL + ALT + I。把聊天設定成特工模式。
在提示欄中選擇工具圖示。
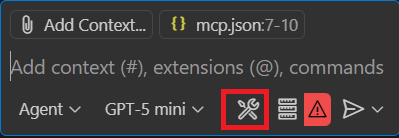
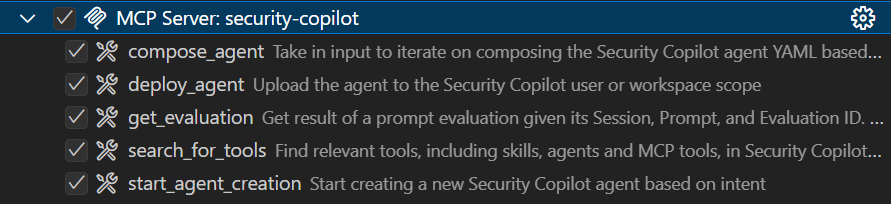
你可以看到 GitHub Copilot 使用的工具清單。 展開你剛新增的 MCP 伺服器欄位,可以看到五種用於代理建置的工具:


管理 MCP 工具的上下文
透過提供正確的背景,你可以在 VS Code 中獲得 AI 的協助,提供相關且準確的回應。 本節介紹兩種管理情境的選項,確保 AI 助理能如預期且更一致地使用 MCP 工具。
您可以從以下選項中選擇來管理情境:
自訂說明
自訂指令讓你可以在 Markdown 檔案中定義常見的指引或規則,描述任務應該如何執行。 與其在每個聊天提示中手動加入上下文,不如在 Markdown 檔案中指定自訂指令,確保 AI 回應一致且符合你的專案需求。
你可以設定自訂指令自動套用於所有聊天請求或只適用於特定檔案。
使用自訂指令檔
在工作區根目錄中,用一個 .github/copilot-instructions.md Markdown 檔案定義你的自訂指令。 VS Code 會自動將此檔案中的指令套用到工作區內所有聊天請求。
使用 .github/copilot-instructions.md 檔案的步驟:
啟用設定
github.copilot.chat.codeGeneration.useInstructionFiles。在工作區根建立一個
.github/copilot-instructions.md檔案。 如果需要,先建立.github目錄。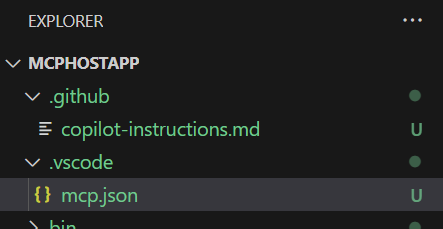
請用自然語言並以 Markdown 格式描述你的指示。
開始時,將上下文檔案
scp-mcp-context.md的內容複製到檔案中copilot-instructions.md。 請參閱 MCP 的背景說明。

新增上下文檔案
為了確保 AI 助理能如預期且更一致地使用 MCP 工具,請將此上下文檔案加入你的 IDE。 當你提示時,請確保 AI 助理有在參考這個檔案。
把上下文
scp-mcp-context.md加到 VS Code 裡,或直接貼到你的工作區。 請使用上下文檔案,請參見 MCP 上下文。 你的工作區大致長這樣: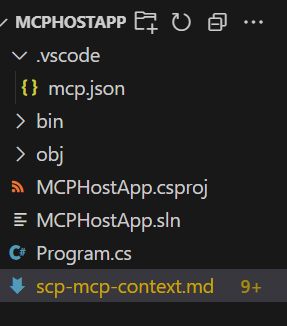
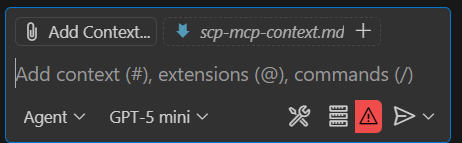
在提示欄選擇 「新增上下文 」,然後選擇上下文檔案。


MCP 工具的上下文檔案
複製用快速入門的圖 scp-mcp-context.md 。
# MCP Tools Available for Agent Building
    1. **start_agent_creation**
        - **Purpose**: Creates a new Security Copilot session and starts the agent building process.
        - The userQuery input will be the user's problem statement (what they want the agent to do).
        - The output of the tool should be returned IN FULL WITHOUT EDITS.
        - The tool will return an initial agent YAML definition.
    2. **compose_agent**
        - **Purpose**: Continues the session and agent building process created by *start_agent_creation*. Outputs agent definition YAML or can ask clarifying questions to the user.
        - The sessionId input is obtained from the output of *start_agent_creation*
        - The existingDefinition input is optional. If an agent definition YAML has not been created yet, this should be blank (can be an empty string).
    3. **search_for_tools**
        - **Purpose: Discover relevant skills (tools) based on the user's query
        - This will create a new Security Copilot session, but it should not be included in the start_agent/continue_agent flow.
          - A user might want to know about Security Copilot skills they have access to without wanting to create an agent
          - The session ID created should NOT be reused in any capacity
    4. **get_evaluation**
        - **Purpose: Get the results of the evaluations triggered by each of the above tools. You MUST repeatedly activate this tool until the property of the result "state" is equal to "Completed" in order to get the fully processed result. The "state" may equal "Created" or "Running" but again, you must repeat the process until the state is "Completed". There is NO MAXIMUM amount of times you might call this tool in a row.
    5. **deploy_agent**
        - **Purpose: Deploy an agent to Security Copilot.
        - The user must provide the scope as either "User" or "Workspace".
        - Unless they already have an AGENT definition yaml provided, *start_agent_creation* must be run before to generate an agentDefinition
        - "agentSkillsetName" should be COPIED EXACTLY from the value of "Descriptor: Name:" in the agent definition YAML, including any special characters like ".". This will NOT work if the two do not match EXACTLY.
        - DO NOT use *get_evaluation* after this tool.

# Agent Building Execution Flow

## Step 1: Problem Statement Check
- If the user did **not** provide a problem statement, prompt them to do so.
- If the user **did** provide a problem statement, proceed to Step 2.

## Step 2: Start Agent Creation
- Use the `start_agent_creation` tool with `userQuery = <problem statement>`.
  - **DO NOT** include any quotation marks in the userQuery
- Then, use `get_evaluation` to retrieve the initial response.
  - **DO** repeatedly call `get_evaluation` until the `"state"` property of the result equals `"Completed"`.
  - **DO NOT** require the user to ask again to get the results.
  - **DO NOT** edit or reword the response content.

## Step 2.5: Output Handling
- **DO NOT** reformat, summarize, or describe the YAML output.
- **DO** return the YAML output **verbatim**.
- **DO** return the output in **AGENT FORMAT**.

## Step 3: Agent Refinement
- Ask the user if they would like to edit the agent or if they would like to deploy the agent. If they want to deploy, skip to **Step 4**.
- If the user wants to edit the agent definition:
  - If they respond with edits directly, use `compose_agent` with:
    - `sessionId` from `start_agent_creation`
    - `existingDefinition = <previous AGENT YAML>`
      - `\n` MUST be rewritten as `\\n`
    - `userQuery = <user’s new input>`
      - **DO NOT** include any quotation marks in the userQuery
  - If they attach a manually edited YAML file to the context, use the file content as `existingDefinition`.
    - **DO NOT** edit the file directly, you MUST use `compose_agent`
    - `\n` MUST be rewritten as `\\n`

## Step 4: Agent Deployment
- If the user asks to deploy the agent, use `deploy_agent`.
  - You **must confirm the scope**: either `"User"` or `"Workspace"`.
    - If not provided, ask the user to specify.
  - `agentSkillsetName` must **exactly match** the value of `Descriptor: Name:` in the YAML.
    - This includes any special characters.
  - Leave existing instances of `\n` inside `agentDefinition` as-is
- **DO NOT** run `get_evaluation` after deployment.
- **DO** include all of these things in the tool response to the user:
    1. Confirm successful deployment to the user
    2. Direct the user to the Security Copilot portal to test and view the agent with this link: https://securitycopilot.microsoft.com/agents
    3. Direct the user to read more on how to test their agent in Security Copilot with this link: https://learn.microsoft.com/en-us/copilot/security/developer/mcp-quickstart#test-agent

## Step 5: Further Agent Refinement and Redeployment
- After deployment, the user may still want to **edit the agent definition**.
  - If so, you must support calling `compose_agent` again.
  - Follow the same process as described in **Step 3**:
    - If the user asks for edits directly, use the previous AGENT YAML as `existingDefinition`.
    - If the user uploads a manually edited YAML file, use the file content as `existingDefinition`.
- The user may also want to **redeploy the agent** after making refinements.
  - You must run `deploy_agent` again using the updated YAML.
  - Ensure the `agentSkillsetName` matches **exactly** the value of `Descriptor: Name:` in the latest YAML, including any special characters.
  - Leave existing instances of `\n` inside `agentDefinition` as-is
  - Confirm the deployment scope: either `"User"` or `"Workspace"`.
    - If the scope is not provided, prompt the user to specify.
  - Do **not** run `get_evaluation` after deployment.
  - Confirm successful redeployment to the user.
- Alternatively, the user may want to **create a new agent**.
  - Restart the procedure from **Step 1**.
  - When using `start_agent_creation`, a new session ID will be created.
  - **DO** keep track of which session IDs correspond to which problem statements or agents so the user can return to previous sessions if needed.

## Additional Rules
- Only call `compose_agent` **after** the user has provided a response. Do not proceed automatically.
- Agent creation must remain **user-driven**. Do not initiate steps without explicit user input.
- Wait for the user to respond before continuing to the next step.
- Tool responses must be returned **directly to the user** in full.
  - Do **not** alter, reformat, summarize, or reword the content of any tool response.
  - This applies specifically to the `"result": "content"` field in the JSON returned by tool executions.
  - LEAVE OUT any "Grounding Notes"

## Error Handling
- If any tool call fails:
  - Inform the user of the failure.
  - If it is a client error, make an attempt to retry the tools, rewriting inputs based on the error message.
    - Example: If the error indicates invalid JSON characters, escape or remove those characters from the input and retry. Always attempt escaping first.