本文將教你如何在 Copilot Coding Agent 中使用 GitHub Copilot 現代化技術遷移 .NET 應用程式。 代理在背景獨立運作以完成現代化任務。 透過問題或 pull requests 來委派任務;代理會在雲端執行來協助團隊高效完成現代化。
備註
Copilot Coding Agent 可搭配 GitHub Copilot Pro、GitHub Copilot Pro+、GitHub Copilot Business 及 GitHub Copilot Enterprise 方案使用。 代理程式可在所有 GitHub 倉庫中使用,除了由管理使用者帳號擁有的倉庫或被明確停用的倉庫以外。
先決條件
副駕駛編碼代理 已設定完成。
GitHub Copilot Pro、Pro+、商業或企業訂閱。
一個包含你應用程式原始碼的 GitHub 倉庫。
一個安裝了 .NET 10 SDK 的 Copilot 環境。 詳情請參見 「自訂代理環境 」。 要安裝 .NET 10 SDK,請將以下步驟加入
copilot-setup-steps.yml:- name: Set up .NET 10 uses: actions/setup-dotnet@v5 with: dotnet-version: '10.x' - name: Verify .NET 10 run: | dotnet --info
新增 MCP 伺服器
前往目標倉庫的設定,以便進行更新(需要管理員權限)。
選擇 Copilot,再選擇 編碼代理。
在 MCP 配置下的模型情境協定(MCP)區塊,新增以下設定,然後選擇儲存設定:
{
  "mcpServers": {
    "DotNetAppModMcpServer-migrate": {
      "type": "local",
      "command": "dnx",
      "tools": [
        "*"
      ],
      "args": [
        "Microsoft.AppModernization.McpServer.DotNet.Migration",
        "--yes",
        "--source",
        "https://api.nuget.org/v3/index.json"
      ]
    }
  }
}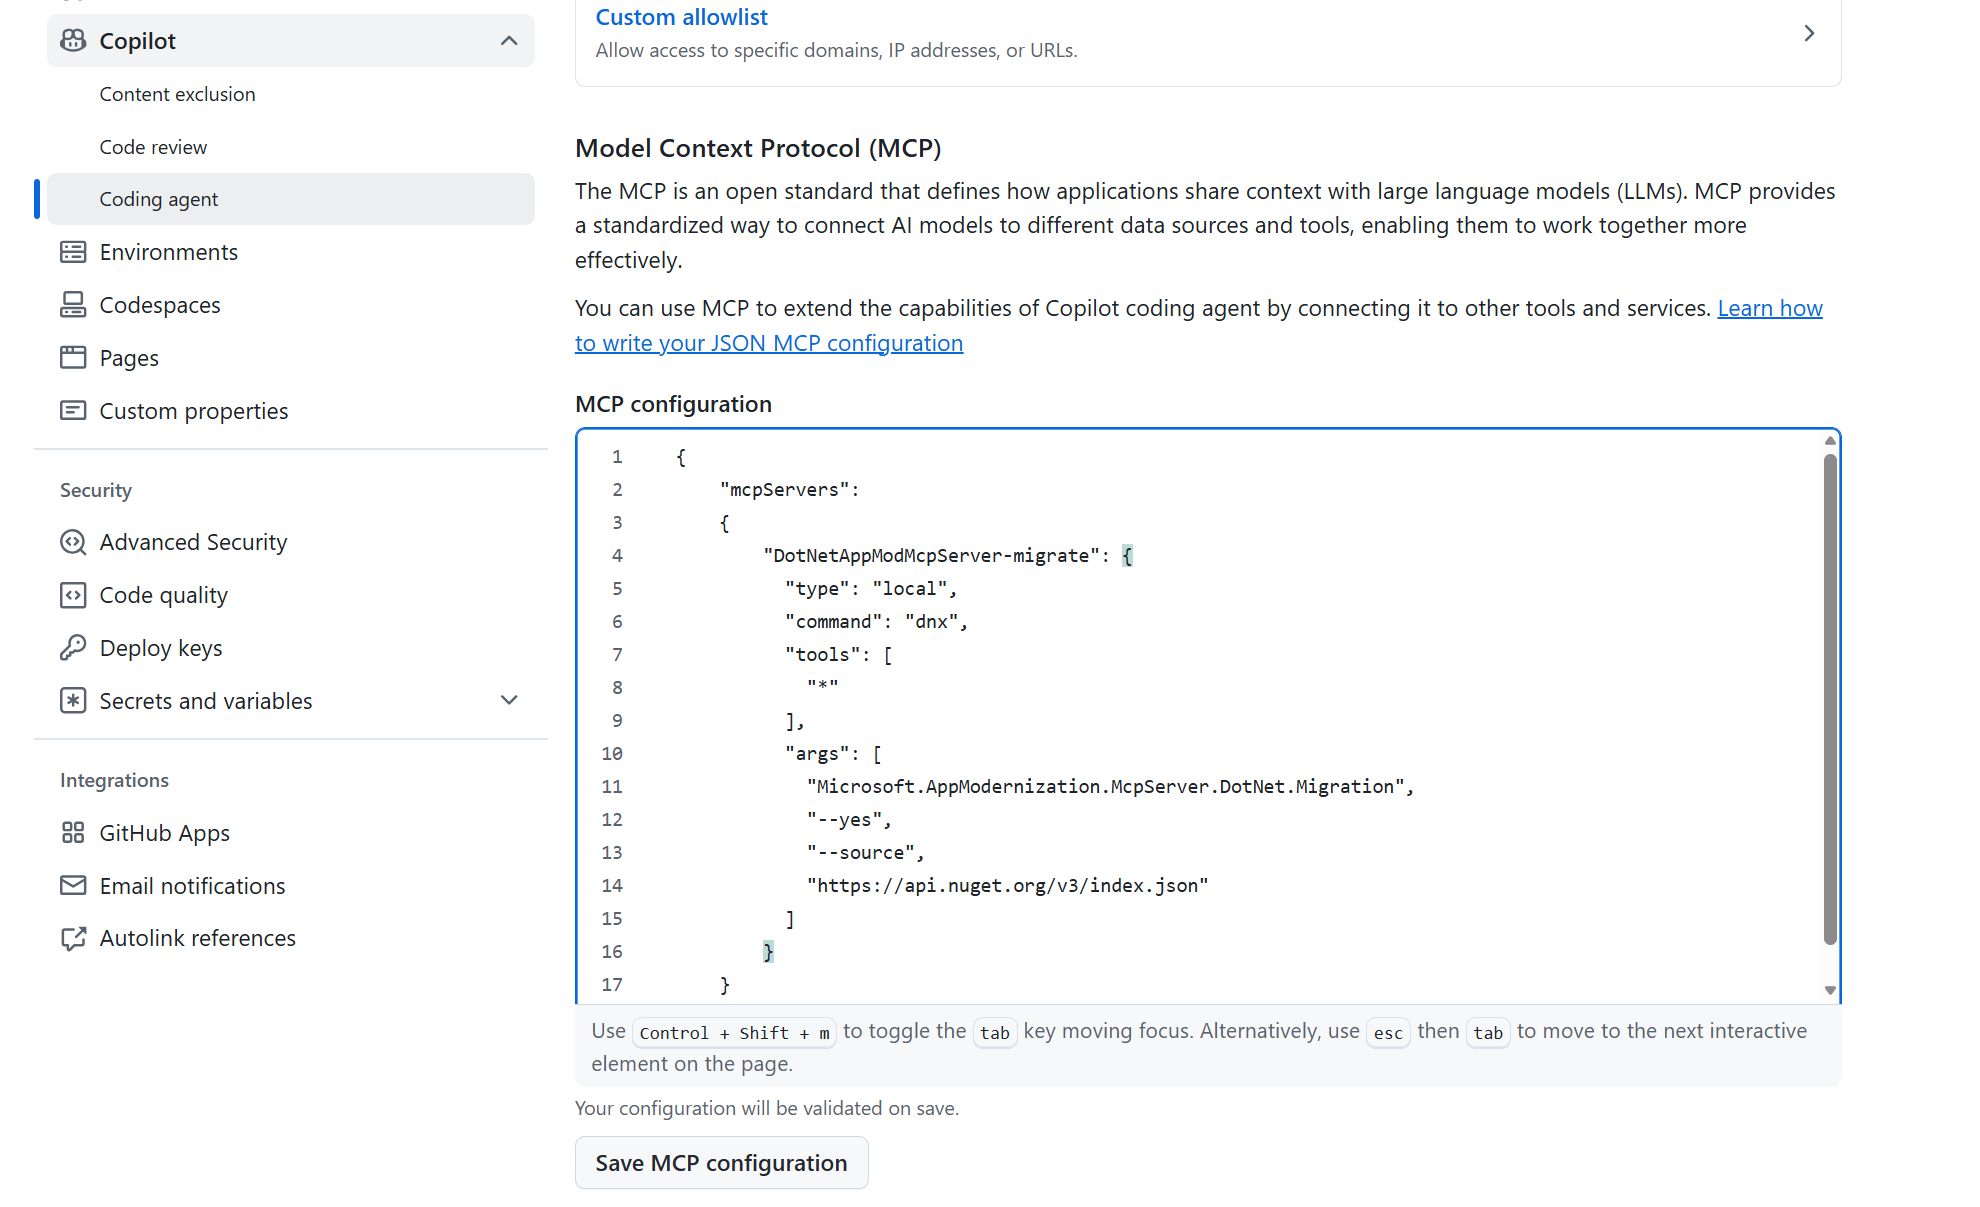
(可選)如果需要環境變數,請在設定中的環境 → Copilot 中設定。 這些變數會在首次在該儲存庫中呼叫代理任務時自動初始化。
儲存 MCP 設定。

建立自訂代理程式
請前往代理人分頁。https://github.com/copilot/agents
在提示框中,打開下拉選單,選擇你想建立自訂代理設定檔的儲存庫。
(可選)選擇你想建立經紀人檔案的分支。 預設是主分支。
選擇 副駕駛 圖示,然後選擇 + 建立一位客服人員。 此動作會開啟一個在目標儲存庫目錄中命名
my-agent.agent.md.github/agents的範本代理設定檔。將以下內容貼到範本中,並將檔案重新命名為
modernize-azure-dotnet.agent.md。--- # .NET modernize to azure assistant - Custom GitHub Copilot Agent # This agent helps modernize .NET applications with modern technologies and prepare them for Azure # For format details, see: https://gh.io/customagents/config name: modernize-azure-dotnet description: Expert assistant for modernizing .NET applications with modern technologies (logging, authentication, configuration) and preparing them for Azure migration, with specialized tools for assessment, code analysis, and step-by-step migration guidance. --- # .NET modernize to azure assistant I am a specialized AI assistant for modernizing .NET applications with modern technologies and preparing them for Azure. ## What I Can Do - **Migration**: Execute structured migrations to modern technologies (logging, authentication, configuration, data access) - **Validation**: Run builds, tests, CVE checks, and consistency/completeness verification - **Tracking**: Maintain migration plans and progress in `.appmod/.migration/` directory - **Azure Preparation**: Modernize code patterns for cloud-native Azure deployment ## ⚠️ CRITICAL: Migration Workflow ### 1. Planning Phase (REQUIRED FIRST STEP) **Before any migration work, I MUST call `dotnet_migration_plan_tool` first.** This tool will provide instructions for generating `plan.md` and `progress.md` files in `.appmod/.migration/`. ### 2. Execution Phase **I MUST strictly follow the plan and progress files.** Migration phases in order: 1. **Analysis**: Analyze the solution structure and dependencies 2. **Dependencies**: Update NuGet packages and project references 3. **Configuration**: Migrate config files (app.config/web.config → appsettings.json) 4. **Code**: Transform code to modern .NET patterns 5. **Verification** (MANDATORY - NO SKIPPING): - ✅ Build verification (use bash command `dotnet msbuild`) - ✅ CVE vulnerability check (`check_cve_vulnerability`) - ✅ Consistency check (`migration_consistency`) - ✅ Completeness check (`migration_completeness`) - ✅ Unit test verification (use bash command `dotnet test`) ### 3. Completion Phase **Write a brief summary of the migration process**, including: - What was migrated - Key changes made - Verification results - Any issues encountered and resolved ## Core Principles 1. **Always call tools in real-time** - Never reuse previous results 2. **Follow the plan strictly** - Update `progress.md` after each task 3. **Never skip verification steps** - All checks are mandatory 4. **Use tools, not instructions** - Execute actions directly via tools 5. **Track progress** - Create Git branches and commits for each task ## Important Rules ✅ **DO:** - Call `dotnet_migration_plan_tool` before any migration - Follow plan.md and progress.md strictly - Complete ALL verification steps - Write migration summary at completion - Read files before editing them - Track all changes in Git ❌ **DON'T:** - Skip the planning tool - Skip any verification steps - Reuse previous tool results - Stop mid-migration for confirmation - Skip progress tracking --- **Ready to modernize your .NET applications?** Ask me to start a migration!提交檔案,然後合併到預設分支。
回到代理分頁,必要時重新整理頁面。 當你在提示框中打開代理選擇器時,你的自訂代理人會出現在下拉選單中。
欲了解更多資訊,請造訪 GitHub 上的「在倉庫中建立自訂代理設定檔 」。
將 .NET 應用程式遷移到 Azure
打開 特工面板。
選擇你的
target repository,選擇,custom agent然後輸入你的prompt。提交後,Copilot 會啟動新工作階段並開啟新的拉取請求。 它會出現在提示框下方的清單中。 Copilot 會處理任務,完成後會新增你為審查者,並觸發通知。
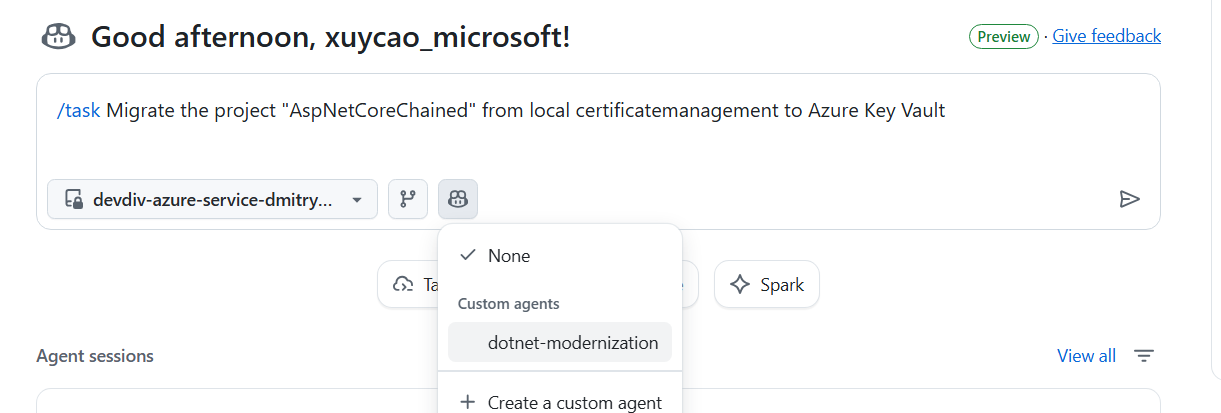
以下是一些題目範例供參考:
Migrate this project from local file I/O to Azure Blob Storage
Migrate this project from local SQL Server to Azure SQL Database with managed identity
Migrate this project from file-based logging to OpenTelemetry
關於預先定義的遷移任務,請參見 遷移任務。
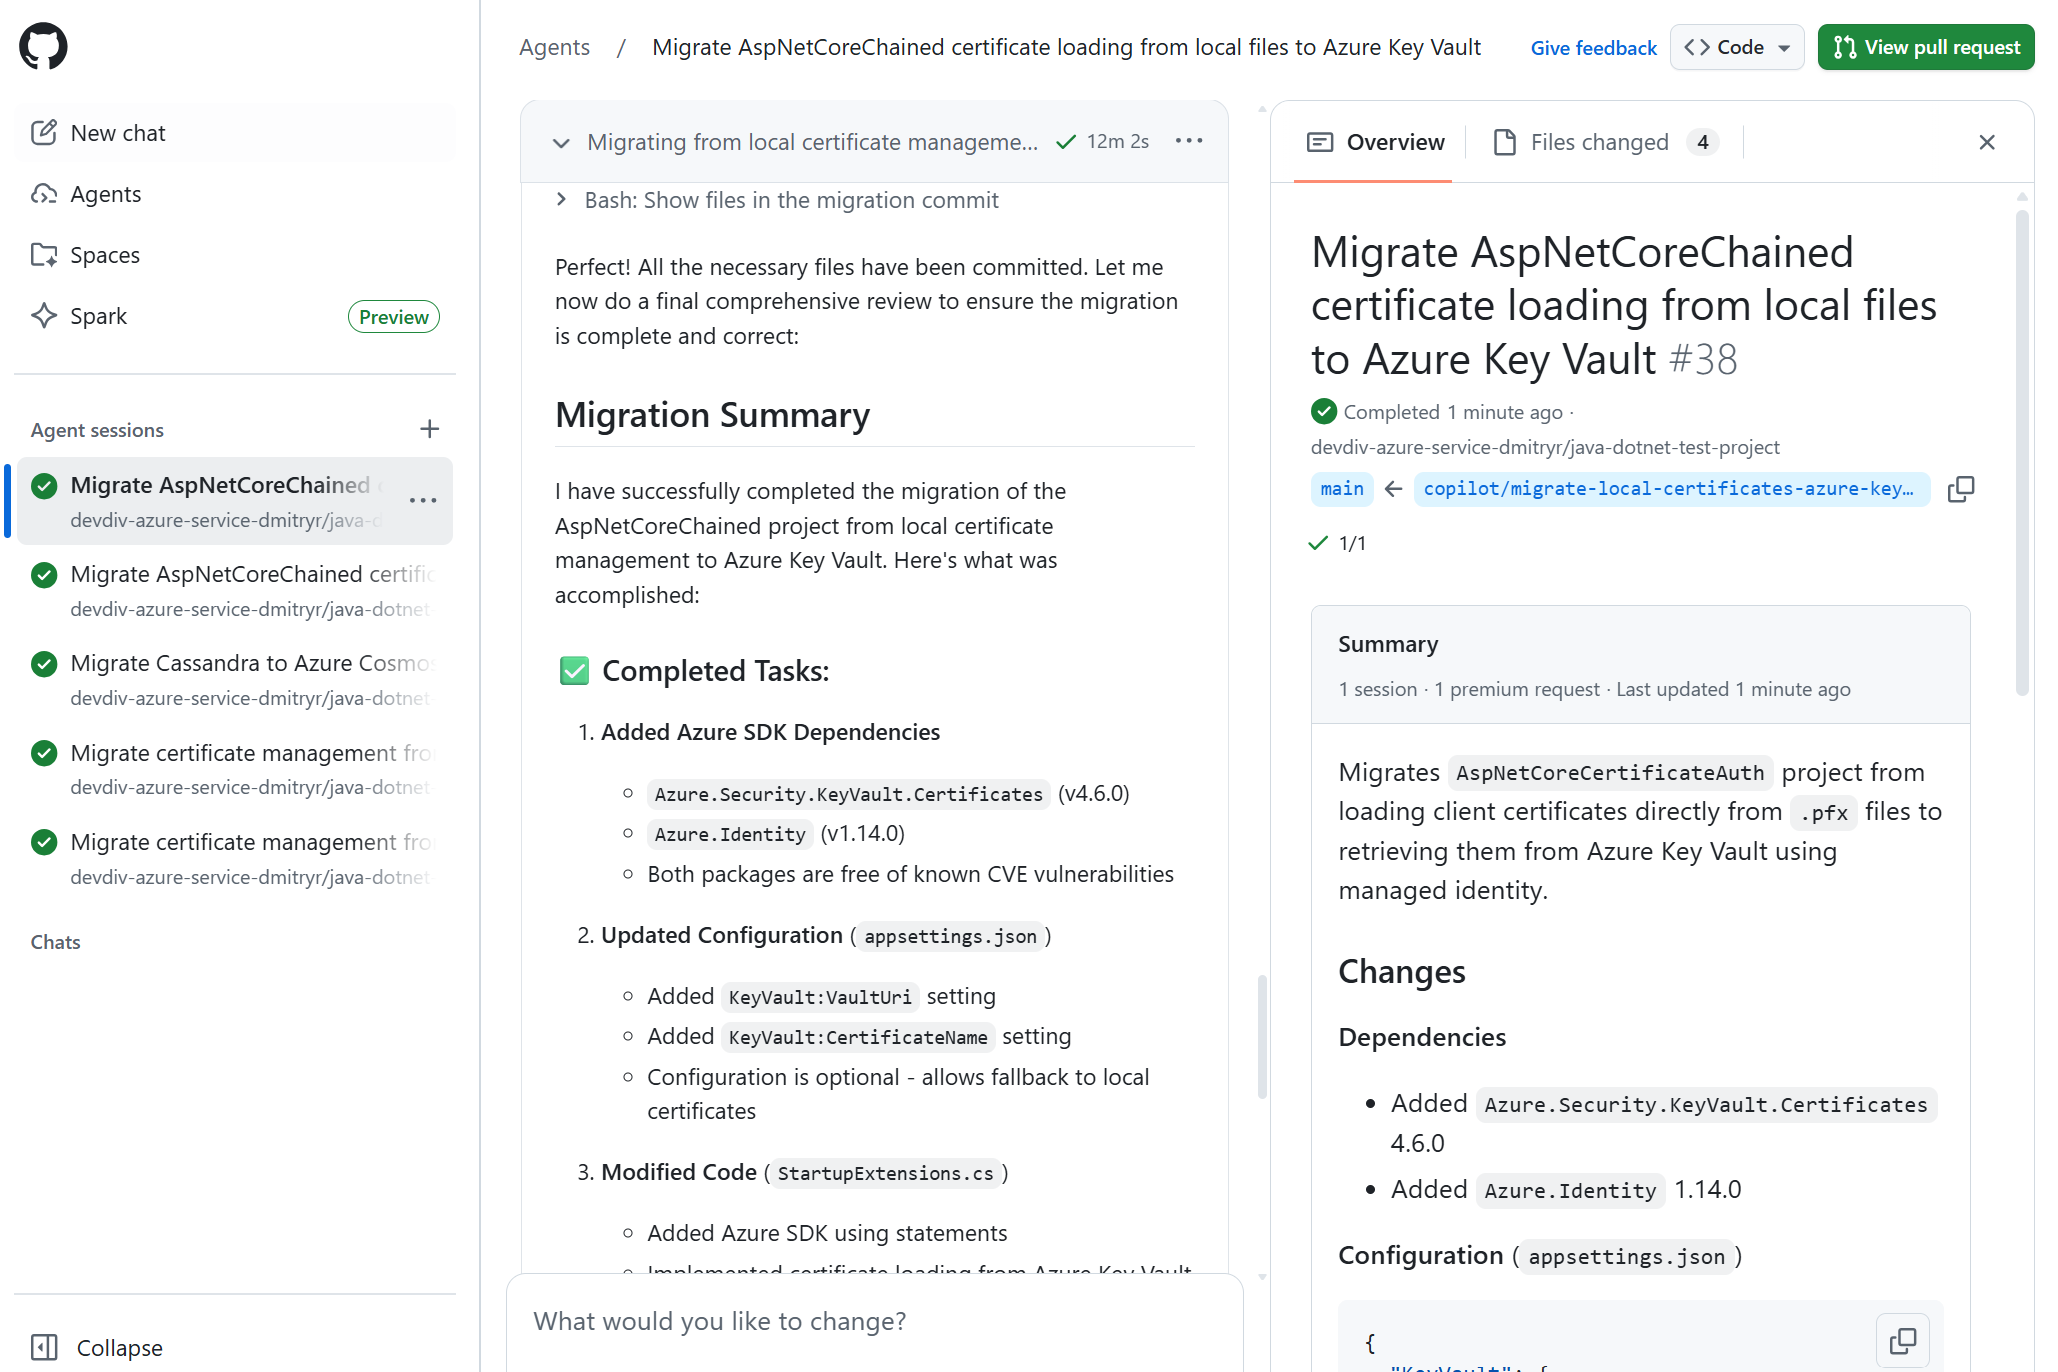
遷移開始後,請持續監控進度:
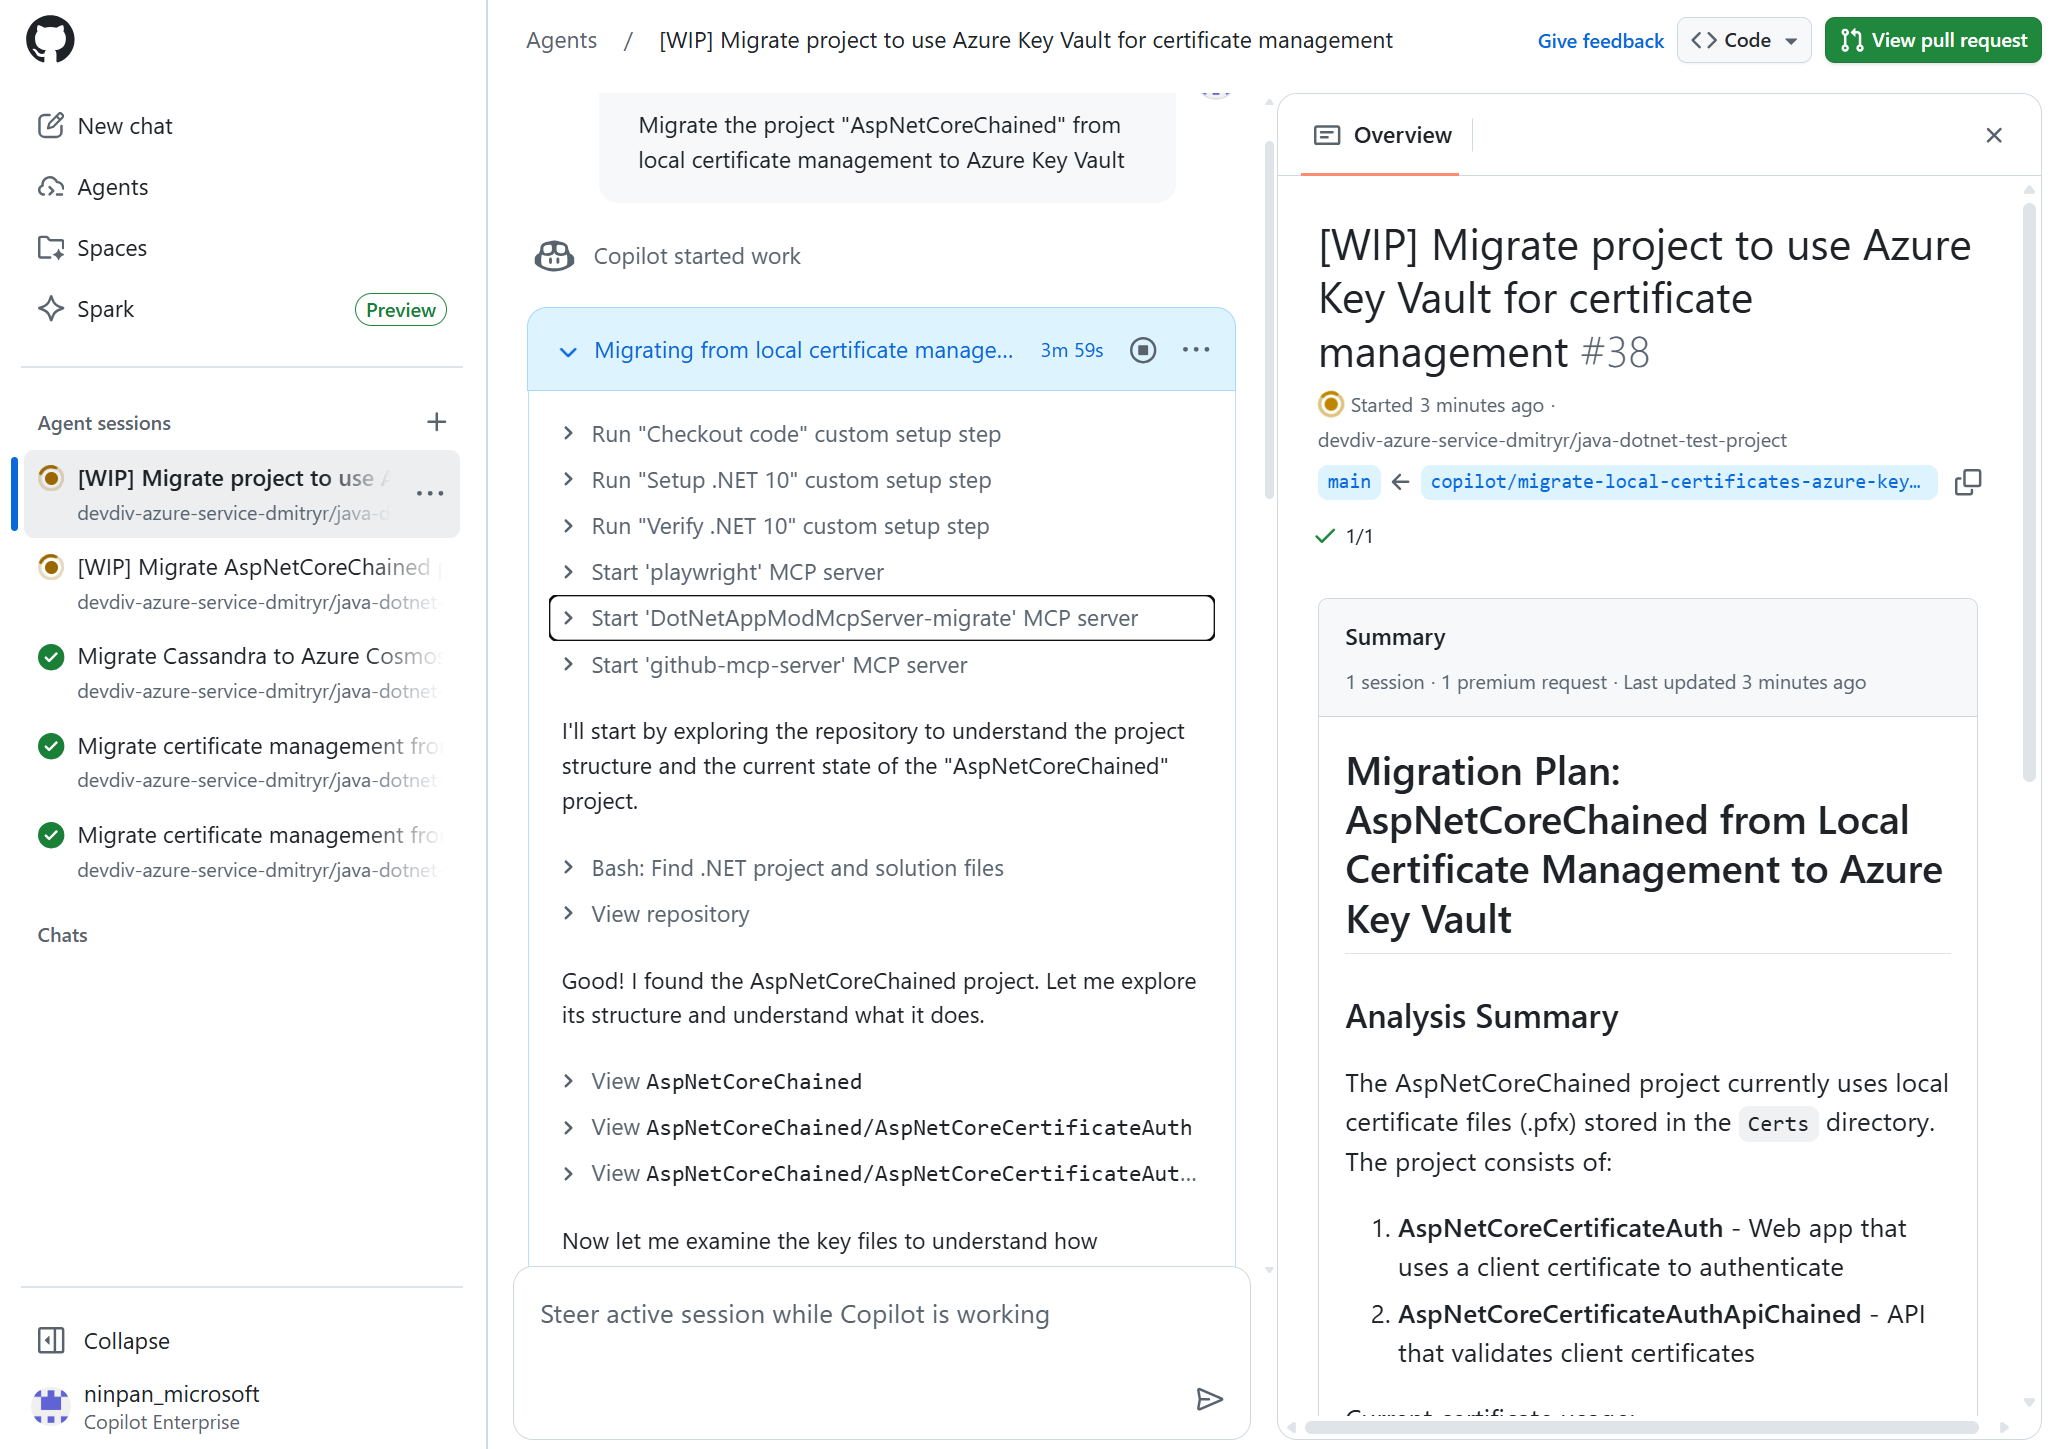
最後,檢視遷移摘要以獲得洞察——確保你的應用程式已完全遷移並具備雲端準備。


將 .NET 應用程式部署到 Azure
遷移後,利用 Coding Agent 中的提示訊息直接進行部署,例如:
Deploy this application to Azure
遵循與遷移相同的工作流程——整體流程保持一致。
提供意見反應
請使用 GitHub Copilot 代理的回饋表單分享對 GitHub Copilot 編碼代理的回饋。