如何:使用影像並排顯示圖案
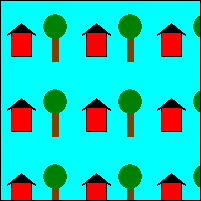
就像可以放在彼此旁邊覆蓋地板一樣,矩形影像可以放在彼此旁邊以填滿(磚)圖形。 若要磚圖形的內部,請使用紋理筆刷。 當您建構 物件時,您傳遞給建構 TextureBrush 函式的其中一個 Image 引數是 物件。 當您使用紋理筆刷繪製圖形的內部時,圖形會填滿此影像的重複複本。
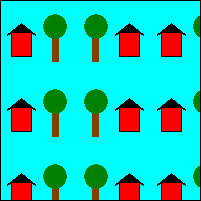
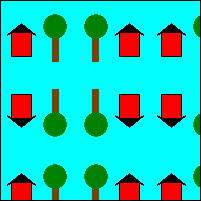
物件的包裝模式屬性 TextureBrush 會決定影像在矩形格線中重複時,影像方向的方式。 您可以將方格中的所有圖格設為相同的方向,也可以讓影像從一個格線位置翻轉到下一個格線。 翻轉可以是水準、垂直或兩者。 下列範例示範具有不同類型的翻轉並排。
若要磚影像
- 此範例使用下列 75×75 影像來磚 200×200 矩形。

- 下圖顯示矩形如何以影像並排顯示。 請注意,所有磚的方向都相同;沒有翻轉。

Image image = new Bitmap("HouseAndTree.gif");
TextureBrush tBrush = new TextureBrush(image);
Pen blackPen = new Pen(Color.Black);
e.Graphics.FillRectangle(tBrush, new Rectangle(0, 0, 200, 200));
e.Graphics.DrawRectangle(blackPen, new Rectangle(0, 0, 200, 200));
Dim image As New Bitmap("HouseAndTree.gif")
Dim tBrush As New TextureBrush(image)
Dim blackPen As New Pen(Color.Black)
e.Graphics.FillRectangle(tBrush, New Rectangle(0, 0, 200, 200))
e.Graphics.DrawRectangle(blackPen, New Rectangle(0, 0, 200, 200))
在並排時水準翻轉影像
- 這個範例使用相同的 75×75 影像來填滿 200×200 矩形。 包裝模式設定為水準翻轉影像。 下圖顯示矩形如何以影像並排顯示。 請注意,當您從指定資料列中的一個磚移至下一個圖格時,影像會水準翻轉。

Image image = new Bitmap("HouseAndTree.gif");
TextureBrush tBrush = new TextureBrush(image);
Pen blackPen = new Pen(Color.Black);
tBrush.WrapMode = WrapMode.TileFlipX;
e.Graphics.FillRectangle(tBrush, new Rectangle(0, 0, 200, 200));
e.Graphics.DrawRectangle(blackPen, new Rectangle(0, 0, 200, 200));
Dim image As New Bitmap("HouseAndTree.gif")
Dim tBrush As New TextureBrush(image)
Dim blackPen As New Pen(Color.Black)
tBrush.WrapMode = WrapMode.TileFlipX
e.Graphics.FillRectangle(tBrush, New Rectangle(0, 0, 200, 200))
e.Graphics.DrawRectangle(blackPen, New Rectangle(0, 0, 200, 200))
在並排時垂直翻轉影像
這個範例使用相同的 75×75 影像來填滿 200×200 矩形。 包裝模式設定為垂直翻轉影像。
Image image = new Bitmap("HouseAndTree.gif");
TextureBrush tBrush = new TextureBrush(image);
Pen blackPen = new Pen(Color.Black);
tBrush.WrapMode = WrapMode.TileFlipY;
e.Graphics.FillRectangle(tBrush, new Rectangle(0, 0, 200, 200));
e.Graphics.DrawRectangle(blackPen, new Rectangle(0, 0, 200, 200));
Dim image As New Bitmap("HouseAndTree.gif") Dim tBrush As New TextureBrush(image) Dim blackPen As New Pen(Color.Black) tBrush.WrapMode = WrapMode.TileFlipY e.Graphics.FillRectangle(tBrush, New Rectangle(0, 0, 200, 200)) e.Graphics.DrawRectangle(blackPen, New Rectangle(0, 0, 200, 200))
在並排時水準和垂直翻轉影像
- 這個範例使用相同的 75×75 影像來磚 200×200 矩形。 包裝模式設定為水準和垂直翻轉影像。 下圖顯示影像如何並排矩形。 請注意,當您從某個圖格移至指定資料列中的下一個圖格時,影像會水準翻轉,當您從指定資料行中的一個磚移至下一個磚時,影像會垂直翻轉。

Image image = new Bitmap("HouseAndTree.gif");
TextureBrush tBrush = new TextureBrush(image);
Pen blackPen = new Pen(Color.Black);
tBrush.WrapMode = WrapMode.TileFlipXY;
e.Graphics.FillRectangle(tBrush, new Rectangle(0, 0, 200, 200));
e.Graphics.DrawRectangle(blackPen, new Rectangle(0, 0, 200, 200));
Dim image As New Bitmap("HouseAndTree.gif")
Dim tBrush As New TextureBrush(image)
Dim blackPen As New Pen(Color.Black)
tBrush.WrapMode = WrapMode.TileFlipXY
e.Graphics.FillRectangle(tBrush, New Rectangle(0, 0, 200, 200))
e.Graphics.DrawRectangle(blackPen, New Rectangle(0, 0, 200, 200))
另請參閱
意見反應
即將登場:在 2024 年,我們將逐步淘汰 GitHub 問題作為內容的意見反應機制,並將它取代為新的意見反應系統。 如需詳細資訊,請參閱:https://aka.ms/ContentUserFeedback。
提交並檢視相關的意見反應
