附註概觀
在書面文件上撰寫附註或註解是相當稀鬆平常的事,我們幾乎將它視為理所當然。 這些附註或註解是我們新增至文件的「註釋」,用以標記資訊,或反白顯示感興趣的項目以供日後參考。 雖然在書面文件上撰寫附註很容易且平常,不過在電子文件中新增個人註解的功能通常非常有限,如果有的話。
本主題會檢閱數種常見的注釋類型,特別是黏附注和重點,並說明 Microsoft Annotations Framework 如何透過 Windows Presentation Foundation (WPF) 檔檢視控制項,協助應用程式中的這些批註類型。 支援注釋的 WPF 檔檢視控制項包括 FlowDocumentReader 和 FlowDocumentScrollViewer ,以及衍生自 DocumentViewerBase 的控制項,例如 DocumentViewer 和 FlowDocumentPageViewer 。
自黏便箋
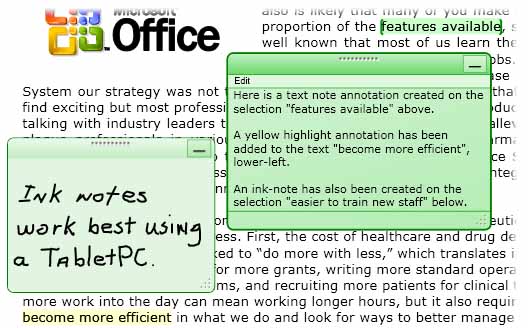
典型的自黏便箋包含寫在一小張色紙上,然後「黏」在文件上的資訊。 數位黏附注為電子檔提供類似的功能,但新增了包含許多其他類型的內容,例如具類型的文字、手寫筆記(例如平板電腦「筆墨」筆劃),或網頁連結。
下圖顯示一些反白顯示、文字自黏便箋和筆跡自黏便箋註釋的範例。

下列範例顯示您可用來在應用程式中啟用註釋支援的方法。
// ------------------------ StartAnnotations --------------------------
/// <summary>
///   Enables annotations and displays all that are viewable.</summary>
private void StartAnnotations()
{
    // If there is no AnnotationService yet, create one.
    if (_annotService == null)
        // docViewer is a document viewing control named in Window1.xaml.
        _annotService = new AnnotationService(docViewer);

    // If the AnnotationService is currently enabled, disable it.
    if (_annotService.IsEnabled == true)
        _annotService.Disable();

    // Open a stream to the file for storing annotations.
    _annotStream = new FileStream(
        _annotStorePath, FileMode.OpenOrCreate, FileAccess.ReadWrite);

    // Create an AnnotationStore using the file stream.
    _annotStore = new XmlStreamStore(_annotStream);

    // Enable the AnnotationService using the new store.
    _annotService.Enable(_annotStore);
}// end:StartAnnotations()
' ------------------------ StartAnnotations --------------------------
''' <summary>
'''   Enables annotations and displays all that are viewable.</summary>
Private Sub StartAnnotations()
    ' If there is no AnnotationService yet, create one.
    If _annotService Is Nothing Then
        ' docViewer is a document viewing control named in Window1.xaml.
        _annotService = New AnnotationService(docViewer)
    End If

    ' If the AnnotationService is currently enabled, disable it.
    If _annotService.IsEnabled = True Then
        _annotService.Disable()
    End If

    ' Open a stream to the file for storing annotations.
    _annotStream = New FileStream(_annotStorePath, FileMode.OpenOrCreate, FileAccess.ReadWrite)

    ' Create an AnnotationStore using the file stream.
    _annotStore = New XmlStreamStore(_annotStream)

    ' Enable the AnnotationService using the new store.
    _annotService.Enable(_annotStore)
End Sub
重點
人們使用有創意的方法,在標記書面文件時將注意力吸引到感興趣的項目,例如使用底線、反白顯示、圈起句子中的文字,或是在邊界繪製記號或標記法。 Microsoft Annotations Framework 中的反白顯示批註提供類似的功能,用於標記 WPF 檔檢視控制項中顯示的資訊。
下圖顯示反白顯示註釋的範例。

使用者通常會先選取某些文字或感興趣的專案來建立批註,然後按一下滑鼠右鍵以顯示 ContextMenu 批註選項。 下列範例顯示您可以使用的可延伸應用程式標記語言 (XAML) 來宣告 ContextMenu 具有路由命令的 ,使用者可以存取這些命令來建立和管理批註。
<DocumentViewer.ContextMenu>
<ContextMenu>
<MenuItem Command="ApplicationCommands.Copy" />
<Separator />
<!-- Add a Highlight annotation to a user selection. -->
<MenuItem Command="ann:AnnotationService.CreateHighlightCommand"
Header="Add Highlight" />
<!-- Add a Text Note annotation to a user selection. -->
<MenuItem Command="ann:AnnotationService.CreateTextStickyNoteCommand"
Header="Add Text Note" />
<!-- Add an Ink Note annotation to a user selection. -->
<MenuItem Command="ann:AnnotationService.CreateInkStickyNoteCommand"
Header="Add Ink Note" />
<Separator />
<!-- Remove Highlights from a user selection. -->
<MenuItem Command="ann:AnnotationService.ClearHighlightsCommand"
Header="Remove Highlights" />
<!-- Remove Text Notes and Ink Notes from a user selection. -->
<MenuItem Command="ann:AnnotationService.DeleteStickyNotesCommand"
Header="Remove Notes" />
<!-- Remove Highlights, Text Notes, Ink Notes from a selection. -->
<MenuItem Command="ann:AnnotationService.DeleteAnnotationsCommand"
Header="Remove Highlights & Notes" />
</ContextMenu>
</DocumentViewer.ContextMenu>
資料錨定
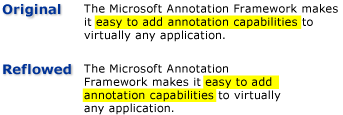
Annotations Framework 會將注釋系結至使用者選取的資料,而不只是系結至顯示檢視上的位置。 因此,如果文件檢視變更,例如當使用者捲動或調整顯示視窗大小時,註釋會與它繫結的資料選取範圍在一起。 例如,下圖說明使用者對文字選取範圍所做的註釋。 當文件檢視變更時 (捲動、調整大小、縮放比例或其他移動),反白顯示註釋會隨著原始資料選取範圍移動。

比對註釋與標註物件
您可以比對註釋與對應的標註物件。 例如,請考慮具有註解窗格的簡單文件讀取應用程式。 註解窗格可能是清單方塊,其中顯示來自錨定到文件之註釋清單的文字。 如果使用者在清單方塊中選取項目,則應用程式會將對應註釋物件所錨定之文件中的段落帶入檢視。
下列範例示範如何為這類作為註解窗格的清單方塊實作事件處理常式。
void annotationsListBox_SelectionChanged(object sender, SelectionChangedEventArgs e)
{

    Annotation comment = (sender as ListBox).SelectedItem as Annotation;
    if (comment != null)
    {
        // IAnchorInfo info;
        // service is an AnnotationService object
        // comment is an Annotation object
        info = AnnotationHelper.GetAnchorInfo(this.service, comment);
        TextAnchor resolvedAnchor = info.ResolvedAnchor as TextAnchor;
        TextPointer textPointer = (TextPointer)resolvedAnchor.BoundingStart;
        textPointer.Paragraph.BringIntoView();
    }
}
Private Sub annotationsListBox_SelectionChanged(ByVal sender As Object, ByVal e As SelectionChangedEventArgs)

    Dim comment As Annotation = TryCast((TryCast(sender, ListBox)).SelectedItem, Annotation)
    If comment IsNot Nothing Then
        ' service is an AnnotationService object
        ' comment is an Annotation object
        info = AnnotationHelper.GetAnchorInfo(Me.service, comment)
        Dim resolvedAnchor As TextAnchor = TryCast(info.ResolvedAnchor, TextAnchor)
        Dim textPointer As TextPointer = CType(resolvedAnchor.BoundingStart, TextPointer)
        textPointer.Paragraph.BringIntoView()
    End If
End Sub
另一個範例案例牽涉到應用程式,可透過電子郵件在檔閱讀程式之間交換批註和黏附注。 這項功能讓這些應用程式可讓讀者巡覽至包含要交換之註釋的頁面。
另請參閱
意見反應
即將登場:在 2024 年,我們將逐步淘汰 GitHub 問題作為內容的意見反應機制,並將它取代為新的意見反應系統。 如需詳細資訊,請參閱:https://aka.ms/ContentUserFeedback。
提交並檢視相關的意見反應
