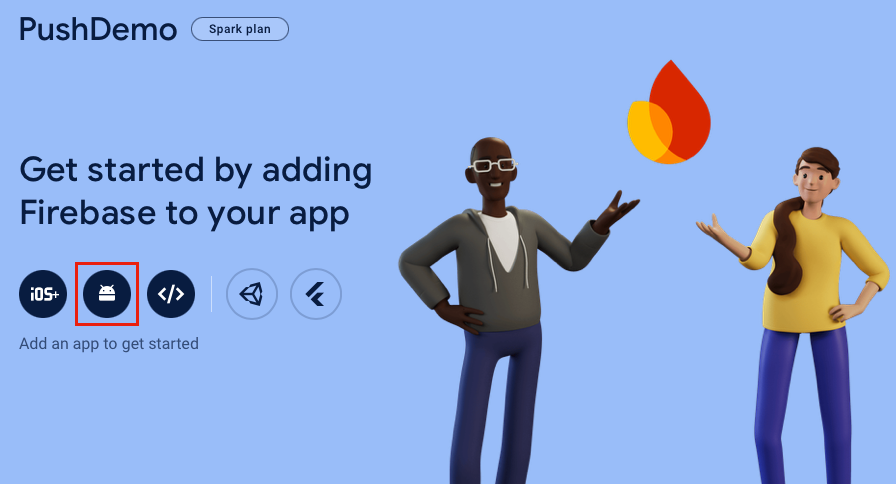
 流覽範例
流覽範例推播通知會將來自後端系統的資訊傳遞至用戶端應用程式。 Apple、Google 和其他平臺各自有自己的推播通知服務(PNS)。 Azure 通知中樞可讓您跨平臺集中通知,讓您的後端應用程式能夠與單一中樞通訊,以處理將通知散發給每個 PNS。
Azure 通知中樞需要應用程式向中樞註冊,並選擇性地定義範本和/或訂閱標籤:
- 執行裝置安裝會將 PNS 控制碼連結至 Azure 通知中樞中的識別碼。 如需註冊的詳細資訊,請參閱 註冊管理。
- 範本可讓裝置指定參數化的訊息範本。 每個裝置都可以自定義傳入訊息。 如需詳細資訊,請參閱 通知中樞範本。
- 標記可用來訂閱訊息類別,例如新聞、體育和天氣。 如需詳細資訊,請參閱 路由和標記表達式。
在本教學課程中,您將使用 Azure 通知中樞 將推播通知傳送至以 Android 和 iOS 為目標的 .NET 多平臺應用程式 UI (.NET MAUI) 應用程式。 ASP.NET Core Web API 後端可用來處理用戶端的裝置註冊,以及起始推播通知。 這些作業是使用 Microsoft.Azure.NotificationHubs NuGet 套件來處理。 如需整體方法的詳細資訊,請參閱 從後端註冊管理。
在本教學課程中,您已:
- 設定推播通知服務和 Azure 通知中樞。
- 建立 ASP.NET Core WebAPI 後端應用程式。
- 建立 .NET MAUI 應用程式。
- 設定 Android 應用程式以取得推播通知。
- 設定 iOS 應用程式以進行推播通知。
- 測試應用程式。
- 疑難排解任何設定和組態問題。
必要條件
若要完成本教學課程,您需要:
- 具有有效訂用帳戶的 Azure 帳戶。
- 執行最新版 Visual Studio/Visual Studio Code 的電腦或 Mac,其中包含 .NET 多平台應用程式 UI 開發工作負載,以及已安裝 ASP.NET 和 Web 開發工作負載。
針對 Android,您必須具備:
- 開發人員已解鎖實體裝置或模擬器,執行 API 26+ 並安裝了 Google Play 服務。
針對 iOS,您必須具備:
- 作用中的Apple開發人員帳戶。
- 一台運行 Xcode 的 Mac,以及已安裝在您的鑰匙圈中的有效開發者證書。
然後,在 iOS 上,您應該擁有以下其中之一:
iOS 16+ 模擬器,可在具有 Apple silicon 或 T2 處理器的 Mac 計算機上於 macOS 13+ 中執行。
OR
已向開發人員帳戶註冊的實體 iOS 裝置(執行 iOS 13.0+)。
您的實體裝置已在您的 Apple 開發人員帳戶中註冊,並與您的憑證相關聯。
重要
iOS 模擬器在使用 Apple silicon 或 T2 處理器的 Mac 計算機上執行 macOS 13+ 時,支援 iOS 16+ 中的遠端通知。 如果您不符合這些硬體需求,您將需要擁有一個有效的Apple開發者帳號和一台實體裝置。
若要遵循本教學課程,您應該熟悉:
雖然本教學課程是以 Visual Studio 為目標,但可以在 PC 或 Mac 上使用 Visual Studio Code 進行追蹤。 然而,仍有一些差異需要調和。 例如,使用者介面和工作流程、範本名稱和環境組態的描述。
設定推播通知服務和 Azure 通知中樞
在本節中,您將設定 Firebase 雲端通訊 和 Apple 推播通知服務 (APNS) 。 接著,您將建立並設定 Azure 通知中樞 來處理這些服務。
建立 Firebase 專案
若要建立 Firebase 專案:
在網頁瀏覽器中,登入 Firebase 控制台。
在 Firebase 控制台中,選取 [ 新增專案 ] 按鈕並建立新的 Firebase 專案,輸入 PushDemo 作為 [項目名稱]。
Note
系統會為您產生唯一的名稱。 根據預設,這會包含您所提供名稱的小寫變體,加上以虛線分隔的產生數位。 只要您的編輯仍然是全域唯一的,您可以變更此項目,如果您想要。
建立項目之後,選取 Android 標誌以將 Firebase 新增至 Android 應用程式:
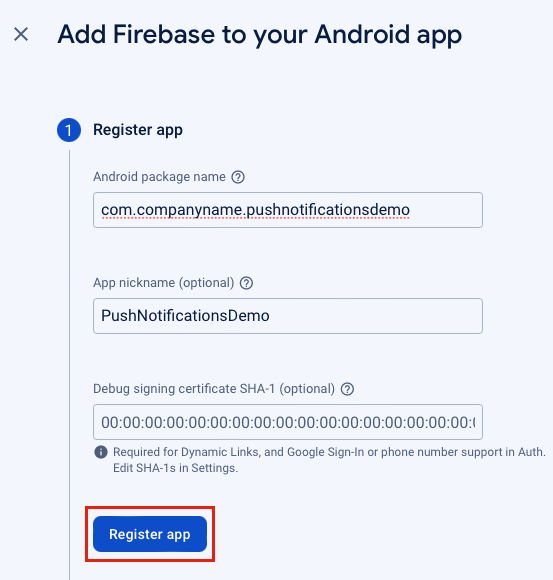
在 [ 將 Firebase 新增至 Android 應用程式] 頁面中,輸入套件的名稱,選擇性地輸入應用程式昵稱,然後選取 [註冊應用程式 ] 按鈕:
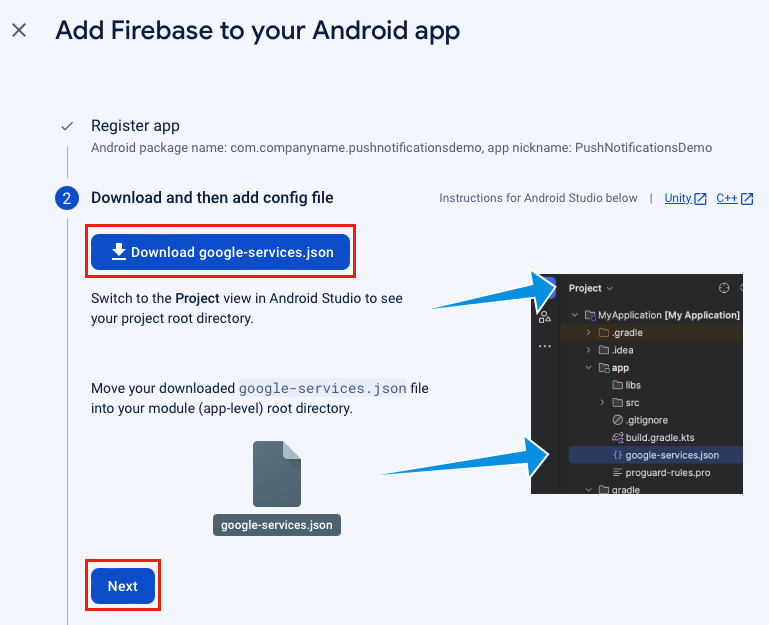
在 [ 將 Firebase 新增至 Android 應用程式 ] 頁面中,選取 [下載google-services.json ] 按鈕,然後將檔案儲存至本機資料夾,再選取 [ 下一步 ] 按鈕:
在 [ 將 Firebase 新增至 Android 應用程式] 頁面中,選取 [ 下一步] 按鈕。
在 [ 將 Firebase 新增至 Android 應用程式] 頁面中,選取 [ 繼續到主控台 ] 按鈕。
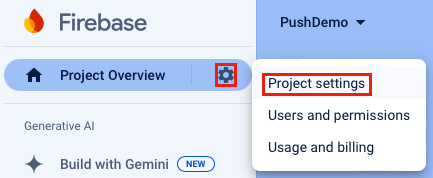
在 Firebase 控制台中 ,選取 [專案概觀 ] 圖示,然後選取 [ 項目設定]:
在 [ 項目設定] 中,選取 [ 雲端通訊] 索引 標籤。您會看到 Firebase 雲端傳訊 API (V1) 已啟用:

在 [ 項目設定] 中,選取 [服務帳戶 ] 索引卷標,然後選取 [ 產生新的私鑰 ] 按鈕。
在 [ 產生新的私鑰 ] 對話框中,選取 [ 產生金鑰 ] 按鈕:
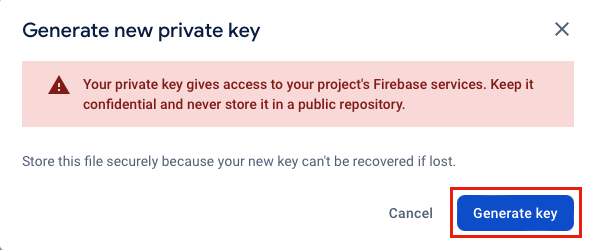
系統會下載 JSON 檔案,其中包含您將輸入至 Azure 通知中樞的值。
註冊 iOS 應用程式以取得推播通知
若要將推播通知傳送至 iOS 應用程式,您必須向 Apple 註冊您的應用程式,並註冊推播通知。 執行下列 Azure 通知中樞檔中的步驟即可達成此目的:
如果您想要在實體裝置上接收推播通知,您也需要 建立布建配置檔。
重要
若要在 iOS 上接收背景通知,您必須將遠端通知背景模式新增至您的應用程式。 如需詳細資訊,請參閱 在 developer.apple.com 上啟用遠端通知功能 。
建立 Azure 通知中樞
若要在 Azure 入口網站 中建立通知中樞:
- 在網頁瀏覽器中,登入 Azure 入口網站。
- 在 Azure 入口網站 中,按兩下 [建立資源] 按鈕,然後搜尋並選擇 [通知中樞],再選取 [建立] 按鈕。
- 在通知中樞頁面中,執行下列步驟:
在 [ 訂 用帳戶] 字段中,選取您想要使用的 Azure 訂用帳戶名稱,然後選取現有的資源群組,或建立新的資源群組。
在 [ 命名空間詳細數據] 字段中,輸入新命名空間的唯一名稱。
在 [通知中心詳細資訊] 字段中,輸入通知中心的名稱。 這是必要的,因為命名空間包含一或多個通知中樞。
在 [ 位置 ] 下拉式清單中,選取值,指定您要在其中建立通知中樞的位置。
檢閱 [可用性區域] 選項。 如果您選擇具有可用性區域的區域,預設會選取複選框。
Note
可用性區域是付費功能,因此會將額外的費用新增至您的方案。
選擇災害復原選項:無、配對的復原區域或彈性復原區域。 如果您選擇 [配對復原區域],就會顯示故障切換區域。 如果您選取 [彈性復原區域],請使用下拉式清單從復原區域清單中選擇。
選取建立按鈕。 將會建立通知中樞。
- 在 Azure 入口網站中,瀏覽至新建立的通知中心,然後瀏覽至 [管理> 存取原則] 面板。
- 在 [存取政策] 面板中,記下政策
DefaultFullSharedAccessSignature的連接字串。 您稍後會在建置與通知中樞通訊的後端服務時需要此專案。
如需建立通知中樞的詳細資訊,請參閱在 Azure 入口網站 中建立 Azure 通知中樞。
在通知中樞中設定 Firebase 雲端通訊
如要設定通知中心與 Firebase Cloud Messaging 通訊,請按照下列步驟操作:
在 Azure 入口網站中,瀏覽到您的通知中樞,然後選取 設定 > Google (FCM v1) 面板。
在 [Google (FCM v1)] 刀鋒視窗中,輸入 [私鑰]、[用戶端電子郵件] 和 [項目標識符] 字段的值。 您可以在您從 Firebase 雲端傳訊下載的私鑰 JSON 檔案中找到這些值:
Azure 欄位 JSON 金鑰 JSON 值範例 私密金鑰 private_key這個值應該以 -----BEGIN PRIVATE KEY-----\n開頭,-----END PRIVATE KEY-----\n並以 結尾。用戶端電子郵件 client_emailfirebase-adminsdk-55sfg@pushdemo-d6ab2.iam.gserviceaccount.com專案識別碼 project_idpushdemo-d6ab2在 Google (FCM v1) 面板中,選取 [儲存] 按鈕。
在通知中樞中設定 Apple 推播通知服務
在 Azure 入口網站中,瀏覽至您的通知中樞,然後選取 > 頁面。 然後,根據您先前為通知中樞建立憑證時所選擇的方法,遵循適當的步驟。
重要
設定 應用程式模式時,只有在您想要將推播通知傳送給從市集購買應用程式的使用者時,才選擇 [ 生產 ]。
選項 1 - 使用 .p12 推送憑證
- 在 Apple (APNS) 面板中,選取 憑證 驗證模式。
- 在 [Apple (APNS)] 刀鋒視窗中,選取 [上傳憑證] 欄位旁的檔案圖示。 然後選取您先前匯出的 .p12 檔案並上傳。
- 在 Apple (APNS) 界面中,如有需要,請在 密碼 欄位中輸入憑證密碼。
- 在 Apple(APNS) 面板中,選取 沙盒 應用程式模式。
- 在 [Apple(APNS)] 面板中,選取 [儲存] 按鈕。
選項 2 - 使用令牌型驗證
- 在 [Apple (APNS)] 頁面中,選取 [令牌驗證模式]。
- 在 Apple(APNS) 面板中,輸入您先前取得的 密鑰 ID、套件 ID、團隊 ID 和 權杖 欄位的值。
- 在 Apple(APNS) 面板中,選取 沙盒 應用程式模式。
- 在 [Apple(APNS)] 面板中,選取 [儲存] 按鈕。
建立 ASP.NET Core Web API 後端應用程式
在本節中,您將建立 ASP.NET Core Web API 後端,以處理 裝置安裝 ,並將通知傳送至 .NET MAUI 應用程式。
建立 Web API 專案
若要建立 Web API 專案:
在 Visual Studio 中,建立 ASP.NET Core Web API 專案:
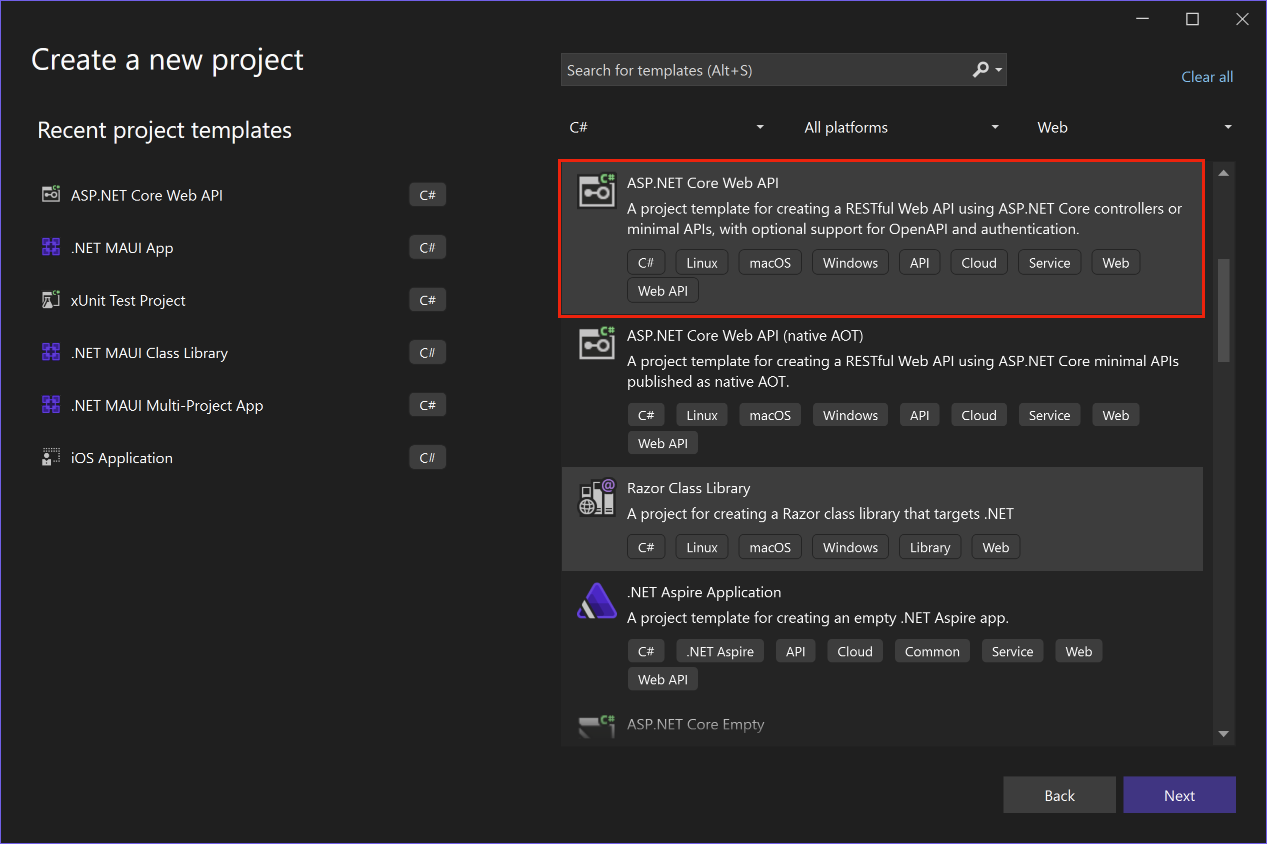
在 [ 設定新專案 ] 對話框中,將專案 命名為 PushNotificationsAPI。
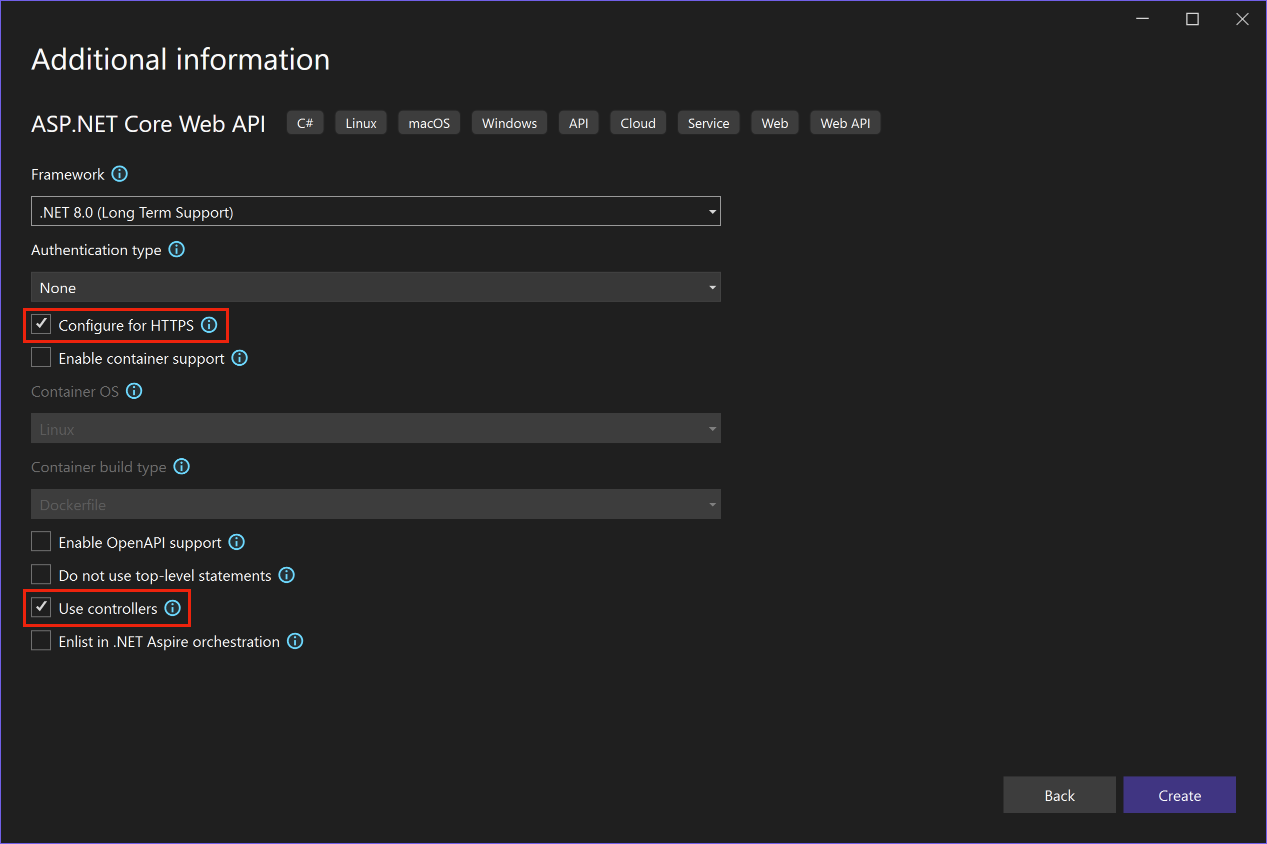
在 [ 其他資訊] 對話框中,確定 已啟用 [設定 HTTPS 和使用 控制器 ] 複選框:
建立項目之後,請按 F5 執行專案。
應用程式目前已設定為使用
WeatherForecastController作為launchUrl,其設定於 Properties\launchSettings.json 檔案中。 應用程式將會在網頁瀏覽器中啟動,並顯示一些 JSON 數據。重要
當您執行使用 HTTPS 的 ASP.NET Core 專案時,Visual Studio 會偵測 ASP.NET Core HTTPS 開發憑證是否已安裝到本地使用者證書存儲中。若憑證缺失,則會提供安裝並設定為信任。
關閉網頁瀏覽器。
在 [方案總管] 中,展開 [控制器] 資料夾,然後刪除WeatherForecastController.cs。
在 方案總管,在專案的根目錄中,刪除WeatherForecast.cs。
開啟命令視窗,並流覽至包含項目檔的目錄。 然後,執行下列命令:
dotnet user-secrets init
dotnet user-secrets set "NotificationHub:Name" <value>
dotnet user-secrets set "NotificationHub:ConnectionString" "<value>"
將佔位符值替換為您自己的 Azure 通知中樞名稱和連接字串值。 您可以在 Azure 通知中樞的下列位置找到這些專案:
組態值 地點 NotificationHub:Name請參閱「概觀」頁面頂端「基本資訊」摘要中的名稱。 NotificationHub:ConnectionString請參閱「存取原則」頁面中的 DefaultFullSharedAccessSignature*。 這會使用 秘密管理員工具設定本機組態值。 這會將您的 Azure 通知中樞機密資訊與 Visual Studio 解決方案分離,以確保它們不會被納入原始碼控制中。
Tip
針對生產案例,請考慮 Azure KeyVault 之類的服務,安全地儲存 連接字串。
使用 API 金鑰驗證用戶端
若要使用 API 金鑰驗證用戶端:
開啟命令視窗,並流覽至包含項目檔的目錄。 然後,執行下列命令:
dotnet user-secrets set "Authentication:ApiKey" <value>將預留位置值取代為您的 API 金鑰,可以是任何值。
在 Visual Studio 中,將名為 Authentication 的新資料夾新增至您的項目,然後將名為
ApiKeyAuthOptions的新類別新增至 Authentication 資料夾,並以下列程式代碼取代其程式代碼:using Microsoft.AspNetCore.Authentication; namespace PushNotificationsAPI.Authentication; public class ApiKeyAuthOptions : AuthenticationSchemeOptions { public const string DefaultScheme = "ApiKey"; public string Scheme => DefaultScheme; public string ApiKey { get; set; } }在 Visual Studio 中,將名為
ApiKeyAuthHandler的新類別新增至 Authentication 資料夾,並以下列程式代碼取代其程式代碼:using Microsoft.AspNetCore.Authentication; using Microsoft.Extensions.Options; using System.Security.Claims; using System.Text.Encodings.Web; namespace PushNotificationsAPI.Authentication; public class ApiKeyAuthHandler : AuthenticationHandler<ApiKeyAuthOptions> { const string ApiKeyIdentifier = "apikey"; public ApiKeyAuthHandler( IOptionsMonitor<ApiKeyAuthOptions> options, ILoggerFactory logger, UrlEncoder encoder) : base(options, logger, encoder) { } protected override Task<AuthenticateResult> HandleAuthenticateAsync() { string key = string.Empty; if (Request.Headers[ApiKeyIdentifier].Any()) { key = Request.Headers[ApiKeyIdentifier].FirstOrDefault(); } else if (Request.Query.ContainsKey(ApiKeyIdentifier)) { if (Request.Query.TryGetValue(ApiKeyIdentifier, out var queryKey)) key = queryKey; } if (string.IsNullOrWhiteSpace(key)) return Task.FromResult(AuthenticateResult.Fail("No api key provided")); if (!string.Equals(key, Options.ApiKey, StringComparison.Ordinal)) return Task.FromResult(AuthenticateResult.Fail("Invalid api key.")); var identities = new List<ClaimsIdentity> { new ClaimsIdentity("ApiKeyIdentity") }; var ticket = new AuthenticationTicket(new ClaimsPrincipal(identities), Options.Scheme); return Task.FromResult(AuthenticateResult.Success(ticket)); } }驗證處理程式是實作配置行為的類型,在此案例中為自定義 API 金鑰配置。
在 Visual Studio 中,將名為
AuthenticationBuilderExtensions的新類別新增至 Authentication 資料夾,並以下列程式代碼取代其程式代碼:using Microsoft.AspNetCore.Authentication; namespace PushNotificationsAPI.Authentication; public static class AuthenticationBuilderExtensions { public static AuthenticationBuilder AddApiKeyAuth( this AuthenticationBuilder builder, Action<ApiKeyAuthOptions> configureOptions) { return builder .AddScheme<ApiKeyAuthOptions, ApiKeyAuthHandler>( ApiKeyAuthOptions.DefaultScheme, configureOptions); } }此擴充方法將用來簡化Program.cs中的中間件組態程序代碼。
在 Visual Studio 中,開啟 Program.cs 並更新程式代碼,以在 方法呼叫
builder.Services.AddControllers下方設定 API 金鑰驗證:using PushNotificationsAPI.Authentication; builder.Services.AddControllers(); builder.Services.AddAuthentication(options => { options.DefaultAuthenticateScheme = ApiKeyAuthOptions.DefaultScheme; options.DefaultChallengeScheme = ApiKeyAuthOptions.DefaultScheme; }).AddApiKeyAuth(builder.Configuration.GetSection("Authentication").Bind);在 Program.cs中,更新批註下方
// Configure the HTTP request pipeline的程序代碼,以呼叫UseRouting、UseAuthentication和MapControllers擴充方法:// Configure the HTTP request pipeline. app.UseHttpsRedirection(); app.UseRouting(); app.UseAuthentication(); app.UseAuthorization(); app.MapControllers(); app.Run();擴充方法
UseAuthentication會註冊使用先前註冊的驗證機制的中間件。UseAuthentication必須在任何依賴用戶驗證的中間件之前被呼叫。Note
雖然 API 金鑰不如令牌那麼安全,但本教學課程就已足夠,而且可透過 ASP.NET 中間件輕鬆設定。
新增和設定服務
若要在 Web API 後端應用程式中新增和設定服務:
在 Visual Studio 中,將 Microsoft.Azure.NotificationHubs NuGet 套件新增至您的專案。 此 NuGet 套件可用來存取服務內封裝的通知中樞。
在 Visual Studio 中,將名為 Models 的新資料夾新增至您的項目,然後將名為
PushTemplates的新類別新增至 Models 資料夾,並以下列程式代碼取代其程式代碼:namespace PushNotificationsAPI.Models; public class PushTemplates { public class Generic { public const string Android = "{ \"message\" : { \"notification\" : { \"title\" : \"PushDemo\", \"body\" : \"$(alertMessage)\"}, \"data\" : { \"action\" : \"$(alertAction)\" } } }"; public const string iOS = "{ \"aps\" : {\"alert\" : \"$(alertMessage)\"}, \"action\" : \"$(alertAction)\" }"; } public class Silent { public const string Android = "{ \"message\" : { \"data\" : {\"message\" : \"$(alertMessage)\", \"action\" : \"$(alertAction)\"} } }"; public const string iOS = "{ \"aps\" : {\"content-available\" : 1, \"apns-priority\": 5, \"sound\" : \"\", \"badge\" : 0}, \"message\" : \"$(alertMessage)\", \"action\" : \"$(alertAction)\" }"; } }該
PushTemplates類別包含一般和靜默推播通知的標記化通知承載。 這些有效載荷在安裝程序之外被定義,以便允許進行實驗,而無需透過服務更新現有的安裝版本。 以這種方式處理安裝的變更已脫離本文的範圍。 在產品案例中,請考慮使用 自定義範本。在 Visual Studio 中,將名為
DeviceInstallation的新類別新增至 Models 資料夾,並以下列程式代碼取代其程式代碼:using System.ComponentModel.DataAnnotations; namespace PushNotificationsAPI.Models; public class DeviceInstallation { [Required] public string InstallationId { get; set; } [Required] public string Platform { get; set; } [Required] public string PushChannel { get; set; } public IList<string> Tags { get; set; } = Array.Empty<string>(); }在 Visual Studio 中,將名為
NotificationRequest的新類別新增至 Models 資料夾,並以下列程式代碼取代其程式代碼:namespace PushNotificationsAPI.Models; public class NotificationRequest { public string Text { get; set; } public string Action { get; set; } public string[] Tags { get; set; } = Array.Empty<string>(); public bool Silent { get; set; } }在 Visual Studio 中,將名為
NotificationHubOptions的新類別新增至 Models 資料夾,並以下列程式代碼取代其程式代碼:using System.ComponentModel.DataAnnotations; namespace PushNotificationsAPI.Models; public class NotificationHubOptions { [Required] public string Name { get; set; } [Required] public string ConnectionString { get; set; } }在 Visual Studio 中,將名為 Services 的新資料夾新增至您的專案,然後將名為 的新介面新增至
INotificationService資料夾,並以下列程式代碼取代其程式代碼:using PushNotificationsAPI.Models; namespace PushNotificationsAPI.Services; public interface INotificationService { Task<bool> CreateOrUpdateInstallationAsync(DeviceInstallation deviceInstallation, CancellationToken token); Task<bool> DeleteInstallationByIdAsync(string installationId, CancellationToken token); Task<bool> RequestNotificationAsync(NotificationRequest notificationRequest, CancellationToken token); }在 Visual Studio 中,將名為
NotificationHubService的新類別新增至 Services 資料夾,並將其程式代碼取代為下列程式代碼:using Microsoft.Extensions.Options; using Microsoft.Azure.NotificationHubs; using PushNotificationsAPI.Models; namespace PushNotificationsAPI.Services; public class NotificationHubService : INotificationService { readonly NotificationHubClient _hub; readonly Dictionary<string, NotificationPlatform> _installationPlatform; readonly ILogger<NotificationHubService> _logger; public NotificationHubService(IOptions<NotificationHubOptions> options, ILogger<NotificationHubService> logger) { _logger = logger; _hub = NotificationHubClient.CreateClientFromConnectionString(options.Value.ConnectionString, options.Value.Name); _installationPlatform = new Dictionary<string, NotificationPlatform> { { nameof(NotificationPlatform.Apns).ToLower(), NotificationPlatform.Apns }, { nameof(NotificationPlatform.FcmV1).ToLower(), NotificationPlatform.FcmV1 } }; } public async Task<bool> CreateOrUpdateInstallationAsync(DeviceInstallation deviceInstallation, CancellationToken token) { if (string.IsNullOrWhiteSpace(deviceInstallation?.InstallationId) || string.IsNullOrWhiteSpace(deviceInstallation?.Platform) || string.IsNullOrWhiteSpace(deviceInstallation?.PushChannel)) return false; var installation = new Installation() { InstallationId = deviceInstallation.InstallationId, PushChannel = deviceInstallation.PushChannel, Tags = deviceInstallation.Tags }; if (_installationPlatform.TryGetValue(deviceInstallation.Platform, out var platform)) installation.Platform = platform; else return false; try { await _hub.CreateOrUpdateInstallationAsync(installation, token); } catch { return false; } return true; } public async Task<bool> DeleteInstallationByIdAsync(string installationId, CancellationToken token) { if (string.IsNullOrWhiteSpace(installationId)) return false; try { await _hub.DeleteInstallationAsync(installationId, token); } catch { return false; } return true; } public async Task<bool> RequestNotificationAsync(NotificationRequest notificationRequest, CancellationToken token) { if ((notificationRequest.Silent && string.IsNullOrWhiteSpace(notificationRequest?.Action)) || (!notificationRequest.Silent && (string.IsNullOrWhiteSpace(notificationRequest?.Text)) || string.IsNullOrWhiteSpace(notificationRequest?.Action))) return false; var androidPushTemplate = notificationRequest.Silent ? PushTemplates.Silent.Android : PushTemplates.Generic.Android; var iOSPushTemplate = notificationRequest.Silent ? PushTemplates.Silent.iOS : PushTemplates.Generic.iOS; var androidPayload = PrepareNotificationPayload( androidPushTemplate, notificationRequest.Text, notificationRequest.Action); var iOSPayload = PrepareNotificationPayload( iOSPushTemplate, notificationRequest.Text, notificationRequest.Action); try { if (notificationRequest.Tags.Length == 0) { // This will broadcast to all users registered in the notification hub await SendPlatformNotificationsAsync(androidPayload, iOSPayload, token); } else if (notificationRequest.Tags.Length <= 20) { await SendPlatformNotificationsAsync(androidPayload, iOSPayload, notificationRequest.Tags, token); } else { var notificationTasks = notificationRequest.Tags .Select((value, index) => (value, index)) .GroupBy(g => g.index / 20, i => i.value) .Select(tags => SendPlatformNotificationsAsync(androidPayload, iOSPayload, tags, token)); await Task.WhenAll(notificationTasks); } return true; } catch (Exception e) { _logger.LogError(e, "Unexpected error sending notification"); return false; } } string PrepareNotificationPayload(string template, string text, string action) => template .Replace("$(alertMessage)", text, StringComparison.InvariantCulture) .Replace("$(alertAction)", action, StringComparison.InvariantCulture); Task SendPlatformNotificationsAsync(string androidPayload, string iOSPayload, CancellationToken token) { var sendTasks = new Task[] { _hub.SendFcmV1NativeNotificationAsync(androidPayload, token), _hub.SendAppleNativeNotificationAsync(iOSPayload, token) }; return Task.WhenAll(sendTasks); } Task SendPlatformNotificationsAsync(string androidPayload, string iOSPayload, IEnumerable<string> tags, CancellationToken token) { var sendTasks = new Task[] { _hub.SendFcmV1NativeNotificationAsync(androidPayload, tags, token), _hub.SendAppleNativeNotificationAsync(iOSPayload, tags, token) }; return Task.WhenAll(sendTasks); } }提供給
SendTemplateNotificationsAsync方法的標記表達式,如果只包含 OR,則限制為 20 個標記。 否則,它們僅限於 6 個標籤。 如需詳細資訊,請參閱 路由和標記表達式。在 Visual Studio 中,開啟 Program.cs,然後更新程式碼,在調用
NotificationHubService方法之後,將INotificationService作為builder.Services.AddAuthentication的單一實例添加進去:using PushNotificationsAPI.Authentication; using PushNotificationsAPI.Services; using PushNotificationsAPI.Models; var builder = WebApplication.CreateBuilder(args); // Add services to the container. builder.Services.AddControllers(); builder.Services.AddAuthentication(options => { options.DefaultAuthenticateScheme = ApiKeyAuthOptions.DefaultScheme; options.DefaultChallengeScheme = ApiKeyAuthOptions.DefaultScheme; }).AddApiKeyAuth(builder.Configuration.GetSection("Authentication").Bind); builder.Services.AddSingleton<INotificationService, NotificationHubService>(); builder.Services.AddOptions<NotificationHubOptions>() .Configure(builder.Configuration.GetSection("NotificationHub").Bind) .ValidateDataAnnotations(); var app = builder.Build();
建立通知 REST API
若要建立通知 REST API:
在 Visual Studio 中,將名為 的新控制器新增至
NotificationsController資料夾。Tip
選擇具有讀取/寫入動作範本的 API 控制器。
在NotificationsController.cs檔案中
using System.ComponentModel.DataAnnotations; using System.Net; using Microsoft.AspNetCore.Authorization; using Microsoft.AspNetCore.Mvc; using PushNotificationsAPI.Models; using PushNotificationsAPI.Services;在NotificationsController.cs檔案中,將
Authorize新增至NotificationsController:[Authorize] [ApiController] [Route("api/[controller]")] public class NotificationsController : ControllerBase在NotificationsController.cs檔案中,更新構造函式以接受註冊的實例
NotificationsContoller作為參數,並將它指派給只讀成員:readonly INotificationService _notificationService; public NotificationsController(INotificationService notificationService) { _notificationService = notificationService; }在 NotificationsContoller.cs 檔案中,以下列程式代碼取代所有方法:
[HttpPut]
[Route("installations")]
[ProducesResponseType((int)HttpStatusCode.OK)]
[ProducesResponseType((int)HttpStatusCode.BadRequest)]
[ProducesResponseType((int)HttpStatusCode.UnprocessableEntity)]
public async Task<IActionResult> UpdateInstallation(
    [Required] DeviceInstallation deviceInstallation)
{
    var success = await _notificationService
        .CreateOrUpdateInstallationAsync(deviceInstallation, HttpContext.RequestAborted);

    if (!success)
        return new UnprocessableEntityResult();

    return new OkResult();
}

[HttpDelete()]
[Route("installations/{installationId}")]
[ProducesResponseType((int)HttpStatusCode.OK)]
[ProducesResponseType((int)HttpStatusCode.BadRequest)]
[ProducesResponseType((int)HttpStatusCode.UnprocessableEntity)]
public async Task<ActionResult> DeleteInstallation(
    [Required][FromRoute] string installationId)
{
    // Probably want to ensure deletion even if the connection is broken
    var success = await _notificationService
        .DeleteInstallationByIdAsync(installationId, CancellationToken.None);

    if (!success)
        return new UnprocessableEntityResult();

    return new OkResult();
}

[HttpPost]
[Route("requests")]
[ProducesResponseType((int)HttpStatusCode.OK)]
[ProducesResponseType((int)HttpStatusCode.BadRequest)]
[ProducesResponseType((int)HttpStatusCode.UnprocessableEntity)]
public async Task<IActionResult> RequestPush(
    [Required] NotificationRequest notificationRequest)
{
    if ((notificationRequest.Silent &&
        string.IsNullOrWhiteSpace(notificationRequest?.Action)) ||
        (!notificationRequest.Silent &&
        string.IsNullOrWhiteSpace(notificationRequest?.Text)))
        return new BadRequestResult();

    var success = await _notificationService
        .RequestNotificationAsync(notificationRequest, HttpContext.RequestAborted);

    if (!success)
        return new UnprocessableEntityResult();

    return new OkResult();
}
在 Properties/launchSettings.json 檔案中,將每個設定檔的屬性從
launchUrl變更weatherforecast為api/notifications。
建立 API 應用程式
您現在會在 Azure App 服務 中建立 API 應用程式,以裝載您的後端服務。 這可以直接透過Visual Studio或Visual Studio Code,透過 Azure CLI、Azure PowerShell、Azure 開發人員 CLI,以及透過 Azure 入口網站來完成。 如需詳細資訊,請參閱 發佈 Web 應用程式。
若要在 Azure 入口網站 中建立 API 應用程式:
在網頁瀏覽器中,登入 Azure 入口網站。
在 Azure 入口網站 中,按兩下 [建立資源] 按鈕,然後搜尋並選擇 [API 應用程式],再選取 [建立] 按鈕。
在 [ 建立 API 應用程式 ] 頁面中,先更新下列字段,再選取 [ 建立] 按鈕:
Field Action 訂用帳戶 選擇您在其中建立通知中樞的相同目標訂用帳戶。 資源群組 選擇您在 中建立通知中樞的相同資源群組。 名稱 輸入全域唯一名稱。 執行階段堆疊 確定已選取最新版本的 .NET。 布建 API 應用程式之後,請瀏覽至該資源。
在 [概 觀] 頁面上,記下預設網域值。 您的 .NET MAUI 應用程式將存取此作為後端終端的 URL。 URL 會使用您指定的 API 應用程式名稱,格式為
https://<app_name>.azurewebsites.net。在 Azure 入口網站中,流覽至 [設定] -> [環境變數] 面板,然後確定 [
應用程式設定 ] 索引標籤已選取。 然後使用 [ 新增 ] 按鈕來新增下列設定: 名稱 價值 Authentication:ApiKey <api_key_value> NotificationHub:Name <hub_name_value> NotificationHub:ConnectionString <集線器連接字串值> 重要
已新增
Authentication:ApiKey應用程式設定以求簡單。 針對生產案例,請考慮 Azure KeyVault 之類的服務,安全地儲存 連接字串。輸入所有這些設定之後,請選取 [ 套用] 按鈕,然後選取 [ 確認] 按鈕。
發佈後端服務
若要將後端服務發佈至 Azure App 服務:
- 在 Visual Studio 中,以滑鼠右鍵按下您的專案,然後選取 [ 發佈]。
- 在 [發佈精靈] 中,選取 [Azure],然後選取 [下一步] 按鈕。
- 在 [發佈精靈] 中,選取 [Azure App 服務 [Windows],然後選取 [下一步] 按鈕。
- 在 [ 發佈 精靈] 中,遵循驗證流程,將Visual Studio連線到您的 Azure 訂用帳戶併發佈應用程式。
Visual Studio 會建置、封裝應用程式,並將應用程式發佈至 Azure,然後在預設瀏覽器中啟動應用程式。 如需詳細資訊,請參閱 發佈 ASP.NET Web 應用程式。
Tip
您可以從 Azure 入口網站中的 API 應用程式「概觀」刀鋒視窗下載應用程式的發佈設定檔,然後在 Visual Studio 中使用該設定檔來發佈您的應用程式。
驗證已發佈的 API
若要檢查 API 應用程式是否已正確發布,您應該使用您選擇的 REST 工具,將要求傳送 POST 至下列位址:
https://<app_name>.azurewebsites.net/api/notifications/requests
Note
基地址為 https://<app_name>.azurewebsites.net。
請確保您已將要求標頭設定為包含鍵 apikey 及其值,將內文設定為原始格式,並使用以下佔位 JSON 內容:
{}
您應該會收到 400 Bad Request 來自服務的回應。
Note
目前無法使用有效的要求數據來測試 API,因為這需要來自 .NET MAUI 應用程式的平臺特定資訊。
如需呼叫 REST API 的詳細資訊,請參閱 在 Visual Studio 中使用 .http 檔案和 使用 Http Repl 測試 Web API。 在 Visual Studio Code 中, REST 用戶端 可用來測試 REST API。
建立 .NET MAUI 應用程式
在本節中,您將建置 .NET 多平臺應用程式 UI (.NET MAUI) 應用程式,讓您註冊以透過後端服務從通知中樞接收推播通知,並取消註冊。
若要建立 .NET MAUI 應用程式:
在 Visual Studio 中,使用 .NET MAUI 應用程式項目範本,建立名為 PushNotificationsDemo 的新 .NET MAUI 應用程式。
在 Visual Studio 中,將名為 Models 的新資料夾新增至 .NET MAUI 專案,然後將名為
DeviceInstallation的新類別新增至 Models 資料夾,並以下列程式代碼取代其程式代碼:using System.Text.Json.Serialization; namespace PushNotificationsDemo.Models; public class DeviceInstallation { [JsonPropertyName("installationId")] public string InstallationId { get; set; } [JsonPropertyName("platform")] public string Platform { get; set; } [JsonPropertyName("pushChannel")] public string PushChannel { get; set; } [JsonPropertyName("tags")] public List<string> Tags { get; set; } = new List<string>(); }在 Visual Studio 中,將名為
PushDemoAction的 列舉新增至 Models 資料夾,並以下列程式代碼取代其程式代碼:namespace PushNotificationsDemo.Models; public enum PushDemoAction { ActionA, ActionB }在 Visual Studio 中,將名為 Services 的新資料夾新增至 .NET MAUI 專案,然後將名為 的新介面新增至
IDeviceInstallationService資料夾,並以下列程式代碼取代其程式代碼:using PushNotificationsDemo.Models; namespace PushNotificationsDemo.Services; public interface IDeviceInstallationService { string Token { get; set; } bool NotificationsSupported { get; } string GetDeviceId(); DeviceInstallation GetDeviceInstallation(params string[] tags); }此介面稍後會在每個平台上實作,以提供
DeviceInstallation後端服務所需的資訊。在 Visual Studio 中,將名為
INotificationRegistrationService的 介面新增至 Services 資料夾,並以下列程式代碼取代其程式代碼:namespace PushNotificationsDemo.Services; public interface INotificationRegistrationService { Task DeregisterDeviceAsync(); Task RegisterDeviceAsync(params string[] tags); Task RefreshRegistrationAsync(); }此介面會處理用戶端與後端服務之間的互動。
在 Visual Studio 中,將名為
INotificationActionService的 介面新增至 Services 資料夾,並以下列程式代碼取代其程式代碼:namespace PushNotificationsDemo.Services; public interface INotificationActionService { void TriggerAction(string action); }此介面將用來作為簡單的機制,以集中處理通知動作。
在 Visual Studio 中,將名為
IPushDemoNotificationActionService的 介面新增至 Services 資料夾,並以下列程式代碼取代其程式代碼:using PushNotificationsDemo.Models; namespace PushNotificationsDemo.Services; public interface IPushDemoNotificationActionService : INotificationActionService { event EventHandler<PushDemoAction> ActionTriggered; }類型
IPushDemoNotificationActionService是此應用程式特有的,並使用PushDemoAction列舉來識別使用強型別方法觸發的動作。在 Visual Studio 中,將名為
NotificationRegistrationService的 類別新增至 Services 資料夾,並以下列程式代碼取代其程式代碼:using System.Text; using System.Text.Json; using PushNotificationsDemo.Models; namespace PushNotificationsDemo.Services; public class NotificationRegistrationService : INotificationRegistrationService { const string RequestUrl = "api/notifications/installations"; const string CachedDeviceTokenKey = "cached_device_token"; const string CachedTagsKey = "cached_tags"; string _baseApiUrl; HttpClient _client; IDeviceInstallationService _deviceInstallationService; IDeviceInstallationService DeviceInstallationService => _deviceInstallationService ?? (_deviceInstallationService = Application.Current.Windows[0].Page.Handler.MauiContext.Services.GetService<IDeviceInstallationService>()); public NotificationRegistrationService(string baseApiUri, string apiKey) { _client = new HttpClient(); _client.DefaultRequestHeaders.Add("Accept", "application/json"); _client.DefaultRequestHeaders.Add("apikey", apiKey); _baseApiUrl = baseApiUri; } public async Task DeregisterDeviceAsync() { var cachedToken = await SecureStorage.GetAsync(CachedDeviceTokenKey) .ConfigureAwait(false); if (cachedToken == null) return; var deviceId = DeviceInstallationService?.GetDeviceId(); if (string.IsNullOrWhiteSpace(deviceId)) throw new Exception("Unable to resolve an ID for the device."); await SendAsync(HttpMethod.Delete, $"{RequestUrl}/{deviceId}") .ConfigureAwait(false); SecureStorage.Remove(CachedDeviceTokenKey); SecureStorage.Remove(CachedTagsKey); } public async Task RegisterDeviceAsync(params string[] tags) { var deviceInstallation = DeviceInstallationService?.GetDeviceInstallation(tags); await SendAsync<DeviceInstallation>(HttpMethod.Put, RequestUrl, deviceInstallation) .ConfigureAwait(false); await SecureStorage.SetAsync(CachedDeviceTokenKey, deviceInstallation.PushChannel) .ConfigureAwait(false); await SecureStorage.SetAsync(CachedTagsKey, JsonSerializer.Serialize(tags)); } public async Task RefreshRegistrationAsync() { var cachedToken = await SecureStorage.GetAsync(CachedDeviceTokenKey) .ConfigureAwait(false); var serializedTags = await SecureStorage.GetAsync(CachedTagsKey) .ConfigureAwait(false); if (string.IsNullOrWhiteSpace(cachedToken) || string.IsNullOrWhiteSpace(serializedTags) || string.IsNullOrWhiteSpace(DeviceInstallationService?.Token) || cachedToken == DeviceInstallationService?.Token) return; var tags = JsonSerializer.Deserialize<string[]>(serializedTags); await RegisterDeviceAsync(tags); } async Task SendAsync<T>(HttpMethod requestType, string requestUri, T obj) { string serializedContent = null; await Task.Run(() => serializedContent = JsonSerializer.Serialize(obj)) .ConfigureAwait(false); await SendAsync(requestType, requestUri, serializedContent); } async Task SendAsync(HttpMethod requestType, string requestUri, string jsonRequest = null) { var request = new HttpRequestMessage(requestType, new Uri($"{_baseApiUrl}{requestUri}")); if (jsonRequest != null) request.Content = new StringContent(jsonRequest, Encoding.UTF8, "application/json"); var response = await _client.SendAsync(request).ConfigureAwait(false); response.EnsureSuccessStatusCode(); } }在 Visual Studio 中,將名為
PushDemoNotificationActionService的 類別新增至 Services 資料夾,並以下列程式代碼取代其程式代碼:using PushNotificationsDemo.Models; namespace PushNotificationsDemo.Services; public class PushDemoNotificationActionService : IPushDemoNotificationActionService { readonly Dictionary<string, PushDemoAction> _actionMappings = new Dictionary<string, PushDemoAction> { { "action_a", PushDemoAction.ActionA }, { "action_b", PushDemoAction.ActionB } }; public event EventHandler<PushDemoAction> ActionTriggered = delegate { }; public void TriggerAction(string action) { if (!_actionMappings.TryGetValue(action, out var pushDemoAction)) return; List<Exception> exceptions = new List<Exception>(); foreach (var handler in ActionTriggered?.GetInvocationList()) { try { handler.DynamicInvoke(this, pushDemoAction); } catch (Exception ex) { exceptions.Add(ex); } } if (exceptions.Any()) throw new AggregateException(exceptions); } }在 Visual Studio 中,將名為
Config的類別新增至專案的根目錄,並以下列程式代碼取代其程式代碼:namespace PushNotificationsDemo; public static partial class Config { public static string ApiKey = "API_KEY"; public static string BackendServiceEndpoint = "BACKEND_SERVICE_ENDPOINT"; }該
Config類用作使您的秘密遠離源代碼控制的簡單方法。 您可以將這些值替換為自動化建置過程中的一部分,或使用在地部分類別覆寫它們。重要
在 .NET MAUI 應用程式中指定基位址時,請確定其結尾為
/。在 Visual Studio 中,將名為
Config.local_secrets的類別新增至專案的根目錄。 然後使用下列程式代碼取代Config.local_secrets.cs檔案中的程式代碼:namespace PushNotificationsDemo; public static partial class Config { static Config() { ApiKey = "<your_api_key>"; BackendServiceEndpoint = "<your_api_app_url>"; } }使用您在建立後端服務時選擇的值來取代預留位置值。
BackendServiceEndpointURL 應該使用 格式https://<api_app_name>.azurewebsites.net/。Tip
請記得將
*.local_secrets.*新增至.gitignore檔案,以避免將此檔案提交到原始檔控制。
建立 UI
若要建立應用程式的 UI:
在 Visual Studio 中,開啟 MainPage.xaml ,並以下列 XAML 取代
VerticalStackLayout和 其子系:<VerticalStackLayout Margin="20" Spacing="6"> <Button x:Name="registerButton" Text="Register" Clicked="OnRegisterButtonClicked" /> <Button x:Name="deregisterButton" Text="Deregister" Clicked="OnDeregisterButtonClicked" /> </VerticalStackLayout>在 Visual Studio 中,開啟 句:
using PushNotificationsDemo.Services;在 MainPage.xaml.cs 中,新增一個
readonly後援欄位來存儲對INotificationRegistrationService實作的參考:readonly INotificationRegistrationService _notificationRegistrationService;在
MainPage建構函式中,解析INotificationRegistrationService實作並將它指派給_notificationRegistrationService後援欄位:public MainPage(INotificationRegistrationService service) { InitializeComponent(); _notificationRegistrationService = service; }在
MainPage類別中,實作OnRegisterButtonClicked和OnDeregisterButtonClicked事件處理程式,並在INotificationRegistrationService物件上呼叫對應的註冊和解除註冊方法。void OnRegisterButtonClicked(object sender, EventArgs e) { _notificationRegistrationService.RegisterDeviceAsync() .ContinueWith((task) => { ShowAlert(task.IsFaulted ? task.Exception.Message : $"Device registered"); }); } void OnDeregisterButtonClicked(object sender, EventArgs e) { _notificationRegistrationService.DeregisterDeviceAsync() .ContinueWith((task) => { ShowAlert(task.IsFaulted ? task.Exception.Message : $"Device deregistered"); }); } void ShowAlert(string message) { MainThread.BeginInvokeOnMainThread(() => { DisplayAlert("Push notifications demo", message, "OK") .ContinueWith((task) => { if (task.IsFaulted) throw task.Exception; }); }); }void OnRegisterButtonClicked(object sender, EventArgs e) { _notificationRegistrationService.RegisterDeviceAsync() .ContinueWith((task) => { ShowAlert(task.IsFaulted ? task.Exception.Message : $"Device registered"); }); } void OnDeregisterButtonClicked(object sender, EventArgs e) { _notificationRegistrationService.DeregisterDeviceAsync() .ContinueWith((task) => { ShowAlert(task.IsFaulted ? task.Exception.Message : $"Device deregistered"); }); } void ShowAlert(string message) { MainThread.BeginInvokeOnMainThread(() => { DisplayAlertAsync("Push notifications demo", message, "OK") .ContinueWith((task) => { if (task.IsFaulted) throw task.Exception; }); }); }重要
在應用程式中,會執行註冊和取消註冊,以回應用戶輸入,以便更輕鬆地探索及測試此功能。 在生產應用程式中,您通常會在應用程式生命週期中的適當時間點執行註冊和取消註冊動作,而不需要明確的用戶輸入。
在 Visual Studio 中,開啟 App.xaml.cs 並新增下列
using語句:using PushNotificationsDemo.Models; using PushNotificationsDemo.Services;在 App.xaml.cs 中新增一個後備欄位,以儲存對
readonly實作的參考。readonly IPushDemoNotificationActionService _actionService;
在
App的建構函式中,解析IPushDemoNotificationActionService的實作並將它指派給_actionService的備援欄位,並訂閱IPushDemoNotificationActionService.ActionTriggered的事件:public App(IPushDemoNotificationActionService service) { InitializeComponent(); _actionService = service; _actionService.ActionTriggered += NotificationActionTriggered; MainPage = new AppShell(); }
在
App的建構函式中,解析IPushDemoNotificationActionService的實作並將它指派給_actionService的備援欄位,並訂閱IPushDemoNotificationActionService.ActionTriggered的事件:public App(IPushDemoNotificationActionService service) { InitializeComponent(); _actionService = service; _actionService.ActionTriggered += NotificationActionTriggered; }
在類別中
App,實作IPushDemoNotificationActionService.ActionTriggered事件的事件處理程式:void NotificationActionTriggered(object sender, PushDemoAction e) { ShowActionAlert(e); } void ShowActionAlert(PushDemoAction action) { MainThread.BeginInvokeOnMainThread(() => { Windows[0].Page?.DisplayAlert("Push notifications demo", $"{action} action received.", "OK") .ContinueWith((task) => { if (task.IsFaulted) throw task.Exception; }); }); }void NotificationActionTriggered(object sender, PushDemoAction e) { ShowActionAlert(e); } void ShowActionAlert(PushDemoAction action) { MainThread.BeginInvokeOnMainThread(() => { Windows[0].Page?.DisplayAlertAsync("Push notifications demo", $"{action} action received.", "OK") .ContinueWith((task) => { if (task.IsFaulted) throw task.Exception; }); }); }處理
ActionTriggered事件的事件處理程式示範了接收和傳播推播通知行為的過程。 這些通常會以無訊息方式處理,例如流覽至特定檢視或重新整理某些數據,而不是顯示警示。
設定 Android 應用程式
若要在 Android 上設定 .NET MAUI 應用程式以接收和處理推播通知:
在 Visual Studio 中,將 Xamarin.Firebase.Messaging NuGet 套件新增至 .NET MAUI 應用程式專案。
在 Visual Studio 中,將 google-services.json 檔案新增至 .NET MAUI 應用程式專案的 [平臺/Android ] 資料夾。 將檔案新增至您的項目之後,應該已經使用
GoogleServicesJson作為建置動作來新增。<ItemGroup Condition="'$(TargetFramework)' == 'net8.0-android'"> <GoogleServicesJson Include="Platforms\Android\google-services.json" /> </ItemGroup>Tip
請記得將
google-services.json新增至.gitignore檔案,以避免將此檔案提交到原始檔控制。在 Visual Studio 中,編輯項目檔 (*.csproj),並將 For Android 設定
SupportedOSPlatformVersion為 26.0:<SupportedOSPlatformVersion Condition="$([MSBuild]::GetTargetPlatformIdentifier('$(TargetFramework)')) == 'android'">26.0</SupportedOSPlatformVersion>Google 在 API 26 中對 Android 通知通道進行了變更。 如需詳細資訊,請參閱 developer.android.com 上的通知通道 。
在 專案的 [平臺/Android] 資料夾中,新增名為
DeviceInstallationService的新類別,並以下列程式代碼取代其程式代碼:using Android.Gms.Common; using PushNotificationsDemo.Models; using PushNotificationsDemo.Services; using static Android.Provider.Settings; namespace PushNotificationsDemo.Platforms.Android; public class DeviceInstallationService : IDeviceInstallationService { public string Token { get; set; } public bool NotificationsSupported => GoogleApiAvailability.Instance.IsGooglePlayServicesAvailable(Platform.AppContext) == ConnectionResult.Success; public string GetDeviceId() => Secure.GetString(Platform.AppContext.ContentResolver, Secure.AndroidId); public DeviceInstallation GetDeviceInstallation(params string[] tags) { if (!NotificationsSupported) throw new Exception(GetPlayServicesError()); if (string.IsNullOrWhiteSpace(Token)) throw new Exception("Unable to resolve token for FCMv1."); var installation = new DeviceInstallation { InstallationId = GetDeviceId(), Platform = "fcmv1", PushChannel = Token }; installation.Tags.AddRange(tags); return installation; } string GetPlayServicesError() { int resultCode = GoogleApiAvailability.Instance.IsGooglePlayServicesAvailable(Platform.AppContext); if (resultCode != ConnectionResult.Success) return GoogleApiAvailability.Instance.IsUserResolvableError(resultCode) ? GoogleApiAvailability.Instance.GetErrorString(resultCode) : "This device isn't supported."; return "An error occurred preventing the use of push notifications."; } }這個類別使用
Secure.AndroidId的值來提供唯一的識別碼,以及通知中心註冊資訊。在 專案的 [平臺/Android] 資料夾中,新增名為
PushNotificationFirebaseMessagingService的新類別,並以下列程式代碼取代其程式代碼:using Android.App; using Firebase.Messaging; using PushNotificationsDemo.Services; namespace PushNotificationsDemo.Platforms.Android; [Service(Exported = false)] [IntentFilter(new[] { "com.google.firebase.MESSAGING_EVENT" })] public class PushNotificationFirebaseMessagingService : FirebaseMessagingService { IPushDemoNotificationActionService _notificationActionService; INotificationRegistrationService _notificationRegistrationService; IDeviceInstallationService _deviceInstallationService; int _messageId; IPushDemoNotificationActionService NotificationActionService => _notificationActionService ?? (_notificationActionService = IPlatformApplication.Current.Services.GetService<IPushDemoNotificationActionService>()); INotificationRegistrationService NotificationRegistrationService => _notificationRegistrationService ?? (_notificationRegistrationService = IPlatformApplication.Current.Services.GetService<INotificationRegistrationService>()); IDeviceInstallationService DeviceInstallationService => _deviceInstallationService ?? (_deviceInstallationService = IPlatformApplication.Current.Services.GetService<IDeviceInstallationService>()); public override void OnNewToken(string token) { DeviceInstallationService.Token = token; NotificationRegistrationService.RefreshRegistrationAsync() .ContinueWith((task) => { if (task.IsFaulted) throw task.Exception; }); } public override void OnMessageReceived(RemoteMessage message) { base.OnMessageReceived(message); if (message.Data.TryGetValue("action", out var messageAction)) NotificationActionService.TriggerAction(messageAction); } }這個類別具有
IntentFilter包含com.google.firebase.MESSAGING_EVENT篩選的屬性。 此篩選可讓Android將傳入訊息傳遞至此類別進行處理。如要瞭解 Firebase Cloud Messaging 訊息格式,請參閱關於 firebase.google.com 上的 FCM 訊息 。
在 Visual Studio 中,開啟 [平臺/Android] 資料夾中的 MainActivity.cs 檔案,然後新增下列
using語句:using Android.App; using Android.Content; using Android.Content.PM; using Android.OS; using PushNotificationsDemo.Services; using Firebase.Messaging;在
MainActivity類別中,將LaunchMode設為SingleTop,以便當MainActivity開啟時不會再次建立。[Activity( Theme = "@style/Maui.SplashTheme", MainLauncher = true, LaunchMode = LaunchMode.SingleTop, ConfigurationChanges = ConfigChanges.ScreenSize | ConfigChanges.Orientation | ConfigChanges.UiMode | ConfigChanges.ScreenLayout | ConfigChanges.SmallestScreenSize | ConfigChanges.Density)]在
MainActivity類別中,新增備份欄位來儲存對IPushDemoNotificationActionService和IDeviceInstallationService實作的參考:IPushDemoNotificationActionService _notificationActionService; IDeviceInstallationService _deviceInstallationService;在類別中
MainActivity,新增NotificationActionService和DeviceInstallationService私用屬性,從應用程式的相依性插入容器擷取其具體實作:IPushDemoNotificationActionService NotificationActionService => _notificationActionService ?? (_notificationActionService = IPlatformApplication.Current.Services.GetService<IPushDemoNotificationActionService>()); IDeviceInstallationService DeviceInstallationService => _deviceInstallationService ?? (_deviceInstallationService = IPlatformApplication.Current.Services.GetService<IDeviceInstallationService>());在 類別中,實作
MainActivityAndroid.Gms.Tasks.IOnSuccessListener介面來擷取和儲存 Firebase 令牌:public class MainActivity : MauiAppCompatActivity, Android.Gms.Tasks.IOnSuccessListener { public void OnSuccess(Java.Lang.Object result) { DeviceInstallationService.Token = result.ToString(); } }在類別中
MainActivityProcessNotificationActions,新增 方法,以檢查指定的Intent是否有名為action的額外值,然後使用 實作有條件地觸發actionIPushDemoNotificationActionService:void ProcessNotificationsAction(Intent intent) { try { if (intent?.HasExtra("action") == true) { var action = intent.GetStringExtra("action"); if (!string.IsNullOrEmpty(action)) NotificationActionService.TriggerAction(action); } } catch (Exception ex) { System.Diagnostics.Debug.WriteLine(ex.Message); } }在
MainActivity類別中,覆寫OnNewIntent方法以呼叫ProcessNotificationActions方法:protected override void OnNewIntent(Intent? intent) { base.OnNewIntent(intent); ProcessNotificationsAction(intent); }由於
LaunchMode的Activity被設置為SingleTop,因此將透過Intent覆寫將Activity發送至現有的OnNewIntent實例,而非使用OnCreate方法。 因此,您必須在OnNewIntent和OnCreate中同時處理傳入的意圖。在
MainActivity類別中,覆寫OnCreate方法以呼叫ProcessNotificationActions方法,並從 Firebase 擷取令牌,並將MainActivity視為IOnSuccessListener來添加。protected override void OnCreate(Bundle? savedInstanceState) { base.OnCreate(savedInstanceState); if (DeviceInstallationService.NotificationsSupported) FirebaseMessaging.Instance.GetToken().AddOnSuccessListener(this); ProcessNotificationsAction(Intent); }Note
每次執行應用程式並停止偵錯會話以繼續接收推播通知時,都必須重新註冊應用程式。
在 Visual Studio 中,將
POST_NOTIFICATIONS許可權新增至 [平臺/Android] 資料夾中的 AndroidManifest.xml 檔案:<uses-permission android:name="android.permission.POST_NOTIFICATIONS" />如需此許可權的詳細資訊,請參閱 developer.android.com 上的通知運行時間許可權 。
在 Visual Studio 中,開啟 MainPage.xaml.cs ,並將下列程式代碼新增至
MainPage類別:#if ANDROID protected override async void OnAppearing() { base.OnAppearing(); PermissionStatus status = await Permissions.RequestAsync<Permissions.PostNotifications>(); } #endifMainPage出現時,此程式代碼會在 Android 上執行,並要求使用者授予POST_NOTIFICATIONS許可權。 如需 .NET MAUI 許可權的詳細資訊,請參閱 許可權。
設定 iOS 應用程式
iOS 模擬器在使用 Apple silicon 或 T2 處理器的 Mac 計算機上執行 macOS 13+ 時,支援 iOS 16+ 中的遠端通知。 每個模擬器都會產生註冊令牌,這些令牌是該模擬器和其執行中 Mac 硬體所唯一的。
重要
模擬器支援 Apple Push Notification Service 沙箱環境。
下列指示假設您使用的硬體支援在iOS 模擬器中接收遠端通知。 如果這不是這種情況,您必須在實體裝置上執行 iOS 應用程式,這會要求您為包含推播通知功能的應用程式建立布建配置檔。 接著,您必須確定您的應用程式是使用您的憑證和布建配置檔所建置。 如需如何執行這項操作的詳細資訊,請參閱 設定 iOS 應用程式以使用 Azure 通知中樞,然後遵循下列指示。
若要在 iOS 上設定 .NET MAUI 應用程式以接收和處理推播通知:
在 Visual Studio 中,編輯項目檔 (*.csproj),並將 for iOS 的 設定
SupportedOSPlatformVersion為 13.0:<SupportedOSPlatformVersion Condition="$([MSBuild]::GetTargetPlatformIdentifier('$(TargetFramework)')) == 'ios'">13.0</SupportedOSPlatformVersion>Apple 在 iOS 13 中對推播服務進行了變更。 如需詳細資訊,請參閱 適用於 iOS 13 的 Azure 通知中樞更新。
在 Visual Studio 中,將 Entitlements.plist 檔案新增至專案的 Platform/iOS 資料夾,並將下列 XML 新增至檔案:
<?xml version="1.0" encoding="UTF-8"?>
<!DOCTYPE plist PUBLIC "-//Apple//DTD PLIST 1.0//EN" "http://www.apple.com/DTDs/PropertyList-1.0.dtd">
<plist version="1.0">
<dict>
  <key>aps-environment</key>
  <string>development</string>
</dict>
</plist>
這會設定 APS 環境權利,並指定使用開發 Apple 推播通知服務環境。 在生產應用程式中,此權利值應設定為
production。 如需此權利的詳細資訊,請參閱 developer.apple.com 上的 APS 環境權利 。如需有關新增權利檔案的詳細資訊,請參閱 iOS 權利。
在 Visual Studio 中,將名為
DeviceInstallationService的新類別新增至 專案的 [平臺/iOS] 資料夾,並將下列程式代碼新增至 檔案:using PushNotificationsDemo.Services; using PushNotificationsDemo.Models; using UIKit; namespace PushNotificationsDemo.Platforms.iOS; public class DeviceInstallationService : IDeviceInstallationService { const int SupportedVersionMajor = 13; const int SupportedVersionMinor = 0; public string Token { get; set; } public bool NotificationsSupported => UIDevice.CurrentDevice.CheckSystemVersion(SupportedVersionMajor, SupportedVersionMinor); public string GetDeviceId() => UIDevice.CurrentDevice.IdentifierForVendor.ToString(); public DeviceInstallation GetDeviceInstallation(params string[] tags) { if (!NotificationsSupported) throw new Exception(GetNotificationsSupportError()); if (string.IsNullOrWhiteSpace(Token)) throw new Exception("Unable to resolve token for APNS"); var installation = new DeviceInstallation { InstallationId = GetDeviceId(), Platform = "apns", PushChannel = Token }; installation.Tags.AddRange(tags); return installation; } string GetNotificationsSupportError() { if (!NotificationsSupported) return $"This app only supports notifications on iOS {SupportedVersionMajor}.{SupportedVersionMinor} and above. You are running {UIDevice.CurrentDevice.SystemVersion}."; if (Token == null) return $"This app can support notifications but you must enable this in your settings."; return "An error occurred preventing the use of push notifications"; } }這個類別使用
UIDevice.IdentifierForVendor的值來提供唯一的識別碼,以及通知中心註冊資訊。在 Visual Studio 中,將名為
NSDataExtensions的新類別新增至 專案的 [平臺/iOS] 資料夾,並將下列程式代碼新增至 檔案:using Foundation; using System.Text; namespace PushNotificationsDemo.Platforms.iOS; internal static class NSDataExtensions { internal static string ToHexString(this NSData data) { var bytes = data.ToArray(); if (bytes == null) return null; StringBuilder sb = new StringBuilder(bytes.Length * 2); foreach (byte b in bytes) sb.AppendFormat("{0:x2}", b); return sb.ToString().ToUpperInvariant(); } }ToHexString擴充方法將會被新增的程式碼使用,以剖析擷取的裝置權杖。在 Visual Studio 中,開啟 [平臺/iOS] 資料夾中的 AppDelegate.cs 檔案,然後新增下列
using語句:using System.Diagnostics; using Foundation; using PushNotificationsDemo.Platforms.iOS; using PushNotificationsDemo.Services; using UIKit; using UserNotifications;在
AppDelegate類別中,新增備援欄位來儲存對IPushDemoNotificationActionService、INotificationRegistrationService和IDeviceInstallationService實作的參考。IPushDemoNotificationActionService _notificationActionService; INotificationRegistrationService _notificationRegistrationService; IDeviceInstallationService _deviceInstallationService;在類別中
AppDelegate,新增NotificationActionService、NotificationRegistrationService和DeviceInstallationService私用屬性,以從應用程式的相依性插入容器擷取其具體實作:IPushDemoNotificationActionService NotificationActionService => _notificationActionService ?? (_notificationActionService = IPlatformApplication.Current.Services.GetService<IPushDemoNotificationActionService>()); INotificationRegistrationService NotificationRegistrationService => _notificationRegistrationService ?? (_notificationRegistrationService = IPlatformApplication.Current.Services.GetService<INotificationRegistrationService>()); IDeviceInstallationService DeviceInstallationService => _deviceInstallationService ?? (_deviceInstallationService = IPlatformApplication.Current.Services.GetService<IDeviceInstallationService>());在類別中
AppDelegate,新增CompleteRegistrationAsync方法來設定IDeviceInstallationService.Token屬性值:Task CompleteRegistrationAsync(NSData deviceToken) { DeviceInstallationService.Token = deviceToken.ToHexString(); return NotificationRegistrationService.RefreshRegistrationAsync(); }此方法也會重新整理註冊,並快取裝置令牌(如果自上次儲存以來已更新)。
在類別中
AppDelegate,新增ProcessNotificationActions處理NSDictionary通知資料的 方法,並有條件地呼叫NotificationActionService.TriggerAction:void ProcessNotificationActions(NSDictionary userInfo) { if (userInfo == null) return; try { // If your app isn't in the foreground, the notification goes to Notification Center. // If your app is in the foreground, the notification goes directly to your app and you // need to process the notification payload yourself. var actionValue = userInfo.ObjectForKey(new NSString("action")) as NSString; if (!string.IsNullOrWhiteSpace(actionValue?.Description)) NotificationActionService.TriggerAction(actionValue.Description); } catch (Exception ex) { Debug.WriteLine(ex.Message); } }在
AppDelegate類別中,新增方法,在RegisteredForRemoteNotifications方法中傳遞deviceToken參數給CompleteRegistrationAsync方法:[Export("application:didRegisterForRemoteNotificationsWithDeviceToken:")] public void RegisteredForRemoteNotifications(UIApplication application, NSData deviceToken) { CompleteRegistrationAsync(deviceToken) .ContinueWith((task) => { if (task.IsFaulted) throw task.Exception; }); }當應用程式註冊以接收遠端通知時,會呼叫這個方法,並用來要求唯一的裝置令牌,這實際上是您裝置上應用程式的位址。
在
AppDelegate類別中,新增方法,在ReceivedRemoteNotification方法中傳遞userInfo參數給ProcessNotificationActions方法:[Export("application:didReceiveRemoteNotification:")] public void ReceivedRemoteNotification(UIApplication application, NSDictionary userInfo) { ProcessNotificationActions(userInfo); }當應用程式收到遠端通知,並用來處理通知時,將會呼叫這個方法。
在類別中
AppDelegate,新增FailedToRegisterForRemoteNotifications方法以記錄任何錯誤:[Export("application:didFailToRegisterForRemoteNotificationsWithError:")] public void FailedToRegisterForRemoteNotifications(UIApplication application, NSError error) { Debug.WriteLine(error.Description); }當應用程式無法註冊以接收遠端通知時,將會呼叫這個方法。 如果裝置未連線到網路、APNS 伺服器無法連線,或應用程式設定不正確,則註冊可能會失敗。
Note
針對生產環境,您會想要在
FailedToRegisterForRemoteNotifications方法中實作適當的記錄和錯誤處理。在
AppDelegate類別中,新增FinishedLaunching方法以有條件地要求權限以使用通知並註冊遠端通知:[Export("application:didFinishLaunchingWithOptions:")] public override bool FinishedLaunching(UIApplication application, NSDictionary launchOptions) { if (DeviceInstallationService.NotificationsSupported) { UNUserNotificationCenter.Current.RequestAuthorization( UNAuthorizationOptions.Alert | UNAuthorizationOptions.Badge | UNAuthorizationOptions.Sound, (approvalGranted, error) => { if (approvalGranted && error == null) { MainThread.BeginInvokeOnMainThread(() => { UIApplication.SharedApplication.RegisterForRemoteNotifications(); }); } }); } using (var userInfo = launchOptions?.ObjectForKey(UIApplication.LaunchOptionsRemoteNotificationKey) as NSDictionary) { ProcessNotificationActions(userInfo); } return base.FinishedLaunching(application, launchOptions); }如需要求許可權使用通知的相關信息,請參閱 要求許可權以在 developer.apple.com 上使用通知 。
如需 iOS 中通知的相關信息,請參閱 developer.apple.com 上的使用者通知 。
在應用程式的依賴注入容器中註冊類型
在 Visual Studio 中,開啟 句:
using PushNotificationsDemo.Services;在
MauiProgram類別中,新增用於在每個平台上註冊RegisterServices,以及跨平台的DeviceInstallationService和PushDemoNotificationActionService服務的擴充方法NotificationRegistrationService程式碼,並傳回MauiAppBuilder物件:public static MauiAppBuilder RegisterServices(this MauiAppBuilder builder) { #if IOS builder.Services.AddSingleton<IDeviceInstallationService, PushNotificationsDemo.Platforms.iOS.DeviceInstallationService>(); #elif ANDROID builder.Services.AddSingleton<IDeviceInstallationService, PushNotificationsDemo.Platforms.Android.DeviceInstallationService>(); #endif builder.Services.AddSingleton<IPushDemoNotificationActionService, PushDemoNotificationActionService>(); builder.Services.AddSingleton<INotificationRegistrationService>(new NotificationRegistrationService(Config.BackendServiceEndpoint, Config.ApiKey)); return builder; }在
MauiProgram類別中,新增RegisterViews擴充方法的程式碼,以將MainPage類型註冊為單例,並回傳一個MauiAppBuilder物件。public static MauiAppBuilder RegisterViews(this MauiAppBuilder builder) { builder.Services.AddSingleton<MainPage>(); return builder; }類型
MainPage已註冊,因為它需要INotificationRegistrationService相依性,而且任何需要相依性的類型都必須向相依性插入容器註冊。在
MauiProgram類別中,修改CreateMauiApp方法,使其呼叫RegisterServices和RegisterViews擴展方法:public static MauiApp CreateMauiApp() { var builder = MauiApp.CreateBuilder(); builder .UseMauiApp<App>() .ConfigureFonts(fonts => { fonts.AddFont("OpenSans-Regular.ttf", "OpenSansRegular"); fonts.AddFont("OpenSans-Semibold.ttf", "OpenSansSemibold"); }) .RegisterServices() .RegisterViews(); #if DEBUG builder.Logging.AddDebug(); #endif return builder.Build(); }
如需 .NET MAUI 中相依性插入的詳細資訊,請參閱 相依性插入。
測試應用程式
您可以使用後端服務,或透過 Azure 入口網站,將推播通知傳送至應用程式,以測試您的應用程式。
iOS 模擬器在使用 Apple silicon 或 T2 處理器的 Mac 計算機上執行 macOS 13+ 時,支援 iOS 16+ 中的遠端通知。 如果您不符合這些硬體需求,則必須在實體裝置上測試 iOS 應用程式。 在 Android 上,您可以在開發人員解除鎖定的實體裝置或模擬器上測試您的應用程式。
Android 和 iOS 會在背景執行時代表應用程式顯示推播通知。 如果應用程式在收到通知時在前景執行,則應用程式的程式代碼會決定行為。 例如,您可以更新應用程式的介面,以反映通知中包含的新資訊。
使用後端服務進行測試
若要透過發佈至 Azure App 服務 的後端服務,將測試推播通知傳送至您的應用程式:
在 Visual Studio 中,在 Android 或 iOS 上執行 PushNotificationsDemo 應用程式,然後選取 [ 註冊 ] 按鈕。
Note
如果您要在Android上進行測試,請確定您未使用偵錯組態執行。 或者,如果應用程式先前已部署,請確定它已強制關閉,然後再次從啟動器啟動它。
在您選擇的 REST 工具中,將要求傳送
POST至下列位址:https://<app_name>.azurewebsites.net/api/notifications/requests請確定您已將要求標頭設定為包含索引鍵
apikey及其值、將本文設定為未經處理,並使用下列 JSON 內容:{ "text": "Message from REST tooling!", "action": "action_a" }整體要求應該類似下列範例:
POST /api/notifications/requests HTTP/1.1
Host: https://<app_name>.azurewebsites.net
apikey: <your_api_key>
Content-Type: application/json

{
    "text": "Message from REST tooling!",
    "action": "action_a"
}
在您選擇的 REST 工具中,驗證您會收到 200 OK 回應。
在 Android 或 iOS 上的應用程式中,應該會顯示警示,其中顯示 已收到的 ActionA 動作。
如需呼叫 REST API 的詳細資訊,請參閱 在 Visual Studio 中使用 .http 檔案和 使用 Http Repl 測試 Web API。 在 Visual Studio Code 中, REST 用戶端 可用來測試 REST API。
使用 Azure 入口網站 進行測試
Azure 通知中樞可讓您檢查您的應用程式是否可以接收推播通知。
若要透過 Azure 入口網站 將測試推播通知傳送至您的應用程式:
在 Visual Studio 中,在 Android 或 iOS 上執行 PushNotificationsDemo 應用程式,然後選取 [ 註冊 ] 按鈕。
Note
如果您要在Android上進行測試,請確定您未使用偵錯組態執行。 或者,如果應用程式先前已部署,請確定它已強制關閉,然後再次從啟動器啟動它。
在 Azure 入口網站中,流覽至您的通知中樞,然後選取 [概觀] 刀鋒視窗上的 [測試傳送] 按鈕。
在 測試傳送 面板中,選取所需的 平台 並修改承載。
對於 Apple,請使用以下承載:
{
  "aps": {
    "alert": "Message from Notification Hub!"
  },
  "action": "action_a"
}
在 Android 平台上,請使用下列資料載荷:
{
  "message": {
    "notification": {
      "title": "PushDemo",
      "body": "Message from Notification Hub!"
    },
    "data": {
      "action": "action_a"
    }
  }
}
Azure 入口網站 應該表示已成功傳送通知。
如需 Firebase 雲端傳訊訊息格式的相關信息,請參閱 關於 developer.android.com 上的 FCM 訊息 。
在 Android 或 iOS 上的應用程式中,應該會顯示警示,其中顯示 已收到的 ActionA 動作。
疑難排解
下列各節將討論嘗試在用戶端應用程式中使用推播通知時遇到的常見問題。
後端服務沒有回應
在本機測試時,請確定後端服務正在執行,並使用正確的埠。
如果針對 Azure API 應用程式進行測試,請檢查服務是否正在執行且已部署且已啟動,而不會發生錯誤。
請確定您已在 REST 工具或 .NET MAUI 應用程式組態中正確指定基位址。 本機測試時,基地址應該是 https://<api_name>.azurewebsites.net 或 https://localhost:7020。
從後端服務接收 401 狀態代碼
驗證您正確設定 apikey 要求標頭,且此值符合您為後端服務設定的標頭。
如果您在本機測試時收到此錯誤,請確定您在 .NET MAUI 應用程式中定義的金鑰值符合 Authentication:ApiKey 後端服務所使用的使用者密碼值。
如果您要使用 Azure API 應用程式進行測試,請確定 .NET MAUI 應用程式中定義的金鑰值符合 Authentication:ApiKey Azure 入口網站 中定義的應用程式設定值。 如果您在部署後端服務之後建立或變更此應用程式設定,則必須重新啟動服務,此值才會生效。
從後端服務接收 404 狀態代碼
驗證端點和 HTTP 要求方法是否正確:
- 更新-
https://<api_name>.azurewebsites.net/api/notifications/installations - 刪除-
https://<api_name>.azurewebsites.net/api/notifications/installations/<installation_id> - 開機自檢-
https://<api_name>.azurewebsites.net/api/notifications/requests
或者在本地測試時:
- 更新-
https://localhost:7020/api/notifications/installations - 刪除-
https://localhost:7020/api/notifications/installations/<installation_id> - 開機自檢-
https://localhost:7020/api/notifications/requests
重要
在 .NET MAUI 應用程式中指定基位址時,請確定其結尾為 /。 本機測試時,基地址應該是 https://<api_name>.azurewebsites.net 或 https://localhost:7020/。
啟動或停止偵錯會話之後,未在Android上收到通知
請確定每次啟動偵錯工作階段時都會註冊。 調試程式會導致產生新的 Firebase 令牌,因此必須更新通知中樞安裝。
無法註冊,並顯示通知中樞錯誤訊息
確認測試裝置具有網路連線能力。 然後,藉由設定斷點來檢查 StatusCode 中的 HttpResponse屬性,以判斷 HTTP 回應狀態代碼。
根據狀態代碼,檢閱先前的疑難解答建議,如果適用的話。
在各 API 傳回特定狀態代碼的行上設定斷點。 然後在本機偵錯時嘗試呼叫後端服務。
驗證後端服務是否按預期運作,使用您所選擇的 REST 工具進行測試,並應用由 .NET MAUI 應用程式為您選擇的平臺所建立的資料包。
檢閱平臺特定的組態區段,以確保未遺漏任何步驟。 請檢查是否為您選擇的平台解析了適當的 InstallationId 和 Token 變數的值。
無法解析裝置的識別碼,裝置錯誤訊息
檢閱平臺特定的組態區段,以確保未遺漏任何步驟。