本機通知
 流覽範例
流覽範例本機通知是由裝置上安裝的應用程式所傳送的警示。 本機通知通常用於下列功能:
- 行事曆事件
- 提醒
- 以位置為基礎的觸發程式
每個平臺都需要自己的原生程式代碼實作,才能傳送和接收本機通知。 不過,每個平台實作都可以在跨平臺層抽象化,讓 .NET 多平臺應用程式 UI (.NET MAUI) 應用程式中有一致的 API 來傳送和接收本機通知。
建立跨平臺抽象概念
.NET MAUI 應用程式應該傳送和接收本機通知,而不必擔心基礎平台實作。 下列 INotificationManagerService 介面可用來定義可用來與本機通知互動的跨平臺 API:
public interface INotificationManagerService
{
    event EventHandler NotificationReceived;
    void SendNotification(string title, string message, DateTime? notifyTime = null);
    void ReceiveNotification(string title, string message);
}
此介面會定義下列作業:
- 事件
NotificationReceived可讓應用程式處理傳入通知。 - 方法
SendNotification會在選擇性DateTime的傳送通知。 - 方法會在
ReceiveNotification基礎平臺收到時處理通知。
介面應該在您想要支援本機通知的每個平台上實作。
在Android上實作本機通知
在 Android 上,本機通知是顯示在應用程式 UI 外部的訊息,以提供您 app 的提醒或其他資訊。 用戶可以點選通知以開啟您的應用程式,也可以選擇性地直接從通知採取動作。 如需 Android 上本機通知的相關信息,請參閱 developer.android.com 上的通知概觀 。
若要讓 .NET MAUI 應用程式在Android上傳送和接收通知,應用程式必須提供介面的實作 INotificationManagerService 。
傳送和接收本機通知
在 Android 上,類別 NotificationManagerService 會實作 INotificationManagerService 介面,並包含傳送和接收本機通知的邏輯:
using Android.App;
using Android.Content;
using Android.Graphics;
using Android.OS;
using AndroidX.Core.App;

namespace LocalNotificationsDemo.Platforms.Android;

public class NotificationManagerService : INotificationManagerService
{
    const string channelId = "default";
    const string channelName = "Default";
    const string channelDescription = "The default channel for notifications.";

    public const string TitleKey = "title";
    public const string MessageKey = "message";

    bool channelInitialized = false;
    int messageId = 0;
    int pendingIntentId = 0;

    NotificationManagerCompat compatManager;

    public event EventHandler NotificationReceived;

    public static NotificationManagerService Instance { get; private set; }

    public NotificationManagerService()
    {
        if (Instance == null)
        {
            CreateNotificationChannel();
            compatManager = NotificationManagerCompat.From(Platform.AppContext);
            Instance = this;
        }
    }

    public void SendNotification(string title, string message, DateTime? notifyTime = null)
    {
        if (!channelInitialized)
        {
            CreateNotificationChannel();
        }

        if (notifyTime != null)
        {
            Intent intent = new Intent(Platform.AppContext, typeof(AlarmHandler));
            intent.PutExtra(TitleKey, title);
            intent.PutExtra(MessageKey, message);
            intent.SetFlags(ActivityFlags.SingleTop | ActivityFlags.ClearTop);

            var pendingIntentFlags = (Build.VERSION.SdkInt >= BuildVersionCodes.S)
                ? PendingIntentFlags.CancelCurrent | PendingIntentFlags.Immutable
                : PendingIntentFlags.CancelCurrent;

            PendingIntent pendingIntent = PendingIntent.GetBroadcast(Platform.AppContext, pendingIntentId++, intent, pendingIntentFlags);
            long triggerTime = GetNotifyTime(notifyTime.Value);
            AlarmManager alarmManager = Platform.AppContext.GetSystemService(Context.AlarmService) as AlarmManager;
            alarmManager.Set(AlarmType.RtcWakeup, triggerTime, pendingIntent);
        }
        else
        {
            Show(title, message);
        }
    }

    public void ReceiveNotification(string title, string message)
    {
        var args = new NotificationEventArgs()
        {
            Title = title,
            Message = message,
        };
        NotificationReceived?.Invoke(null, args);
    }

    public void Show(string title, string message)
    {
        Intent intent = new Intent(Platform.AppContext, typeof(MainActivity));
        intent.PutExtra(TitleKey, title);
        intent.PutExtra(MessageKey, message);
        intent.SetFlags(ActivityFlags.SingleTop | ActivityFlags.ClearTop);

        var pendingIntentFlags = (Build.VERSION.SdkInt >= BuildVersionCodes.S)
            ? PendingIntentFlags.UpdateCurrent | PendingIntentFlags.Immutable
            : PendingIntentFlags.UpdateCurrent;

        PendingIntent pendingIntent = PendingIntent.GetActivity(Platform.AppContext, pendingIntentId++, intent, pendingIntentFlags);
        NotificationCompat.Builder builder = new NotificationCompat.Builder(Platform.AppContext, channelId)
            .SetContentIntent(pendingIntent)
            .SetContentTitle(title)
            .SetContentText(message)
            .SetLargeIcon(BitmapFactory.DecodeResource(Platform.AppContext.Resources, Resource.Drawable.dotnet_logo))
            .SetSmallIcon(Resource.Drawable.message_small);

        Notification notification = builder.Build();
        compatManager.Notify(messageId++, notification);
    }

    void CreateNotificationChannel()
    {
        // Create the notification channel, but only on API 26+.
        if (Build.VERSION.SdkInt >= BuildVersionCodes.O)
        {
            var channelNameJava = new Java.Lang.String(channelName);
            var channel = new NotificationChannel(channelId, channelNameJava, NotificationImportance.Default)
            {
                Description = channelDescription
            };
            // Register the channel
            NotificationManager manager = (NotificationManager)Platform.AppContext.GetSystemService(Context.NotificationService);
            manager.CreateNotificationChannel(channel);
            channelInitialized = true;
        }
    }

    long GetNotifyTime(DateTime notifyTime)
    {
        DateTime utcTime = TimeZoneInfo.ConvertTimeToUtc(notifyTime);
        double epochDiff = (new DateTime(1970, 1, 1) - DateTime.MinValue).TotalSeconds;
        long utcAlarmTime = utcTime.AddSeconds(-epochDiff).Ticks / 10000;
        return utcAlarmTime; // milliseconds
    }
}
類別NotificationManagerService應該放在您應用程式的 [平臺 Android] > 資料夾中。 或者,您可以根據您自己的檔名和資料夾準則來執行多重目標,而不是使用 [平臺 Android] > 資料夾。 如需詳細資訊,請參閱 設定多重目標。
Android 可讓應用程式定義通知的多個通道。 建 NotificationManagerService 構函式會建立用來傳送通知的基本通道。 方法 SendNotification 會定義建立和傳送通知所需的平臺特定邏輯。 ReceiveNotification收到訊息並叫NotificationReceived用事件處理程式時,Android OS 會呼叫 方法。 如需詳細資訊,請參閱 在 developer.android.com 上建立通知 。
方法 SendNotification 會立即建立本機通知,或直接 DateTime建立 。 您可以使用 類別來排程通知DateTimeAlarmManager,而衍生自 BroadcastReceiver 類別的物件將會收到通知:
[BroadcastReceiver(Enabled = true, Label = "Local Notifications Broadcast Receiver")]
public class AlarmHandler : BroadcastReceiver
{
    public override void OnReceive(Context context, Intent intent)
    {
        if (intent?.Extras != null)
        {
            string title = intent.GetStringExtra(NotificationManagerService.TitleKey);
            string message = intent.GetStringExtra(NotificationManagerService.MessageKey);

            NotificationManagerService manager = NotificationManagerService.Instance ?? new NotificationManagerService();
            manager.Show(title, message);
        }
    }
}
重要
根據預設,使用 AlarmManager 類別排程的通知將不會在裝置重新啟動時存留。 不過,您可以設計應用程式,以在裝置重新啟動時自動重新排程通知。 如需詳細資訊,請參閱在排程重複警示 developer.android.com 中重新啟動裝置時啟動警示。 如需Android上背景處理的相關信息,請參閱 developer.android.com 背景處理 指南。
處理傳入通知
Android 應用程式必須偵測傳入通知,並通知 NotificationManagerService 實例。 達成此目標的其中一種方式是修改 MainActivity 類別。
類別 Activity 上的 MainActivity 屬性應該指定 LaunchMode 的值 LaunchMode.SingleTop:
[Activity(Theme = "@style/Maui.SplashTheme", MainLauncher = true, LaunchMode = LaunchMode.SingleTop, //... )]
public class MainActivity : MauiAppCompatActivity
{
}
模式 SingleTop 可防止在應用程式處於前景時啟動的多個實例 Activity 。 這可能 LaunchMode 不適用於在更複雜的通知案例中啟動多個活動的應用程式。 如需列舉值的詳細資訊 LaunchMode ,請參閱 developer.android.com 上的Android活動LaunchMode 。
類別 MainActivity 也需要修改,才能接收傳入通知:
public class MainActivity : MauiAppCompatActivity
{
    protected override void OnCreate(Bundle? savedInstanceState)
    {
        base.OnCreate(savedInstanceState);

        CreateNotificationFromIntent(Intent);
    }

    protected override void OnNewIntent(Intent? intent)
    {
        base.OnNewIntent(intent);

        CreateNotificationFromIntent(intent);
    }

    static void CreateNotificationFromIntent(Intent intent)
    {
        if (intent?.Extras != null)
        {
            string title = intent.GetStringExtra(LocalNotificationsDemo.Platforms.Android.NotificationManagerService.TitleKey);
            string message = intent.GetStringExtra(LocalNotificationsDemo.Platforms.Android.NotificationManagerService.MessageKey);

            var service = IPlatformApplication.Current.Services.GetService<INotificationManagerService>();
            service.ReceiveNotification(title, message);
        }
    }
}
方法 CreateNotificationFromIntent 會從 自變數擷 intent 取通知數據,並將它 ReceiveNotification 傳遞給類別中的 NotificationManagerService 方法。 從 CreateNotificationFromIntent 方法和 OnNewIntent 方法呼叫 OnCreate 方法:
- 當應用程式由通知數據啟動時,
Intent數據會傳遞至OnCreate方法。 - 如果應用程式已經在前景中,數據
Intent將會傳遞至OnNewIntent方法。
檢查許可權
Android 13 (API 33) 和更新版本需要 POST_NOTIFICATIONS 從應用程式傳送通知的許可權。 此許可權應在您的 AndroidManifest.xml 檔案中宣告:
<uses-permission android:name="android.permission.POST_NOTIFICATIONS" />
如需許可權的詳細資訊 POST_NOTIFICATIONS ,請參閱 developer.android.com 上的通知運行時間許可權 。
您應該實作在執行時間檢查權限宣告的權限類別:
using Android;

namespace LocalNotificationsDemo.Platforms.Android;

public class NotificationPermission : Permissions.BasePlatformPermission
{
    public override (string androidPermission, bool isRuntime)[] RequiredPermissions
    {
        get
        {
            var result = new List<(string androidPermission, bool isRuntime)>();
            if (OperatingSystem.IsAndroidVersionAtLeast(33))
                result.Add((Manifest.Permission.PostNotifications, true));
            return result.ToArray();
        }
    }
}
啟動應用程式之後,您應該先要求使用者授與此許可權,再嘗試傳送本機通知:
PermissionStatus status = await Permissions.RequestAsync<NotificationPermission>();
如需 .NET MAUI 許可權的詳細資訊,請參閱 許可權。
在 iOS 和 Mac Catalyst 上實作本機通知
在 Apple 平臺上,本機通知是一則訊息,可傳達重要資訊給使用者。 系統會根據指定的時間或位置處理通知的傳遞。 如需 Apple 平臺上本機通知的相關信息,請參閱 在 developer.apple.com 上從您的應用程式 本機排程通知。
若要讓 .NET MAUI 應用程式在Apple 平台上傳送和接收通知,應用程式必須提供介面的實作 INotificationManagerService 。
傳送和接收本機通知
在 Apple 平臺上,類別 NotificationManagerService 會實作 INotificationManagerService 介面,並包含傳送和接收本機通知的邏輯:
using Foundation;
using UserNotifications;

namespace LocalNotificationsDemo.Platforms.iOS;

public class NotificationManagerService : INotificationManagerService
{
    int messageId = 0;
    bool hasNotificationsPermission;

    public event EventHandler? NotificationReceived;

    public NotificationManagerService()
    {
        // Create a UNUserNotificationCenterDelegate to handle incoming messages.
        UNUserNotificationCenter.Current.Delegate = new NotificationReceiver();

        // Request permission to use local notifications.
        UNUserNotificationCenter.Current.RequestAuthorization(UNAuthorizationOptions.Alert, (approved, err) =>
        {
            hasNotificationsPermission = approved;
        });
    }

    public void SendNotification(string title, string message, DateTime? notifyTime = null)
    {
        // App doesn't have permissions.
        if (!hasNotificationsPermission)
            return;

        messageId++;
        var content = new UNMutableNotificationContent()
        {
            Title = title,
            Subtitle = "",
            Body = message,
            Badge = 1
        };

        UNNotificationTrigger trigger;
        if (notifyTime != null)
            // Create a calendar-based trigger.
            trigger = UNCalendarNotificationTrigger.CreateTrigger(GetNSDateComponents(notifyTime.Value), false);
        else
            // Create a time-based trigger, interval is in seconds and must be greater than 0.
            trigger = UNTimeIntervalNotificationTrigger.CreateTrigger(0.25, false);

        var request = UNNotificationRequest.FromIdentifier(messageId.ToString(), content, trigger);
        UNUserNotificationCenter.Current.AddNotificationRequest(request, (err) =>
        {
            if (err != null)
                throw new Exception($"Failed to schedule notification: {err}");
        });
    }

    public void ReceiveNotification(string title, string message)
    {
        var args = new NotificationEventArgs()
        {
            Title = title,
            Message = message
        };
        NotificationReceived?.Invoke(null, args);
    }

    NSDateComponents GetNSDateComponents(DateTime dateTime)
    {
        return new NSDateComponents
        {
            Month = dateTime.Month,
            Day = dateTime.Day,
            Year = dateTime.Year,
            Hour = dateTime.Hour,
            Minute = dateTime.Minute,
            Second = dateTime.Second
        };
    }
}
類別 NotificationManagerService 應該放在您應用程式的 [平臺 > ] iOS 或 [平臺 > Mac Catalyst ] 資料夾中。 或者,您可以根據您自己的檔名和資料夾準則來執行多重目標,而不是使用 [平臺] 資料夾。 如需詳細資訊,請參閱 設定多重目標。
在 Apple 平臺上,您必須要求許可權才能使用通知,才能嘗試排程通知。 這會在建構函式中 NotificationManagerService 發生。 如需本機通知許可權的詳細資訊,請參閱 要求許可權以在 developer.apple.com 上使用通知 。
方法SendNotification會定義建立和傳送通知所需的邏輯,並使用 物件建立立即的本機通知,或確切DateTime使用 物件建立本機UNCalendarNotificationTrigger通知UNTimeIntervalNotificationTrigger。 ReceiveNotification收到訊息時,iOS 會呼叫 方法,並叫用NotificationReceived事件處理程式。
處理傳入通知
在 Apple 平臺上,若要處理傳入訊息,您必須建立子類別的 UNUserNotificationCenterDelegate委派:
using UserNotifications;

namespace LocalNotificationsDemo.Platforms.iOS;

public class NotificationReceiver : UNUserNotificationCenterDelegate
{
    // Called if app is in the foreground.
    public override void WillPresentNotification(UNUserNotificationCenter center, UNNotification notification, Action<UNNotificationPresentationOptions> completionHandler)
    {
        ProcessNotification(notification);

        var presentationOptions = (OperatingSystem.IsIOSVersionAtLeast(14))
            ? UNNotificationPresentationOptions.Banner
            : UNNotificationPresentationOptions.Alert;

        completionHandler(presentationOptions);
    }

    // Called if app is in the background, or killed state.
    public override void DidReceiveNotificationResponse(UNUserNotificationCenter center, UNNotificationResponse response, Action completionHandler)
    {
        if (response.IsDefaultAction)
            ProcessNotification(response.Notification);

        completionHandler();
    }

    void ProcessNotification(UNNotification notification)
    {
        string title = notification.Request.Content.Title;
        string message = notification.Request.Content.Body;

        var service = IPlatformApplication.Current?.Services.GetService<INotificationManagerService>();
        service?.ReceiveNotification(title, message);
    }
}
類別會在建NotificationReceiver構函式中NavigationManagerService註冊為UNUserNotificationCenter委派,並將傳入通知數據ReceiveNotification提供給 類別中的 NavigationManagerService 方法。
在 Windows 上實作本機通知
Windows 應用程式 SDK 中的本機通知是應用程式目前不在應用程式內時,應用程式可以傳送給使用者的訊息。 通知內容會顯示在畫面右下角和通知中心的暫時性視窗中。 本機通知可用來通知使用者應用程式狀態,或提示使用者採取動作。
如需 Windows 上本機通知的相關信息,包括已封裝和未封裝應用程式的實作詳細數據,請參閱 應用程式通知概觀。
登錄平台實作
每個 NotificationManagerService 實作都應該向 INotificationManagerService 介面註冊,以便從跨平臺程式代碼呼叫介面公開的作業。 若要達成此目的,請在 類別的方法MauiProgram中CreateMauiApp,向 Services 對象的屬性MauiAppBuilder註冊類型:
#if ANDROID
            builder.Services.AddTransient<INotificationManagerService, LocalNotificationsDemo.Platforms.Android.NotificationManagerService>();
#elif IOS
            builder.Services.AddTransient<INotificationManagerService, LocalNotificationsDemo.Platforms.iOS.NotificationManagerService>();
#elif MACCATALYST
            builder.Services.AddTransient<INotificationManagerService, LocalNotificationsDemo.Platforms.MacCatalyst.NotificationManagerService>();
#elif WINDOWS
            builder.Services.AddTransient<INotificationManagerService, LocalNotificationsDemo.Platforms.Windows.NotificationManagerService>();
#endif
如需 .NET MAUI 中相依性插入的詳細資訊,請參閱 相依性插入。
傳送和接收本機通知
實 INotificationManagerService 作可以透過自動相依性解析,或透過明確相依性解析來解決。 下列範例示範如何使用明確的相依性解析來解析實 INotificationManagerService 作:
INotificationManagerService notificationManager =
    Application.Current?.MainPage?.Handler?.MauiContext?.Services.GetService<INotificationManagerService>();
如需解析已註冊類型的詳細資訊,請參閱 解析。
解析實 INotificationManagerService 作之後,就可以叫用其作業:
// Send
notificationManager.SendNotification();

// Scheduled send
notificationManager.SendNotification("Notification title goes here", "Notification messages goes here.", DateTime.Now.AddSeconds(10));

// Receive
notificationManager.NotificationReceived += (sender, eventArgs) =>
{
    var eventData = (NotificationEventArgs)eventArgs;

    MainThread.BeginInvokeOnMainThread(() =>
    {
        // Take required action in the app once the notification has been received.
    });
};
}
NotificationReceived事件處理程式會將其事件自變數NotificationEventArgs轉換成 ,其會Title定義 和 Message 屬性:
public class NotificationEventArgs : EventArgs
{
    public string Title { get; set; }
    public string Message { get; set; }
}
在 Android 上,當通知傳送時,它會顯示為狀態列中的圖示:

當您向下撥動狀態列時,通知選單隨即開啟:
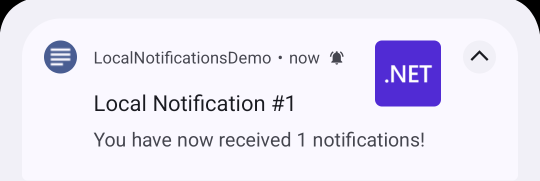
點選通知會啟動應用程式。 在應用程式或使用者關閉通知之前,通知會在通知選單中保持可見。
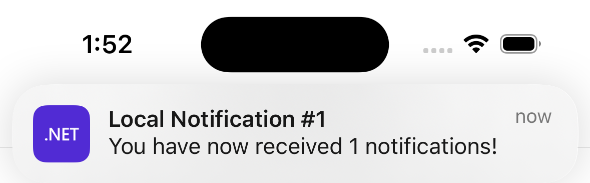
在 iOS 上,應用程式會自動收到傳入通知,而不需要使用者輸入:

意見反應
即將登場:在 2024 年,我們將逐步淘汰 GitHub 問題作為內容的意見反應機制,並將它取代為新的意見反應系統。 如需詳細資訊,請參閱:https://aka.ms/ContentUserFeedback。
提交並檢視相關的意見反應