填滿規則
 流覽範例
流覽範例數個 .NET 多平臺應用程式 UI (.NET MAUI) Shapes 類別具有 FillRule 類型的 FillRule 屬性。 這些包括 Polygon 、 Polyline 和 GeometryGroup 。
列舉 FillRule 會 EvenOdd 定義 和 Nonzero 成員。 每個成員都代表決定某個點是否在圖形填滿區域中的不同規則。
重要
所有圖形都會視為關閉,以填滿規則為目的。
EvenOdd
EvenOdd填滿規則會將光線從點繪製到任何方向的無限大,並計算光線交叉圖形內的線段數目。 如果這個數位是奇數,則點位於 內部。 如果這個數位是偶數,則點位於外部。
下列 XAML 範例會建立並轉譯複合圖形, FillRule 預設值為 EvenOdd :
<Path Stroke="Black"
      Fill="#CCCCFF"
      Aspect="Uniform"
      HorizontalOptions="Start">
    <Path.Data>
        <!-- FillRule doesn't need to be set, because EvenOdd is the default. -->
        <GeometryGroup>
            <EllipseGeometry RadiusX="50"
                             RadiusY="50"
                             Center="75,75" />
            <EllipseGeometry RadiusX="70"
                             RadiusY="70"
                             Center="75,75" />
            <EllipseGeometry RadiusX="100"
                             RadiusY="100"
                             Center="75,75" />
            <EllipseGeometry RadiusX="120"
                             RadiusY="120"
                             Center="75,75" />
        </GeometryGroup>
    </Path.Data>
</Path>
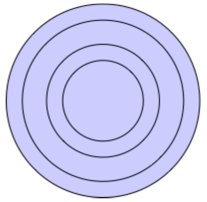
在此範例中,會顯示由一系列同心環形組成的複合圖形:

在複合圖形中,請注意,中央和第三個環形未填滿。 這是因為從這兩個環形中的任何一個點繪製的光線通過偶數段:
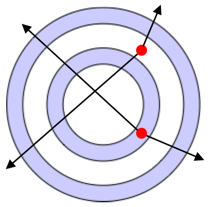
在上圖中,紅色圓形代表點,線條代表任意光線。 對於上點,兩個任意光線會分別通過偶數線段。 因此,不會填入點的環形。 對於下一點,兩個任意光線都會通過奇數的線段。 因此,已填入點的環形。
零
Nonzero填滿規則會將光線從點繪製到任何方向的無限大,然後檢查圖形區段跨越光線的位置。 從零計數開始,每次線段從左至右交叉光線,每次線段從右至左交叉光線時,計數就會遞增,每次線段從右至左交叉光線時遞減。 計算交叉之後,如果結果為零,則點位於多邊形外部。 否則,它是在裡面。
下列 XAML 範例會建立並呈現複合圖形,並將 FillRule 設定為 Nonzero :
<Path Stroke="Black"
      Fill="#CCCCFF"
      Aspect="Uniform"
      HorizontalOptions="Start">
    <Path.Data>
        <GeometryGroup FillRule="Nonzero">
            <EllipseGeometry RadiusX="50"
                             RadiusY="50"
                             Center="75,75" />
            <EllipseGeometry RadiusX="70"
                             RadiusY="70"
                             Center="75,75" />
            <EllipseGeometry RadiusX="100"
                             RadiusY="100"
                             Center="75,75" />
            <EllipseGeometry RadiusX="120"
                             RadiusY="120"
                             Center="75,75" />
        </GeometryGroup>
    </Path.Data>
</Path>
在此範例中,會顯示由一系列同心環形組成的複合圖形:
在複合圖形中,請注意所有環形都會填滿。 這是因為所有線段都以相同的方向執行,因此從任何點繪製的光線會交叉一或多個區段,而交叉的總和不等於零:
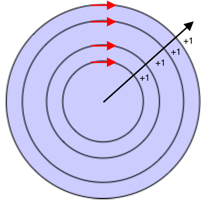
在上方的影像中,紅色箭號代表繪製線段的方向,而黑色箭號代表從最內環中點執行的任意光線。 起始值為零,針對光線交會的每個線段,值會增加 1,因為線段由左至右與光線交會。
需要以不同方向執行的區段更複雜的圖形,才能更清楚地示範填滿規則的行為 Nonzero 。 下列 XAML 範例會建立與上一個範例類似的圖形,不同之處在于它是使用 PathGeometryEllipseGeometry 而不是 建立的:
<Path Stroke="Black"
      Fill="#CCCCFF">
     <Path.Data>
         <GeometryGroup FillRule="Nonzero">
             <PathGeometry>
                 <PathGeometry.Figures>
                     <!-- Inner ring -->
                     <PathFigure StartPoint="120,120">
                         <PathFigure.Segments>
                             <PathSegmentCollection>
                                 <ArcSegment Size="50,50"
                                             IsLargeArc="True"
                                             SweepDirection="CounterClockwise"
                                             Point="140,120" />
                             </PathSegmentCollection>
                         </PathFigure.Segments>
                     </PathFigure>

                     <!-- Second ring -->
                     <PathFigure StartPoint="120,100">
                         <PathFigure.Segments>
                             <PathSegmentCollection>
                                 <ArcSegment Size="70,70"
                                             IsLargeArc="True"
                                             SweepDirection="CounterClockwise"
                                             Point="140,100" />
                             </PathSegmentCollection>
                         </PathFigure.Segments>
                     </PathFigure>

                     <!-- Third ring  -->
                         <PathFigure StartPoint="120,70">
                         <PathFigure.Segments>
                             <PathSegmentCollection>
                                 <ArcSegment Size="100,100"
                                             IsLargeArc="True"
                                             SweepDirection="CounterClockwise"
                                             Point="140,70" />
                             </PathSegmentCollection>
                         </PathFigure.Segments>
                     </PathFigure>

                     <!-- Outer ring -->
                     <PathFigure StartPoint="120,300">
                         <PathFigure.Segments>
                             <ArcSegment Size="130,130"
                                         IsLargeArc="True"
                                         SweepDirection="Clockwise"
                                         Point="140,300" />
                         </PathFigure.Segments>
                     </PathFigure>
                 </PathGeometry.Figures>
             </PathGeometry>
         </GeometryGroup>
     </Path.Data>
 </Path>
在此範例中,會繪製一系列的弧線段,但未關閉:
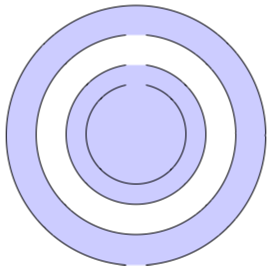
在上圖中,中央的第三個弧線不會填滿。 這是因為在路徑中交叉線段之指定光線中的值總和為零:

在上圖中,紅色圓圈代表一個點、黑色線條代表從非填滿區域中的點移出的任意光線,而紅色箭號代表繪製線段的方向。 如所見,穿越線段的光線值總和為零:
- 以對角線向右移動的任意光線會交叉兩個以不同方向執行的區段。 因此,區段會彼此取消,並提供值為零的值。
- 以對角線向左移動的任意光線總共跨越了六個線段。 不過,交叉點會彼此取消,使零是最終的總和。
零的總和會導致環形未填滿。
意見反應
即將登場:在 2024 年,我們將逐步淘汰 GitHub 問題作為內容的意見反應機制,並將它取代為新的意見反應系統。 如需詳細資訊,請參閱:https://aka.ms/ContentUserFeedback。
提交並檢視相關的意見反應