自我追蹤實體逐步解說
重要
我們不再建議使用自我追蹤實體範本。 繼續提供該範本只是為了支援現有應用程式。 如果您的應用程式需要使用已中斷連線的實體圖形,請考慮使用 Trackable Entities (可追蹤的實體) 之類的其他替代項目,這是一項類似於自我追蹤實體的技術,可由社群更積極地進行開發或使用低層級變更追蹤 API 來撰寫自訂程式碼。
本逐步解說示範 Windows Communication Foundation (WCF) 服務公開傳回實體圖形之作業的案例。 接下來,用戶端應用程式會操作該圖形,並將修改提交至服務作業,該作業會使用 Entity Framework 來驗證和儲存資料庫的更新。
完成本逐步解說之前,請確定您已閱讀 自我追蹤實體 頁面。
這個逐步解說會完成下列動作:
- 建立要存取的資料庫。
- 建立包含模型的類別庫。
- 交換至自我追蹤實體產生器範本。
- 將實體類別移至個別的專案。
- 建立 WCF 服務,以公開作業來查詢和儲存實體。
- 建立取用服務的用戶端應用程式 (主控台和 WPF)。
在本逐步解說中,我們將使用 Database First,但相同的技術同樣適用于 Model First。
必要條件
若要完成本逐步解說,您將需要最新版本的 Visual Studio。
建立資料庫
隨 Visual Studio 一起安裝的資料庫伺服器會根據您安裝的 Visual Studio 版本而有所不同:
- 如果您使用 Visual Studio 2012,您將建立 LocalDB 資料庫。
- 如果您使用 Visual Studio 2010,您將建立 SQL Express 資料庫。
讓我們繼續產生資料庫。
- 開啟 Visual Studio
- 檢視 - > 伺服器總管
- 以滑鼠右鍵按一下 [資料連線 - > 新增連線...
- 如果您尚未從 [伺服器總管] 連線到資料庫,則必須先選取 [Microsoft SQL Server ] 作為資料來源
- 連線至 LocalDB 或 SQL Express,視您已安裝的專案而定
- 輸入 STESample 作為資料庫名稱
- 選取 [ 確定 ],系統會詢問您是否要建立新的資料庫,選取 [ 是]
- 新的資料庫現在會出現在 [伺服器總管] 中
- 如果您使用 Visual Studio 2012
- 以滑鼠右鍵按一下 [伺服器總管] 中的資料庫,然後選取 [ 新增查詢]
- 將下列 SQL 複製到新的查詢,然後以滑鼠右鍵按一下查詢,然後選取 [ 執行]
- 如果您使用 Visual Studio 2010
- 選取 資料 - > Transact SQL 編輯器 - > 新的查詢連線...
- 輸入 .\SQLEXPRESS 作為伺服器名稱,然後按一下 [ 確定]
- 從查詢編輯器頂端的下拉式清單中選取 STESample 資料庫
- 將下列 SQL 複製到新的查詢,然後在查詢上按一下滑鼠右鍵,然後選取 [ 執行 SQL]
    CREATE TABLE [dbo].[Blogs] (
        [BlogId] INT IDENTITY (1, 1) NOT NULL,
        [Name] NVARCHAR (200) NULL,
        [Url]  NVARCHAR (200) NULL,
        CONSTRAINT [PK_dbo.Blogs] PRIMARY KEY CLUSTERED ([BlogId] ASC)
    );

    CREATE TABLE [dbo].[Posts] (
        [PostId] INT IDENTITY (1, 1) NOT NULL,
        [Title] NVARCHAR (200) NULL,
        [Content] NTEXT NULL,
        [BlogId] INT NOT NULL,
        CONSTRAINT [PK_dbo.Posts] PRIMARY KEY CLUSTERED ([PostId] ASC),
        CONSTRAINT [FK_dbo.Posts_dbo.Blogs_BlogId] FOREIGN KEY ([BlogId]) REFERENCES [dbo].[Blogs] ([BlogId]) ON DELETE CASCADE
    );

    SET IDENTITY_INSERT [dbo].[Blogs] ON
    INSERT INTO [dbo].[Blogs] ([BlogId], [Name], [Url]) VALUES (1, N'ADO.NET Blog', N'blogs.msdn.com/adonet')
    SET IDENTITY_INSERT [dbo].[Blogs] OFF
    INSERT INTO [dbo].[Posts] ([Title], [Content], [BlogId]) VALUES (N'Intro to EF', N'Interesting stuff...', 1)
    INSERT INTO [dbo].[Posts] ([Title], [Content], [BlogId]) VALUES (N'What is New', N'More interesting stuff...', 1)
建立模型
首先,我們需要一個專案來放置模型。
- 檔案 - > 新增 - > 專案...
- 從左窗格中選取 [Visual C# ],然後 選取 [類別庫]
- 輸入 STESample 作為名稱,然後按一下 [ 確定]
現在,我們將在 EF Designer 中建立簡單的模型,以存取我們的資料庫:
- 專案 - > 新增專案...
- 從左窗格中選取 [資料 ],然後 ADO.NET [實體資料模型]
- 輸入 BloggingModel 作為名稱,然後按一下 [ 確定]
- 選取 [從資料庫 產生],然後按 [ 下一步]
- 輸入您在上一節中建立之資料庫的連線資訊
- 輸入 BloggingCoNtext 作為連接字串的名稱,然後按 [下一步]
- 核取 [資料表 ] 旁的 方塊,然後按一下 [ 完成]
交換至 STE 程式碼產生
現在我們需要停用預設程式碼產生,並交換至自我追蹤實體。
如果您使用 Visual Studio 2012
- 展開 方案總管 中的 BloggingModel.edmx ,並刪除 BloggingModel.tt 和 BloggingModel.CoNtext.tt 這會停用預設程式碼產生
- 以滑鼠右鍵按一下 EF Designer 介面上的空白區域,然後選取 [ 新增程式碼產生專案...
- 從左窗格中選取 [線上 ],然後搜尋 STE 產生器
- 選取 C# 範本的 STE 產生器,輸入 STETemplate 作為名稱,然後按一下 [ 新增]
- STETemplate.tt 和 STETemplate.CoNtext.tt 檔案會以巢狀方式新增到 BloggingModel.edmx 檔案底下
如果您使用 Visual Studio 2010
- 以滑鼠右鍵按一下 EF Designer 介面上的空白區域,然後選取 [ 新增程式碼產生專案...
- 從左窗格中選取 [ 程式碼 ],然後 ADO.NET 自我追蹤實體產生器
- 輸入 STETemplate 作為名稱,然後按一下 [ 新增]
- STETemplate.tt 和 STETemplate.CoNtext.tt 檔案會直接新增至您的專案
將實體類型移至個別專案
若要使用自我追蹤實體,用戶端應用程式需要存取從模型產生的實體類別。 因為我們不想將整個模型公開給用戶端應用程式,所以我們要將實體類別移至個別的專案。
第一個步驟是停止在現有專案中產生實體類別:
- 以滑鼠右鍵按一下 方案總管 中的 STETemplate.tt ,然後選取 [ 屬性]
- 在 [ 屬性] 視窗中,從 CustomTool 屬性清除 TextTemplatingFileGenerator
- 展開 方案總管中的 STETemplate.tt ,並刪除其下巢狀的所有檔案
接下來,我們將新增專案,並在其中產生實體類別
檔案 - > 新增 - > 專案...
從左窗格中選取 [Visual C# ],然後 選取 [類別庫]
輸入 STESample.Entities 作為名稱,然後按一下 [ 確定]
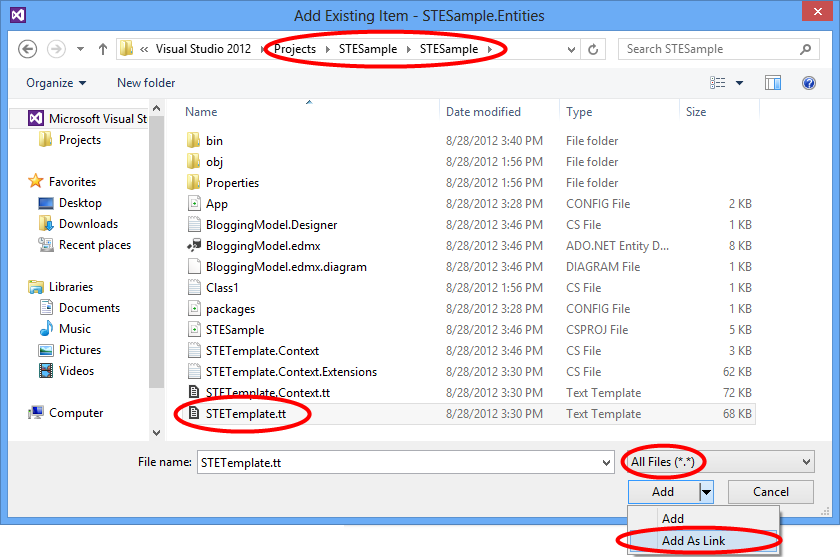
專案 - > 新增現有的專案...
流覽至 STESample 專案資料夾
選取即可檢視 [所有檔案] (*.*)
選取 STETemplate.tt 檔案
按一下 [新增 ] 按鈕旁的 下拉式箭號,然後選取 [ 新增為連結]
我們也將確定實體類別會在與內容相同的命名空間中產生。 這只會減少我們需要在整個應用程式中新增的 using 語句數目。
- 以滑鼠右鍵按一下方案總管中 連結 的 STETemplate.tt ,然後選取 [ 屬性]
- 在 [ 屬性] 視窗中,將 [自訂工具命名空間 ] 設定 為 STESample
STE 範本所產生的程式碼將需要 System.Runtime.Serialization 的 參考,才能編譯。 WCF DataContract 和 DataMember 屬性需要此程式庫,這些屬性用於可序列化的實體類型。
- 以滑鼠右鍵按一下 方案總管 中的 STESample.Entities 專案,然後選取 [ 新增參考...
- 在 Visual Studio 2012 - 核取 System.Runtime.Serialization 旁 的方塊,然後按一下 [ 確定]
- 在 Visual Studio 2010 - 選取 [System.Runtime.Serialization] ,然後按一下 [ 確定]
最後,具有我們內容的專案將需要實體類型的參考。
- 以滑鼠右鍵按一下 方案總管 中的 STESample 專案,然後選取 [ 新增參考...
- 在 Visual Studio 2012 - 從左窗格中選取 [解決方案 ],核取 STESample.Entities 旁 的方塊,然後按一下 [ 確定]
- 在 Visual Studio 2010 - 選取 [ 專案 ] 索引標籤,選取 [STESample.Entities ],然後按一下 [ 確定]
注意
將實體類型移至個別專案的另一個選項是移動範本檔案,而不是從預設位置連結它。 如果您這樣做,您必須更新 範本中的 inputFile 變數,以提供 edmx 檔案的相對路徑(在此範例中為 。。\BloggingModel.edmx )。
建立 WCF 服務
現在是時候新增 WCF 服務來公開我們的資料,我們將從建立專案開始。
- 檔案 - > 新增 - > 專案...
- 從左窗格中選取 [Visual C# ],然後 選取 [WCF 服務應用程式]
- 輸入 STESample.Service 作為名稱,然後按一下 [ 確定]
- 新增 System.Data.Entity 元件的參考
- 新增 STESample 和 STESample.Entities 專案的參考
我們需要將 EF 連接字串複製到此專案,以便在執行時間找到它。
- 開啟 **STESample ** 專案的 App.Config 檔案,並複製 connectionStrings 元素
- 將 connectionStrings 專案貼上為 STESample.Service 專案中 Web.Config 檔案 組態 專案的子專案
現在是時候實作實際服務了。
- 開啟 IService1.cs ,並以下列程式碼取代內容
    using System.Collections.Generic;
    using System.ServiceModel;

    namespace STESample.Service
    {
        [ServiceContract]
        public interface IService1
        {
            [OperationContract]
            List<Blog> GetBlogs();

            [OperationContract]
            void UpdateBlog(Blog blog);
        }
    }
- 開啟 Service1.svc ,並以下列程式碼取代內容
    using System;
    using System.Collections.Generic;
    using System.Data;
    using System.Linq;

    namespace STESample.Service
    {
        public class Service1 : IService1
        {
            /// <summary>
            /// Gets all the Blogs and related Posts.
            /// </summary>
            public List<Blog> GetBlogs()
            {
                using (BloggingContext context = new BloggingContext())
                {
                    return context.Blogs.Include("Posts").ToList();
                }
            }

            /// <summary>
            /// Updates Blog and its related Posts.
            /// </summary>
            public void UpdateBlog(Blog blog)
            {
                using (BloggingContext context = new BloggingContext())
                {
                    try
                    {
                        // TODO: Perform validation on the updated order before applying the changes.

                        // The ApplyChanges method examines the change tracking information
                        // contained in the graph of self-tracking entities to infer the set of operations
                        // that need to be performed to reflect the changes in the database.
                        context.Blogs.ApplyChanges(blog);
                        context.SaveChanges();

                    }
                    catch (UpdateException)
                    {
                        // To avoid propagating exception messages that contain sensitive data to the client tier
                        // calls to ApplyChanges and SaveChanges should be wrapped in exception handling code.
                        throw new InvalidOperationException("Failed to update. Try your request again.");
                    }
                }
            }
        }
    }
從主控台應用程式取用服務
讓我們建立使用我們的服務的主控台應用程式。
- 檔案 - > 新增 - > 專案...
- 從左窗格中選取 [Visual C# ],然後 選取 [主控台應用程式]
- 輸入 STESample.ConsoleTest 作為名稱,然後按一下 [ 確定]
- 新增 STESample.Entities 專案的參考
我們需要 WCF 服務的服務參考
- 以滑鼠右鍵按一下 方案總管 中的 STESample.ConsoleTest 專案,然後選取 [ 新增服務參考...]。
- 按一下 [ 探索]
- 輸入 BloggingService 作為命名空間,然後按一下 [ 確定]
現在我們可以撰寫一些程式碼來取用服務。
- 開啟 Program.cs ,並以下列程式碼取代內容。
    using STESample.ConsoleTest.BloggingService;
    using System;
    using System.Linq;

    namespace STESample.ConsoleTest
    {
        class Program
        {
            static void Main(string[] args)
            {
                // Print out the data before we change anything
                Console.WriteLine("Initial Data:");
                DisplayBlogsAndPosts();

                // Add a new Blog and some Posts
                AddBlogAndPost();
                Console.WriteLine("After Adding:");
                DisplayBlogsAndPosts();

                // Modify the Blog and one of its Posts
                UpdateBlogAndPost();
                Console.WriteLine("After Update:");
                DisplayBlogsAndPosts();

                // Delete the Blog and its Posts
                DeleteBlogAndPost();
                Console.WriteLine("After Delete:");
                DisplayBlogsAndPosts();

                Console.WriteLine("Press any key to exit...");
                Console.ReadKey();
            }

            static void DisplayBlogsAndPosts()
            {
                using (var service = new Service1Client())
                {
                    // Get all Blogs (and Posts) from the service
                    // and print them to the console
                    var blogs = service.GetBlogs();
                    foreach (var blog in blogs)
                    {
                        Console.WriteLine(blog.Name);
                        foreach (var post in blog.Posts)
                        {
                            Console.WriteLine(" - {0}", post.Title);
                        }
                    }
                }

                Console.WriteLine();
                Console.WriteLine();
            }

            static void AddBlogAndPost()
            {
                using (var service = new Service1Client())
                {
                    // Create a new Blog with a couple of Posts
                    var newBlog = new Blog
                    {
                        Name = "The New Blog",
                        Posts =
                        {
                            new Post { Title = "Welcome to the new blog"},
                            new Post { Title = "What's new on the new blog"}
                        }
                    };

                    // Save the changes using the service
                    service.UpdateBlog(newBlog);
                }
            }

            static void UpdateBlogAndPost()
            {
                using (var service = new Service1Client())
                {
                    // Get all the Blogs
                    var blogs = service.GetBlogs();

                    // Use LINQ to Objects to find The New Blog
                    var blog = blogs.First(b => b.Name == "The New Blog");

                    // Update the Blogs name
                    blog.Name = "The Not-So-New Blog";

                    // Update one of the related posts
                    blog.Posts.First().Content = "Some interesting content...";

                    // Save the changes using the service
                    service.UpdateBlog(blog);
                }
            }

            static void DeleteBlogAndPost()
            {
                using (var service = new Service1Client())
                {
                    // Get all the Blogs
                    var blogs = service.GetBlogs();

                    // Use LINQ to Objects to find The Not-So-New Blog
                    var blog = blogs.First(b => b.Name == "The Not-So-New Blog");

                    // Mark all related Posts for deletion
                    // We need to call ToList because each Post will be removed from the
                    // Posts collection when we call MarkAsDeleted
                    foreach (var post in blog.Posts.ToList())
                    {
                        post.MarkAsDeleted();
                    }

                    // Mark the Blog for deletion
                    blog.MarkAsDeleted();

                    // Save the changes using the service
                    service.UpdateBlog(blog);
                }
            }
        }
    }
您現在可以執行應用程式來查看運作狀況。
- 以滑鼠右鍵按一下 方案總管 中的 STESample.ConsoleTest 專案,然後選取 [偵錯 - > 啟動新實例]
當應用程式執行時,您會看到下列輸出。
Initial Data:
ADO.NET Blog
- Intro to EF
- What is New

After Adding:
ADO.NET Blog
- Intro to EF
- What is New
The New Blog
- Welcome to the new blog
- What's new on the new blog

After Update:
ADO.NET Blog
- Intro to EF
- What is New
The Not-So-New Blog
- Welcome to the new blog
- What's new on the new blog

After Delete:
ADO.NET Blog
- Intro to EF
- What is New

Press any key to exit...
從 WPF 應用程式取用服務
讓我們建立使用我們的服務的 WPF 應用程式。
- 檔案 - > 新增 - > 專案...
- 從左窗格中選取 [Visual C# ],然後 選取 [WPF 應用程式]
- 輸入 STESample.WPFTest 作為名稱,然後按一下 [ 確定]
- 新增 STESample.Entities 專案的參考
我們需要 WCF 服務的服務參考
- 以滑鼠右鍵按一下 方案總管 中的 STESample.WPFTest 專案,然後選取 [ 新增服務參考...]。
- 按一下 [ 探索]
- 輸入 BloggingService 作為命名空間,然後按一下 [ 確定]
現在我們可以撰寫一些程式碼來取用服務。
- 開啟 MainWindow.xaml ,並以下列程式碼取代內容。
    <Window
        xmlns="http://schemas.microsoft.com/winfx/2006/xaml/presentation"
        xmlns:x="http://schemas.microsoft.com/winfx/2006/xaml"
        xmlns:d="http://schemas.microsoft.com/expression/blend/2008"
        xmlns:mc="http://schemas.openxmlformats.org/markup-compatibility/2006"
        xmlns:STESample="clr-namespace:STESample;assembly=STESample.Entities"
        mc:Ignorable="d" x:Class="STESample.WPFTest.MainWindow"
        Title="MainWindow" Height="350" Width="525" Loaded="Window_Loaded">

        <Window.Resources>
            <CollectionViewSource
                x:Key="blogViewSource"
                d:DesignSource="{d:DesignInstance {x:Type STESample:Blog}, CreateList=True}"/>
            <CollectionViewSource
                x:Key="blogPostsViewSource"
                Source="{Binding Posts, Source={StaticResource blogViewSource}}"/>
        </Window.Resources>

        <Grid DataContext="{StaticResource blogViewSource}">
            <DataGrid AutoGenerateColumns="False" EnableRowVirtualization="True"
                      ItemsSource="{Binding}" Margin="10,10,10,179">
                <DataGrid.Columns>
                    <DataGridTextColumn Binding="{Binding BlogId}" Header="Id" Width="Auto" IsReadOnly="True" />
                    <DataGridTextColumn Binding="{Binding Name}" Header="Name" Width="Auto"/>
                    <DataGridTextColumn Binding="{Binding Url}" Header="Url" Width="Auto"/>
                </DataGrid.Columns>
            </DataGrid>
            <DataGrid AutoGenerateColumns="False" EnableRowVirtualization="True"
                      ItemsSource="{Binding Source={StaticResource blogPostsViewSource}}" Margin="10,145,10,38">
                <DataGrid.Columns>
                    <DataGridTextColumn Binding="{Binding PostId}" Header="Id" Width="Auto"  IsReadOnly="True"/>
                    <DataGridTextColumn Binding="{Binding Title}" Header="Title" Width="Auto"/>
                    <DataGridTextColumn Binding="{Binding Content}" Header="Content" Width="Auto"/>
                </DataGrid.Columns>
            </DataGrid>
            <Button Width="68" Height="23" HorizontalAlignment="Right" VerticalAlignment="Bottom"
                    Margin="0,0,10,10" Click="buttonSave_Click">Save</Button>
        </Grid>
    </Window>
- 開啟 MainWindow 的程式碼後置 ( MainWindow.xaml.cs ),並以下列程式碼取代內容
    using STESample.WPFTest.BloggingService;
    using System.Collections.Generic;
    using System.Linq;
    using System.Windows;
    using System.Windows.Data;

    namespace STESample.WPFTest
    {
        public partial class MainWindow : Window
        {
            public MainWindow()
            {
                InitializeComponent();
            }

            private void Window_Loaded(object sender, RoutedEventArgs e)
            {
                using (var service = new Service1Client())
                {
                    // Find the view source for Blogs and populate it with all Blogs (and related Posts)
                    // from the Service. The default editing functionality of WPF will allow the objects
                    // to be manipulated on the screen.
                    var blogsViewSource = (CollectionViewSource)this.FindResource("blogViewSource");
                    blogsViewSource.Source = service.GetBlogs().ToList();
                }
            }

            private void buttonSave_Click(object sender, RoutedEventArgs e)
            {
                using (var service = new Service1Client())
                {
                    // Get the blogs that are bound to the screen
                    var blogsViewSource = (CollectionViewSource)this.FindResource("blogViewSource");
                    var blogs = (List<Blog>)blogsViewSource.Source;

                    // Save all Blogs and related Posts
                    foreach (var blog in blogs)
                    {
                        service.UpdateBlog(blog);
                    }

                    // Re-query for data to get database-generated keys etc.
                    blogsViewSource.Source = service.GetBlogs().ToList();
                }
            }
        }
    }
您現在可以執行應用程式來查看運作狀況。
- 以滑鼠右鍵按一下 方案總管 中的 STESample.WPFTest 專案,然後選取 [ 偵錯 - > 啟動新實例]
- 您可以使用畫面運算元據,並使用 [儲存] 按鈕透過服務 儲存資料
