適用於:白色圓圈內有灰色 X 符號  Workforce 租使用者
  外部租使用者(深入瞭解)
本教學課程是系列的最後一部分,示範如何建立 .NET 多平臺應用程式 UI (.NET MAUI) 殼層應用程式,並準備使用 Microsoft Entra 系統管理中心進行驗證。 在此系列的 第 2 部分,您已新增自定義 Microsoft 驗證程式庫(MSAL)用戶端輔助程式,以初始化 MSAL SDK,安裝必要的程式庫,並包含影像資源。 最後一步展示如何在 .NET MAUI 中新增登入和登出程式碼,並在 Android 平台上運行 shell 應用程式。
在本教學課程中,您會:
- 新增登入和登出程序代碼。
- 修改應用程式介面。
- 新增平臺特定程序代碼。
- 新增應用程式設定。
- 執行及測試 .NET MAUI Shell 應用程式。
先決條件
新增登入和登出程序代碼
.NET MAUI 應用程式的使用者介面 (UI) 是由對應至每個目標平臺之原生控件的物件所建構。 用來建立 .NET MAUI 應用程式 UI 的主要控件群組是頁面、版面配置和檢視。
新增主檢視頁面
後續步驟會組織我們的程序代碼,以便定義 main view。
從您的專案刪除 MainPage.xaml 和 MainPage.xaml.cs,不再需要這些專案。 在 [方案總管] 窗格中,尋找 MainPage.xaml項目,按一下右鍵,然後選取 [刪除]。
以滑鼠右鍵按下 SignInMaui 專案,然後選取 新增>新資料夾。 將資料夾命名為 Views。
以滑鼠右鍵點擊 檢視。
選取 (新增>新項目...)。
選取範本清單中的 .NET MAUI。
選取 .NET MAUI ContentPage (XAML) 範本。 將檔案命名 MainView.xaml。
選取 ,然後新增。
MainView.xaml 檔案將在新的文件標籤頁中開啟,顯示代表頁面 UI 的所有 XAML 標記。 以下列標記取代 XAML 標記:
<?xml version="1.0" encoding="utf-8" ?>
<ContentPage xmlns="http://schemas.microsoft.com/dotnet/2021/maui"
             xmlns:x="http://schemas.microsoft.com/winfx/2009/xaml"
             x:Class="SignInMaui.Views.MainView"
             Title="Microsoft Entra External ID"
             >
    <Shell.BackButtonBehavior>
        <BackButtonBehavior IsVisible="False" IsEnabled="False" />
    </Shell.BackButtonBehavior>

    <ScrollView>
        <VerticalStackLayout
            Spacing="25"
            Padding="30,0"
            VerticalOptions="Center">

            <Image
                Source="external_id.png"
                SemanticProperties.Description="External ID"
                HeightRequest="200"
                HorizontalOptions="Center" />

            <Label
                Text="CIAM"
                SemanticProperties.HeadingLevel="Level1"
                FontSize="26"
                HorizontalOptions="Center" />

            <Label
                Text="MAUI sample"
                SemanticProperties.HeadingLevel="Level1"
                FontSize="26"
                HorizontalOptions="Center" />

            <Button
                x:Name="SignInButton"
                Text="Sign In"
                SemanticProperties.Hint="Sign In"
                Clicked="OnSignInClicked"
                HorizontalOptions="Center"
                IsEnabled="False"/>

        </VerticalStackLayout>
    </ScrollView>

</ContentPage>
儲存檔案。
讓我們細分放在頁面上之 XAML 控制件的主要部分:
-
<ContentPage>是MainView類別的根物件。 -
<VerticalStackLayout>是 ContentPage 的子物件。 此版面配置控件會垂直排列其子項,依序一個接一個。 -
<Image>會顯示一個影像,在這種情況下,它使用您稍早下載的 azure active_directory.png_。 -
<Label>控制顯示文字。 - 使用者可以按下
<Button>,這會引發Clicked事件。 您可以執行程式代碼來回應Clicked事件。 -
Clicked="OnSignInClicked"按鈕的Clicked事件會指派給程式代碼後置檔案中定義的OnSignInClicked事件處理程式。 您將在下一個步驟中建立此程序代碼。
-
處理 OnSignInClicked 事件
下一個步驟是新增按鈕 Clicked 事件的程序代碼。
在 Visual Studio 的 [方案總管] 窗格中,展開 MainView.xaml 檔案,以顯示其程式代碼後置檔案 MainView.xaml.cs。 開啟 MainView.xaml.cs,並以下列程式代碼取代檔案的內容:
// Copyright (c) Microsoft Corporation. All rights reserved. // Licensed under the MIT License. using SignInMaui.MSALClient; using Microsoft.Identity.Client; namespace SignInMaui.Views { public partial class MainView : ContentPage { public MainView() { InitializeComponent(); IAccount cachedUserAccount = PublicClientSingleton.Instance.MSALClientHelper.FetchSignedInUserFromCache().Result; _ = Dispatcher.DispatchAsync(async () => { if (cachedUserAccount == null) { SignInButton.IsEnabled = true; } else { await Shell.Current.GoToAsync("claimsview"); } }); } private async void OnSignInClicked(object sender, EventArgs e) { await PublicClientSingleton.Instance.AcquireTokenSilentAsync(); await Shell.Current.GoToAsync("claimsview"); } protected override bool OnBackButtonPressed() { return true; } } }MainView類別是負責顯示應用程式主要檢視的內容頁面。 在建構函式中,它會使用來自MSALClientHelper實例的PublicClientSingleton擷取快取用戶帳戶,並在找不到任何快取的使用者帳戶時啟用登入按鈕。按兩下 [登入] 按鈕時,它會呼叫
AcquireTokenSilentAsync方法來以無訊息方式取得令牌,並使用claimsview方法巡覽至 [Shell.Current.GoToAsync] 頁面。 此外,會覆寫OnBackButtonPressed方法以傳回 true,表示在此檢視中已停用返回鍵。
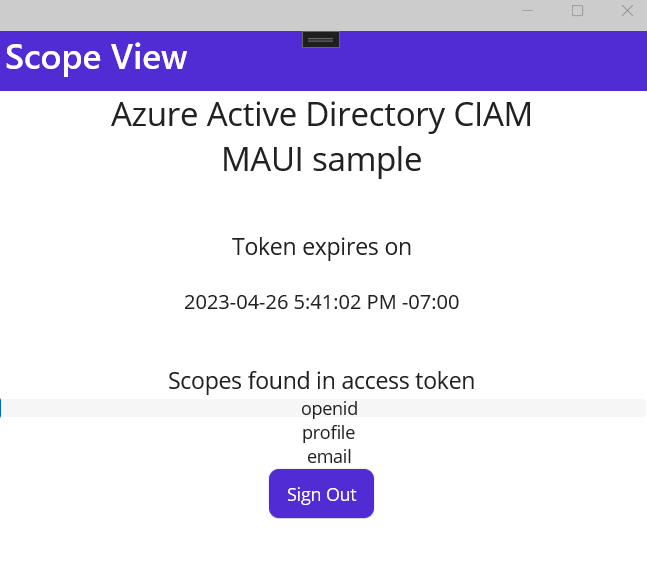
新增索賠檢視頁面
後續步驟會組織程序代碼,以便定義 ClaimsView 頁面。 此頁面會顯示在 ID token 中找到的使用者權利聲明。
在 Visual Studio 的 [方案總管] 窗格中,右鍵點擊 [檢視]。
選取 (新增>新項目...)。
選取範本清單中的 .NET MAUI。
選取 .NET MAUI ContentPage (XAML) 範本。 將檔案命名 ClaimsView.xaml。
選取 ,然後新增。
ClaimsView.xaml 檔案將會在新的文件索引標籤中開啟,顯示代表頁面 UI 的所有 XAML 標記語言。 以下列標記取代 XAML 標記:
<?xml version="1.0" encoding="utf-8" ?>
<ContentPage xmlns="http://schemas.microsoft.com/dotnet/2021/maui"
             xmlns:x="http://schemas.microsoft.com/winfx/2009/xaml"
             x:Class="SignInMaui.Views.ClaimsView"
             Title="ID Token View">
    <Shell.BackButtonBehavior>
        <BackButtonBehavior IsVisible="False" IsEnabled="False" />
    </Shell.BackButtonBehavior>
    <VerticalStackLayout>
        <Label
            Text="CIAM"
            FontSize="26"
            HorizontalOptions="Center" />
        <Label
            Text="MAUI sample"
            FontSize="26"
            Padding="0,0,0,20"
            HorizontalOptions="Center" />

        <Label
            Padding="0,20,0,0"
            VerticalOptions="Center"
            HorizontalOptions="Center"
            FontSize="18"
            Text="Claims found in ID token"
            />
        <ListView ItemsSource="{Binding IdTokenClaims}"
                  x:Name="Claims">
            <ListView.ItemTemplate>
                <DataTemplate>
                    <ViewCell>
                        <Grid Padding="0, 0, 0, 0">
                            <Label Grid.Column="1"
                                   Text="{Binding}"
                                   HorizontalOptions="Center" />
                        </Grid>
                    </ViewCell>
                </DataTemplate>
            </ListView.ItemTemplate>
        </ListView>
        <Button
            x:Name="SignOutButton"
            Text="Sign Out"
            HorizontalOptions="Center"
            Clicked="SignOutButton_Clicked" />
    </VerticalStackLayout>
</ContentPage>
此 XAML 標記程式代碼代表 .NET MAUI 應用程式中宣告檢視的 UI 配置。 一開始先以標題定義
ContentPage,並停用返回按鈕的功能。在
VerticalStackLayout內有數個Label元素顯示靜態文字,之後是一個名為ListView的Claims,其綁定到一個稱為IdTokenClaims的集合,以顯示身份標識符令牌中找到的宣告。 每個聲明都會在ViewCell內使用DataTemplate轉譯,並在網格中顯示為置中的Label。最後,配置底部有一個
Sign Out按鈕,會在按兩下時觸發SignOutButton_Clicked事件處理程式。
處理 ClaimsView 數據
下一個步驟是新增程式代碼來處理 ClaimsView 數據。
在 Visual Studio 的 [方案總管] 窗格中,展開 ClaimsView.xaml 檔案,以顯示其程式代碼後置檔案 ClaimsView.xaml.cs。 開啟 ClaimsView.xaml.cs,並以下列程式代碼取代檔案的內容:
using SignInMaui.MSALClient;
using Microsoft.Identity.Client;

namespace SignInMaui.Views;

public partial class ClaimsView : ContentPage
{
    public IEnumerable<string> IdTokenClaims { get; set; } = new string[] {"No claims found in ID token"};
    public ClaimsView()
    {
        BindingContext = this;
        InitializeComponent();

        _ = SetViewDataAsync();
    }

    private async Task SetViewDataAsync()
    {
        try
        {
            _ = await PublicClientSingleton.Instance.AcquireTokenSilentAsync();

            IdTokenClaims = PublicClientSingleton.Instance.MSALClientHelper.AuthResult.ClaimsPrincipal.Claims.Select(c => c.Value);

            Claims.ItemsSource = IdTokenClaims;
        }

        catch (MsalUiRequiredException)
        {
            await Shell.Current.GoToAsync("claimsview");
        }
    }

    protected override bool OnBackButtonPressed() { return true; }

    private async void SignOutButton_Clicked(object sender, EventArgs e)
    {
        await PublicClientSingleton.Instance.SignOutAsync().ContinueWith((t) =>
        {
            return Task.CompletedTask;
        });

        await Shell.Current.GoToAsync("mainview");
    }
}
ClaimsView.xaml.cs 程式代碼代表 .NET MAUI 應用程式中申請視圖的後置代碼。 它會從匯入必要的命名空間和定義
ClaimsView類別開始,其會擴充ContentPage。IdTokenClaims屬性是可被列舉的字串集合,最初設為一個字串,表示未找到任何索賠。ClaimsView建構函式會將系結內容設定為目前的實例、初始化檢視元件,並以異步方式呼叫SetViewDataAsync方法。SetViewDataAsync方法會嘗試以靜默方式取得令牌,並從驗證結果擷取權限資訊,然後設定IdTokenClaims屬性,以便在名為ListView的Claims中顯示這些資訊。 如果發生MsalUiRequiredException,代表需要用戶進行驗證互動,應用程式會導向至認證檢視畫面。OnBackButtonPressed方法會覆寫返回按鈕行為,使其一律傳回 true,從而防止使用者返回這個檢視。SignOutButton_Clicked事件處理程式會使用PublicClientSingleton實體將使用者登出,並在完成時導航至main view。
修改應用程式殼層
AppShell 類別會定義應用程式的視覺階層、用來建立應用程式 UI 的 XAML 標記。 更新 AppShell,讓它了解有關 Views的詳細資訊。
按兩下 [
AppShell.xaml窗格中的 檔案,以開啟 XAML 編輯器。 使用以下程式碼替換 XAML 標記:<?xml version="1.0" encoding="UTF-8" ?> <Shell x:Class="SignInMaui.AppShell" xmlns="http://schemas.microsoft.com/dotnet/2021/maui" xmlns:x="http://schemas.microsoft.com/winfx/2009/xaml" xmlns:local="clr-namespace:SignInMaui.Views" Shell.FlyoutBehavior="Disabled"> <ShellContent Title="Home" ContentTemplate="{DataTemplate local:MainView}" Route="MainPage" /> </Shell>XAML 程式碼定義了一個
AppShell類別,它會停用飛出視窗行為,並將主要內容設定為一個ShellContent元素,該元素具有標題Home和指向MainView類別的內容範本。在 Visual Studio 的 [方案總管] 窗格中,展開 AppShell.xaml 檔案,以顯示其程式代碼後置檔案 AppShell.xaml.cs。 開啟 AppShell.xaml.cs,並以下列程式代碼取代檔案的內容:
// Copyright (c) Microsoft Corporation. All rights reserved.
// Licensed under the MIT License.
using SignInMaui.Views;

namespace SignInMaui;

public partial class AppShell : Shell
{
    public AppShell()
    {
        InitializeComponent();
        Routing.RegisterRoute("mainview", typeof(MainView));
        Routing.RegisterRoute("claimsview", typeof(ClaimsView));
    }
}
您可以更新
AppShell.xaml.cs檔案,以包含MainView和ClaimsView的必要路由註冊。 藉由呼叫InitializeComponent()方法,可確保AppShell類別的初始化。RegisterRoute()方法會將mainview和claimsview路由與其各自的檢視類型、MainView和ClaimsView產生關聯。
新增平臺特定程序代碼
.NET MAUI 應用程式專案包含 [平臺] 資料夾,每個子資料夾都代表 .NET MAUI 可以鎖定的平臺。 若要提供 Android 應用程式特定行為來補充預設應用程式類別,請遵循下列步驟:
按兩下 [
Platforms/Android/AndroidManifest.xml窗格中的 檔案,以開啟 XML 編輯器。 更新下列屬性:- 將 應用程式名稱 設定為 MAUI CIAM。
- 將 套件名稱 設定為 SignInMaui.Droid。
- 將 最低 Android 版本 設定為 Android 5.0 (API 層級 21)。
按兩下 [
Platforms/Android/MainActivity.cs窗格中的 檔案,以開啟 csharp 編輯器。 使用下列程式代碼取代檔案的內容:// Copyright (c) Microsoft Corporation. All rights reserved. // Licensed under the MIT License. using Android.App; using Android.Content; using Android.Content.PM; using Android.OS; using SignInMaui.MSALClient; using Microsoft.Identity.Client; namespace SignInMaui; [Activity(Theme = "@style/Maui.SplashTheme", MainLauncher = true, ConfigurationChanges = ConfigChanges.ScreenSize | ConfigChanges.Orientation | ConfigChanges.UiMode | ConfigChanges.ScreenLayout | ConfigChanges.SmallestScreenSize | ConfigChanges.Density)] public class MainActivity : MauiAppCompatActivity { protected override void OnCreate(Bundle savedInstanceState) { base.OnCreate(savedInstanceState); // configure platform specific params PlatformConfig.Instance.RedirectUri = $"msal{PublicClientSingleton.Instance.MSALClientHelper.AzureAdConfig.ClientId}://auth"; PlatformConfig.Instance.ParentWindow = this; // Initialize MSAL and platformConfig is set _ = Task.Run(async () => await PublicClientSingleton.Instance.MSALClientHelper.InitializePublicClientAppAsync()).Result; } protected override void OnActivityResult(int requestCode, Result resultCode, Intent data) { base.OnActivityResult(requestCode, resultCode, data); AuthenticationContinuationHelper.SetAuthenticationContinuationEventArgs(requestCode, resultCode, data); } }讓我們細分您已新增之程序代碼的主要部分:
- 頂端會包含必要的
using語句。 - 定義
MainActivity類別,繼承自MauiAppCompatActivity,這是 .NET MAUI 中 Android 平臺的基類。 - [Activity] 屬性會套用至
MainActivity類別,並指定 Android 活動的各種設定。-
Theme = "@style/Maui.SplashTheme"設定活動的顯示畫面主題。 -
MainLauncher = true將此活動指定為應用程式的主要進入點。 -
ConfigurationChanges會指定活動可以處理的組態變更,例如 螢幕大小、方向、UI 模式、螢幕配置、最小螢幕大小,以及 密度。
-
- 系統會覆寫
OnCreate方法,以在建立活動時提供自定義邏輯。-
base.OnCreate(savedInstanceState)呼叫 方法的基底實作。 -
PlatformConfig.Instance.RedirectUri會根據PublicClientSingleton.Instance.MSALClientHelper.AzureAdConfig.ClientId設定為動態產生的值。 它會設定 MSAL 用戶端的重新導向 URI。 -
PlatformConfig.Instance.ParentWindow設定為目前的活動實例,指定驗證相關作業的父視窗。 -
PublicClientSingleton.Instance.MSALClientHelper.InitializePublicClientAppAsync()使用名為MSALClientHelper的單一實例中的輔助方法,以異步方式初始化 MSAL 用戶端應用程式。Task.Run可用來在背景線程上執行初始化,而.Result用來同步等候工作完成。
-
-
OnActivityResult方法被覆寫以處理由當前活動啟動的活動的結果。-
base.OnActivityResult(requestCode, resultCode, data)呼叫 方法的基底實作。 -
AuthenticationContinuationHelper.SetAuthenticationContinuationEventArgs(requestCode, resultCode, data)會根據收到的要求碼、結果碼和意圖數據,設定驗證接續事件自變數。 這可用來在外部活動傳回結果之後繼續驗證流程。
-
- 頂端會包含必要的
在 Visual Studio 的 [方案總管] 窗格中,選取 [[平臺]。
以滑鼠右鍵點擊 Android 資料夾,>新增>項目...。
選取 C# 項目>類別。 將檔案命名為
MsalActivity.cs。使用下列程式代碼取代
MsalActivity.cs檔案的內容:// Copyright (c) Microsoft Corporation. All rights reserved. // Licensed under the MIT License. using System; using System.Collections.Generic; using System.Linq; using System.Text; using Android.App; using Android.Content; using Android.OS; using Android.Runtime; using Android.Views; using Android.Widget; using Microsoft.Identity.Client; namespace MauiAppBasic.Platforms.Android.Resources { [Activity(Exported =true)] [IntentFilter(new[] { Intent.ActionView }, Categories = new[] { Intent.CategoryBrowsable, Intent.CategoryDefault }, DataHost = "auth", DataScheme = "msalEnter_the_Application_Id_Here")] public class MsalActivity : BrowserTabActivity { } }讓我們細分您已新增之程序代碼的主要部分:
-
MsalActivity類別是在MauiAppBasic.Platforms.Android.Resources命名空間內宣告的。 類別繼承自BrowserTabActivity類別,指出其擴充功能。 - 類別是以
[Activity(Exported = true)]屬性裝飾,表示活動已導出,而且可由其他方法存取。 - 意圖篩選條件是使用 “[IntentFilter(...)]” 屬性來指定。 它會配置活動以攔截
ActionView意圖。 - 意圖篩選條件設定為使用指定的
ActionView(DataScheme)和msalEnter_the_Application_Id_Here來處理DataHost意圖(“auth”)。 此設定允許活動透過攔截和處理ActionView意圖來執行驗證過程。 將稍早註冊的應用程式之Enter_the_Application_Id_Here替換為 。
-
新增應用程式設定
設定允許區隔設定應用程式與程式代碼行為的數據,允許變更行為而不重建應用程式。
MauiAppBuilder 提供 ConfigurationManager 來設定 .NET MAUI 應用程式中的設定。 讓我們將 appsettings.json 檔案新增為 EmbeddedResource。
若要建立 appsettings.json,請遵循下列步驟:
在 Visual Studio 的 方案總管 窗格中,以滑鼠右鍵單擊 SignInMaui 專案,然後選擇 >新增>項目...。
選取 Web>JavaScript JSON 組態檔。 將檔案命名為
appsettings.json。選取 ,然後新增。
選取 appsettings.json
在 [屬性] 窗格中,將 [建置動作] 設定為 [內嵌資源]。
在 [屬性] 窗格中,將 [複製到輸出目錄] 設定為 [一律複製]。
使用下列程式代碼取代
appsettings.json檔案的內容:{ "AzureAd": { "Authority": "https://Enter_the_Tenant_Subdomain_Here.ciamlogin.com/", "ClientId": "Enter_the_Application_Id_Here", "CacheFileName": "msal_cache.txt", "CacheDir": "C:/temp" }, "DownstreamApi": { "Scopes": "openid offline_access" } }在
appsettings.json中,尋找佔位符:-
Enter_the_Tenant_Subdomain_Here,並將它取代為 Directory (tenant) 子域。 例如,如果您的承租者主要網域為contoso.onmicrosoft.com,請使用contoso。 如果您沒有租戶名稱,請了解如何 查看您租戶的詳細資料。 -
Enter_the_Application_Id_Here,並將其替換為您稍早註冊之應用程式的應用程式(用戶端)ID。
-
使用自訂網址 (選擇性)
使用自訂網域來全面打造驗證 URL 的品牌形象。 從用戶的觀點來看,用戶在驗證過程中會留在您的網域上,而非重新導向至 ciamlogin.com 網域名稱。
請遵循下列步驟來使用自訂網域:
使用在 「為外部租使用者中的應用程式啟用自訂 URL 網域」中描述的步驟,然後在 中為您的外部租使用者啟用自訂 URL 網域。
開啟 appsettings.json 檔案:
- 將
Authority屬性的值更新為 https://Enter_the_Custom_Domain_Here/Enter_the_Tenant_ID_Here。 將Enter_the_Custom_Domain_Here替換成您的自定義 URL 網域,並將Enter_the_Tenant_ID_Here替換為您的租使用者標識碼。 如果您沒有租使用者標識碼,請瞭解如何 閱讀租使用者詳細數據。 - 新增
knownAuthorities屬性,使用值 [Enter_the_Custom_Domain_Here]。
- 將
對 appsettings.json 檔案進行變更之後,如果您的自定義 URL 網域是 login.contoso.com,且您的租戶識別碼是 aaaabbbb-0000-cccc-1111-dddd2222eeee,則您的檔案應該如下列代碼片段所示:
{
  "AzureAd": {
    "Authority": "https://login.contoso.com/aaaabbbb-0000-cccc-1111-dddd2222eeee",
    "ClientId": "Enter_the_Application_Id_Here",
    "CacheFileName": "msal_cache.txt",
    "CacheDir": "C:/temp",
    "KnownAuthorities": ["login.contoso.com"]
  },
  "DownstreamApi": {
    "Scopes": "openid offline_access"
  }
}
執行及測試 .NET MAUI 行動應用程式
.NET MAUI 應用程式的設計目的是在多個作系統和裝置上執行。 您必須選取您要用來測試和偵錯應用程式的目標。
將 Visual Studio 工具列中的 偵錯目標設定為您想要偵錯及測試的裝置。 下列步驟示範如何將 偵錯目標 設定為 Android:
- 選取 [偵錯目標] 下拉式清單。
- 選擇 Android 模擬器。
- 選取模擬器裝置。
按下 F5,或選取 Visual Studio 頂端的 執行按鈕來運行應用程式。
您現在可以測試範例 .NET MAUI Android 應用程式。 執行應用程式之後,Android 應用程式視窗會出現在模擬器中:
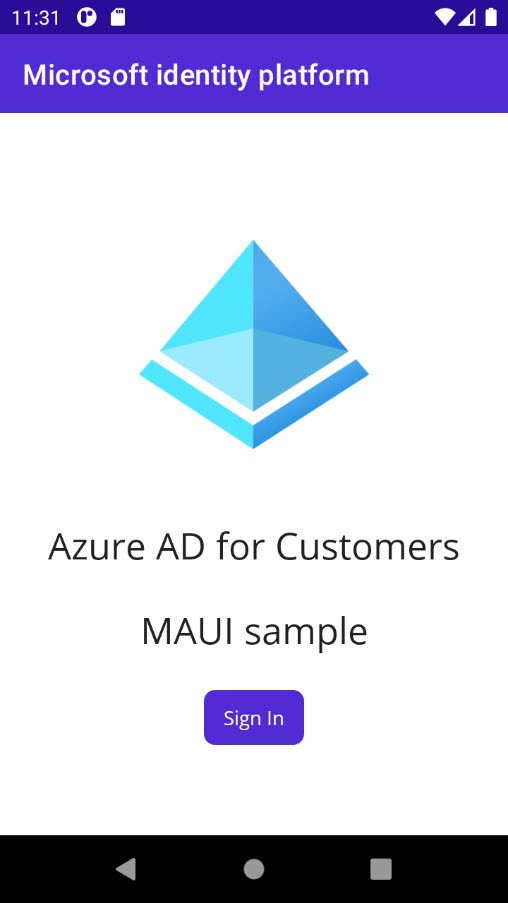
在出現的 Android 視窗中,選取 登入 按鈕。 瀏覽器視窗隨即開啟,系統會提示您登入。
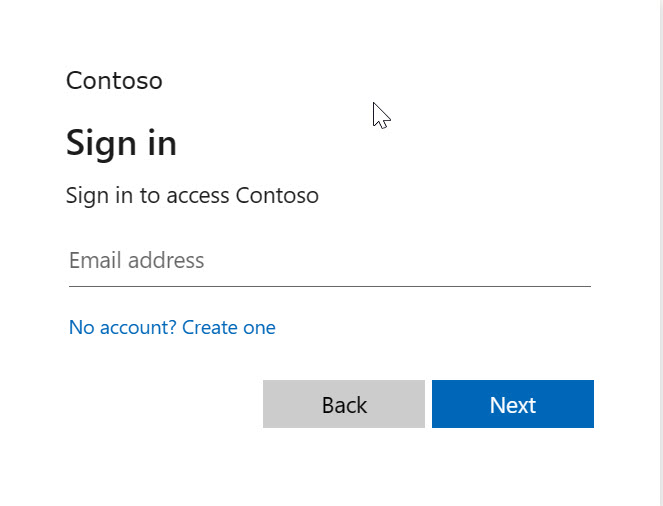
在登入過程中,系統會提示您授與各種許可權(允許應用程式存取您的數據)。 成功登入並同意後,應用程式畫面會顯示主頁面。