在 Azure Functions 中建立權杖發行開始事件的 REST API
本文說明如何在 Azure 入口網站中使用 Azure Functions 建立具有權杖發行開始事件的 REST API。 您可以建立 Azure Function 應用程式和 HTTP 觸發程序函數以傳回權杖的額外宣告。
必要條件
- 對自訂驗證延伸模組概觀中所涵蓋的概念有基本了解。
- 能夠建立 Azure Functions 的 Azure 訂用帳戶。 如果您沒有現有的 Azure 帳戶,請註冊免費試用帳戶,或是在建立帳戶時使用 Visual Studio 訂用帳戶權益。
- Microsoft Entra ID 租用戶。 您可以使用客戶或員工租用戶來進行本操作指南。
本文說明如何使用 Microsoft.Azure.WebJobs.Extensions.AuthenticationEvents NuGet 程式庫來建立權杖發行開始事件的 REST API,並進行設定以供驗證。 您將在 Visual Studio 或 Visual Studio Code 中建立 HTTP 觸發程序函數、進行設定以供驗證,並將其部署至 Azure 入口網站,以便透過 Azure Functions 存取。
必要條件
- 對自訂驗證延伸模組概觀中所涵蓋的概念有基本了解。
- 能夠建立 Azure Functions 的 Azure 訂用帳戶。 如果您沒有現有的 Azure 帳戶,請註冊免費試用帳戶,或是在建立帳戶時使用 Visual Studio 訂用帳戶權益。
- Microsoft Entra ID 租用戶。 您可以使用客戶或員工租用戶來進行本操作指南。
- 下列其中一項 IDE 和設定:
- 已設定 Visual Studio 的 Azure 開發工作負載的 Visual Studio。
- 已啟用 Azure Functions 延伸模組的 Visual Studio Code。
注意
Microsoft.Azure.WebJobs.Extensions.AuthenticationEvents NuGet 程式庫目前為預覽。 本文中的步驟可能會變更。 針對實作權杖發行開始事件的正式發行實作,您可以使用 Azure 入口網站進行。
建立 Azure 函數應用程式
在 Azure 入口網站中,請先建立 Azure 函數應用程式和其相關聯的資源,再繼續建立 HTTP 觸發程序函數。
至少要以應用程式系統管理員和驗證系統管理員的身分登入 Azure 入口網站。
從 Azure 入口網站功能表或 [首頁] 頁面,選取 [建立資源]。
搜尋並選取 [函數應用程式],然後選取 [建立]。
在 [建立函式應用程式] 頁面上,選取 [取用],然後選取 [選取]。
在 [ 建立函式應用程式 (取用)] 頁面上的 [基本] 索引標籤中,使用下表中指定的設定來建立函式應用程式:
設定 建議的值 描述 訂用帳戶 您的訂用帳戶 建立新函數應用程式的訂用帳戶。 資源群組 myResourceGroup 選取現有的資源群組,或要建立函數應用程式的新資源群組名稱。 函數應用程式名稱 全域唯一的名稱 識別新函數應用程式的名稱。 有效的字元是 a-z(不區分大小寫)、0-9和-。部署程式碼或容器映像 代碼 發佈程式碼檔案或 Docker 容器的選項。 在本教學課程中,請選取 [程式碼]。 執行階段堆疊 .NET 您慣用的程式設計語言。 在本教學課程中,請選取 [.NET]。 版本 8 (LTS) 進程內 .NET 執行階段的版本。 同處理序表示您可以在入口網站中建立和修改函式,這是本指南建議的作法 區域 慣用區域 選取的區域應靠近您或靠近函式能夠存取的其他服務。 作業系統 Windows 系統會根據您的執行階段堆疊選項預先選取作業系統。 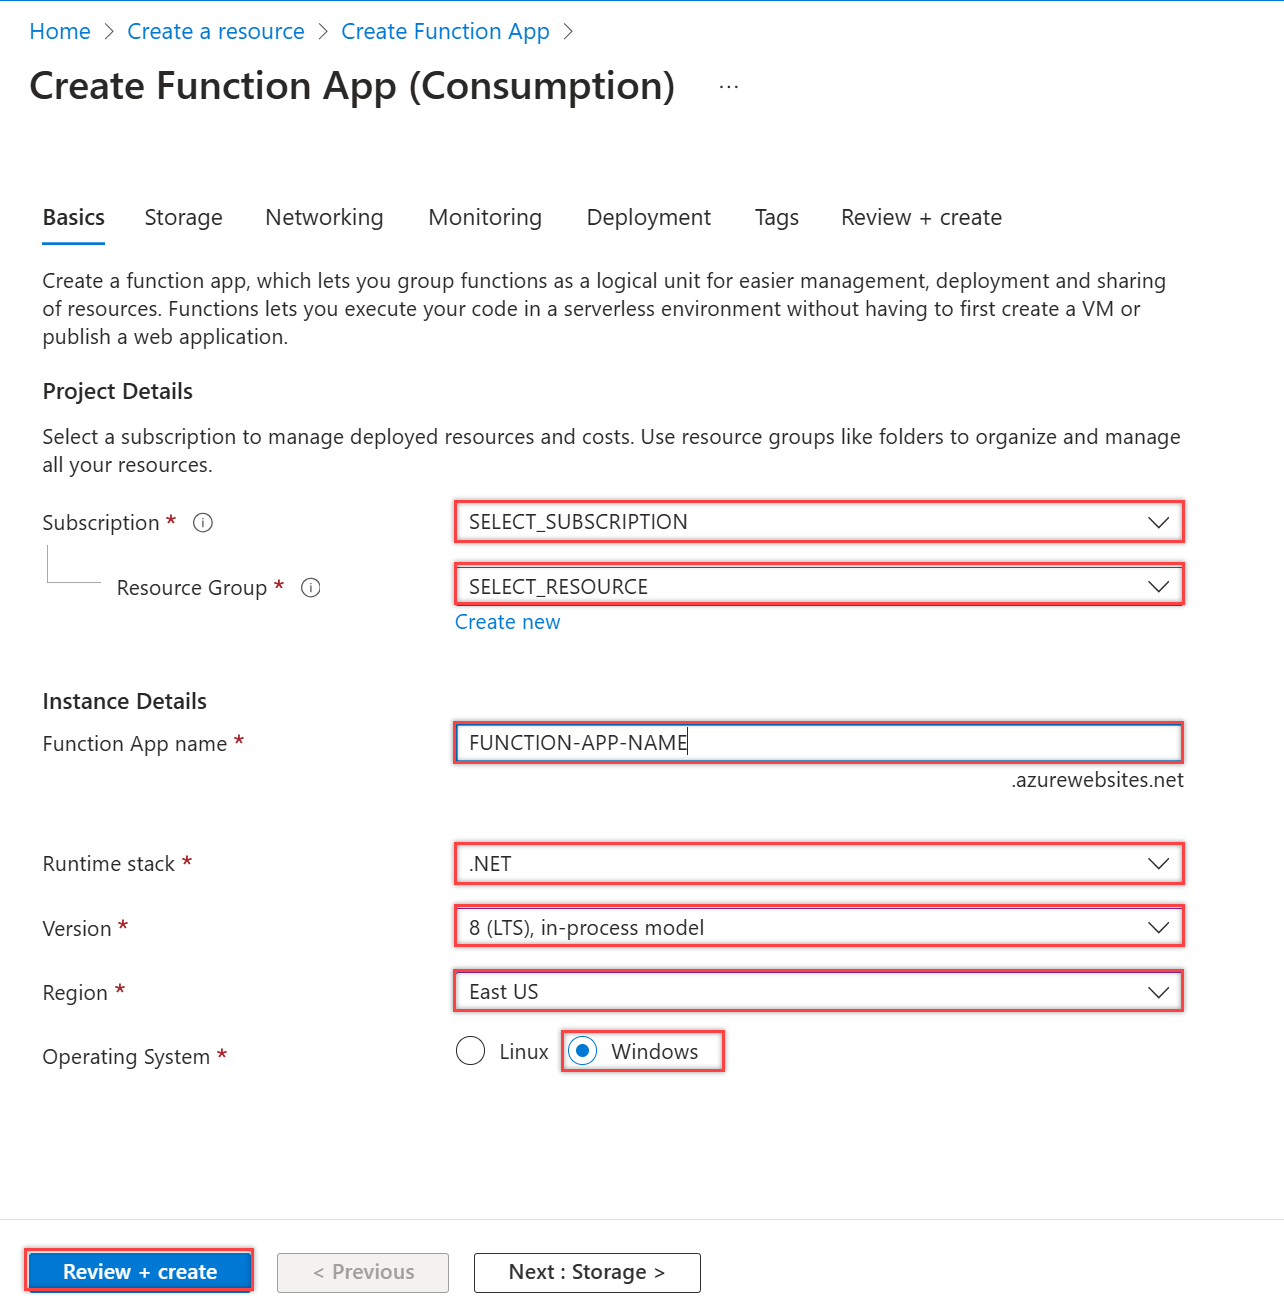
選取 [檢閱 + 建立],以檢閱應用程式組態選項,然後選取 [建立]。 部署需要幾分鐘的時間。
部署後,請選取 [前往資源] 以檢視新的函式應用程式。

建立 HTTP 觸發程序函式
建立 Azure 函數應用程式後,請在應用程式內建立 HTTP 觸發程序函數。 HTTP 觸發程序可讓您使用 HTTP 要求叫用函數,並由您的 Microsoft Entra 自訂驗證延伸模組參考。
- 在函式應用程式的 [概觀] 頁面中,選取 [函式] 窗格,然後選取 [在 Azure 入口網站中建立] 底下的 [建立函式]。
- 在 [ 建立函式 ] 視窗中,選取 HTTP 觸發程式 函式類型,然後選取 [ 下一步]。
- 在 [範本詳細數據] 底下,輸入 CustomAuthenticationExtensionsAPI 作為函式名稱函式屬性,然後選取 [函式] 作為 [授權層級]。
- 選取 建立。
編輯函式
程式碼會讀取傳入的 JSON 物件,Microsoft Entra ID 會將 JSON 物件傳送至您的 API。 本範例中會讀取相互關連識別碼值。 然後,程式代碼會傳回自訂宣告的集合,包括原始的 CorrelationId、Azure 函式的 ApiVersion,以及傳回至 Microsoft Entra ID 的 DateOfBirth 和 CustomRoles。
在功能表中,選取 [開發人員] 下的 [程式碼 + 測試]。
以下列程式碼片段取代整段程式碼,然後選取 [儲存]。
#r "Newtonsoft.Json"
using System.Net;
using Microsoft.AspNetCore.Mvc;
using Microsoft.Extensions.Primitives;
using Newtonsoft.Json;
public static async Task<IActionResult> Run(HttpRequest req, ILogger log)
{
    log.LogInformation("C# HTTP trigger function processed a request.");
    string requestBody = await new StreamReader(req.Body).ReadToEndAsync();
    dynamic data = JsonConvert.DeserializeObject(requestBody);

    // Read the correlation ID from the Microsoft Entra request
    string correlationId = data?.data.authenticationContext.correlationId;

    // Claims to return to Microsoft Entra
    ResponseContent r = new ResponseContent();
    r.data.actions[0].claims.CorrelationId = correlationId;
    r.data.actions[0].claims.ApiVersion = "1.0.0";
    r.data.actions[0].claims.DateOfBirth = "01/01/2000";
    r.data.actions[0].claims.CustomRoles.Add("Writer");
    r.data.actions[0].claims.CustomRoles.Add("Editor");
    return new OkObjectResult(r);
}
public class ResponseContent{
    [JsonProperty("data")]
    public Data data { get; set; }
    public ResponseContent()
    {
        data = new Data();
    }
}
public class Data{
    [JsonProperty("@odata.type")]
    public string odatatype { get; set; }
    public List<Action> actions { get; set; }
    public Data()
    {
        odatatype = "microsoft.graph.onTokenIssuanceStartResponseData";
        actions = new List<Action>();
        actions.Add(new Action());
    }
}
public class Action{
    [JsonProperty("@odata.type")]
    public string odatatype { get; set; }
    public Claims claims { get; set; }
    public Action()
    {
        odatatype = "microsoft.graph.tokenIssuanceStart.provideClaimsForToken";
        claims = new Claims();
    }
}
public class Claims{
    [JsonProperty(NullValueHandling = NullValueHandling.Ignore)]
    public string CorrelationId { get; set; }
    [JsonProperty(NullValueHandling = NullValueHandling.Ignore)]
    public string DateOfBirth { get; set; }
    public string ApiVersion { get; set; }
    public List<string> CustomRoles { get; set; }
    public Claims()
    {
        CustomRoles = new List<string>();
    }
}
從頂端功能表中選取 [取得函式 URL],並複製 URL 值。 在設定自訂驗證延伸模組時,可以使用此函數 URL。
建立和建置 Azure 函數應用程式
在此步驟中,您會使用 IDE 建立 HTTP 觸發程序函數 API、安裝必要 Nuget 套件並複製到範例程式碼中。 您將建置專案並執行函數以擷取本機函數 URL。
建立應用程式
若要建立 Azure 函數應用程式,請依照下列步驟:
- 開啟 Visual Studio,然後選取 [建立新專案]。
- 搜尋並選取 [Azure Functions] 並選取 [下一步]。
- 命名專案,例如 AuthEventsTrigger。 建議解決方案名稱與專案名稱相符。
- 選取專案的 [位置] 。 選取 [下一步]。
- 選取 .NET 8.0 (長期支持) 作為目標架構。
- 選取 [HTTP 觸發程序] 作為 [函數] 類型,且 [授權層級] 設定為 [函數]。 選取 建立。
- 在 [方案總管] 中,將 Function1.cs 重新命名為 AuthEventsTrigger.cs,並接受重新命名變更建議。
安裝 NuGet 套件並建置專案
建立專案後,您必須安裝必要的 NuGet 套件並建置專案。
- 在 Visual Studio 的頂端功能表中,選取 [專案] 並選取 [管理 NuGet 套件]。
- 選取 [瀏覽] 索引標籤,然後搜尋並選取右側窗格中的 Microsoft.Azure.WebJobs.Extensions.AuthenticationEvents。 選取 [安裝]。
- 在顯示的快顯功能表中套用並接受變更。
新增範例程式碼
函數 API 是權杖的額外宣告來源。 基於本文章的目的,我們將硬式編碼範例應用程式的值。 在實際執行環境中,您可以從外部資料存放區擷取使用者的相關資訊。 如需現有屬性,請參閱 WebJobsAuthenticationEventsContext 類別。
在 AuthEventsTrigger.cs 檔案中,將檔案的整個內容取代為下列程式碼:
using System;
using Microsoft.Azure.WebJobs;
using Microsoft.Extensions.Logging;
using Microsoft.Azure.WebJobs.Extensions.AuthenticationEvents.TokenIssuanceStart;
using Microsoft.Azure.WebJobs.Extensions.AuthenticationEvents;

namespace AuthEventsTrigger
{
    public static class AuthEventsTrigger
    {
        [FunctionName("onTokenIssuanceStart")]
        public static WebJobsAuthenticationEventResponse Run(
            [WebJobsAuthenticationEventsTrigger] WebJobsTokenIssuanceStartRequest request, ILogger log)
        {
            try
            {
                // Checks if the request is successful and did the token validation pass
                if (request.RequestStatus == WebJobsAuthenticationEventsRequestStatusType.Successful)
                {
                    // Fetches information about the user from external data store
                    // Add new claims to the token's response
                    request.Response.Actions.Add(
                        new WebJobsProvideClaimsForToken(
                            new WebJobsAuthenticationEventsTokenClaim("dateOfBirth", "01/01/2000"),
                            new WebJobsAuthenticationEventsTokenClaim("customRoles", "Writer", "Editor"),
                            new WebJobsAuthenticationEventsTokenClaim("apiVersion", "1.0.0"),
                            new WebJobsAuthenticationEventsTokenClaim(
                                "correlationId",
                                request.Data.AuthenticationContext.CorrelationId.ToString())));
                }
                else
                {
                    // If the request fails, such as in token validation, output the failed request status,
                    // such as in token validation or response validation.
                    log.LogInformation(request.StatusMessage);
                }
                return request.Completed();
            }
            catch (Exception ex)
            {
                return request.Failed(ex);
            }
        }
    }
}
在本機建置並執行專案
已建立專案並新增範例程式碼。 使用 IDE 時,我們必須在本機建置並執行專案以擷取本機函數 URL。
- 瀏覽至頂端功能錶中的 [建置],並選取 [建置解決方案]。
- 按下 F5 或從上端功能表選取 [AuthEventsTrigger],以執行函數。
- 從執行函數快顯得終端複製函數 URL。 在設定自訂驗證延伸模組時,可以使用此函數 URL。
在本機執行函數 (建議)
建議先在本機測試函數,再將其部署至 Azure。 我們可以使用虛擬 JSON 主體以模擬 Microsoft Entra ID 傳送至 REST API 的要求。 使用您慣用的 API 測試工具以直接呼叫函數。
在 IDE 中,開啟 local.settings.json 並將程式碼取代為下列 JSON。 基於本機測試目的,我們可以將
"AuthenticationEvents__BypassTokenValidation"設定為true。{ "IsEncrypted": false, "Values": { "AzureWebJobsStorage": "", "AzureWebJobsSecretStorageType": "files", "FUNCTIONS_WORKER_RUNTIME": "dotnet", "AuthenticationEvents__BypassTokenValidation" : true } }使用慣用的 API 測試工具,建立新的 HTTP 要求並將 [HTTP 方法] 設定為
POST。使用下列 JSON 主體以模擬 Microsoft Entra ID 傳送至 REST API 的要求。
{
    "type": "microsoft.graph.authenticationEvent.tokenIssuanceStart",
    "source": "/tenants/aaaabbbb-0000-cccc-1111-dddd2222eeee/applications/00001111-aaaa-2222-bbbb-3333cccc4444",
    "data": {
        "@odata.type": "microsoft.graph.onTokenIssuanceStartCalloutData",
        "tenantId": "aaaabbbb-0000-cccc-1111-dddd2222eeee",
        "authenticationEventListenerId": "11112222-bbbb-3333-cccc-4444dddd5555",
        "customAuthenticationExtensionId": "22223333-cccc-4444-dddd-5555eeee6666",
        "authenticationContext": {
            "correlationId": "aaaa0000-bb11-2222-33cc-444444dddddd",
            "client": {
                "ip": "127.0.0.1",
                "locale": "en-us",
                "market": "en-us"
            },
            "protocol": "OAUTH2.0",
            "clientServicePrincipal": {
                "id": "aaaaaaaa-0000-1111-2222-bbbbbbbbbbbb",
                "appId": "00001111-aaaa-2222-bbbb-3333cccc4444",
                "appDisplayName": "My Test application",
                "displayName": "My Test application"
            },
            "resourceServicePrincipal": {
                "id": "aaaaaaaa-0000-1111-2222-bbbbbbbbbbbb",
                "appId": "00001111-aaaa-2222-bbbb-3333cccc4444",
                "appDisplayName": "My Test application",
                "displayName": "My Test application"
            },
            "user": {
                "companyName": "Casey Jensen",
                "createdDateTime": "2023-08-16T00:00:00Z",
                "displayName": "Casey Jensen",
                "givenName": "Casey",
                "id": "00aa00aa-bb11-cc22-dd33-44ee44ee44ee",
                "mail": "casey@contoso.com",
                "onPremisesSamAccountName": "Casey Jensen",
                "onPremisesSecurityIdentifier": "<Enter Security Identifier>",
                "onPremisesUserPrincipalName": "Casey Jensen",
                "preferredLanguage": "en-us",
                "surname": "Jensen",
                "userPrincipalName": "casey@contoso.com",
                "userType": "Member"
            }
        }
    }
}
選取 [傳送],您應該會收到類似於下列內容的 JSON 回應:
{
    "data": {
        "@odata.type": "microsoft.graph.onTokenIssuanceStartResponseData",
        "actions": [
            {
                "@odata.type": "microsoft.graph.tokenIssuanceStart.provideClaimsForToken",
                "claims": {
                    "customClaim1": "customClaimValue1",
                    "customClaim2": [
                        "customClaimString1",
                        "customClaimString2"
                    ]
                }
            }

        ]
    }
}
將函數部署並發佈至 Azure
函數必須使用 IDE 部署至 Azure。 確認您已正確登入您的 Azure 帳戶,以便發佈函數。
在 [方案總管] 中,以滑鼠右鍵按一下專案並選取 [發佈]。
在 [目標] 中,選取 [Azure],然後選取 [下一步]。
針對 [特定目標],選取 [Azure 函數應用程式 (Windows)],然後選取 [Azure 函數應用程式 (Windows)],然後選取 [下一步]。
在 [函數執行個體] 中,使用 [訂用帳戶名稱] 下拉式清單以選取建立新函數應用程式的訂用帳戶。
選取要發佈新函數應用程式的位置,並選取 [新建]。
在 [函數應用程式 (Windows)] 頁面上,使用函數應用程式設定 (如下表所指定),然後選取 [建立]。
設定 建議的值 名描述 名稱 全域唯一的名稱 識別新函數應用程式的名稱。 有效的字元是 a-z(不區分大小寫)、0-9和-。訂用帳戶 您的訂用帳戶 將建立新函式應用程式的訂用帳戶。 資源群組 myResourceGroup 選取現有的資源群組,或要建立函數應用程式的新資源群組名稱。 方案類型 使用量 (無伺服器) 定義如何將資源配置給函式應用程式的主控方案。 地點 慣用區域 選取的區域應靠近您或靠近函式能夠存取的其他服務。 Azure 儲存體 您的儲存體帳戶 函數執行階段所需的 Azure 儲存體帳戶。 選取 [新增] 以設定一般用途的儲存體帳戶。 Application Insights Default Azure 監視器功能。 這會自動選取,選取您要使用的功能或設定新功能。 請等候片刻以部署您的函數應用程式。 視窗關閉後,選取 [完成]。
新的 [發佈] 窗格隨即開啟。 在頂端,選取 [發佈]。 請等候幾分鐘的時間以部署您的函數應用程式並顯示在 Azure 入口網站中 。
設定 Azure 函數的驗證
設定 Azure 函數驗證有三個方法:
- 使用環境變數在 Azure 入口網站中設定驗證 (建議)
- 使用
WebJobsAuthenticationEventsTriggerAttribute在程式碼中設定驗證 - Azure App 服務驗證與授權
依預設,已使用環境變數在 Azure 入口網站中設定程式碼以供驗證。 使用下方索引標籤以選取慣用的實作環境變數方法,或者請參閱內建的 Azure App 服務驗證與授權。 若要設定環境變數,請使用下列值:
| 名稱 | 值 |
|---|---|
| AuthenticationEvents__AudienceAppId | 自訂驗證延伸模組應用程式識別碼 (在設定權杖發行事件的自訂宣告提供者中設定) |
| AuthenticationEvents__AuthorityUrl | • 員工租用戶 https://login.microsoftonline.com/<tenantID> • 外部租用戶 https://<mydomain>.ciamlogin.com/<tenantID> |
| AuthenticationEvents__AuthorizedPartyAppId | 99045fe1-7639-4a75-9d4a-577b6ca3810f 或其他授權方 |
使用環境變數在 Azure 入口網站中設定驗證
- 至少要以應用程式系統管理員或驗證系統管理員的身分登入 Azure 入口網站。
- 瀏覽至您建立的函數應用程式,並在 [設定] 下選取 [組態]。
- 在 [應用程式設定] 下,選取 [新增應用程式設定] 並從表格新增環境變數和相關值。
- 選取 [儲存] 以儲存應用程式設定。