教學課程:在 Microsoft Entra ID 與 SharePoint 內部部署之間實作同盟驗證
案例描述
在本教學課程中,您會設定 Microsoft Entra ID 與 SharePoint 內部部署之間的同盟驗證。 目標是允許使用者登入 Microsoft Entra ID,並使用其身分識別來存取 SharePoint 內部部署網站。
必要條件
若要執行設定,您需要下列資源:
- Microsoft Entra 租用戶。 如果您沒有帳戶,您可以建立 免費帳戶。
- SharePoint 2013 伺服器陣列或更新版本。
本文使用下列值:
- 企業應用程式名稱(在 Microsoft Entra ID 中):
SharePoint corporate farm - 信任標識符 (在 Microsoft Entra ID 中) / 領域 (在 SharePoint 中):
urn:sharepoint:federation - loginUrl (至 Microsoft Entra ID):
https://login.microsoftonline.com/dc38a67a-f981-4e24-ba16-4443ada44484/wsfed - SharePoint 網站 URL:
https://spsites.contoso.local/ - SharePoint 網站回復 URL:
https://spsites.contoso.local/_trust/ - SharePoint 信任組態名稱:
MicrosoftEntraTrust - Microsoft Entra 測試使用者的 UserPrincipalName:
AzureUser1@demo1984.onmicrosoft.com
在 Microsoft Entra 識別碼中設定企業應用程式
若要在 Microsoft Entra ID 中設定同盟,您必須建立專用的企業應用程式。 其設定是使用可在應用連結庫中找到的預先設定範本 SharePoint on-premises 來簡化。
建立企業應用程式
- 以至少雲端應用程式 管理員 istrator 身分登入 Microsoft Entra 系統管理中心。
- 流覽至 [身分>識別應用程式>企業應用程式>] [新增應用程式]。
- 在搜尋方塊中,輸入 SharePoint 內部部署。 從結果窗格中選取 [SharePoint 內部部署 ]。
- 指定應用程式的名稱(在本教學課程中為
SharePoint corporate farm),然後按下 [ 建立 ] 以新增應用程式。 - 在新的企業應用程式中,選取 [屬性],然後檢查 [需要使用者指派] 的值 ?。 在此案例中,將其值設定為 [否 ],然後按兩下 [ 儲存]。
設定企業應用程式
在本節中,您會設定 SAML 驗證,並定義在成功驗證時傳送至 SharePoint 的宣告。
在 [企業應用程式
SharePoint corporate farm概觀] 中,選取 [2]。設定單一登錄 ,然後在下一個對話框中選擇 SAML 。在 [使用 SAML 設定單一登錄] 頁面上,選取 [基本 SAML 組態] 窗格中的 [編輯] 圖示。
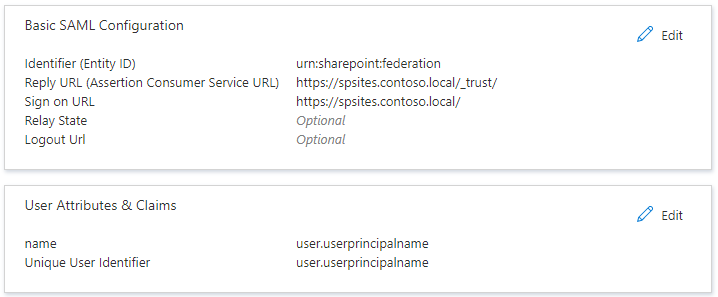
在 [ 基本 SAML 組態 ] 區段中,遵循下列步驟:
在 [ 標識符 ] 方塊中,確定此值存在:
urn:sharepoint:federation。在 [ 回復 URL ] 方塊中,使用此模式輸入 URL:
https://spsites.contoso.local/_trust/。在 [ 登入 URL ] 方塊中,使用此模式輸入 URL:
https://spsites.contoso.local/。選取 [儲存]。
在 [ 使用者屬性和宣告 ] 區段中,刪除下列宣告類型,因為 SharePoint 不會使用這些宣告類型來授與許可權:
http://schemas.xmlsoap.org/ws/2005/05/identity/claims/emailaddresshttp://schemas.xmlsoap.org/ws/2005/05/identity/claims/givennamehttp://schemas.xmlsoap.org/ws/2005/05/identity/claims/surname
設定現在看起來應該像這樣:
複製您稍後在 SharePoint 中需要的資訊:
在 [SAML 簽署憑證] 區段中,下載憑證 (Base64) 。 這是 Microsoft Entra ID 用來簽署 SAML 令牌之簽署憑證的公鑰。 SharePoint 需要它來驗證傳入 SAML 令牌的完整性。
在 [ 設定 SharePoint 公司伺服器陣列 ] 區段中,複製 記事本中的登入 URL ,並將尾端字串 /saml2 取代為 /wsfed。
重要
請務必將 /saml2 取代為 /wsfed,以確保 Microsoft Entra ID 會視 SharePoint 的要求發出 SAML 1.1 令牌。
- 在 [ 設定 SharePoint 公司伺服器陣列 ] 區段中,複製 註銷 URL
將 SharePoint 設定為信任 Microsoft Entra ID
在 SharePoint 中建立信任
在此步驟中,您會建立SPTrustedLoginProvider來儲存SharePoint信任 Microsoft Entra ID 所需的設定。 為此,您需要上面複製的 Microsoft Entra ID 資訊。 啟動 SharePoint 管理命令介面並執行下列腳本來建立它:
# Path to the public key of the Microsoft Entra SAML signing certificate (self-signed), downloaded from the Enterprise application in the Azure portal
$signingCert = New-Object System.Security.Cryptography.X509Certificates.X509Certificate2("C:\Microsoft Entra app\SharePoint corporate farm.cer")
# Unique realm (corresponds to the "Identifier (Entity ID)" in the Microsoft Entra enterprise application)
$realm = "urn:sharepoint:federation"
# Login URL copied from the Microsoft Entra enterprise application. Make sure to replace "saml2" with "wsfed" at the end of the URL:
$loginUrl = "https://login.microsoftonline.com/dc38a67a-f981-4e24-ba16-4443ada44484/wsfed"

# Define the claim types used for the authorization
$userIdentifier = New-SPClaimTypeMapping -IncomingClaimType "http://schemas.xmlsoap.org/ws/2005/05/identity/claims/name" -IncomingClaimTypeDisplayName "name" -LocalClaimType "http://schemas.xmlsoap.org/ws/2005/05/identity/claims/upn"
$role = New-SPClaimTypeMapping "http://schemas.microsoft.com/ws/2008/06/identity/claims/role" -IncomingClaimTypeDisplayName "Role" -SameAsIncoming

# Let SharePoint trust the Microsoft Entra signing certificate
New-SPTrustedRootAuthority -Name "Microsoft Entra signing certificate" -Certificate $signingCert

# Create a new SPTrustedIdentityTokenIssuer in SharePoint
$trust = New-SPTrustedIdentityTokenIssuer -Name "MicrosoftEntraTrust" -Description "Microsoft Entra ID" -Realm $realm -ImportTrustCertificate $signingCert -ClaimsMappings $userIdentifier, $role -SignInUrl $loginUrl -IdentifierClaim $userIdentifier.InputClaimType
設定 SharePoint Web 應用程式
在此步驟中,您會在 SharePoint 中設定 Web 應用程式,以信任上面建立的 Microsoft Entra Enterprise 應用程式。 有一個重要的規則要記住:
- SharePoint Web 應用程式的預設區域必須啟用 Windows 驗證。 搜尋編目程式需要此專案。
- 將使用 Microsoft Entra 驗證的 SharePoint URL 必須設定為 HTTPS。
建立或擴充 Web 應用程式。 本文說明兩個可能的組態:
如果您在預設區域中建立同時使用 Windows 和 Microsoft Entra 驗證的新 Web 應用程式:
啟動 SharePoint 管理命令介面並執行下列文稿:
# This script creates a new web application and sets Windows and Microsoft Entra authentication on the Default zone
# URL of the SharePoint site federated with Microsoft Entra
$trustedSharePointSiteUrl = "https://spsites.contoso.local/"
$applicationPoolManagedAccount = "Contoso\spapppool"

$winAp = New-SPAuthenticationProvider -UseWindowsIntegratedAuthentication -DisableKerberos:$true
$sptrust = Get-SPTrustedIdentityTokenIssuer "MicrosoftEntraTrust"
$trustedAp = New-SPAuthenticationProvider -TrustedIdentityTokenIssuer $sptrust

New-SPWebApplication -Name "SharePoint - Microsoft Entra" -Port 443 -SecureSocketsLayer -URL $trustedSharePointSiteUrl -ApplicationPool "SharePoint - Microsoft Entra" -ApplicationPoolAccount (Get-SPManagedAccount $applicationPoolManagedAccount) -AuthenticationProvider $winAp, $trustedAp
開啟 SharePoint Central 管理員 istration 網站。
在 [系統 設定] 底下,選取 [設定替代存取對應]。 [ 替代存取對應集合 ] 方塊隨即開啟。
使用新的 Web 應用程式篩選顯示,並確認您看到類似如下的內容:

如果您擴充現有的 Web 應用程式,以在新區域中使用 Microsoft Entra 驗證:
啟動 SharePoint 管理命令介面並執行下列文稿:
# This script extends an existing web application to set Microsoft Entra authentication on a new zone
# URL of the default zone of the web application
$webAppDefaultZoneUrl = "http://spsites/"
# URL of the SharePoint site federated with ADFS
$trustedSharePointSiteUrl = "https://spsites.contoso.local/"
$sptrust = Get-SPTrustedIdentityTokenIssuer "MicrosoftEntraTrust"
$ap = New-SPAuthenticationProvider -TrustedIdentityTokenIssuer $sptrust
$wa = Get-SPWebApplication $webAppDefaultZoneUrl

New-SPWebApplicationExtension -Name "SharePoint - Microsoft Entra" -Identity $wa -SecureSocketsLayer -Zone Internet -Url $trustedSharePointSiteUrl -AuthenticationProvider $ap
開啟 SharePoint Central 管理員 istration 網站。
在 [系統 設定] 底下,選取 [設定替代存取對應]。 [ 替代存取對應集合 ] 方塊隨即開啟。
使用擴充的 Web 應用程式篩選顯示,並確認您看到類似下列內容:

建立 Web 應用程式之後,您可以建立根網站集合,並將 Windows 帳戶新增為主要網站集合管理員。
建立 SharePoint 網站的憑證
由於 SharePoint URL 使用 HTTPS 通訊協定 (
https://spsites.contoso.local/),因此必須在對應的 網際網路資訊服務 (IIS) 網站上設定憑證。 請遵循這些步驟來產生自我簽署憑證:重要
自我簽署憑證僅適用於測試目的。 在生產環境中,強烈建議您改用證書頒發機構單位所簽發的憑證。
開啟 Windows PowerShell 控制台。
執行下列腳本來產生自我簽署憑證,並將它新增至計算機的 MY 存放區:
New-SelfSignedCertificate -DnsName "spsites.contoso.local" -CertStoreLocation "cert:\LocalMachine\My"
在 IIS 網站中設定憑證
- 開啟 網際網路資訊服務 Manager 控制台。
- 展開樹檢視中的伺服器、展開 [網站]、選取網站 SharePoint - Microsoft Entra ID,然後選取 [ 系結]。
- 選取 [https 系結 ],然後選取 [ 編輯]。
- 在 [TLS/SSL 憑證] 欄位中,選擇要使用的憑證(例如, 上面建立的 spsites.contoso.local ),然後選取 [ 確定]。
注意
如果您有多個 Web 前端伺服器,則必須在每個伺服器上重複此作業。
SharePoint 與 Microsoft Entra ID 之間的信任基本設定現已完成。 讓我們看看如何以 Microsoft Entra 使用者身分登入 SharePoint 網站。
以成員使用者身分登入
Microsoft Entra ID 有 兩種類型的使用者:來賓用戶和成員使用者。 讓我們從成員用戶開始,這隻是您組織中的使用者。
在 Microsoft Entra 識別碼中建立成員使用者
- 至少以使用者 管理員 istrator 身分登入 Microsoft Entra 系統管理中心。
- 流覽至 [身分>識別使用者>所有使用者]。
- 選取畫面頂端的 [新增使用者>建立新使用者]。
- 在 [ 用戶 屬性] 中,遵循下列步驟:
- 在 [ 顯示名稱] 欄位中, 輸入
B.Simon。 - 在 [ 使用者主體名稱] 欄位中, 輸入 username@companydomain.extension。 例如:
B.Simon@contoso.com。 - 選取 [顯示密碼] 複選框,然後記下 [密碼] 方塊中顯示的值。
- 選取 [檢閱 + 建立]。
- 在 [ 顯示名稱] 欄位中, 輸入
- 選取 建立。
- 您可以與這個使用者共享網站,並允許存取該網站。
在 SharePoint 中將許可權授與 Microsoft Entra 使用者
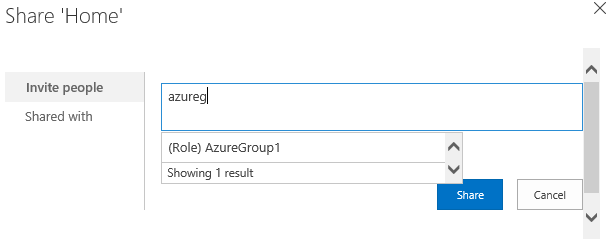
以您的 Windows 帳戶 (網站集合管理員) 身分登入 SharePoint 根網站集合,然後按兩下 [ 共用]。
在對話框中,您必須輸入userprincipalname 的確切值,例如 AzureUser1@demo1984.onmicrosoft.com,並小心選取 名稱 宣告結果(將滑鼠移到結果上以查看其宣告類型)
重要
請小心輸入您想要邀請的使用者確切值,並在清單中選擇適當的宣告類型,否則共用將無法運作。
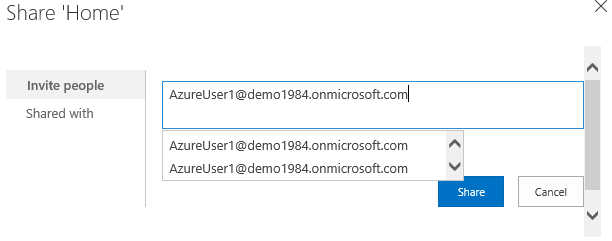
這項限制是因為 SharePoint 不會驗證人員選擇器輸入,這可能會造成混淆,並導致拼錯或使用者不小心選擇錯誤的宣告類型。
若要修正此案例,稱為 EntraCP 的開放原始碼解決方案可用來將 SharePoint 2019 / 2016 / 2013 與 Microsoft Entra ID 連線,並針對您的 Microsoft Entra 租使用者解析輸入。 如需詳細資訊,請參閱 EntraCP。
以下是設定 EntraCP 的相同搜尋:SharePoint 會根據輸入傳回實際使用者:
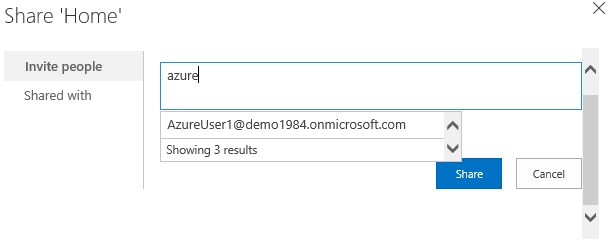
重要
EntraCP 不是 Microsoft 產品,Microsoft 支援服務 不支援。 若要在內部部署 SharePoint 伺服器數位上下載、安裝及設定 EntraCP,請參閱 EntraCP 網站。
Microsoft Entra 用戶 AzureUser1@demo1984.onmicrosoft.com 現在可以使用其身分識別登入 SharePoint 網站 https://spsites.contoso.local/。
將許可權授與安全組
將群組宣告類型新增至企業應用程式
在 [企業應用程式
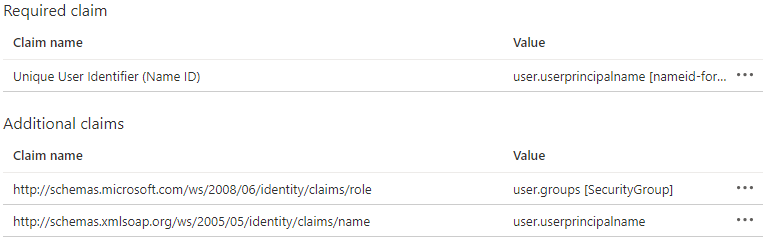
SharePoint corporate farm概觀] 中,選取 [2]。設定單一登錄。在 [ 使用者屬性和宣告 ] 區段中,如果沒有群組宣告存在,請遵循下列步驟:
- 選取 [新增群組宣告],選取 [安全組],確定 [來源屬性 ] 設定為 [群組標識符]
- 核 取 [自定義群組宣告的名稱],然後核 取 [發出群組為角色宣告] ,然後按兩下 [ 儲存]。
- 使用者屬性和宣告看起來應該像這樣:
在 Microsoft Entra ID 中建立安全性群組
讓我們建立安全組。
流覽至 [身分識別>群組]。
選取新增群組。
填入 [群組類型]、[安全組]、[組名] 和 [
AzureGroup1成員資格類型]。 新增您在上面建立的用戶作為成員,然後按兩下 [ 建立]: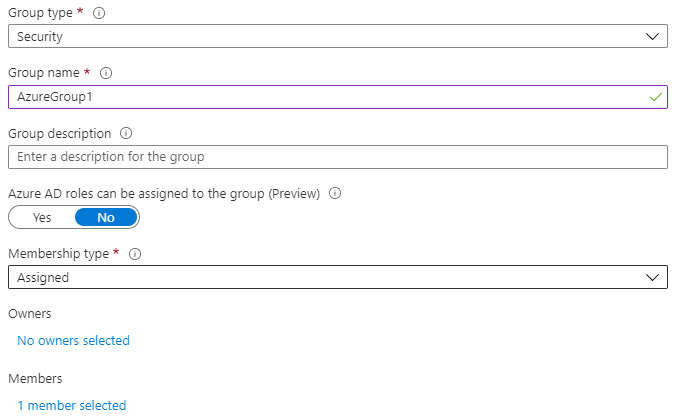
將許可權授與 SharePoint 中的安全組
Microsoft Entra 安全組會使用其屬性 Id來識別,也就是 GUID (例如 , E89EF0A3-46CC-45BF-93A4-E078FCEBFC45)。
如果沒有自定義宣告提供者,用戶必須在人員選擇器中輸入群組的確切值(Id),然後選取對應的宣告類型。 這不方便使用者或可靠。
若要避免這個問題,本文會使用第三方宣告提供者 EntraCP ,在 SharePoint 中以易記的方式尋找群組:
管理來賓用戶存取權
來賓帳戶有兩種類型:
- B2B 來賓帳戶:這些用戶位於外部 Microsoft Entra 租使用者中
- MSA 來賓帳戶:這些用戶位於 Microsoft 識別提供者(Hotmail、Outlook)或社交帳戶提供者(Google 或類似專案)
根據預設,Microsoft Entra ID 會將 「Unique User Identifier」 和宣告 「name」 設定為 屬性 user.userprincipalname。
不幸的是,來賓帳戶的這個屬性模棱兩可,如下表所示:
| Microsoft Entra ID 中設定的來源屬性 | Microsoft Entra ID 用於 B2B 來賓的實際屬性 | Microsoft Entra ID 用於 MSA 來賓的實際屬性 | SharePoint 可以依賴的屬性來驗證身分識別 |
|---|---|---|---|
user.userprincipalname |
mail,例如: guest@PARTNERTENANT |
userprincipalname,例如: guest_outlook.com#EXT#@TENANT.onmicrosoft.com |
模糊 |
user.localuserprincipalname |
userprincipalname,例如: guest_PARTNERTENANT#EXT#@TENANT.onmicrosoft.com |
userprincipalname,例如: guest_outlook.com#EXT#@TENANT.onmicrosoft.com |
userprincipalname |
最後,為了確保來賓帳戶全都以相同的屬性來識別,應更新企業應用程式的標識碼宣告,以使用 屬性 user.localuserprincipalname ,而不是 user.userprincipalname。
更新應用程式以對所有來賓使用者使用一致的屬性
在 [企業應用程式
SharePoint corporate farm概觀] 中,選取 [2]。設定單一登錄。在 [使用 SAML 設定單一登錄] 頁面上,選取 [使用者屬性與宣告] 窗格中的 [編輯] 圖示。
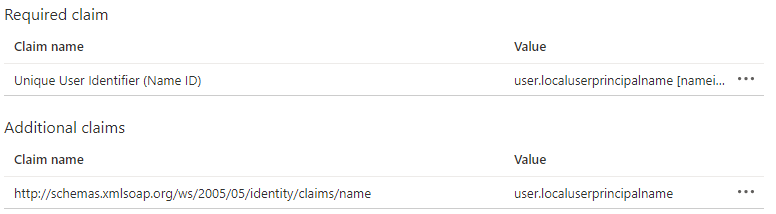
在 [ 用戶屬性和宣告 ] 區段中,遵循下列步驟:
選取 [唯一使用者標識符(名稱標識符],將其 [來源屬性] 屬性變更為 user.localuserprincipalname,然後按兩下 [ 儲存]。
選取
http://schemas.xmlsoap.org/ws/2005/05/identity/claims/name,將其 [來源屬性] 屬性變更為 user.localuserprincipalname,然後按兩下 [ 儲存]。使用者屬性和宣告看起來應該像這樣:
邀請 SharePoint 中的來賓使用者
注意
本節假設使用宣告提供者 EntraCP
在上一節中,您已更新企業應用程式,以對所有來賓帳戶使用一致的屬性。
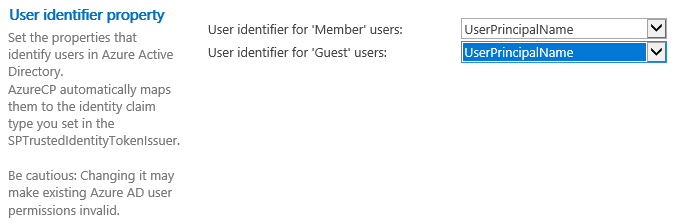
現在,必須更新 EntraCP 的組態,以反映該變更,並使用來賓帳戶的屬性 userprincipalname :
- 開啟 SharePoint Central 管理員 istration 網站。
- 在 [安全性] 底下,選取 [EntraCP 全域設定]。
- 在 [用戶標識符] 屬性:將 'Guest' 使用者的使用者標識符設定為UserPrincipalName 一節。
- 按兩下 [確定]
您現在可以邀請 SharePoint 網站中的任何來賓使用者。
設定多個 Web 應用程式的同盟
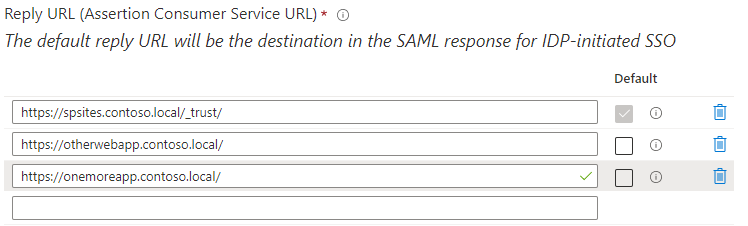
此組態適用於單一 Web 應用程式,但如果您想要針對多個 Web 應用程式使用相同的受信任識別提供者,則需要額外的設定。 例如,假設您有個別的 Web 應用程式 https://otherwebapp.contoso.local/ ,而您現在想要在它上啟用 Microsoft Entra 驗證。 若要這樣做,請將 SharePoint 設定為傳遞 SAML WReply 參數,並在企業應用程式中新增 URL。
設定 SharePoint 以傳遞 SAML WReply 參數
- 在 SharePoint 伺服器上,開啟 SharePoint 201x 管理命令介面,然後執行下列命令。 針對您先前使用的受信任識別令牌簽發者使用相同的名稱。
$t = Get-SPTrustedIdentityTokenIssuer "MicrosoftEntraTrust"
$t.UseWReplyParameter = $true
$t.Update()
在企業應用程式中新增URL
以至少雲端應用程式 管理員 istrator 身分登入 Microsoft Entra 系統管理中心。
流覽至 [身分>識別應用程式>企業應用程式>] 選取先前建立的企業應用程式,然後選取 [單一登錄]。
在 [ 使用 SAML 設定單一登錄] 頁面上,編輯 [基本 SAML 組態]。
在 [回復 URL(判斷提示取用者服務 URL)] 區段中,新增需要以 Microsoft Entra ID 登入使用者之所有其他 Web 應用程式的 URL,
https://otherwebapp.contoso.local/然後按兩下 [儲存]。
設定安全性令牌的存留期
根據預設,Microsoft Entra ID 會建立有效 1 小時的 SAML 令牌,該令牌無法在 Azure 入口網站 或使用條件式存取原則中自定義。
不過,您可以建立 自定義令牌存留期原則,並將它指派給您為 SharePoint Server 建立的企業應用程式。
您可以執行下列腳本來達成此目的:
Install-Module Microsoft.Graph
Connect-MgGraph -Scopes "Policy.ReadWrite.ApplicationConfiguration","Policy.Read.All","Application.ReadWrite.All"

$appDisplayName = "SharePoint corporate farm"
$sp = Get-MgServicePrincipal -Search DisplayName:"$appDisplayName" -ConsistencyLevel eventual

$oldPolicy = Get-MgServicePrincipalTokenLifetimePolicy -ServicePrincipalId $sp.Id
if ($null -ne $oldPolicy) {
	# There can be only 1 TokenLifetimePolicy associated to the service principal (or 0, as by default)
    Remove-MgServicePrincipalAppManagementPolicy -AppManagementPolicyId $oldPolicy.Id -ServicePrincipalId $sp.Id
}

# Get / create a custom token lifetime policy
$policyDisplayName = "WebPolicyScenario"
$policy = Get-MgPolicyTokenLifetimePolicy -Filter "DisplayName eq '$policyDisplayName'"
if ($null -eq $policy) {
	$params = @{
		Definition = @('{"TokenLifetimePolicy":{"Version":1,"AccessTokenLifetime":"4:00:00"}}')
		DisplayName = $policyDisplayName
		IsOrganizationDefault = $false
	}
	$policy = New-MgPolicyTokenLifetimePolicy -BodyParameter $params
}

# Assign the token lifetime policy to an app
$body = @{
	"@odata.id" = "https://graph.microsoft.com/v1.0/policies/tokenLifetimePolicies/$($policy.Id)"
}
Invoke-GraphRequest -Uri ('https://graph.microsoft.com/v1.0/servicePrincipals/{0}/tokenLifetimePolicies/$ref' -f $sp.Id) -Method POST -Body $body