交易整合器 (TI) 提供 Windows 起始處理 (WIP) 呼叫和主機起始處理 (HIP) 呼叫的詳細追蹤。 此追蹤是透過在應用程式組態檔中啟用追蹤功能,以及使用描述追蹤內容的主機整合追蹤定義檔案(.hitd)來完成。 您可以透過 hitd 檔案來啟用或停用追蹤功能。 追蹤也可以透過應用程式組態檔開啟和關閉,不過,必須重新啟動 TI 程式,讓新的組態生效,因為應用程式組態檔只有在 TI 程式啟動時才會讀取。
下列指示示範如何在 C:\Tracing 資料夾內設定追蹤。 如有需要,可以使用不同的資料夾 -- 執行 TI 進程的帳戶必須具有追蹤資料夾的讀取/寫入許可權。
建立追蹤資料夾 C:\Tracing
建立主機整合追蹤定義檔案 (HITD)
啟動追蹤查看器(必須安裝 HIS):啟動 - 執行 – histraceviewer
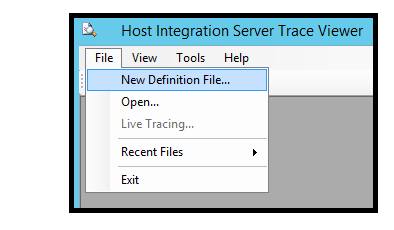
從 [檔案] 功能表中,選取 [新增定義檔案]。
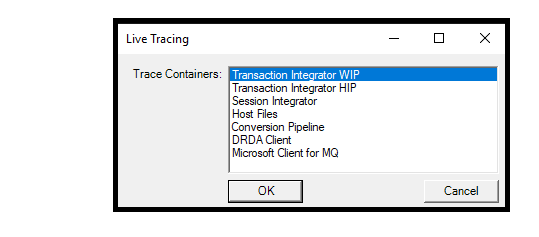
選取交易整合器 WIP:
追蹤大小和選擇:您可以為每個元件設定追蹤層級。 如果追蹤層級設定在較高的元件,則該追蹤層級也會套用至次級元件。
- 以滑鼠右鍵按兩下 [追蹤層級],然後選取 [新增層級]。

- 選取一或多個層級,然後按兩下 [確定]。
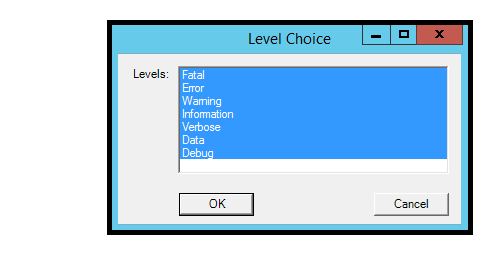
- 選取所有選項後按一下 [確定] 將會顯示「ALL」。
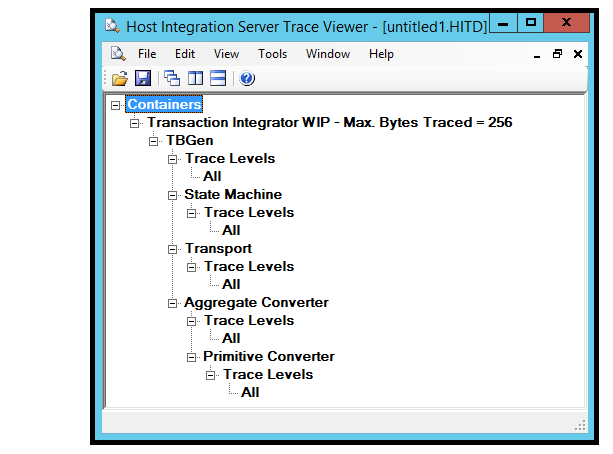
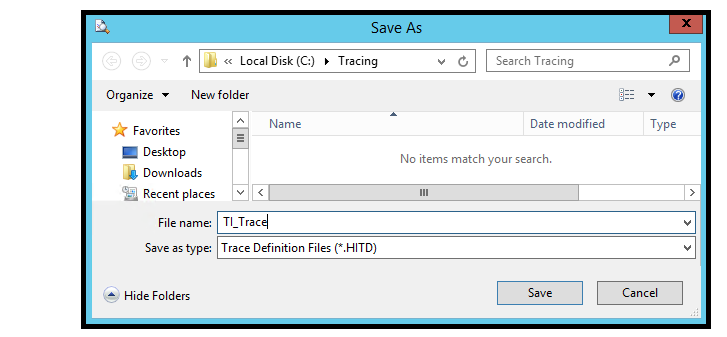
- 將新的 HITD 檔案儲存為 C:\Tracing 目錄中的TI_Trace。 關閉追蹤查看器。
- 以滑鼠右鍵按兩下 [追蹤層級],然後選取 [新增層級]。
使用追蹤組態資訊更新應用程式組態檔。
針對 Windows 起始處理 (WIP),TI .Net 專案中的 app.config 可以使用追蹤組態資訊進行修改,並在編譯應用程式時包含在 <appname>.exe.config 檔案中。 如果應用程式已經編譯, <則可以直接使用這項資訊來修改 appname>.exe.config 檔案。
如果在 BizTalk 中使用 BizTalk Adapter for Host Applications (BAHA),則必須修改的組態檔是 BizTalk Server exe 組態檔,該組態檔是 BizTalk 應用程式內針對 BAHA 埠選取的 BizTalk 主機組態檔。 組態檔位於 %BTSINSTALLPATH%,並根據BAHA埠所使用的32位或64位主機進程,具有 BTSNTSvc.exe.config 或 BTSNTSvc64.exe.config 的名稱。
如果使用主機起始處理 (HIP),則必須修改 HIPService.exe.config 檔案。 此檔案位於 %SNAROOT%。
在 configSections 元素內新增下列 section 語句。 如果一個不存在,請新增 configSections 元素
<configSections> 語句必須緊接在<configuration>之後,以及在 <startup> 區段之前。
若為 HIS 2016 ,請在 configSections 元素內輸入下列行:
<configSections>
   <section name="hostIntegration.tracing" type="Microsoft.HostIntegration.ConfigurationSectionHandlers.Tracing.TracingConfigurationSectionHandler, Microsoft.HostIntegration.ConfigurationSectionHandlers, Version=10.0.1000.0, Culture=neutral, PublicKeyToken=31bf3856ad364e35" />
</configSections>
若為 HIS 2013 ,請在 configSections 元素中輸入下列這一行(差異在於版本變更):
<configSections>
   <section name="hostIntegration.tracing" type="Microsoft.HostIntegration.ConfigurationSectionHandlers.Tracing.TracingConfigurationSectionHandler, Microsoft.HostIntegration.ConfigurationSectionHandlers, Version=9.0.1000.0, Culture=neutral, PublicKeyToken=31bf3856ad364e35" />
</configSections>
在 </configuration> 區段中的結尾陳述之前,新增下列基本追蹤組態元素至該區段:
<hostIntegration.tracing xmlns="http://schemas.microsoft.com/HIS/Tracing/2020">
      <traceOptions traceDefinitionFile="C:\Tracing\TI_Trace.hitd"
                    writeTraceFile="true"
                    fileNamePreamble="TI_Tracing"
                    traceFileFolder="C:\Tracing\" />
      </hostIntegration.tracing>
執行應用程式以開始追蹤。 如果對應用程式組態檔進行變更,則必須重新啟動 TI 執行時間所使用的程式,才能啟用追蹤。 如果使用 BizTalk,則必須重新啟動主機實例。 如果使用 IIS,則必須重新啟動網站。 如果執行 .Net exe,則必須重新啟動該程式。
查看 C:\Tracing 資料夾,以查看一或多個 HITF (主機整合追蹤檔案) 檔案。 檔案名稱將會是 TI_Tracing_<程序 ID 號碼>_<日期和時間>.hitf。 例如:
TI_TRACING_6076_AUG_29_2017_13_00_52_421.HITF按兩下 HITF 檔案,在追蹤查看器開啟它,並檢查追蹤的內容。 如果 TI 程序仍在運行,部分追蹤資訊可能會保留在緩衝區中;結束應用程式或在應用程式中執行另一個 TI 呼叫將排清緩衝區,這樣就可以查看第一次 TI 呼叫的完整追蹤。
    TBGen invoke entered for Class: BankingCicsElmLink.Accounts
    Non-Persistent
    Attempting to acquire library reader and load HIS object assembly
    Method: GetBalance
    Using configured RE for this object
    Remote Environment: ELM Link RE
    Aggregate Converter: Microsoft.HostIntegration.TI.AggregateConverter, Microsoft.HostIntegration.TI.AggregateConverter, Version=10.0.1000.0, Culture=neutral, PublicKeyToken=31bf3856ad364e35
    Primitive Converter: Microsoft.HostIntegration.Common.BasePrimitiveConverter, Microsoft.HostIntegration.Common.BasePrimitiveConverter, Version=10.0.1000.0, Culture=neutral, PublicKeyToken=31bf3856ad364e35
    Transport: Microsoft.HostIntegration.TI.ELMTransport, Microsoft.HostIntegration.TI.ELMTransport, Version=10.0.1000.0, Culture=neutral, PublicKeyToken=31bf3856ad364e35
    State Machine: Microsoft.HostIntegration.TI.GenericLinkStateMachine, Microsoft.HostIntegration.TI.GenericLinkStateMachine, Version=10.0.1000.0, Culture=neutral, PublicKeyToken=31bf3856ad364e35
    Invoking the state machine
    Generic Link state machine entered for method: GetBalance
    ELM Transport Initialized, Link: True, Codepage: 37
    Header length: 35
    Header Length: 35, Trailer Length: 0
    Non-Persistent
關閉追蹤功能
- 在追蹤查看器中開啟 TI_Trace.hitd 檔案,並移除追蹤層級。 當 hitd 檔案被儲存時,跟蹤功能將會自動停止。 不需要重新啟動 TI 應用程式。
各種案例的應用程式組態檔範例
- .Net WIP 應用程式程式的範例
      <?xml version="1.0"?>
      <configuration>
        <configSections>
          <section name="hostIntegration.ti.wip" type="Microsoft.HostIntegration.ConfigurationSectionHandlers.Ti.Wip.WipConfigurationSectionHandler, Microsoft.HostIntegration.ConfigurationSectionHandlers, Version=10.0.1000.0, Culture=neutral, PublicKeyToken=31bf3856ad364e35" />
          <section name="hostIntegration.tracing" type="Microsoft.HostIntegration.ConfigurationSectionHandlers.Tracing.TracingConfigurationSectionHandler, Microsoft.HostIntegration.ConfigurationSectionHandlers, Version=10.0.1000.0, Culture=neutral, PublicKeyToken=31bf3856ad364e35" />
        </configSections>

        <hostIntegration.ti.wip xmlns="http://schemas.microsoft.com/his/Config/TiWip/2020">
          <readOrder appConfig="first" cache="unused" registry="unused"/>
          <remoteEnvironments>
            <remoteEnvironment isDefault="true" name="ELM Link RE" timeout="5" codePage="37">
              <elmLink ipAddress="localhost" ports="7511" requestHeaderFormat="Microsoft"/>
            </remoteEnvironment>
          </remoteEnvironments>
        </hostIntegration.ti.wip>

        <startup>
          <supportedRuntime version="v4.0" sku=".NETFramework,Version=v4.6"/>
        </startup>

        <hostIntegration.tracing xmlns="http://schemas.microsoft.com/his/Tracing/2020">
          <traceOptions traceDefinitionFile="C:\Tracing\TI_Trace.hitd"
                        writeTraceFile="true"
                        fileNamePreamble="TI_Tracing"
                        traceFileFolder="C:\Tracing\" />
        </hostIntegration.tracing>
      </configuration>
- 使用 BizTalk Adapter for Host Applications 的 BizTalk 應用程式範例 - %BTSINSTALLPATH%\BTSNTSvc.exe.config or %BTSINSTALLPATH%\BTSNTSvc64.exe.config 檔案:
Here is my text - 使用 TI 執行時間的 IIS 應用程式範例
Here is my text - TI 主機起始處理 (HIP) 應用程式的範例 - %SNAROOT%\HIPService.exe.config 檔案:
Here is my text
另請參閱
SNA 追蹤公用程式可協助 TI 物件透過主機整合伺服器閘道使用 APPC。 此公用程式會擷取與主機之間的APPC流量。 如果 TI 物件正透過 TCP/IP 直接與主機系統通訊,則此公用程式將無濟於事。