Windows 驗證 < windowsAuthentication>
概觀
元素 <windowsAuthentication> 會定義 Internet Information Services (IIS) 7 Windows 驗證 模組的組態設定。 當您的 IIS 7 伺服器在使用 Microsoft Active Directory 服務網域身分識別或其他 Windows 帳戶來識別使用者的公司網路上執行時,可以使用 Windows 驗證。 因此,您可以使用Windows 驗證您的伺服器是否為 Active Directory 網域的成員。
Windows 驗證 (先前稱為 NTLM,也稱為 Windows NT 挑戰/回應驗證) 是安全的驗證形式,因為使用者名稱和密碼會在網路傳送之前進行雜湊處理。 當您啟用Windows 驗證時,用戶端瀏覽器會在與網頁伺服器的密碼編譯交換中傳送密碼的強雜湊版本。
Windows 驗證支援元素中 <providers> 定義的兩種驗證通訊協定 Kerberos 和 NTLM。 當您在 IIS 7 上安裝並啟用Windows 驗證時,預設通訊協定為 Kerberos。 元素 <windowsAuthentication> 也可以包含 useKernelMode 屬性,可設定是否要使用 Windows Server 2008 新增的核心模式驗證功能。
Windows 驗證最適合內部網路環境,原因如下:
- 用戶端電腦和網頁伺服器位於相同的網域中。
- 系統管理員可以確定每個用戶端瀏覽器都是 Internet Explorer 2.0 或更新版本。
- 不需要 NTLM 不支援的 HTTP Proxy 連線。
- Kerberos 第 5 版需要連線到 Active Directory,這在網際網路環境中不可行。
IIS 7.5 的新功能
元素 <extendedProtection> 是在 IIS 7.5 中引進,可讓您設定已整合到 Windows 驗證的新擴充保護功能的設定。
相容性
| 版本 | 備註 |
|---|---|
| IIS 10.0 | 在 <windowsAuthentication> IIS 10.0 中未修改專案。 |
| IIS 8.5 | 未 <windowsAuthentication> 在 IIS 8.5 中修改專案。 |
| IIS 8.0 | 在 IIS 8.0 中未修改專案 <windowsAuthentication> 。 |
| IIS 7.5 | 專案 <extendedProtection> 已在 IIS 7.5 中新增。 |
| IIS 7.0 | 專案 <windowsAuthentication> 是在 IIS 7.0 中引進的。 |
| IIS 6.0 | 元素 <windowsAuthentication> 會取代 IIS 6.0 AuthType 和 AuthFlags 中繼基底屬性的部分。 |
安裝程式
IIS 7 和更新版本的預設安裝不包含Windows 驗證角色服務。 若要在 IIS 上使用Windows 驗證,您必須安裝角色服務、停用網站或應用程式的匿名驗證,然後啟用網站或應用程式的Windows 驗證。
注意
安裝角色服務之後,IIS 7 會將下列組態設定認可至ApplicationHost.config檔案。
<windowsAuthentication enabled="false" />
Windows Server 2012 或 Windows Server 2012 R2
- 在工作列上,按一下 [伺服器管理員]。
- 在伺服器管理員中,按一下 [管理]功能表,然後按一下 [新增角色和功能]。
- 在 [ 新增角色和功能 精靈] 中,按 [下一步]。 選取安裝類型,然後按 [ 下一步]。 選取目的地伺服器,然後按 [ 下一步]。
- 在 [ 伺服器角色] 頁面上,依序展開 [Web 服務器] ([IIS) ]、[ 網頁伺服器]、[ 安全性],然後選取 [ Windows 驗證]。 按一下 [下一步] 。
![[伺服器角色] 頁面的螢幕擷取畫面,其中已醒目提示 [Windows 驗證] 選項。](index/_static/image2.png) .
. - 在 [選取功能] 頁面上,按 [下一步]。
- 在 [確認安裝選項] 頁面上,按一下 [安裝]。
- 在 [結果] 頁面上,按一下 [關閉]。
![[伺服器角色] 頁面的螢幕擷取畫面,其中已醒目提示 [Windows 驗證] 選項。](index/_static/image1.png)
Windows 8 或Windows 8.1
- 在 [開始] 畫面上,將指標全部移至左下角,以滑鼠右鍵按一下 [開始] 按鈕,然後按一下[主控台]。
- 在主控台中,按一下 [程式和功能],然後按一下 [開啟或關閉 Windows 功能]。
- 展開 [Internet Information Services]、[ 萬維網服務]、[ 安全性],然後選取 [ Windows 驗證]。
- 按一下 [確定]。
- 按一下 [關閉] 。

Windows Server 2008 或 Windows Server 2008 R2
- 在工作列上,按一下 [開始],指向 [系統管理工具],然後按一下[伺服器管理員]。
- 在[伺服器管理員階層] 窗格中,展開 [角色],然後按一下 [Web 服務器] (IIS) 。
- 在 [Web 服務器 (IIS) ] 窗格中,捲動至 [ 角色服務 ] 區段,然後按一下 [ 新增角色服務]。
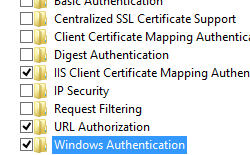
- 在 [新增角色服務精靈] 的 [選取角色服務] 頁面上,選取 [Windows 驗證],然後按 [下一步]。
![[選取角色服務] 頁面的螢幕擷取畫面,其中已醒目提示 Windows 驗證選項。](index/_static/image6.png)
- 在 [確認安裝選項] 頁面上,按一下 [安裝]。
- 在 [結果] 頁面上,按一下 [關閉]。
![[選取角色服務] 頁面的螢幕擷取畫面,其中已醒目提示 Windows 驗證選項。](index/_static/image5.png)
Windows Vista 或 Windows 7
- 在工作列上,按一下 [開始],然後按一下[主控台]。
- 在主控台中,按一下 [程式和功能],然後按一下 [開啟或關閉 Windows 功能]。
- 展開 [Internet Information Services]、[ 萬維網服務]、[ 安全性]。
- 選取 [Windows 驗證],然後按一下 [ 確定]。

作法
如何啟用網站、Web 應用程式或 Web 服務的Windows 驗證
(IIS) 管理員開啟 Internet Information Services:
如果您使用 Windows Server 2012 或 Windows Server 2012 R2:
- 在工作列上,依序按一下 [伺服器管理員]、[工具],然後按一下 [Internet Information Services] ([IIS) 管理員]。
如果您使用 Windows 8 或 Windows 8.1:
- 按住Windows鍵,按字母X,然後按一下[主控台]。
- 按一下 [ 系統管理工具],然後按兩下 [Internet Information Services] ([IIS) 管理員]。
如果您使用 Windows Server 2008 或 Windows Server 2008 R2:
- 在工作列上,按一下 [ 開始],指向 [ 系統管理工具],然後按一下 [ Internet Information Services (IIS) 管理員]。
如果您使用 Windows Vista 或 Windows 7:
- 在工作列上,按一下 [開始],然後按一下[主控台]。
- 按兩下 [ 系統管理工具],然後按兩下 [Internet Information Services] ([IIS) 管理員]。
在 [連線] 窗格中,展開伺服器名稱、[站台],然後展開您要啟用Windows 驗證的網站、應用程式或 Web 服務。
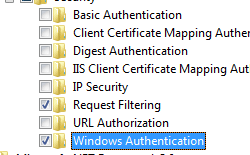
捲動至 [首頁] 窗格中的 [安全性] 區段,然後按兩下 [驗證]。
在 [驗證]窗格中,選取 [Windows 驗證],然後按一下 [動作] 窗格中的 [啟用]。
![[驗證] 窗格的螢幕擷取畫面,其中包含 [名稱] 和 [狀態] 欄位。](index/_static/image10.png)
![[驗證] 窗格的螢幕擷取畫面,其中包含 [名稱] 和 [狀態] 欄位。](index/_static/image9.png)
如何啟用Windows 驗證的擴充保護
(IIS) 管理員開啟 Internet Information Services:
如果您使用 Windows Server 2012 或 Windows Server 2012 R2:
- 在工作列上,依序按一下 [伺服器管理員]、[工具],然後按一下 [Internet Information Services] ([IIS) 管理員]。
如果您使用 Windows 8 或 Windows 8.1:
- 按住Windows鍵,按字母X,然後按一下[主控台]。
- 按一下 [ 系統管理工具],然後按兩下 [Internet Information Services] ([IIS) 管理員]。
如果您使用 Windows Server 2008 或 Windows Server 2008 R2:
- 在工作列上,按一下 [ 開始],指向 [ 系統管理工具],然後按一下 [ Internet Information Services (IIS) 管理員]。
如果您使用 Windows Vista 或 Windows 7:
- 在工作列上,按一下 [開始],然後按一下[主控台]。
- 按兩下 [系統管理工具],然後按兩下 [ Internet Information Services] (IIS) Manager。
在 [連線] 窗格中,展開伺服器名稱、展開[站台],然後展開您要為 Windows 驗證啟用 [擴充保護] 的網站、應用程式或 Web 服務。
捲動至 [首頁] 窗格中的 [安全性] 區段,然後按兩下 [驗證]。
在 [ 驗證] 窗格中,選取 [Windows 驗證]。
按一下 [動作] 窗格中的 [啟用]。
![[驗證] 窗格及其 [分組依據] 欄位的螢幕擷取畫面。](index/_static/image12.png)
按一下 [動作] 窗格中的 [進階設定]。
當 [ 進階設定] 對話方塊出現時,請在 [ 擴充保護 ] 下拉式功能表中選取下列其中一個選項:
- 如果您想要啟用擴充保護,同時為不支援擴充保護的用戶端提供下層支援,請選取 [ 接受 ]。
- 如果您想要啟用擴充保護而不提供下層支援,請選取 [ 必要 ]。
![[進階設定] 對話方塊的螢幕擷取畫面,其中已醒目提示 [擴充保護] 欄位的 [接受] 選項。](index/_static/image14.png)
按一下 [確定] 以關閉 [進階設定] 對話方塊。
![[驗證] 窗格及其 [分組依據] 欄位的螢幕擷取畫面。](index/_static/image11.png)
![[進階設定] 對話方塊的螢幕擷取畫面,其中已醒目提示 [擴充保護] 欄位的 [接受] 選項。](index/_static/image13.png)
組態
元素 <windowsAuthentication> 可在ApplicationHost.config檔案中的月臺、應用程式或虛擬目錄層級進行設定。
屬性
| 屬性 | 描述 |
|---|---|
authPersistNonNTLM |
選擇性 Boolean 屬性。 指定 IIS 是否會自動重新驗證每個非 NTLM (,例如 Kerberos) 要求,甚至是相同連線上的要求。 False 會啟用相同連線的多個驗證。 注意:true的設定表示用戶端只會在同一個連線上驗證一次。 IIS 會在伺服器上快取權杖或票證,以取得持續建立的 TCP 會話。 預設值為 false。 |
authPersistSingleRequest |
選擇性 Boolean 屬性。 將此旗標設定為 true 會指定驗證只會針對連線上的單一要求保存。 IIS 會在每個要求結束時重設驗證,並在會話的下一個要求上強制重新驗證。 預設值是 false。 |
enabled |
必要的 布林 值屬性。 指定是否啟用Windows 驗證。 預設值是 false。 |
useKernelMode |
選擇性 Boolean 屬性。 指定Windows 驗證是否在核心模式中完成。 True指定Windows 驗證使用核心模式。 核心模式驗證可能會改善驗證效能,並防止設定為使用自訂身分識別的應用程式集區驗證問題。 如果您使用 Kerberos 驗證並且在應用程式集區上有自訂身分識別,最佳作法是不要停用此設定。 預設值為 true。 |
子元素
| 元素 | 描述 |
|---|---|
extendedProtection |
選擇性項目。 指定Windows 驗證的擴充保護選項。 注意: 此元素已新增于 IIS 7.5 中。 |
providers |
選擇性項目。 指定用於Windows 驗證的安全性支援提供者。 |
組態範例
下列預設 <windowsAuthentication> 專案是在 IIS 7.0 中的根ApplicationHost.config檔案上設定,預設會停用Windows 驗證。 它也定義 IIS 7.0 的兩個Windows 驗證提供者。
<windowsAuthentication enabled="false">
   <providers>
      <add value="Negotiate" />
      <add value="NTLM" />
   </providers>
</windowsAuthentication>
下列範例會啟用Windows 驗證,並停用名為 Contoso 的網站匿名驗證。
<location path="Contoso">
   <system.webServer>
      <security>
         <authentication>
            <anonymousAuthentication enabled="false" />
            <windowsAuthentication enabled="true" />
         </authentication>
      </security>
   </system.webServer>
</location>
範例程式碼
下列範例會停用名為 Contoso 的網站匿名驗證,然後為網站啟用Windows 驗證。
AppCmd.exe
appcmd.exe set config "Contoso" -section:system.webServer/security/authentication/anonymousAuthentication /enabled:"False" /commit:apphost

appcmd.exe set config "Contoso" -section:system.webServer/security/authentication/windowsAuthentication /enabled:"True" /commit:apphost
注意
當您使用 AppCmd.exe 來設定這些設定時,請務必將 認可 參數 apphost 設定為 。 這會將組態設定認可至ApplicationHost.config檔案中的適當位置區段。
C#
using System;
using System.Text;
using Microsoft.Web.Administration;

internal static class Sample {

   private static void Main() {

      using(ServerManager serverManager = new ServerManager()) {
         Configuration config = serverManager.GetApplicationHostConfiguration();

         ConfigurationSection anonymousAuthenticationSection = config.GetSection("system.webServer/security/authentication/anonymousAuthentication", "Contoso");
         anonymousAuthenticationSection["enabled"] = false;

         ConfigurationSection windowsAuthenticationSection = config.GetSection("system.webServer/security/authentication/windowsAuthentication", "Contoso");
         windowsAuthenticationSection["enabled"] = true;

         serverManager.CommitChanges();
      }
   }
}
VB.NET
Imports System
Imports System.Text
Imports Microsoft.Web.Administration

Module Sample
   Sub Main()
      Dim serverManager As ServerManager = New ServerManager
      Dim config As Configuration = serverManager.GetApplicationHostConfiguration

      Dim anonymousAuthenticationSection As ConfigurationSection = config.GetSection("system.webServer/security/authentication/anonymousAuthentication", "Contoso")
      anonymousAuthenticationSection("enabled") = False

      Dim windowsAuthenticationSection As ConfigurationSection = config.GetSection("system.webServer/security/authentication/windowsAuthentication", "Contoso")
      windowsAuthenticationSection("enabled") = True

      serverManager.CommitChanges()
   End Sub
End Module
JavaScript
var adminManager = new ActiveXObject('Microsoft.ApplicationHost.WritableAdminManager');
adminManager.CommitPath = "MACHINE/WEBROOT/APPHOST";

var anonymousAuthenticationSection = adminManager.GetAdminSection("system.webServer/security/authentication/anonymousAuthentication", "MACHINE/WEBROOT/APPHOST/Contoso");
anonymousAuthenticationSection.Properties.Item("enabled").Value = false;

var windowsAuthenticationSection = adminManager.GetAdminSection("system.webServer/security/authentication/windowsAuthentication", "MACHINE/WEBROOT/APPHOST/Contoso");
windowsAuthenticationSection.Properties.Item("enabled").Value = true;

adminManager.CommitChanges();
VBScript
Set adminManager = CreateObject("Microsoft.ApplicationHost.WritableAdminManager")
adminManager.CommitPath = "MACHINE/WEBROOT/APPHOST"

Set anonymousAuthenticationSection = adminManager.GetAdminSection("system.webServer/security/authentication/anonymousAuthentication", "MACHINE/WEBROOT/APPHOST/Contoso")
anonymousAuthenticationSection.Properties.Item("enabled").Value = False

Set windowsAuthenticationSection = adminManager.GetAdminSection("system.webServer/security/authentication/windowsAuthentication", "MACHINE/WEBROOT/APPHOST/Contoso")
windowsAuthenticationSection.Properties.Item("enabled").Value = True

adminManager.CommitChanges()
意見反應
即將登場:在 2024 年,我們將逐步淘汰 GitHub 問題作為內容的意見反應機制,並將它取代為新的意見反應系統。 如需詳細資訊,請參閱:https://aka.ms/ContentUserFeedback。
提交並檢視相關的意見反應