Create a configurable tab
Ensure that you've all the prerequisites to build your configurable tab.
Note
This topic reflects version 2.0.x of the Microsoft Teams JavaScript client library (TeamsJS). If you are using an earlier version, refer to the TeamsJS library overview for guidance on the differences between the latest TeamsJS and earlier versions.
Create a configurable tab with Node.js
At the command prompt, install the Yeoman and gulp-cli packages by entering the following command after installing the Node.js:
npm install yo gulp-cli --globalAt the command prompt, install Microsoft Teams app generator by entering the following command:
npm install generator-teams --global
Generate your application with a configurable tab
At the command prompt, create a new directory for your configurable tab.
Enter the following command in your new directory to start the Microsoft Teams app generator:
yo teamsProvide your values to a series of questions prompted by Microsoft Teams app generator to update your
manifest.jsonfile: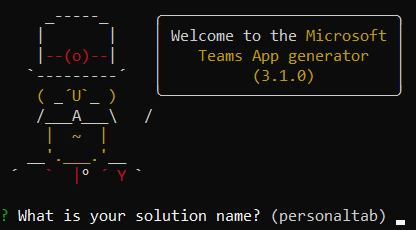
Series of questions to update your manifest.json file
What is your solution name?
The solution name is your project name. You can accept the suggested name by selecting Enter.
Where do you want to place the files?
You're in your project directory. Select Enter.
Title of your Microsoft Teams app project?
The title is your app package name and is used in the app manifest and description. Enter a title or select Enter to accept the default name.
Your (company) name? (max 32 characters)
Your company name can be used in the app manifest. Enter a company name or select Enter to accept the default name.
Which manifest version would you like to use?
Select the default schema.
Quick scaffolding? (Y/n)
The default is yes; enter n to enter your Microsoft Partner ID.
Enter your Microsoft Partner Id, if you've one? (Leave blank to skip)
This field isn't required and must be used only if you're already part of the Microsoft Cloud Partner Program, formerly known as Microsoft Partner Network.
What do you want to add to your project?
Select ( * ) A Tab.
The URL to host this solution?
By default, the generator suggests an Azure website URL. You're only testing your app locally, so a valid URL isn't necessary.
Would you like show a loading indicator when your app/tab loads?
Choose not to include a loading indicator when your app or tab loads. The default is no, enter n.
Would you like personal apps to be rendered without a tab header-bar?
Choose not to include personal apps to be rendered without a tab header-bar. Default is no, enter n.
Would you like to include Test framework and initial tests? (y/N)
Choose not to include a test framework for this project. The default is no, enter n.
Would you like to include ESLint support? (y/N)
Choose not to include ESLint support. The default is no, enter n.
Would you like to use Azure Applications Insights for telemetry? (y/N)
Choose not to include Azure Application Insights. The default is no; enter n.
Default Tab Name (max 16 characters)?
Name your tab. This tab name is used throughout your project as a file or URL path component.
What kind of Tab would you like to create?
Use the arrow keys to select Configurable tab.
What scopes do you intend to use for your Tab?
You can select a team or a group chat.
Do you require Microsoft Entra Single-Sign-On support for the tab?
Choose not to include Microsoft Entra Single-Sign-On support for the tab. The default is yes, enter n.
Do you want this tab to be available in SharePoint Online? (Y/n)
Enter n.
Important
The path component yourDefaultTabNameTab is the value that you entered in the generator for Default Tab Name plus the word Tab. For example, DefaultTabName is MyTab then /MyTabTab/.
Create your app package
You must have an app package to build and run your application in Teams. The app package is created through a gulp task that validates the manifest.json file and generates the zip folder in the ./package directory. At the command prompt, enter the following command:
gulp manifest
Build and run your application
Build your application
Enter the following command at the command prompt to transpile your solution into the ./dist folder:
gulp build
Run your application
At the command prompt, enter the following command to start a local web server:
gulp serveEnter
http://localhost:3007/<yourDefaultAppNameTab>/in your browser to view your application's home page.
To view your tab configuration page, go to
http://localhost:3007/<yourDefaultAppNameTab>/config.html.
Establish a secure tunnel to your tab
To establish a secure tunnel to your tab, exit the localhost and enter the following command:
gulp ngrok-serve
Important
After your tab is uploaded to Microsoft Teams through ngrok, and successfully saved, you can view it in Teams until your tunnel session ends. If you restart your ngrok session, you must update your app with the new URL.
Upload your application to Teams
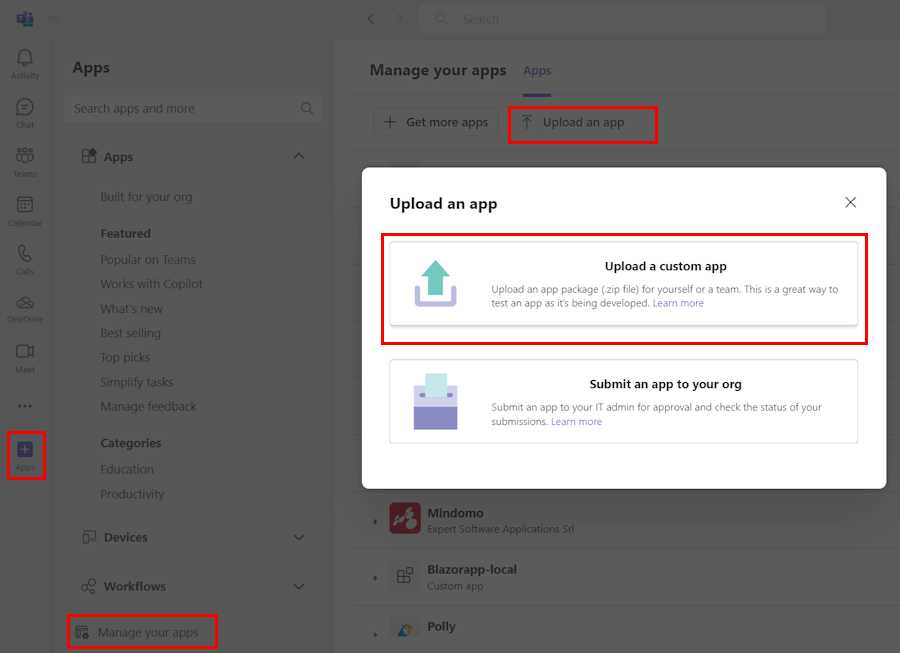
Go to Teams and select Apps
 .
.Select Manage your apps > Upload an app > Upload a custom app.
Go to your project directory, browse to the ./package folder, select the app package zip folder, and choose Open.
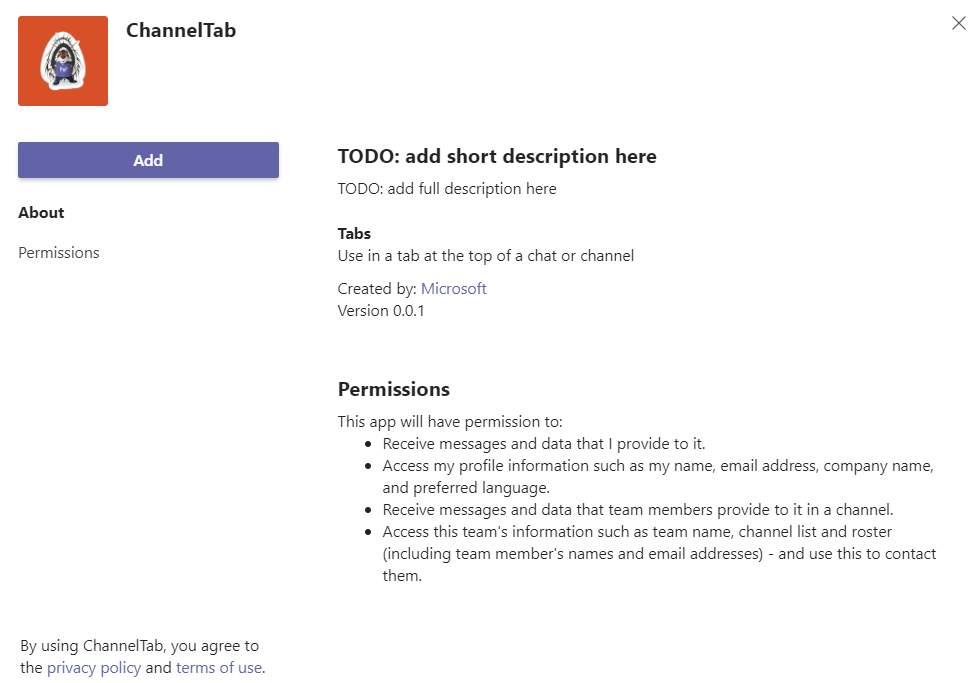
Select Add in the dialog. Your tab is uploaded to Teams.
If Add doesn't display in the dialog box, then remove the following code from the manifest of the uploaded app package zip folder. Zip the folder again and upload it to Teams.
"staticTabs": [],
"bots": [],
"connectors": [],
"composeExtensions": [],
Follow the directions for adding a tab. There's a custom configuration dialog for your configurable tab.
Select Save and your tab is added to the channel's tab bar.
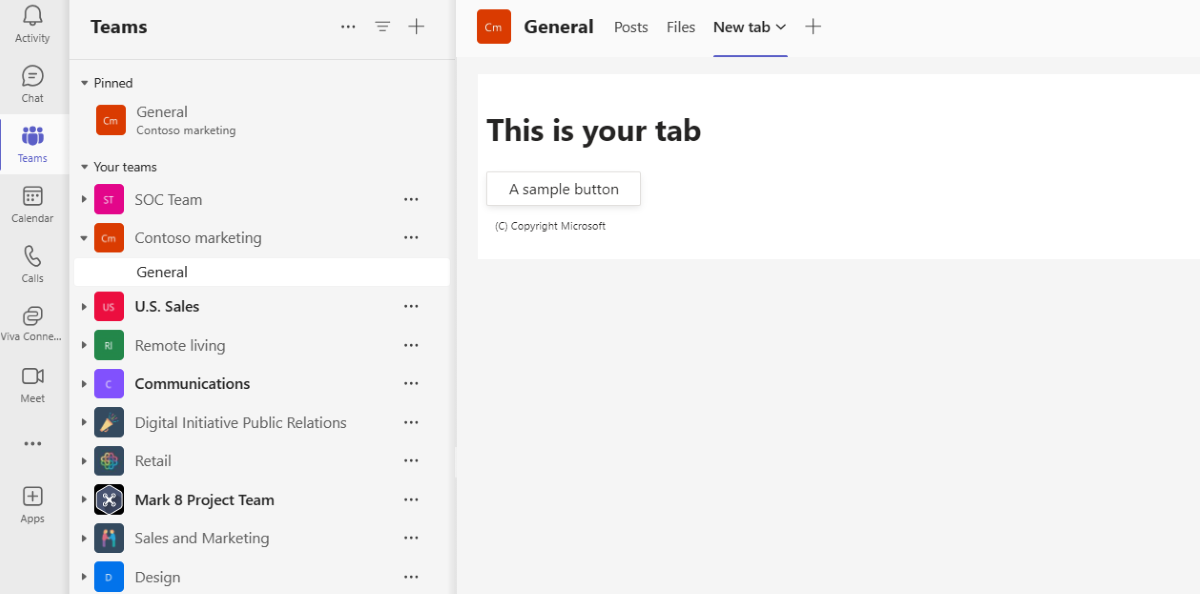
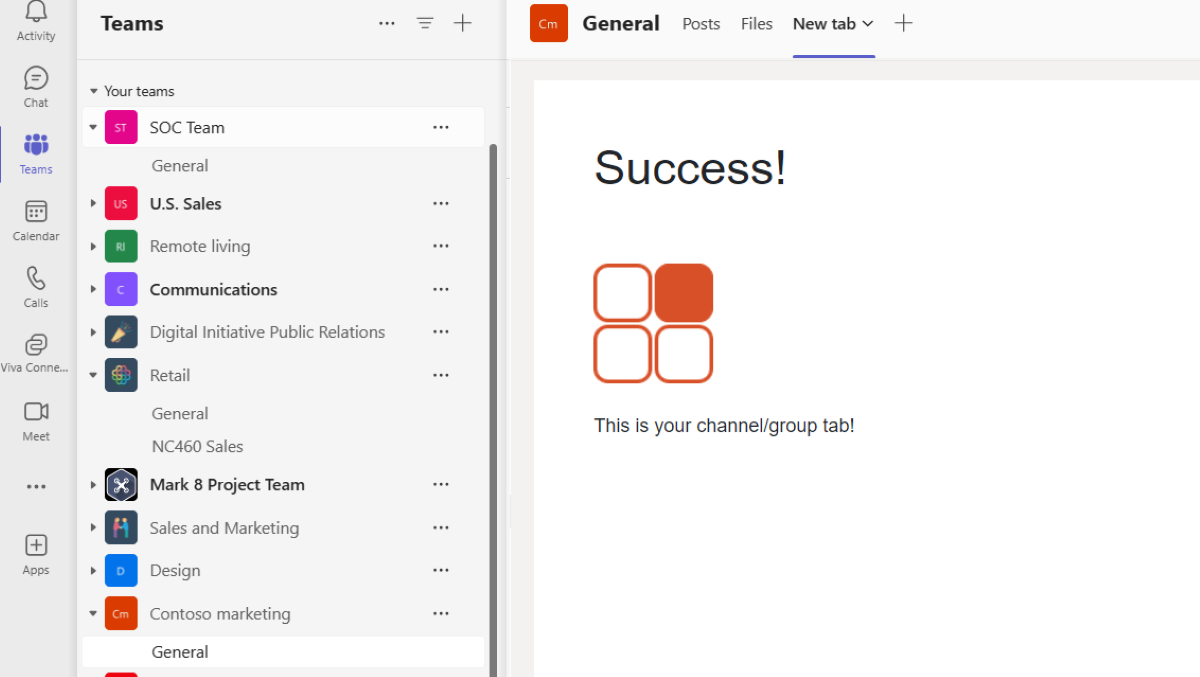
Your configurable tab is successfully created and added in Teams.
Create a custom configurable tab with ASP.NET Core
At the command prompt, create a new directory for your tab project.
Clone the sample repository into your new directory using the following command or you can download the source code and extract the files:
git clone https://github.com/OfficeDev/Microsoft-Teams-Samples.git
Generate your application with a configurable tab
Open Visual Studio and select Open a project or solution.
Go to Microsoft-Teams-Samples > samples > tab-channel-group > razor-csharp folder and open channelGroupTab.sln.
In Visual Studio, select F5 or choose Start Debugging from your application's Debug menu to verify if the application is loaded properly. In a browser, go to the following URLs:
https://localhost:3978/https://localhost:3978/privacyhttps://localhost:3978/tou
Review the source code
Startup.cs
This project was created from an ASP.NET Core 3.1 web application empty template with the Advanced * Configure for HTTPS check box selected at setup. The MVC services are registered by the dependency injection framework's ConfigureServices() method. Additionally, the empty template doesn't enable serving static content by default, so the static files middleware is added to the Configure() method using the following code:
public void ConfigureServices(IServiceCollection services)
{
    services.AddMvc(options => options.EnableEndpointRouting = false);
}

public void Configure(IApplicationBuilder app)
{
    app.UseStaticFiles();
    app.UseMvc();
}
wwwroot folder
In ASP.NET Core, the web root folder is where the application looks for static files.
Index.cshtml
ASP.NET Core treats files called Index as the default or home page for the site. When your browser URL points to the root of the site, Index.cshtml is displayed as the home page for your application.
Tab.cs
This C# file contains a method that is called from Tab.cshtml during configuration.
AppManifest folder
This folder contains the following required app package files:
- A full color icon measuring 192 x 192 pixels.
- A transparent outline icon measuring 32 x 32 pixels.
- A
manifest.jsonfile that specifies the attributes of your app.
These files need to be zipped in an app package for use in uploading your tab to Teams. When a user chooses to add or update your tab, Teams loads the configurationUrl specified in your manifest, embeds it in an Iframe, and renders it in your tab.
.csproj
In the Visual Studio Solution Explorer window, right-click on the project and select Edit Project File. At the end of the file, you see the following code that creates and updates your zip folder when the application builds:
<PropertyGroup>
    <PostBuildEvent>powershell.exe Compress-Archive -Path \"$(ProjectDir)AppManifest\*\" -DestinationPath \"$(TargetDir)tab.zip\" -Force</PostBuildEvent>
  </PropertyGroup>

  <ItemGroup>
    <EmbeddedResource Include="AppManifest\icon-outline.png">
      <CopyToOutputDirectory>Always</CopyToOutputDirectory>
    </EmbeddedResource>
    <EmbeddedResource Include="AppManifest\icon-color.png">
      <CopyToOutputDirectory>Always</CopyToOutputDirectory>
    </EmbeddedResource>
    <EmbeddedResource Include="AppManifest\manifest.json">
      <CopyToOutputDirectory>Always</CopyToOutputDirectory>
    </EmbeddedResource>
  </ItemGroup>
Establish a secure tunnel to your tab
At the command prompt in the root of your project directory, run the following command to establish a secure tunnel to your tab:
ngrok http 3978 --host-header=localhost
Ensure that you keep the command prompt with ngrok running and make a note of the URL.
Update your application
Open Visual Studio Solution Explorer and go to the Pages > Shared folder and open _Layout.cshtml, and add the following to the tags section:
<script src="https://ajax.aspnetcdn.com/ajax/jQuery/jquery-3.4.1.min.js"></script>
<script src="https://res.cdn.office.net/teams-js/2.2.0/js/MicrosoftTeams.min.js"
  integrity="sha384yBjE++eHeBPzIg+IKl9OHFqMbSdrzY2S/LW3qeitc5vqXewEYRWegByWzBN/chRh"
  crossorigin="anonymous" >
</script>
Important
Do not copy and paste the
<script src="...">URLs from this page, as they do not represent the latest version. To get the latest version of TeamsJS, always go to Microsoft Teams JavaScript API.Insert a call to
microsoftTeams.app.initialize();in thescripttag.In Visual Studio Solution Explorer, go to the Pages folder and open Tab.cshtml
Within Tab.cshtml, the application presents the user with two options for displaying the tab with a red or gray icon. The Select Gray or Select Red button triggers
saveGray()orsaveRed()respectively, setspages.config.setValidityState(true), and enables Save on the configuration page. This code lets Teams know that the requirements configuration is completed and you can proceed with the installation. The parameters ofpages.config.setConfigare set. Finally,saveEvent.notifySuccess()is called to indicate that the content URL is successfully resolved.Update the
websiteUrlandcontentUrlvalues in each function with the HTTPS ngrok URL to your tab.Your code should now include the following with y8rCgT2b replaced with your ngrok URL:
    let saveGray = () => {
        microsoftTeams.pages.config.registerOnSaveHandler((saveEvent) => {
            microsoftTeams.pages.config.setConfig({
                websiteUrl: `https://y8rCgT2b.ngrok.io`,
                contentUrl: `https://y8rCgT2b.ngrok.io/gray/`,
                entityId: "grayIconTab",
                suggestedDisplayName: "MyNewTab",
                removeUrl: ""
            });
            saveEvent.notifySuccess();
        });
    }

    let saveRed = () => {
        microsoftTeams.pages.config.registerOnSaveHandler((saveEvent) => {
            microsoftTeams.pages.config.setConfig({
                websiteUrl: `https://y8rCgT2b.ngrok.io`,
                contentUrl: `https://y8rCgT2b.ngrok.io/red/`,
                entityId: "redIconTab",
                suggestedDisplayName: "MyNewTab",
                removeUrl: ""
            });
            saveEvent.notifySuccess();
        });
    }
Save the updated Tab.cshtml.
Build and run your application
In Visual Studio, select F5 or choose Start Debugging from the Debug menu.
Verify that ngrok is running and working properly by opening your browser and going to your content page via the ngrok HTTPS URL that was provided in your command prompt window.
Tip
You need to have both your application in Visual Studio and ngrok running to complete the steps provided in this article. If you need to stop running your application in Visual Studio to work on it, keep ngrok running. It listens and resumes routing your application's request when it restarts in Visual Studio. If you've to restart the ngrok service it returns a new URL and you've to update your application with the new URL.
Update your app package with Developer Portal
Go to Teams. If you use the web-based version, you can inspect your front-end code using your browser's developer tools.
Go to Developer portal.
Open Apps and select Import app.
The name of your app package is
tab.zip. It's available in the following path:/bin/Debug/netcoreapp3.1/tab.zipSelect
tab.zipand open it in the Developer Portal.A default App ID is created and populated in Basic information section.
Add the Short and Long description for your app in Descriptions.
In Developer Information, add the required details and in Website (must be a valid HTTPS URL) give your ngrok HTTPS URL.
In App URLs, update the Privacy policy to
https://<yourngrokurl>/privacyand Terms of use tohttps://<yourngrokurl>/touand save.In App features, select Group and channel app. Update the Configuration URL with
https://<yourngrokurl>/taband select your tab Scope.Select Save.
In the Domains section, domains from your tabs must contain your ngrok URL without the HTTPS prefix
<yourngrokurl>.ngrok.io.
Preview your app in Teams
Select Preview in Teams from the Developer Portal toolbar, Developer Portal informs you that your custom app is uploaded successfully. The Add page appears for your app in Teams.
Select Add to team to Set up the tab in a team. Configure your tab and select Save. Your tab is now available in Teams.
Your configurable tab is successfully created and added in Teams.
Create a custom configurable tab with ASP.NET Core MVC
At the command prompt, create a new directory for your tab project.
Clone the sample repository into your new directory using the following command or you can download the source code and extract the files:
git clone https://github.com/OfficeDev/Microsoft-Teams-Samples.git
Generate your application with a configurable tab
Open Visual Studio and select Open a project or solution.
Go to Microsoft-Teams-Samples > samples > tab-channel-group > mvc-csharp folder and open ChannelGroupTabMVC.sln.
In Visual Studio, select F5 or choose Start Debugging from your application's Debug menu to verify if the application is loaded properly. In a browser, go to the following URLs:
https://localhost:3978/https://localhost:3978/privacyhttps://localhost:3978/tou
Review the source code
Startup.cs
This project was created from an ASP.NET Core 3.1 web application empty template with the Advanced - Configure for HTTPS check box selected at setup. The MVC services are registered by the dependency injection framework's ConfigureServices() method. Additionally, the empty template doesn't enable serving static content by default, so the static files middleware is added to the Configure() method using the following code:
public void ConfigureServices(IServiceCollection services)
{
    services.AddMvc(options => options.EnableEndpointRouting = false);
}

public void Configure(IApplicationBuilder app)
{
    app.UseStaticFiles();
    app.UseMvc();
}
wwwroot folder
In ASP.NET Core, the web root folder is where the application looks for static files.
AppManifest folder
This folder contains the following required app package files:
- A full color icon measuring 192 x 192 pixels.
- A transparent outline icon measuring 32 x 32 pixels.
- A
manifest.jsonfile that specifies the attributes of your app.
These files need to be zipped in an app package for use in uploading your tab to Teams.
.csproj
In the Visual Studio Solution Explorer window, right-click on the project and select Edit Project File. At the end of the file you, see the following code that creates and updates your zip folder when the application builds:
<PropertyGroup>
    <PostBuildEvent>powershell.exe Compress-Archive -Path \"$(ProjectDir)AppManifest\*\" -DestinationPath \"$(TargetDir)tab.zip\" -Force</PostBuildEvent>
  </PropertyGroup>

  <ItemGroup>
    <EmbeddedResource Include="AppManifest\icon-outline.png">
      <CopyToOutputDirectory>Always</CopyToOutputDirectory>
    </EmbeddedResource>
    <EmbeddedResource Include="AppManifest\icon-color.png">
      <CopyToOutputDirectory>Always</CopyToOutputDirectory>
    </EmbeddedResource>
    <EmbeddedResource Include="AppManifest\manifest.json">
      <CopyToOutputDirectory>Always</CopyToOutputDirectory>
    </EmbeddedResource>
  </ItemGroup>
Models
ChannelGroup.cs presents a message object and methods that can be called from the controllers during configuration.
Views
The different views in ASP.NET Core MVC are:
Home: ASP.NET Core treats files called Index as the default or home page for the site. When your browser URL points to the root of the site, Index.cshtml can be displayed as the home page for your application.
Shared: The partial view markup _Layout.cshtml contains the application's overall page structure and shared visual elements that also reference the Teams Library.
Controllers
The controllers use the ViewBag property to transfer values dynamically to the views.
Establish a secure tunnel to your tab
At the command prompt in the root of your project directory, run the following command to establish a secure tunnel to your tab:
ngrok http 3978 --host-header=localhost
Ensure that you keep the command prompt with ngrok running and make a note of the URL.
Update your application
Open Visual Studio Solution Explorer and go to the Views > Shared folder and open _Layout.cshtml, and add the following to the tags section:
<script src="https://ajax.aspnetcdn.com/ajax/jQuery/jquery-3.4.1.min.js"></script>
<script src="https://res.cdn.office.net/teams-js/2.2.0/js/MicrosoftTeams.min.js"
  integrity="sha384yBjE++eHeBPzIg+IKl9OHFqMbSdrzY2S/LW3qeitc5vqXewEYRWegByWzBN/chRh"
  crossorigin="anonymous" >
</script>
Important
Do not copy and paste the
<script src="...">URLs from this page, as they do not represent the latest version. To get the latest version of the SDK, always go to Microsoft Teams JavaScript API.Insert a call to
microsoftTeams.app.initialize();in thescripttag.In Visual Studio Solution Explorer, go to the Tab folder and open Tab.cshtml
Within Tab.cshtml, the application presents the user with two options for displaying the tab with a red or gray icon. The Select Gray or Select Red button triggers
saveGray()orsaveRed()respectively, setspages.config.setValidityState(true), and enables Save on the configuration page. This code lets Teams know that the requirements configuration is completed and you can proceed with the installation. The parameters ofpages.config.setConfigare set. Finally,saveEvent.notifySuccess()is called to indicate that the content URL has been successfully resolved.Update the
websiteUrlandcontentUrlvalues in each function with the HTTPS ngrok URL to your tab.Your code should now include the following with y8rCgT2b replaced with your ngrok URL:
    let saveGray = () => {
        microsoftTeams.pages.config.registerOnSaveHandler((saveEvent) => {
            microsoftTeams.pages.config.setConfig({
                websiteUrl: `https://y8rCgT2b.ngrok.io`,
                contentUrl: `https://y8rCgT2b.ngrok.io/gray/`,
                entityId: "grayIconTab",
                suggestedDisplayName: "MyNewTab",
                removeUrl:""
            });
            saveEvent.notifySuccess();
        });
    }

    let saveRed = () => {
        microsoftTeams.pages.config.registerOnSaveHandler((saveEvent) => {
            microsoftTeams.pages.config.setConfig({
                websiteUrl: `https://y8rCgT2b.ngrok.io`,
                contentUrl: `https://y8rCgT2b.ngrok.io/red/`,
                entityId: "redIconTab",
                suggestedDisplayName: "MyNewTab",
                removeUrl:""
            });
            saveEvent.notifySuccess();
        });
    }
Make sure to save the updated Tab.cshtml.
Build and run your application
In Visual Studio, select F5 or choose Start Debugging from the Debug menu.
Verify that ngrok is running and working properly by opening your browser and going to your content page via the ngrok HTTPS URL that was provided in your command prompt window.
Tip
You need to have both your application in Visual Studio and ngrok running to complete the steps provided in this article. If you need to stop running your application in Visual Studio to work on it, keep ngrok running. It listens and resumes routing your application's request when it restarts in Visual Studio. If you've to restart the ngrok service it returns a new URL and you've to update your application with the new URL.
Update your app package with Developer Portal
Go to Teams. If you use the web-based version, you can inspect your front-end code using your browser's developer tools.
Go to Developer portal.
Open Apps and select Import app.
The name of your app package is tab.zip. It's available in the following path:
/bin/Debug/netcoreapp3.1/tab.zipSelect tab.zip and open it in the Developer Portal.
A default App ID is created and populated in Basic information section.
Add the Short and Long description for your app in Descriptions.
In Developer Information, add the required details and in Website (must be a valid HTTPS URL) give your ngrok HTTPS URL.
In App URLs, update the Privacy policy to
https://<yourngrokurl>/privacyand Terms of use tohttps://<yourngrokurl>/touand save.In App features, select Group and channel app. Update the Configuration URL with
https://<yourngrokurl>/taband select your tab Scope.Select Save.
In the Domains section, domains from your tabs must contain your ngrok URL without the HTTPS prefix
<yourngrokurl>.ngrok.io.
Preview your app in Teams
Select Preview in Teams from the Developer Portal toolbar, Developer Portal informs you that your custom app is uploaded successfully. The Add page appears for your app in Teams.
Select Add to team to Set up the tab in a team. Configure your tab and select Save. Your tab is now available in Teams.
Your configurable tab is successfully created and added in Teams.
Blazor lets you build interactive web UIs using C#, instead of JavaScript. You can create a tab app and a bot app with Blazor and the latest version of Visual Studio.
Note
Teams Toolkit doesn't support the message extension capability.
Here's a list of tools you require for building and deploying your app.
| Install | For using... | |
|---|---|---|
| Required | ||
| Visual Studio version 17.2.0 preview 2.1 | Select Visual Studio Enterprise 2022 Preview (version 17.2.0 preview 2.1). | |
| Microsoft Teams | Microsoft Teams to collaborate with everyone you work with through apps for chat, meetings, and calls - all in one place. | |
| Microsoft Edge (recommended) or Google Chrome | A browser with developer tools. |
Prepare development environment
After you've installed the required tools, set up the development environment.
Install Microsoft Teams Toolkit
The Teams Toolkit helps simplify the development process with tools to provision and deploy cloud resources for your app, publish to the Teams Store, and more. You can use the toolkit with Visual Studio, or as a Command Line Interface (called teamsfx).
You can use the latest version of the Visual Studio to develop Teams apps with Blazor Server in .NET.
To install the Microsoft Teams Toolkit extension:
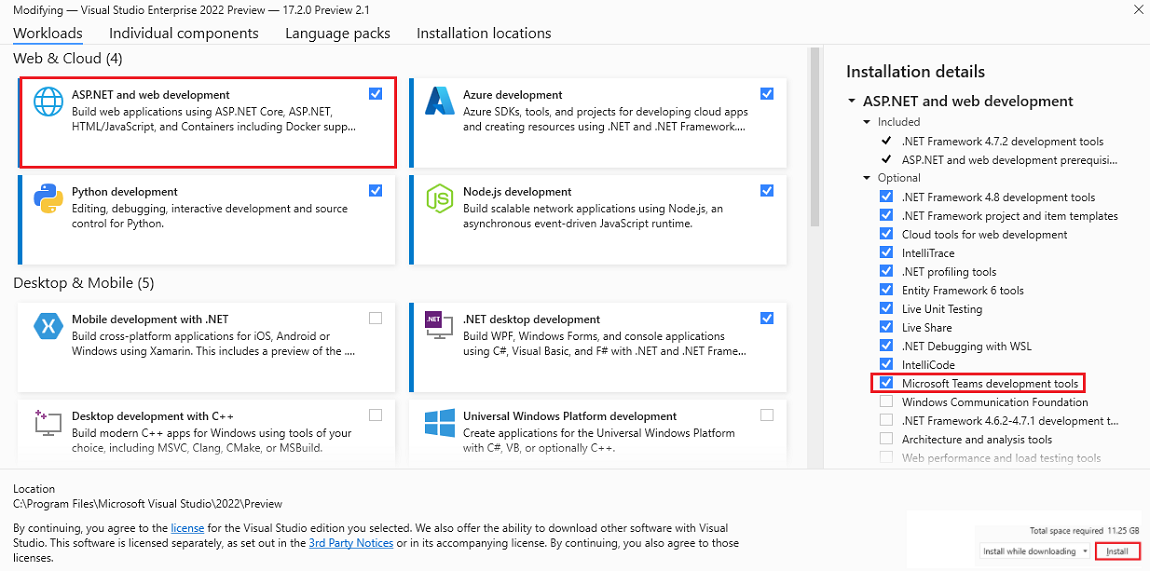
Download the latest version of the Visual Studio.
Open
vs_enterprise__3bed52501a604464b1eff2ce580fd4eb.exefrom your download folder.Select Continue in the Visual Studio Installer page to configure your installation.

Select ASP.NET and web development under Workloads.
Select Microsoft Teams development tools under Installation details.
Select Install.
Your Visual Studio is installed in a few minutes.
Set up your Teams development tenant
A tenant is like a space or a container for your organization in Teams, where you chat, share files, and run meetings. This space is also where you upload and test your custom app. Let's verify if you're ready to develop with the tenant.
Enable custom app upload option
After creating the app, you must load your app in Teams without distributing it. This process is known as custom app upload. Sign in to your Microsoft 365 account to view this option.
Do you already have a tenant, and do you've the admin access? Let's check if you really do!
Verify if you can upload a custom app in Teams:
In the Teams client, select Apps.
Select Manage your apps.
Select Upload a custom app. If you see Upload a custom app option, custom app upload is enabled.
Note
Contact your Teams administrator, if you don't find the option to upload a custom app.
Create a free Teams developer tenant (optional)
If you don't have a Teams developer account, you can get it for free. Join the Microsoft 365 developer program!
Go to the Microsoft 365 developer program.
Select Join Now and follow the onscreen instructions.
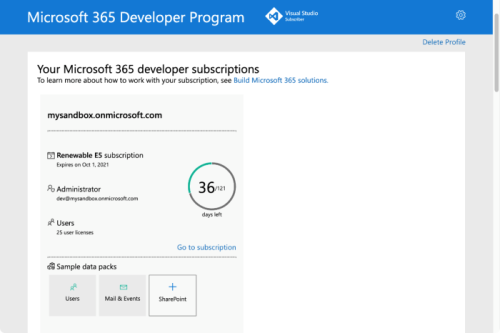
In the welcome screen, select Set up E5 subscription.
Set up your administrator account. After you finish, the following screen appears.
Sign in to Teams using the administrator account you just set up. Verify that you've the Upload a custom app option in Teams.
Get a free Azure account
If you wish to host your app or access resources in Azure, you must have an Azure subscription. Create a free account before you begin.
Now you've got all tools and set up your accounts. Next, let's set up your development environment and start building!
Create project workspace for your tab app
Start Teams app development by creating your first app. This app uses the tab capability.

This tutorial walks you through the steps to create, run, and deploy your first Teams app using .NET/Blazor.
In this page, you'll learn:
Create your tab project
Use Teams Toolkit to create your first tab project. The toolkit takes you through a series of pages to create and configure your Teams app project:
- Create a new project page: You can select the project type.
- Configure your new project page: You can enter the project details.
- Create a new Teams application page: You can select the Teams app capabilities.
To create your tab project workspace
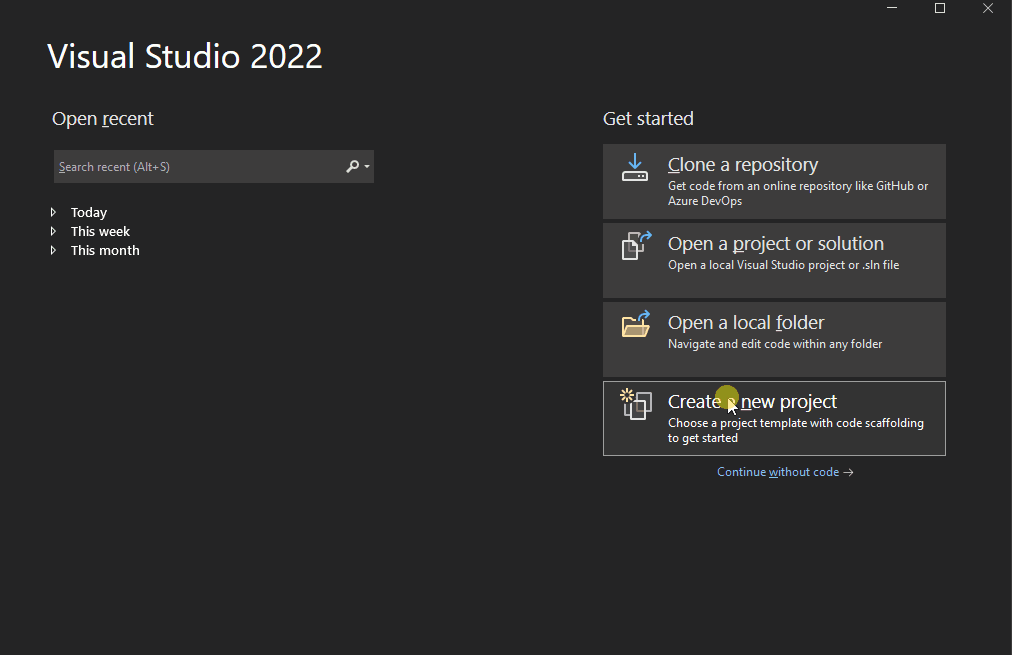
Open the latest version of Visual Studio.
Select Create a new project.
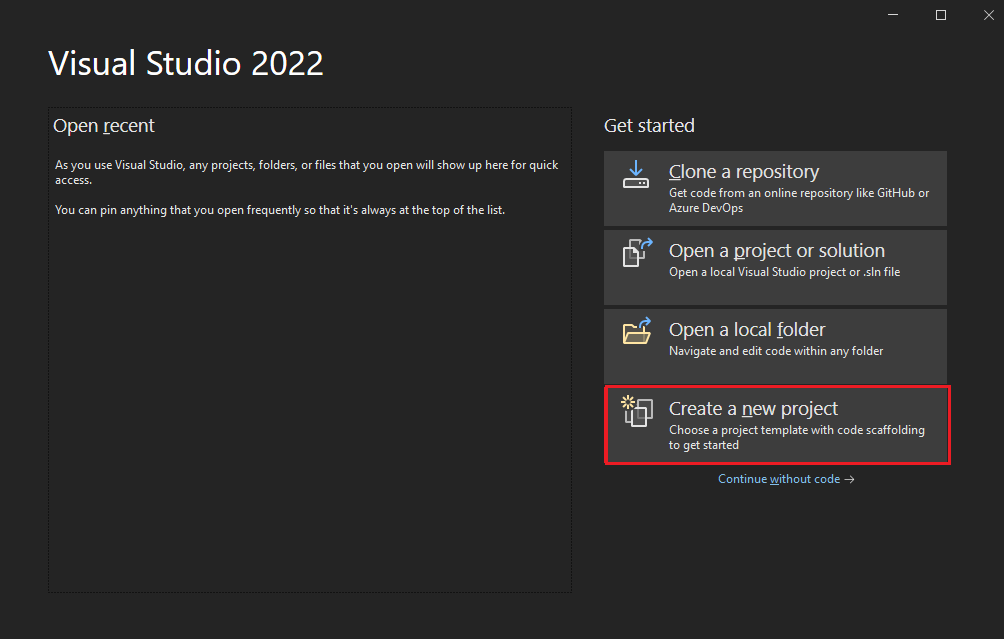
The Create a new project page appears.
Select the project details.
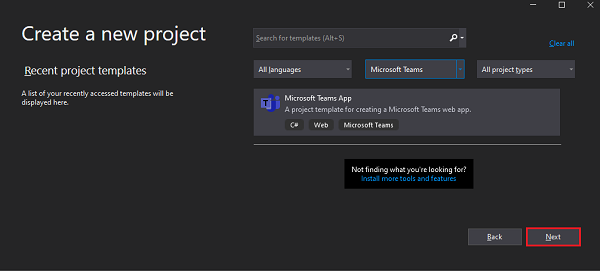
Select the project type:
Search for Microsoft Teams from templates dropdown list.
Select Microsoft Teams App as the template.
Select Next.
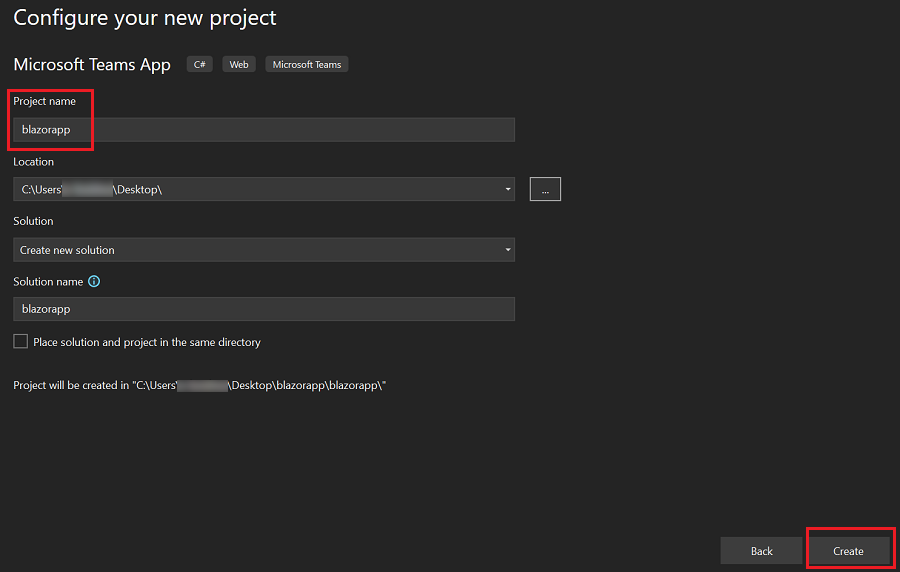
The Configure your new project page appears.
Configure the new project details.
Select the following project configuration:
Enter a suitable name for your project.
Note
You can note that the project name you enter is automatically filled in as the Solution name also. If you want, you can change the solution name with no affect on project name.
Select the folder path where you want to create the project workspace.
Enter a different solution name, if you want.
Check the option to save the project and solution in the same folder, if you want. For this tutorial, you don't need this option.
Select Create.
The Create a new Teams application page appears.
Select Teams app feature.
Select app feature:
Select the Tab as the capability for your app.
Select Create.
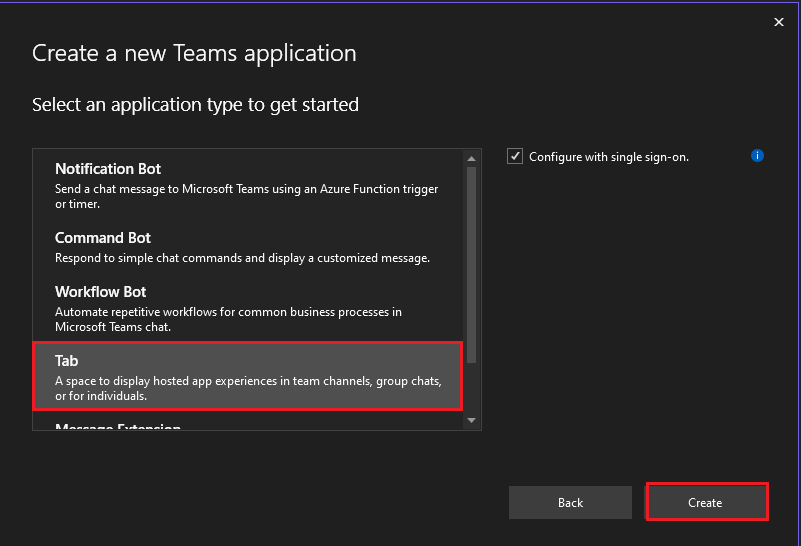


Your Teams tab app is created in few seconds.

A quick recap of creating a Teams tab app.
Watch this short recap for creating a Teams tab app.
Take a tour of the source code for Teams tab app
After project creation, you've the components to build a basic personal app. You can view the project directory structure in the Solution Explorer pane of the Visual Studio.
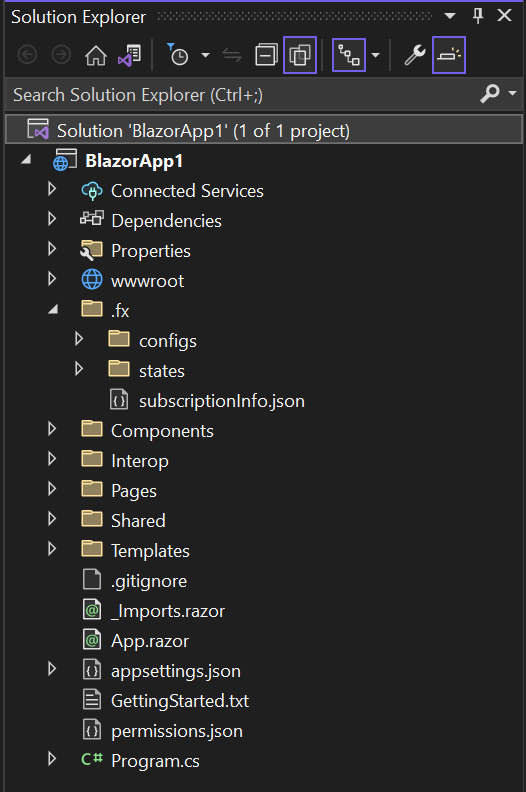
Teams Toolkit creates a scaffolding for your project based on the capabilities you selected. Among other files, Teams Toolkit maintains:
| Folder name | Contents |
|---|---|
| App icons | The app icons are stored as PNG files in color.png and outline.png. |
manifest.json |
The app manifest for publishing through the Developer Portal for Teams is stored in Properties/manifest.json. |
BackendController.cs |
A backend controller is provided in Controllers/BackendController.cs for assisting with authentication. |
Pages/Tab.razor |
The app manifest for publishing through the Developer Portal for Teams is stored in Properties/manifest.json. |
TeamsFx.cs and JS/src/index.js |
The content is used for initializing communications with the Teams host. |
You can add backend functionality by adding other ASP.NET Core controllers to your application.
Build and run your first Teams tab app
After you set up your project workspace with Teams Toolkit, build your tab project.
To build and run your app:
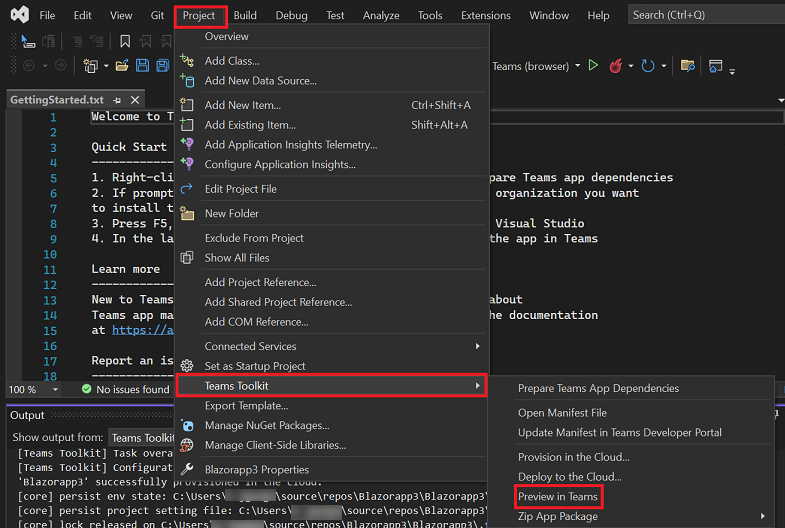
Select Project > Teams Toolkit > Prepare Teams App Dependencies.

Select your Microsoft 365 account or Add an account to sign in.
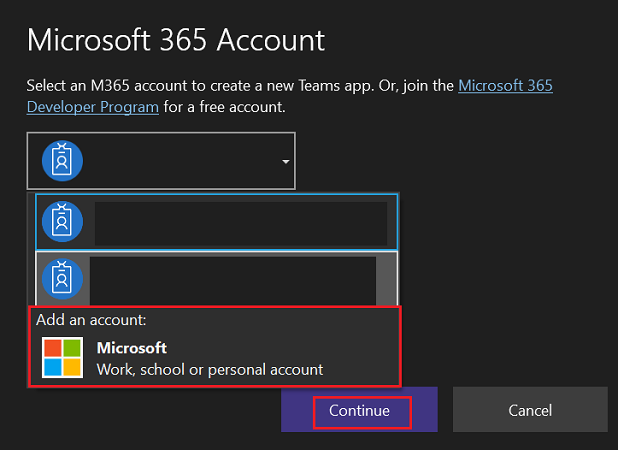
Select Debug > Start Debugging or select F5 to run your app in debug mode.
Learn what happens when you run your app locally in the debugger.
When you select F5, Teams Toolkit:
- Registers your application with Microsoft Entra ID.
- Registers your application for uploading in Teams.
- Starts your application backend running locally.
- Starts your application front-end hosted locally.
- Starts Teams in a web browser with a command to instruct Teams to upload the custom app (the URL is registered inside the application manifest).
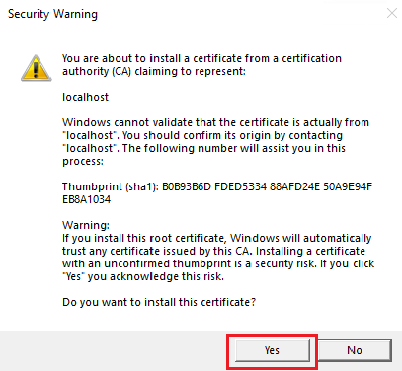
Install the self-signed SSL certificate for local debugging, if requested.
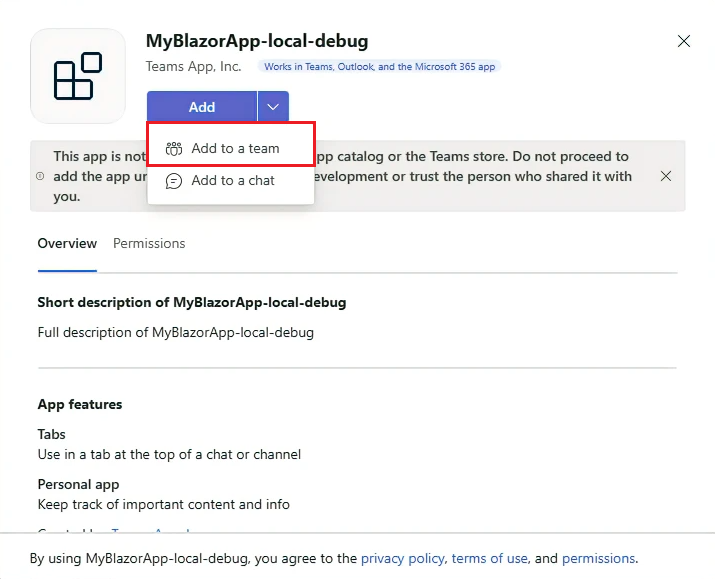
Teams is loaded in a web browser.
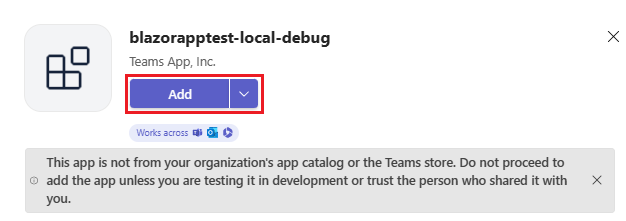
Select Add to a team when prompted to install the app to Teams.
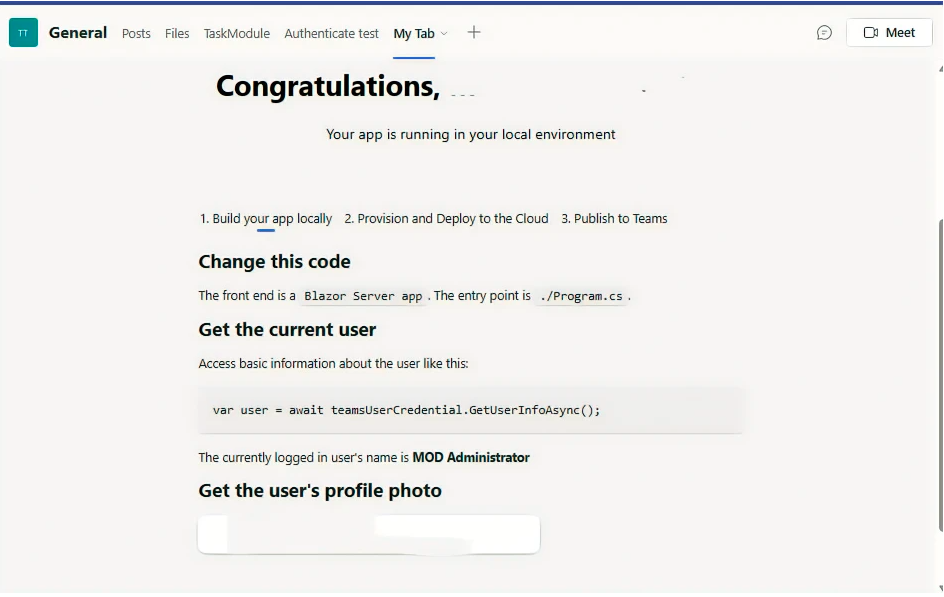
Congratulations, your first tab app is running in your local environment!
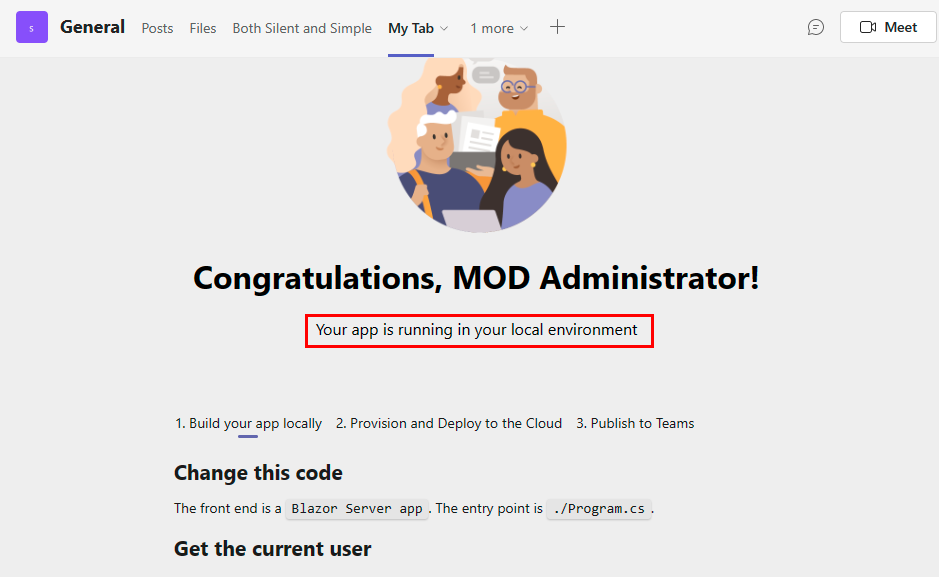
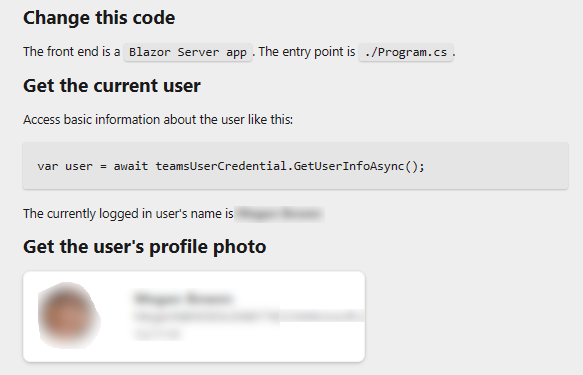
Move through the page to view the user details.
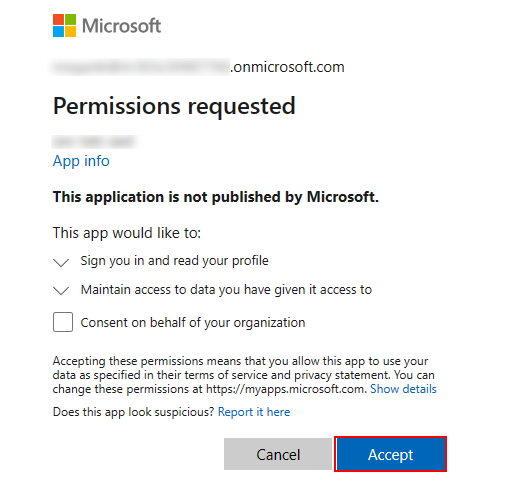
Select Authorize to let your app retrieve user details using Microsoft Graph.
The app requests permission to grant access for displaying user details.
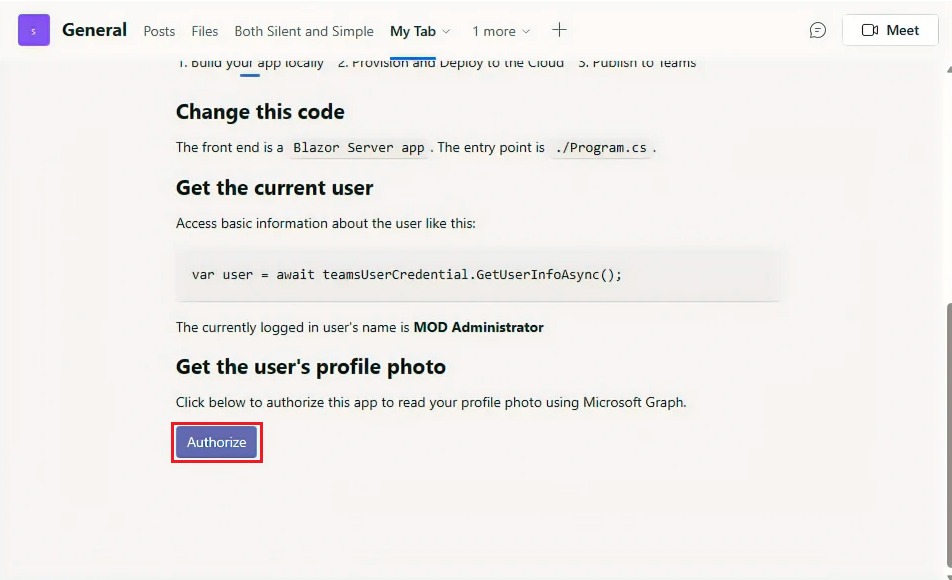
Select Accept to let your app access user details.
Your photograph and details appear in your channel tab.
You can do normal debugging activities, such as setting breakpoints, as if it were any other web application. The app supports hot reloading. If you change any file within the project, the page is reloaded.
Learn how to troubleshoot if your app doesn't run locally.
To run your app in Teams, you need a Microsoft 365 development account that allows custom app upload. You can learn more about it in the prerequisites section.
Stop debugging in Visual Studio.

Preview your first Teams tab app
You've learned to create, build, and run Teams app with tab capability. The following final steps are to deploy your app on Azure and Preview in Teams:
Provision your tab app in the cloud: You can provision your tab app in the cloud.
Deploy your tab app to cloud: You can deploy your tab app to cloud.
Preview your tab app in Teams: You can preview your tab app in Teams.
Let's deploy the first app with tab capability on Azure using Teams Toolkit.
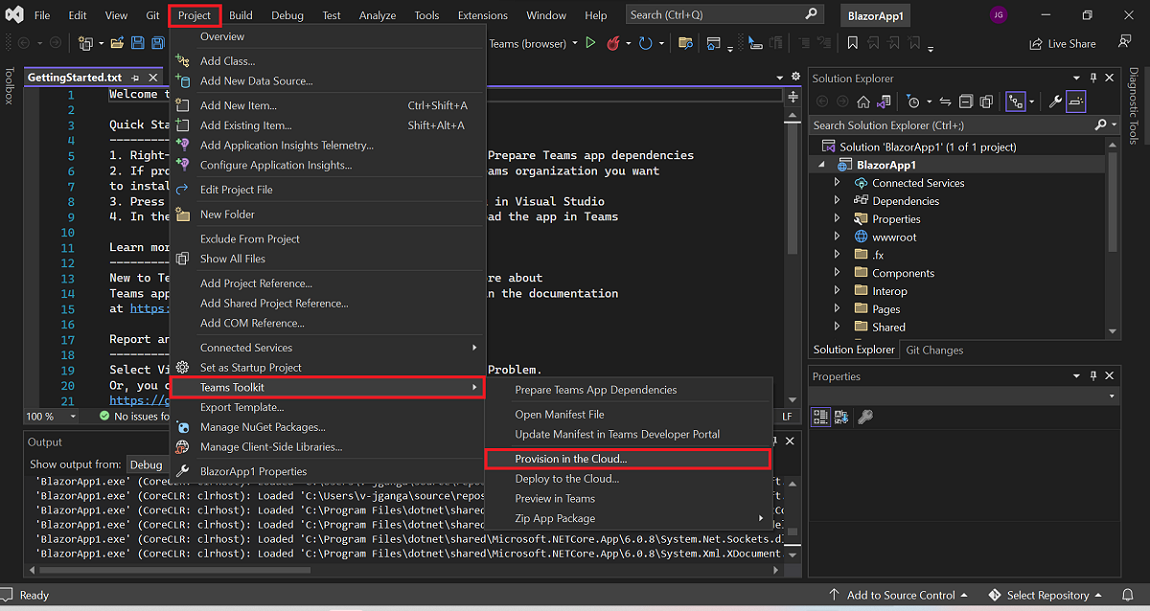
To provision your tab app in the cloud
Select Project > Teams Toolkit > Provision in the Cloud.
Enter the subscription and resource group details in the Provision dialog:
- Select the subscription name from Subscription name dropdown list.
- Select the resource group from Resource group dropdown list or select New to add the resource group generated for your app.
- Select your Region, if new resource group is created.
- Select Provision.
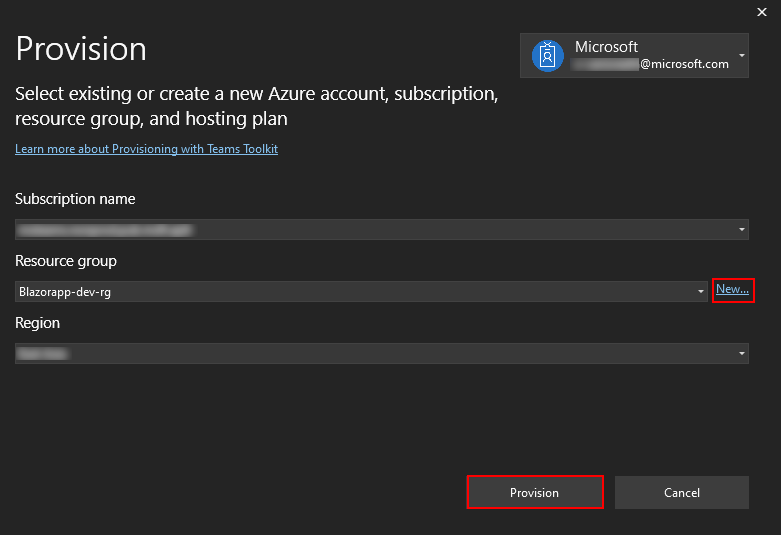
Provision warning displays.
Select Provision.

It takes a few minutes for your resource group to provision in the cloud.
After the provision is complete, select OK.

Select View Provisioned Resources to view on Azure portal.

Sign in to your Azure portal account on sign-in prompt.
Your app-dev-rg appears.
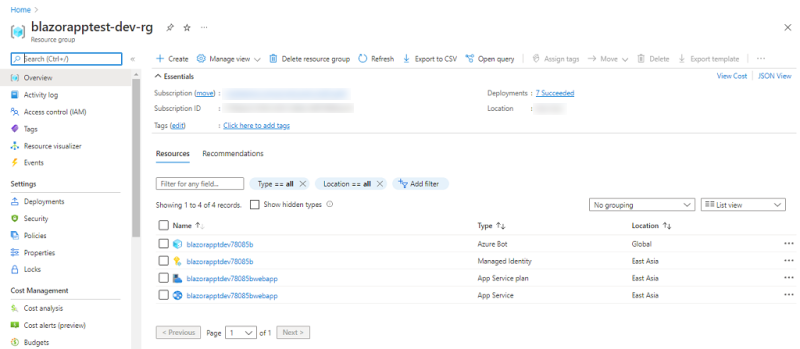
Your resources are provisioned in the Azure portal!


To deploy your tab app to cloud
Select Project > Teams Toolkit > Deploy to the Cloud.
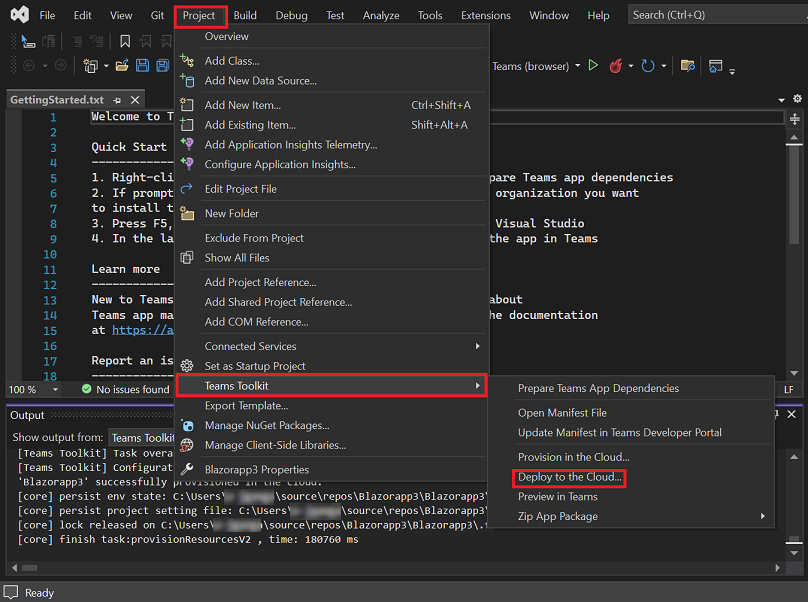
Select OK.
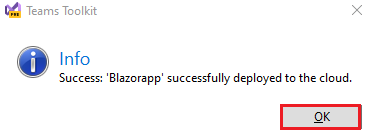
Your tab app is successfully deployed to the cloud!

To preview your tab app in Teams
Select Project > Teams Toolkit > Preview in Teams.
Select Add when prompted to install the app to Teams.
Congratulations, your first tab app is running in your Azure environment!
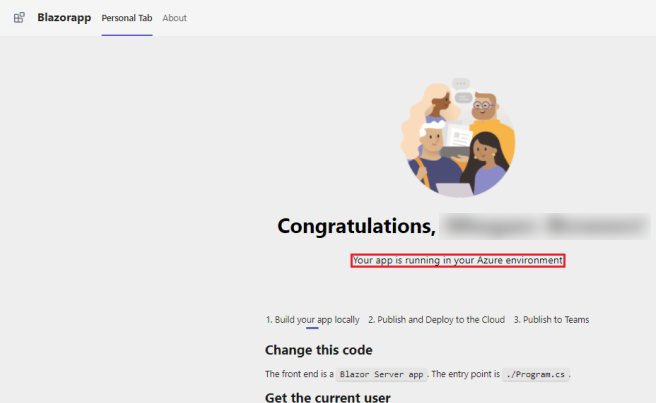
Move through the page to view the user details.
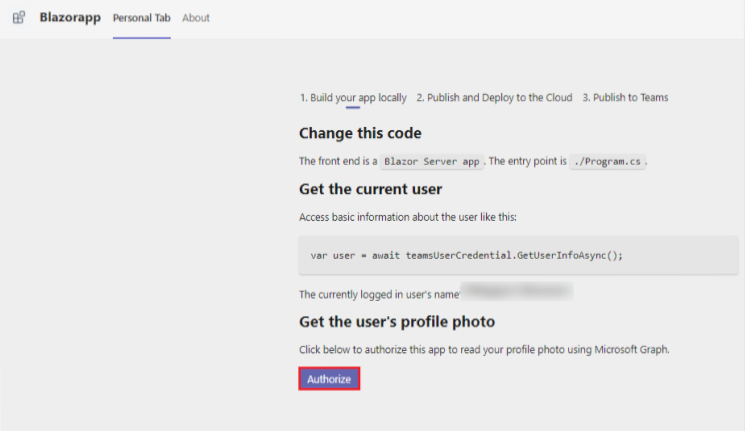
Select Authorize to let your app retrieve user details using Microsoft Graph.
The app requests permission to grant access for displaying user details.
Select Accept to let your app access user details.
Your photograph and details appear in your Personal Tab.

Congratulations
You've completed the tutorial to build a tab app with Blazor.
Migrate your configurable tab to static tab
Note
To migrate your configurable tab to static tab, use the app manifest v1.16 or later.
Static tab capability is extended to support group chat, channels, and meetings. In static tabs, there's no configuration dialog, enabling users to pin the tab instantly. You have the option to configure your tab after it's pinned, as the setConfig APIs allow you to modify the contentUrl, which can be useful to change the landing page if needed. When you declare multiple static tabs in the manifest and add the app in the channel scope, only the first tab listed in the manifest appears.
You can update your existing configurable tab to a static tab and add different scopes to the static tab. To change your configurable tab to static tab:
Move your configuration logic out of your
configurationUrlcode space to yourcontentUrlcode space.Add the
staticTabsproperty to your app manifest withscopesandcontextparameters. Following is an example of app manifest where a static tab is defined that works in all scopes and contexts in Teams:"staticTabs": [ { "entityId": "homeTab", "scopes": [ "personal", "groupChat", "team" ], "context": [ "personalTab", "channelTab", "privateChatTab", "meetingChatTab", "meetingDetailsTab", "meetingSidePanel", "meetingStage" ], "name": "Contoso", "contentUrl": "https://contoso.com/content (displayed in Teams canvas)", "websiteUrl": "https://contoso.com/content (displayed in web browser)" } ],For more information, see configuration page and static tab.
If your app supports configurable tab, then you must continue to keep the configurableTab property in your app manifest to ensure the backward compatibility of previously pinned tabs. As you can only pin static tabs from now, it's important that previous configurable tabs continue to be supported.